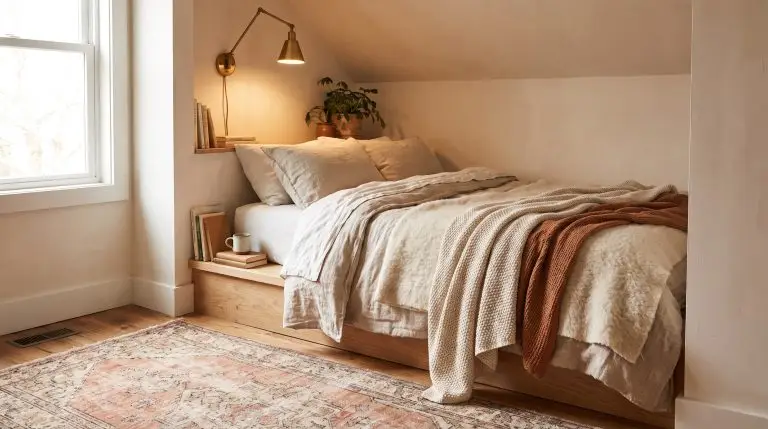
Pushing a bed into the corner is universally viewed as a spatial surrender—a temporary dorm-room compromise when square footage runs out. But treating a tight corner as a limitation ignores its incredible potential for coziness and structural permanence. By shifting your perspective, you can transform an awkward architectural constraint into a highly intentional, built-in destination that reclaims the center of your floor plan.
The secret lies entirely in “Architectural Intentionality.” When a standard metal frame floats against two bare walls, it looks misplaced. However, when you bridge the gap between the mattress and the drywall using tactile wall treatments, custom millwork, or strategic upholstery, the bed suddenly feels like a bespoke architectural feature. The goal is to visually anchor the bed so deeply into the room’s geometry that it looks impossible to place anywhere else.
Whether you are navigating a studio apartment footprint, optimizing a shared kids’ room, or rethinking a cramped guest space, this guide bridges the gap between visual inspiration and physical execution. From weekend-friendly DIY upholstery hacks to accessible bespoke built-ins, here is exactly how to engineer a corner bed layout that looks permanent, purposeful, and profoundly comfortable.
Structural & Built-In Corner Solutions
Leaving a raw metal bed frame shoved against intersecting drywall guarantees a temporary, unfinished look. To make a corner placement look expensive and permanent, you must bridge the physical gap between the mattress and the walls using hard structural architecture.
The Seamless Millwork Nook (Bespoke)
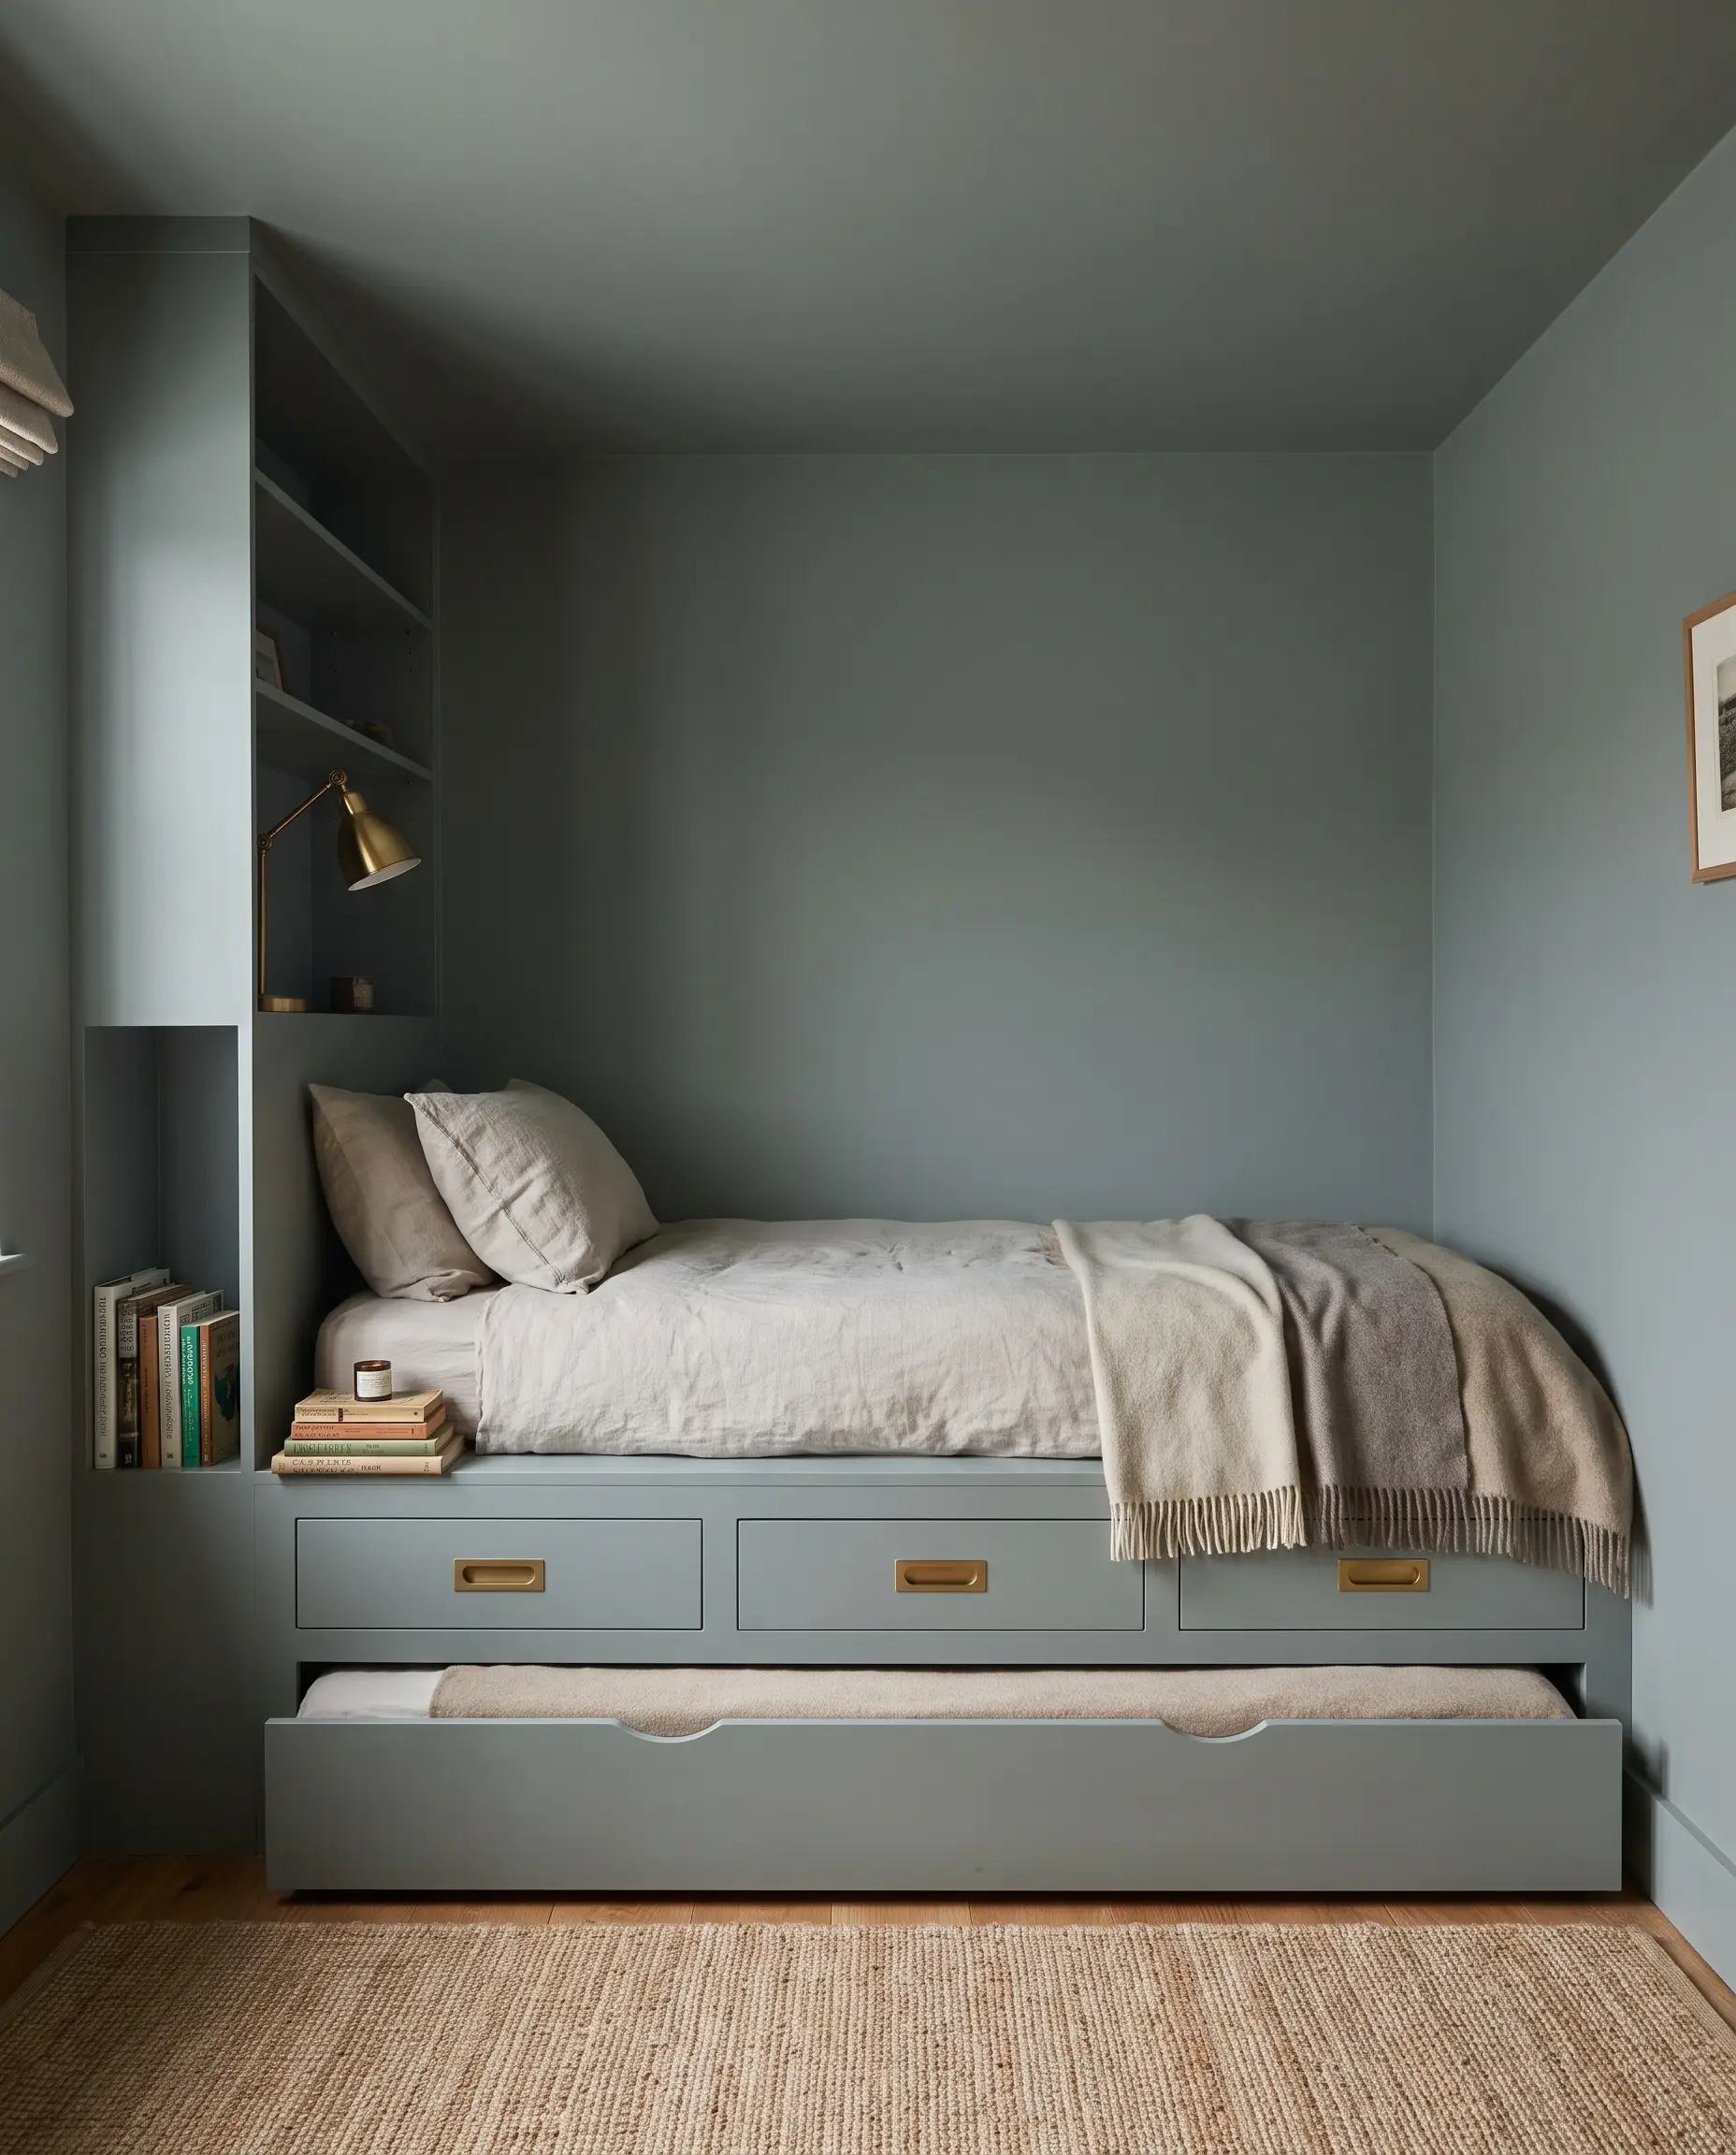
Building custom cabinetry tightly around the exact footprint of the bed transforms a standard mattress into a luxurious, cabin-like alcove. By integrating a built-in bookshelf at the head and a flush trundle system underneath, the bed becomes a seamless extension of the room’s architecture rather than a floating piece of furniture.
Paint the entire millwork structure, the surrounding walls, and the ceiling in a single, saturated color. This technique, known as color drenching, erases harsh structural lines and mimics high-end bespoke craftsmanship on a tight budget.
Designer Shortcut
- Vibe: High-End Bespoke English Cottage.
- Key Materials: Custom plywood framing, flush-mount drawer fronts, integrated brass hardware.
- Paint Recommendation: Farrow & Ball De Nimes (a grounding, moody blue-grey).
- Styling Pro-Tip: Install a low-profile reading light directly into the side of the millwork bookshelf to eliminate the need for a nightstand.
Faking Built-Ins with Bookshelf Surrounds (Accessible)
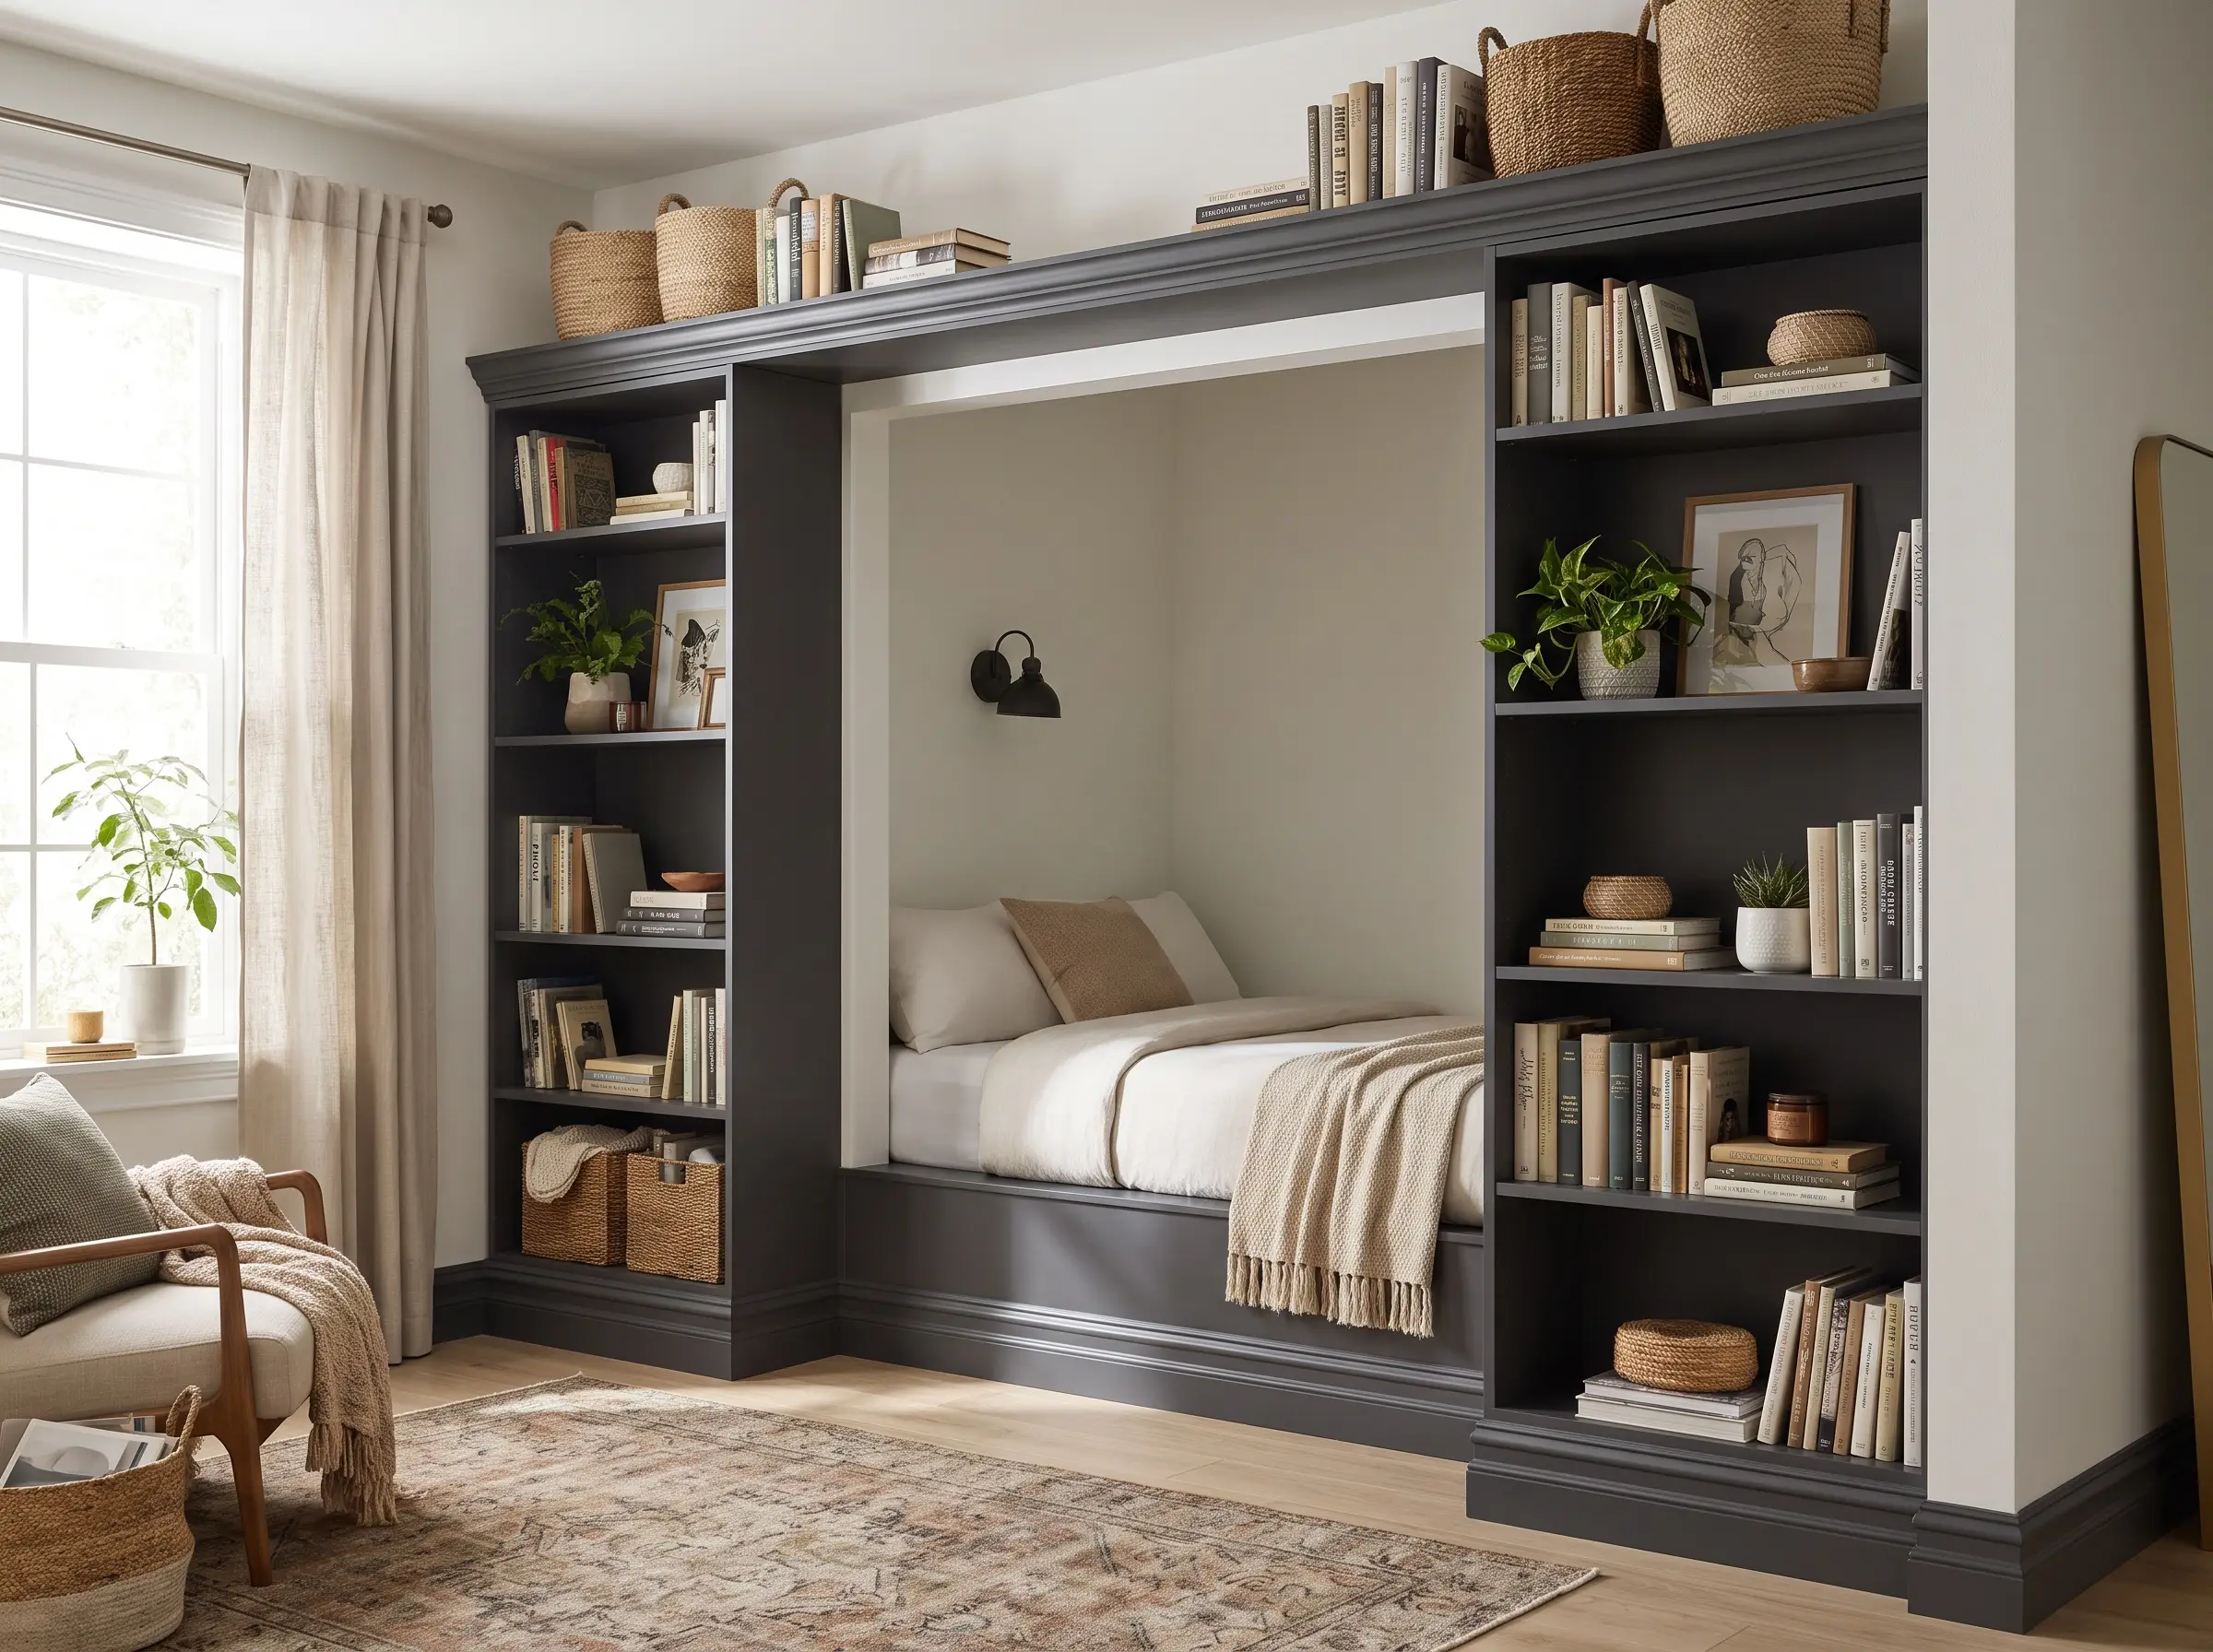
If custom millwork exceeds your budget, flanking the bed with tall, narrow bookcases and bridging them with an overhead shelf creates an instant, structural alcove. This accessible hack maximizes vertical storage while visually recessing the bed, giving the illusion of deep, intentional architecture.
- Vibe: Clever, Library-Chic Studio.
- Key Materials: Flat-pack tall bookcases (like IKEA Pax or Billy), heavy-duty wall anchors, custom baseboards.
- Color Match: Benjamin Moore Onyx (paint the shelves to match the room’s trim for a built-in look).
- Styling Pro-Tip: Run your room’s exact baseboard molding across the bottom front of the bookcases to seamlessly tie them into the floor plan.
The Elevated Platform with Hidden Drawers
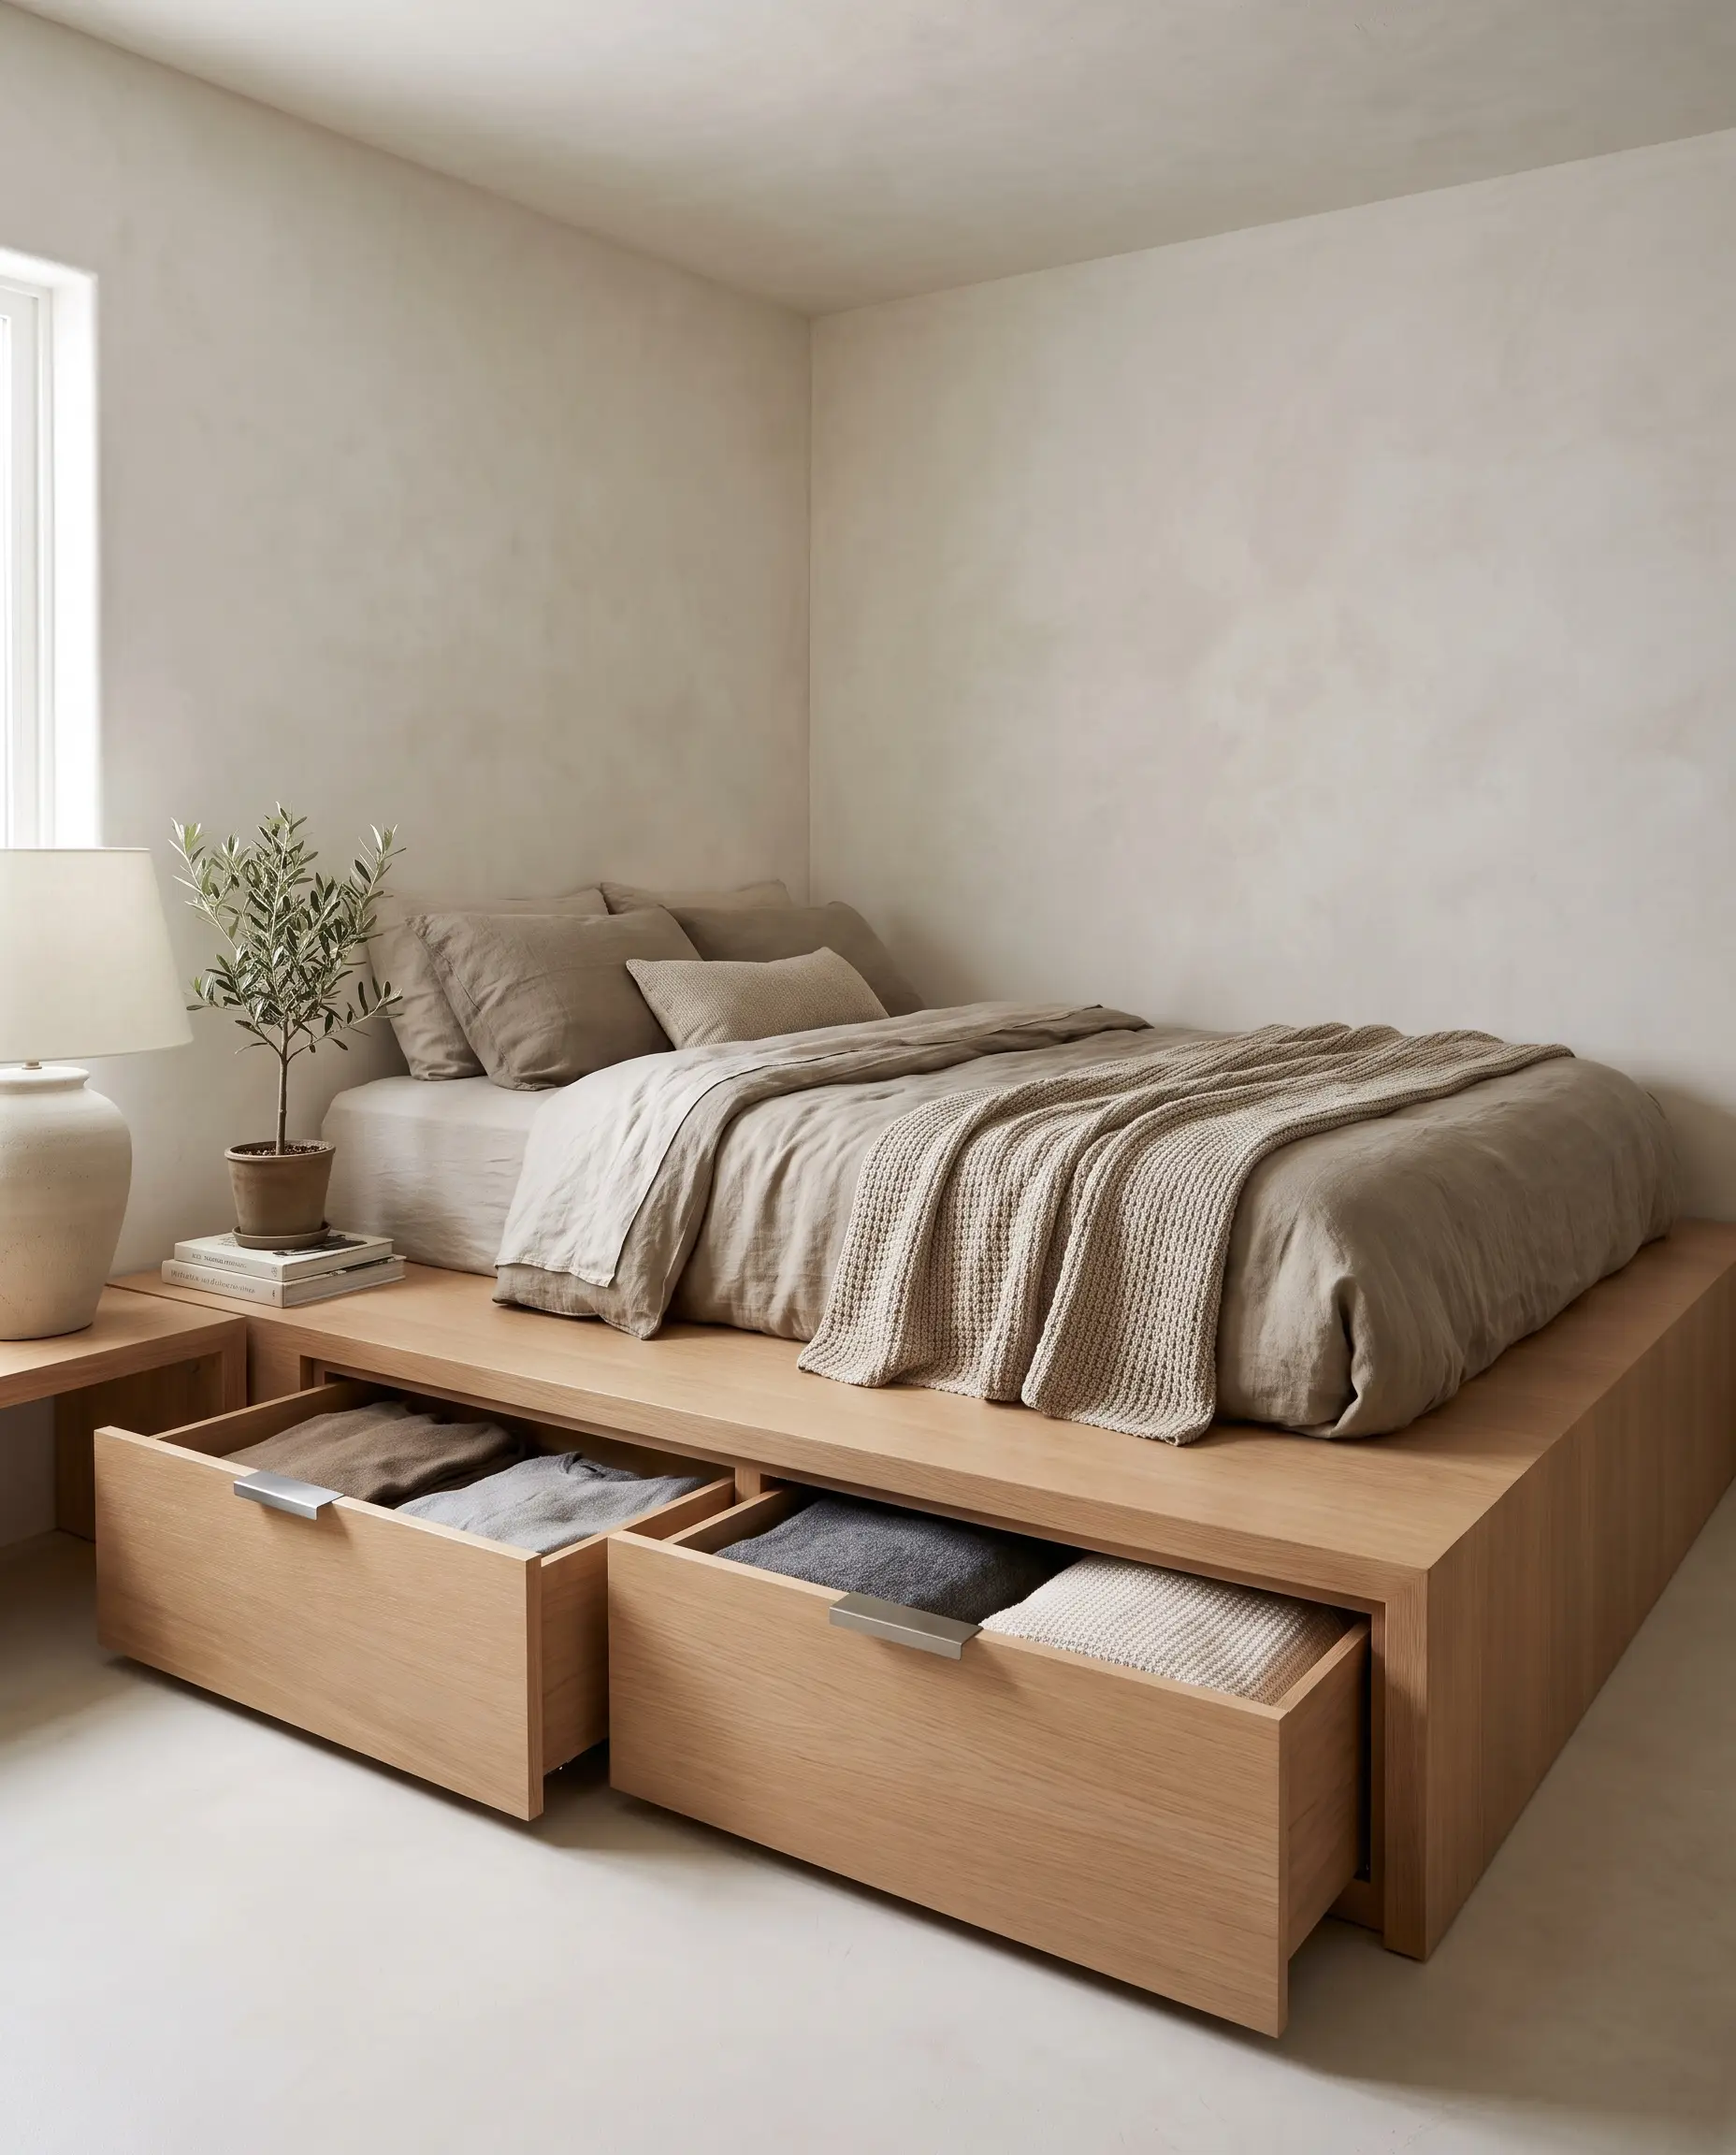
A low-profile Japandi platform base that spans exactly wall-to-wall in a tight corner aggressively utilizes dead space. By raising the mattress, you capitalize on the massive cavity underneath for deep drawer storage, keeping the overall visual weight low and minimalist.
- Vibe: Modern Organic Minimalism.
- Key Materials: Rift-sawn white oak veneer, heavy-duty soft-close drawer glides.
- Design Concept: Flush, wall-to-wall installation leaving zero gaps for dust.
- Styling Pro-Tip: Keep the mattress strictly flush with the edge of the platform to maintain sharp, architectural lines.
Wrap-Around Wainscoting for Visual Anchoring
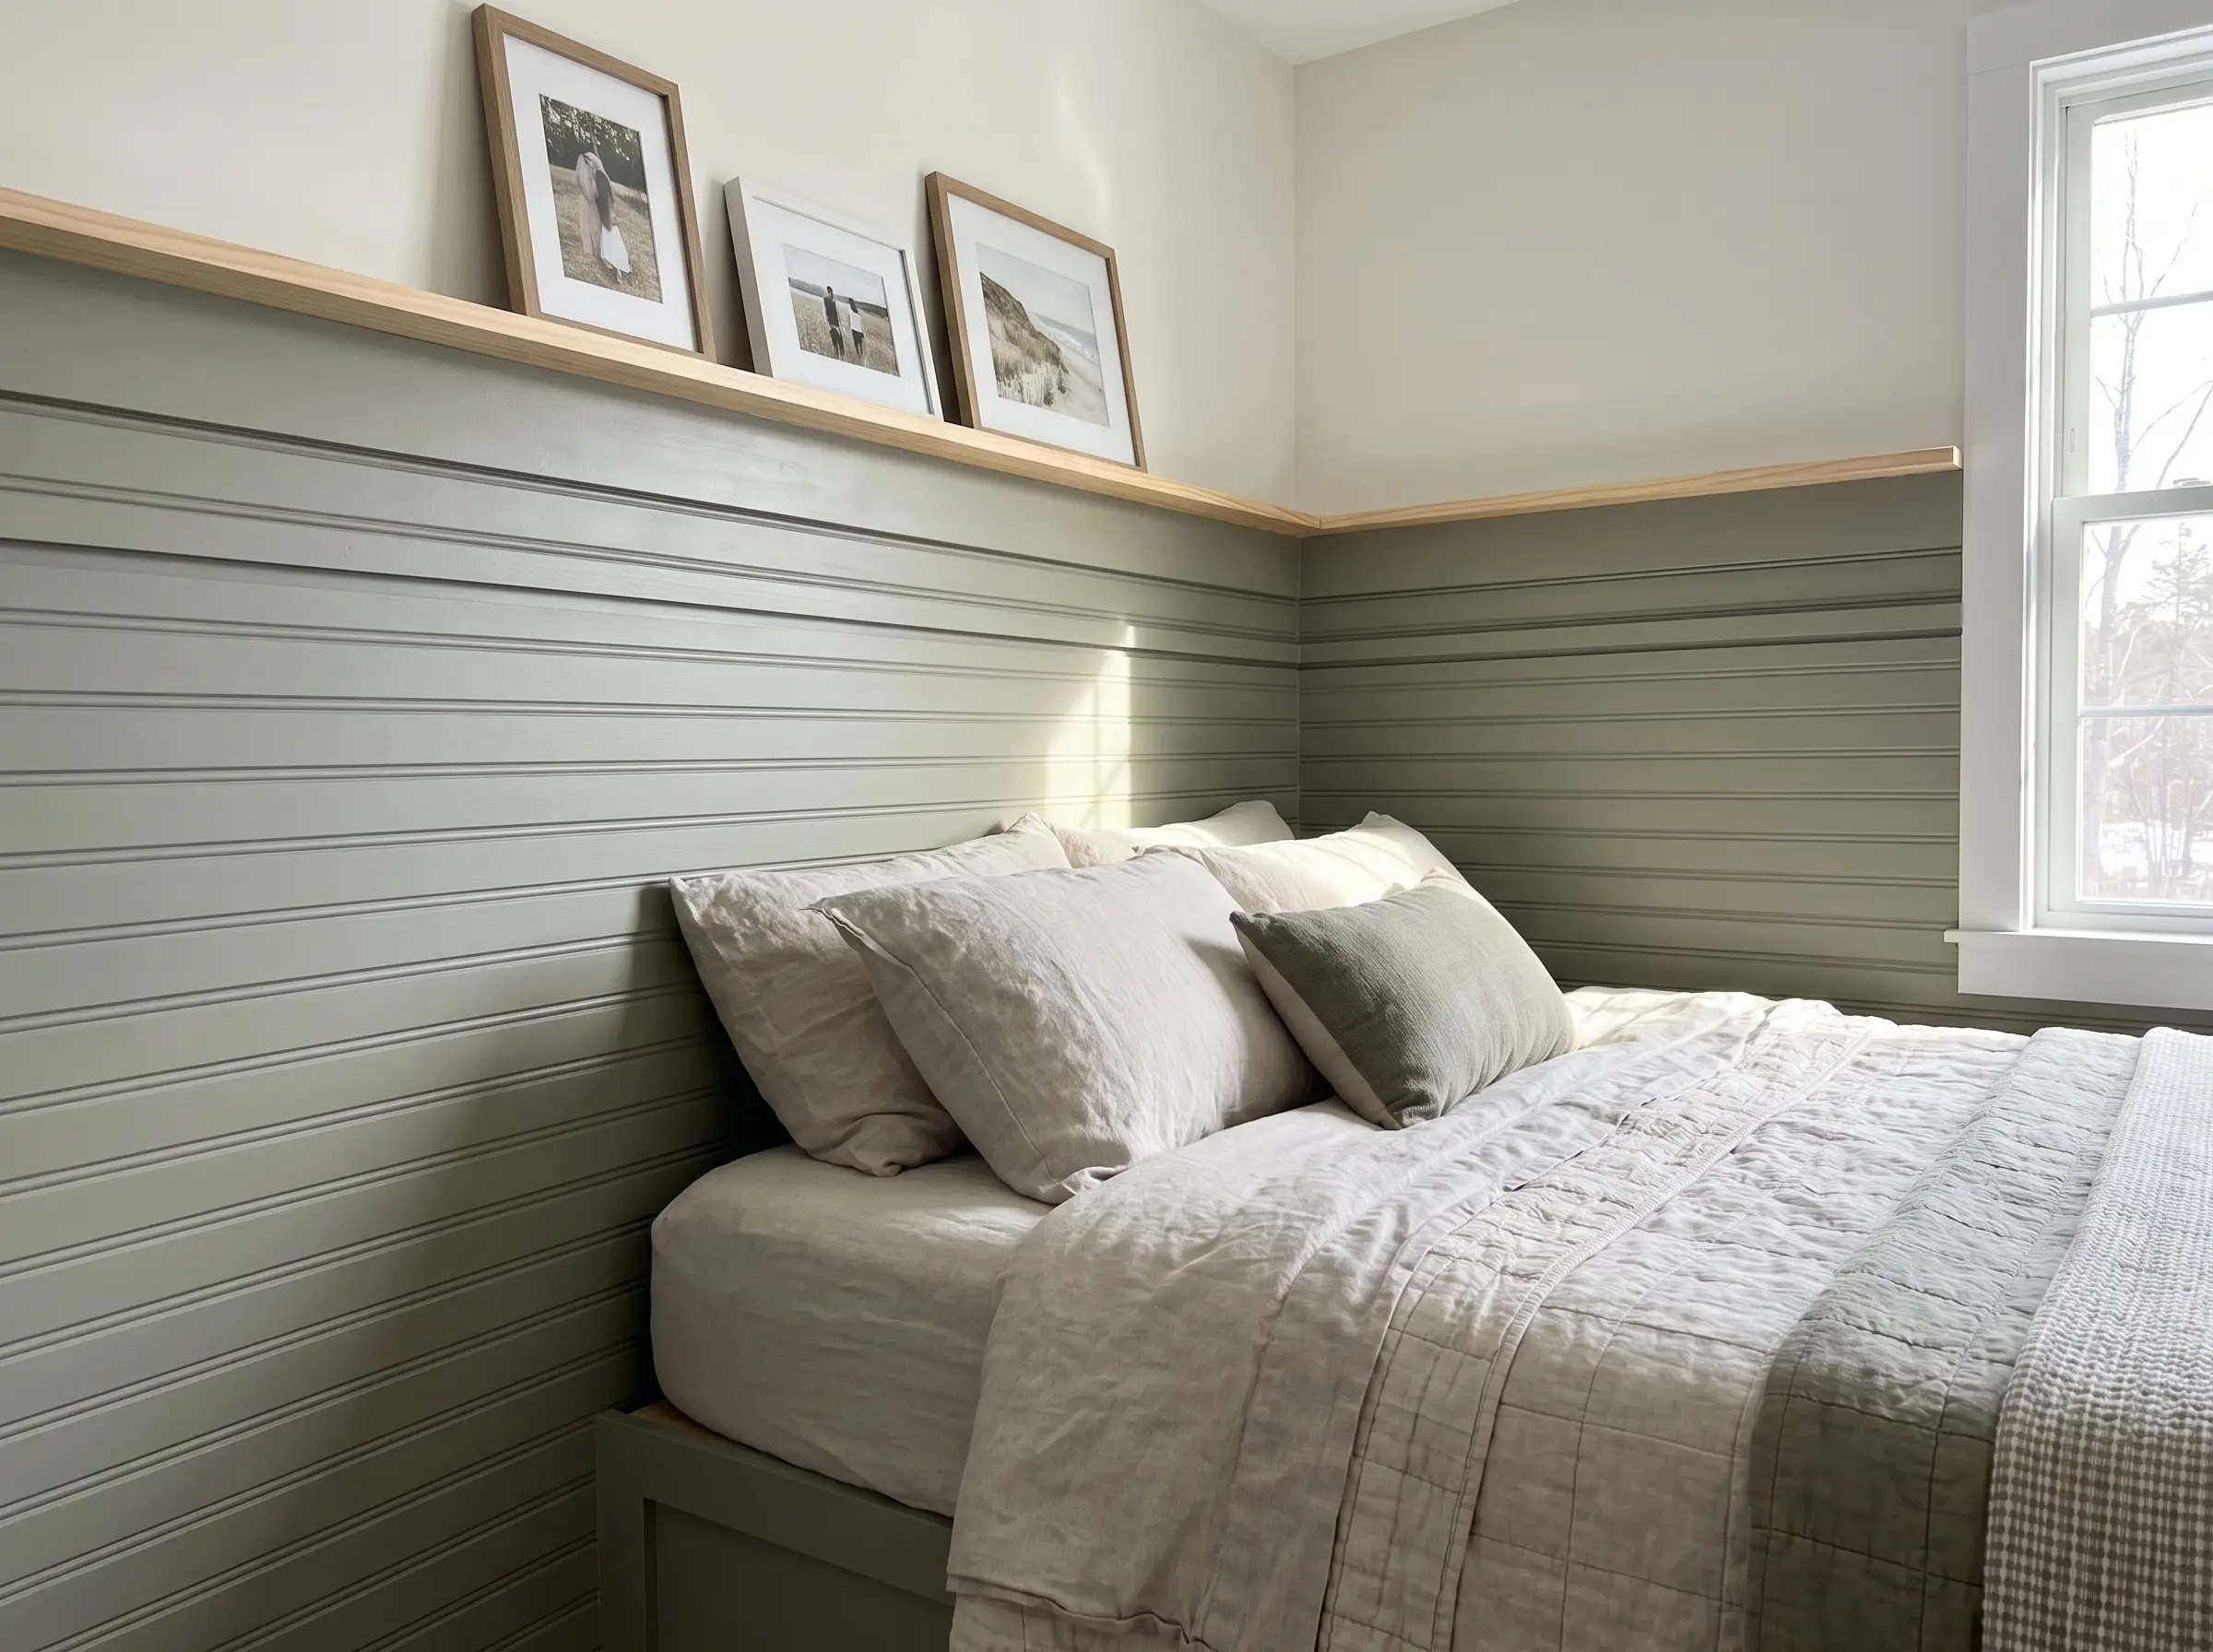
Running continuous paneling horizontally along the two intersecting walls acts as an architectural headboard that instantly anchors the bed. Capping beadboard or board-and-batten at a height of 40-48 inches creates a strong visual container, making the corner look like a purposeful nook.
- Vibe: Traditional Coastal or Modern Farmhouse.
- Key Materials: Primed MDF beadboard, 1×4 pine top trim, brad nails.
- Paint Recommendation: Sherwin-Williams Evergreen Fog.
- Styling Pro-Tip: Cap the wainscoting with a deep 3-inch trim ledge to serve as a micro-shelf for picture frames.
| Feature | Wrap-Around Wainscoting | Paint Blocking (Corner Arch/Square) |
|---|---|---|
| Visual Impact | High architectural permanence and texture. | Bold, modern, and graphic. |
| Tactile Protection | Protects walls from scuffs and pillows. | Zero physical protection from cold drywall. |
| Installation | Requires saws, leveling, and brad nailing. | Quick weekend project using painter’s tape. |
| Cost | Moderate ($150 – $300 for materials). | Low (Cost of a single can of paint). |
Upholstery & Tactile Wall Treatments
The primary physical drawback of a corner bed is forcing the sleeper to rest against cold, hard drywall. Transitioning from hard architecture to soft textiles solves this sensory issue, adding necessary sound dampening, warmth, and a layer of tactile luxury.
Custom L-Shaped Corner Headboards
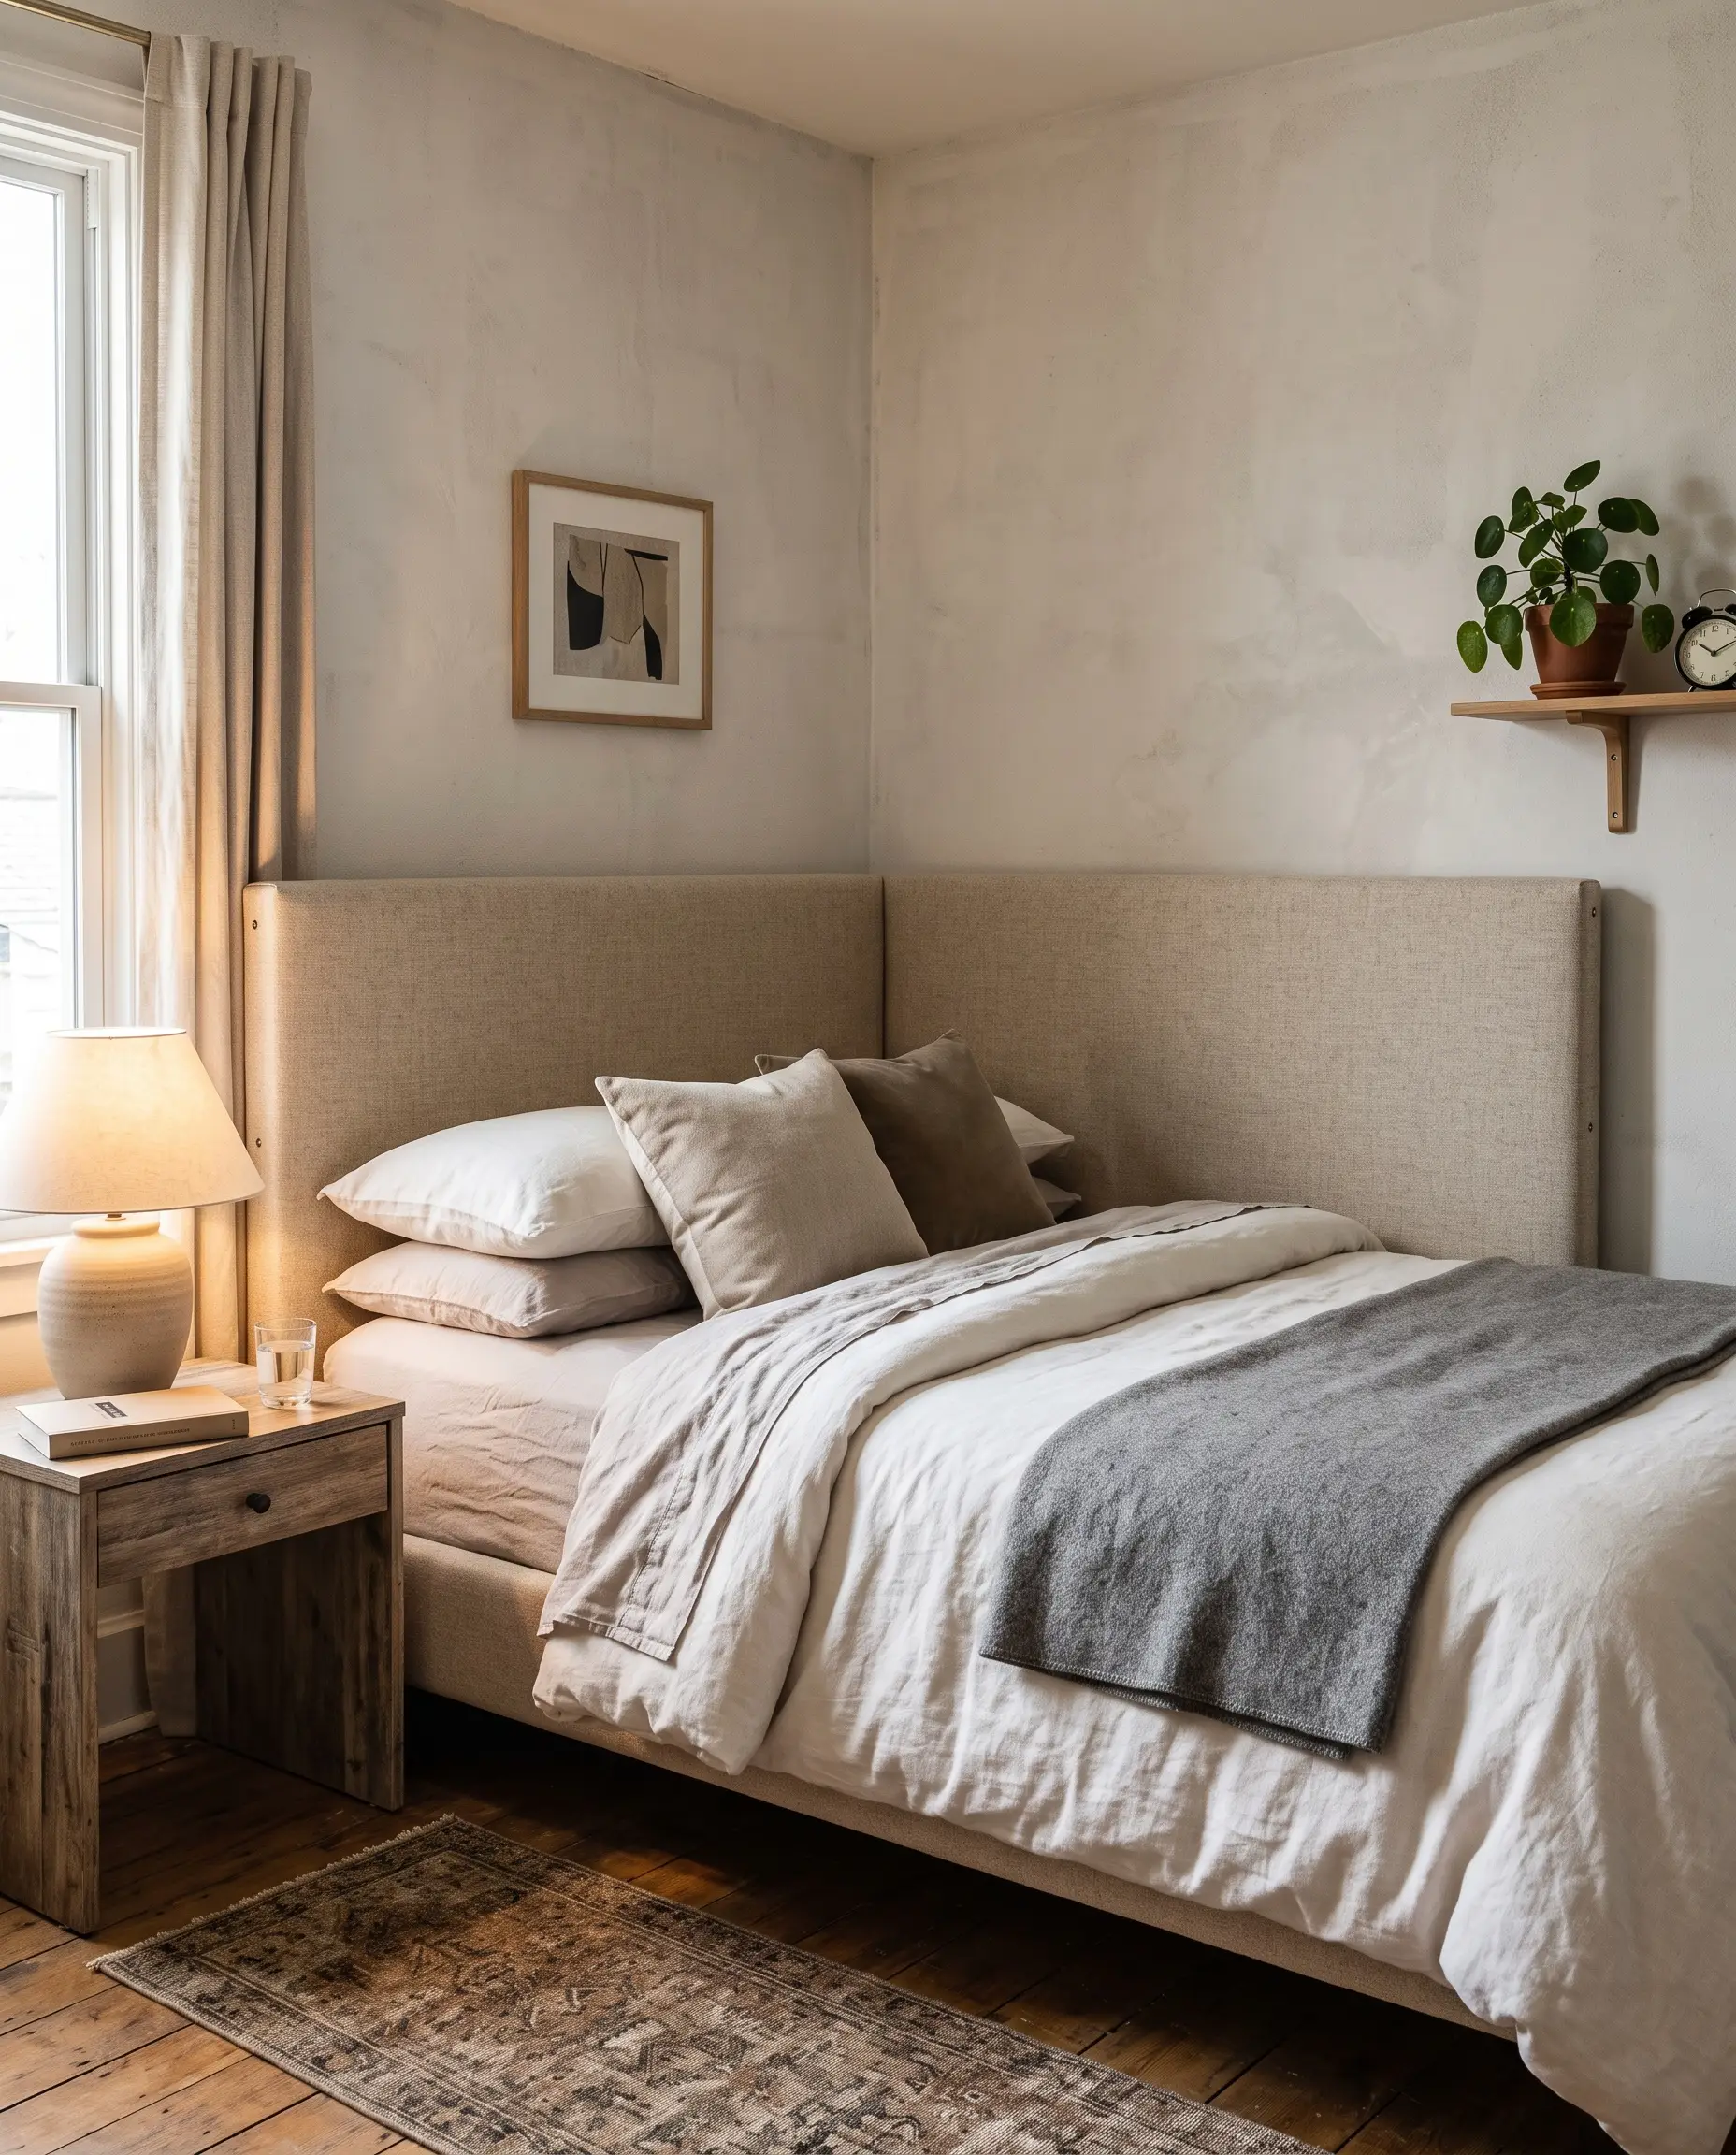
An L-shaped headboard physically wraps around the corner, fully protecting the sleeper from the raw wall on two intersecting sides. This instantly upgrades a basic mattress into a custom lounging destination, preventing pillows from slipping into the gap.
- Vibe: Tailored Boutique Hotel.
- Key Materials: 2-inch high-density foam, ¾-inch plywood backing, performance linen or velvet.
- Fabrication Detail: Secure the two headboard panels tightly together at the 90-degree seam using heavy-duty L-brackets.
- Styling Pro-Tip: Choose a highly durable performance fabric, as shoulder and head friction against the corner panels will be constant.
Wall-to-Wall Acoustic Fluted Panels
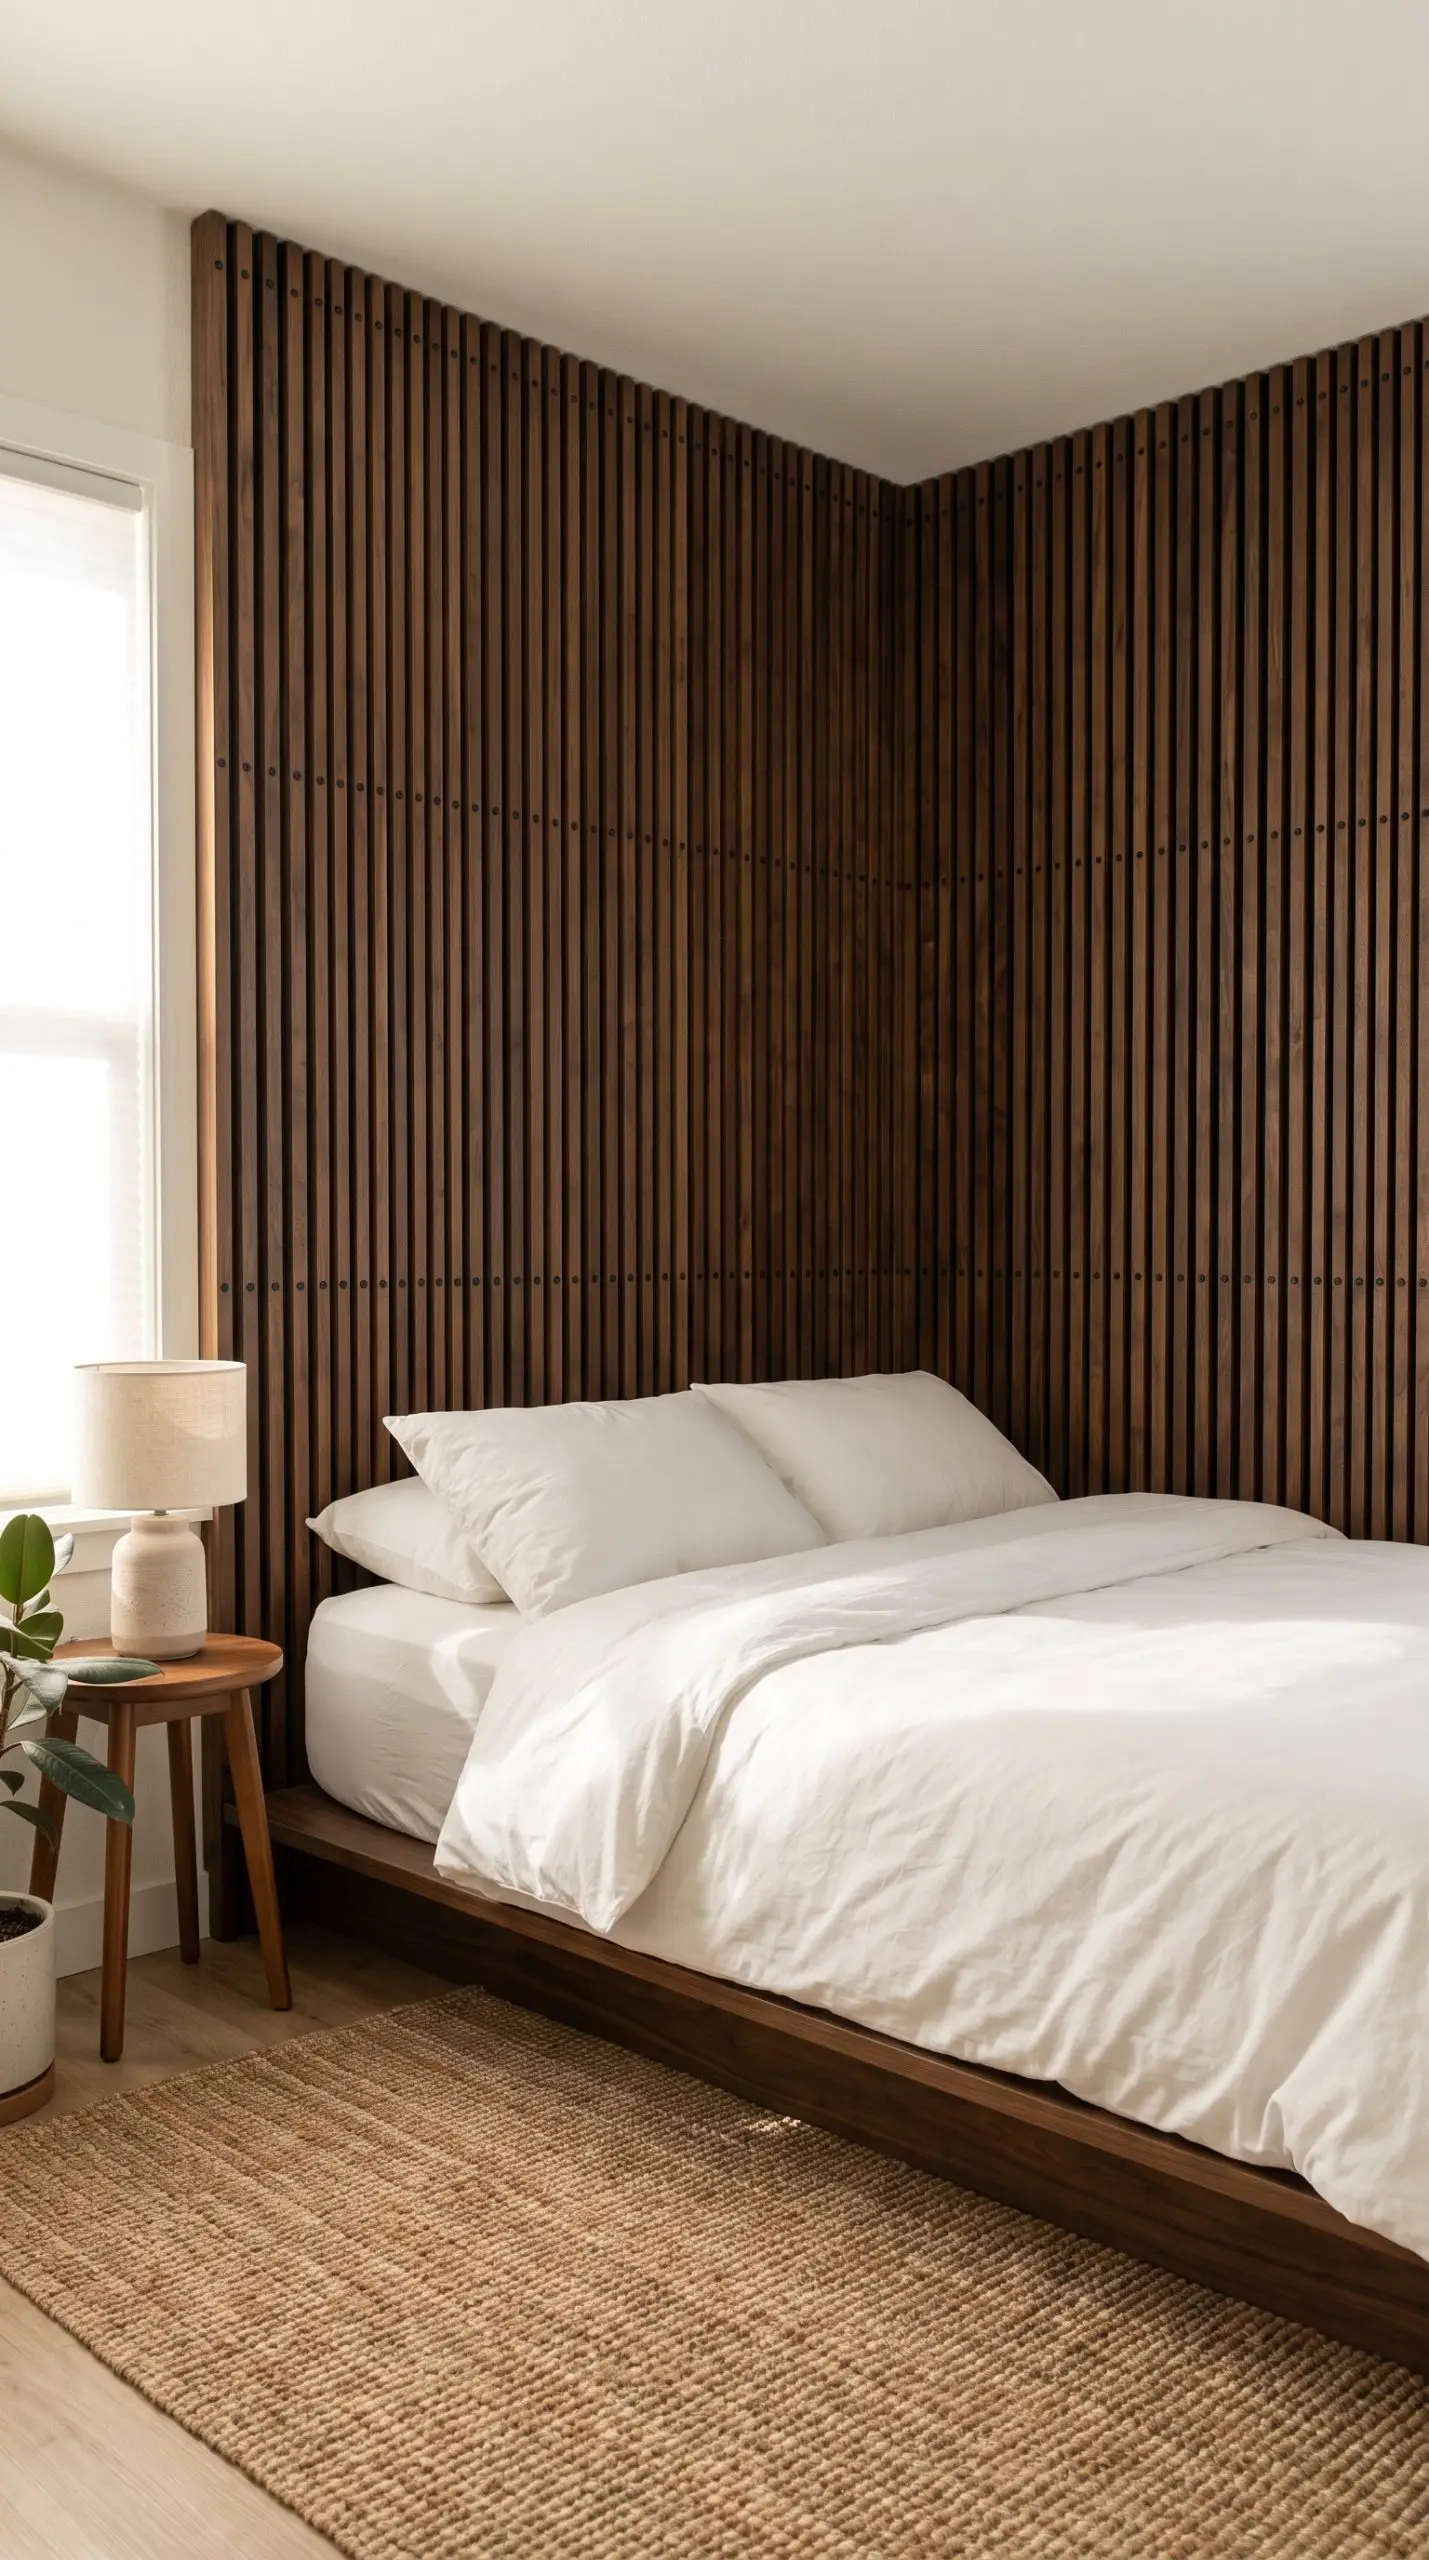
Applying wood-slat acoustic fluting to the corner walls provides a warm, organic backdrop that radically dampens sound in tight apartments. This acts as an extended, ceiling-height headboard that is incredibly easy to install over a single weekend.
- Vibe: Warm Modern Organic.
- Key Materials: Felt-backed acoustic wood panels, construction adhesive, black trim screws.
- Sensory Benefit: Absorbs echoing in small rooms while providing a warm wood texture.
- Styling Pro-Tip: Run the panels vertically all the way to the ceiling to draw the eye up and make the room feel significantly taller.
The Upholstered Wall Pad Approach
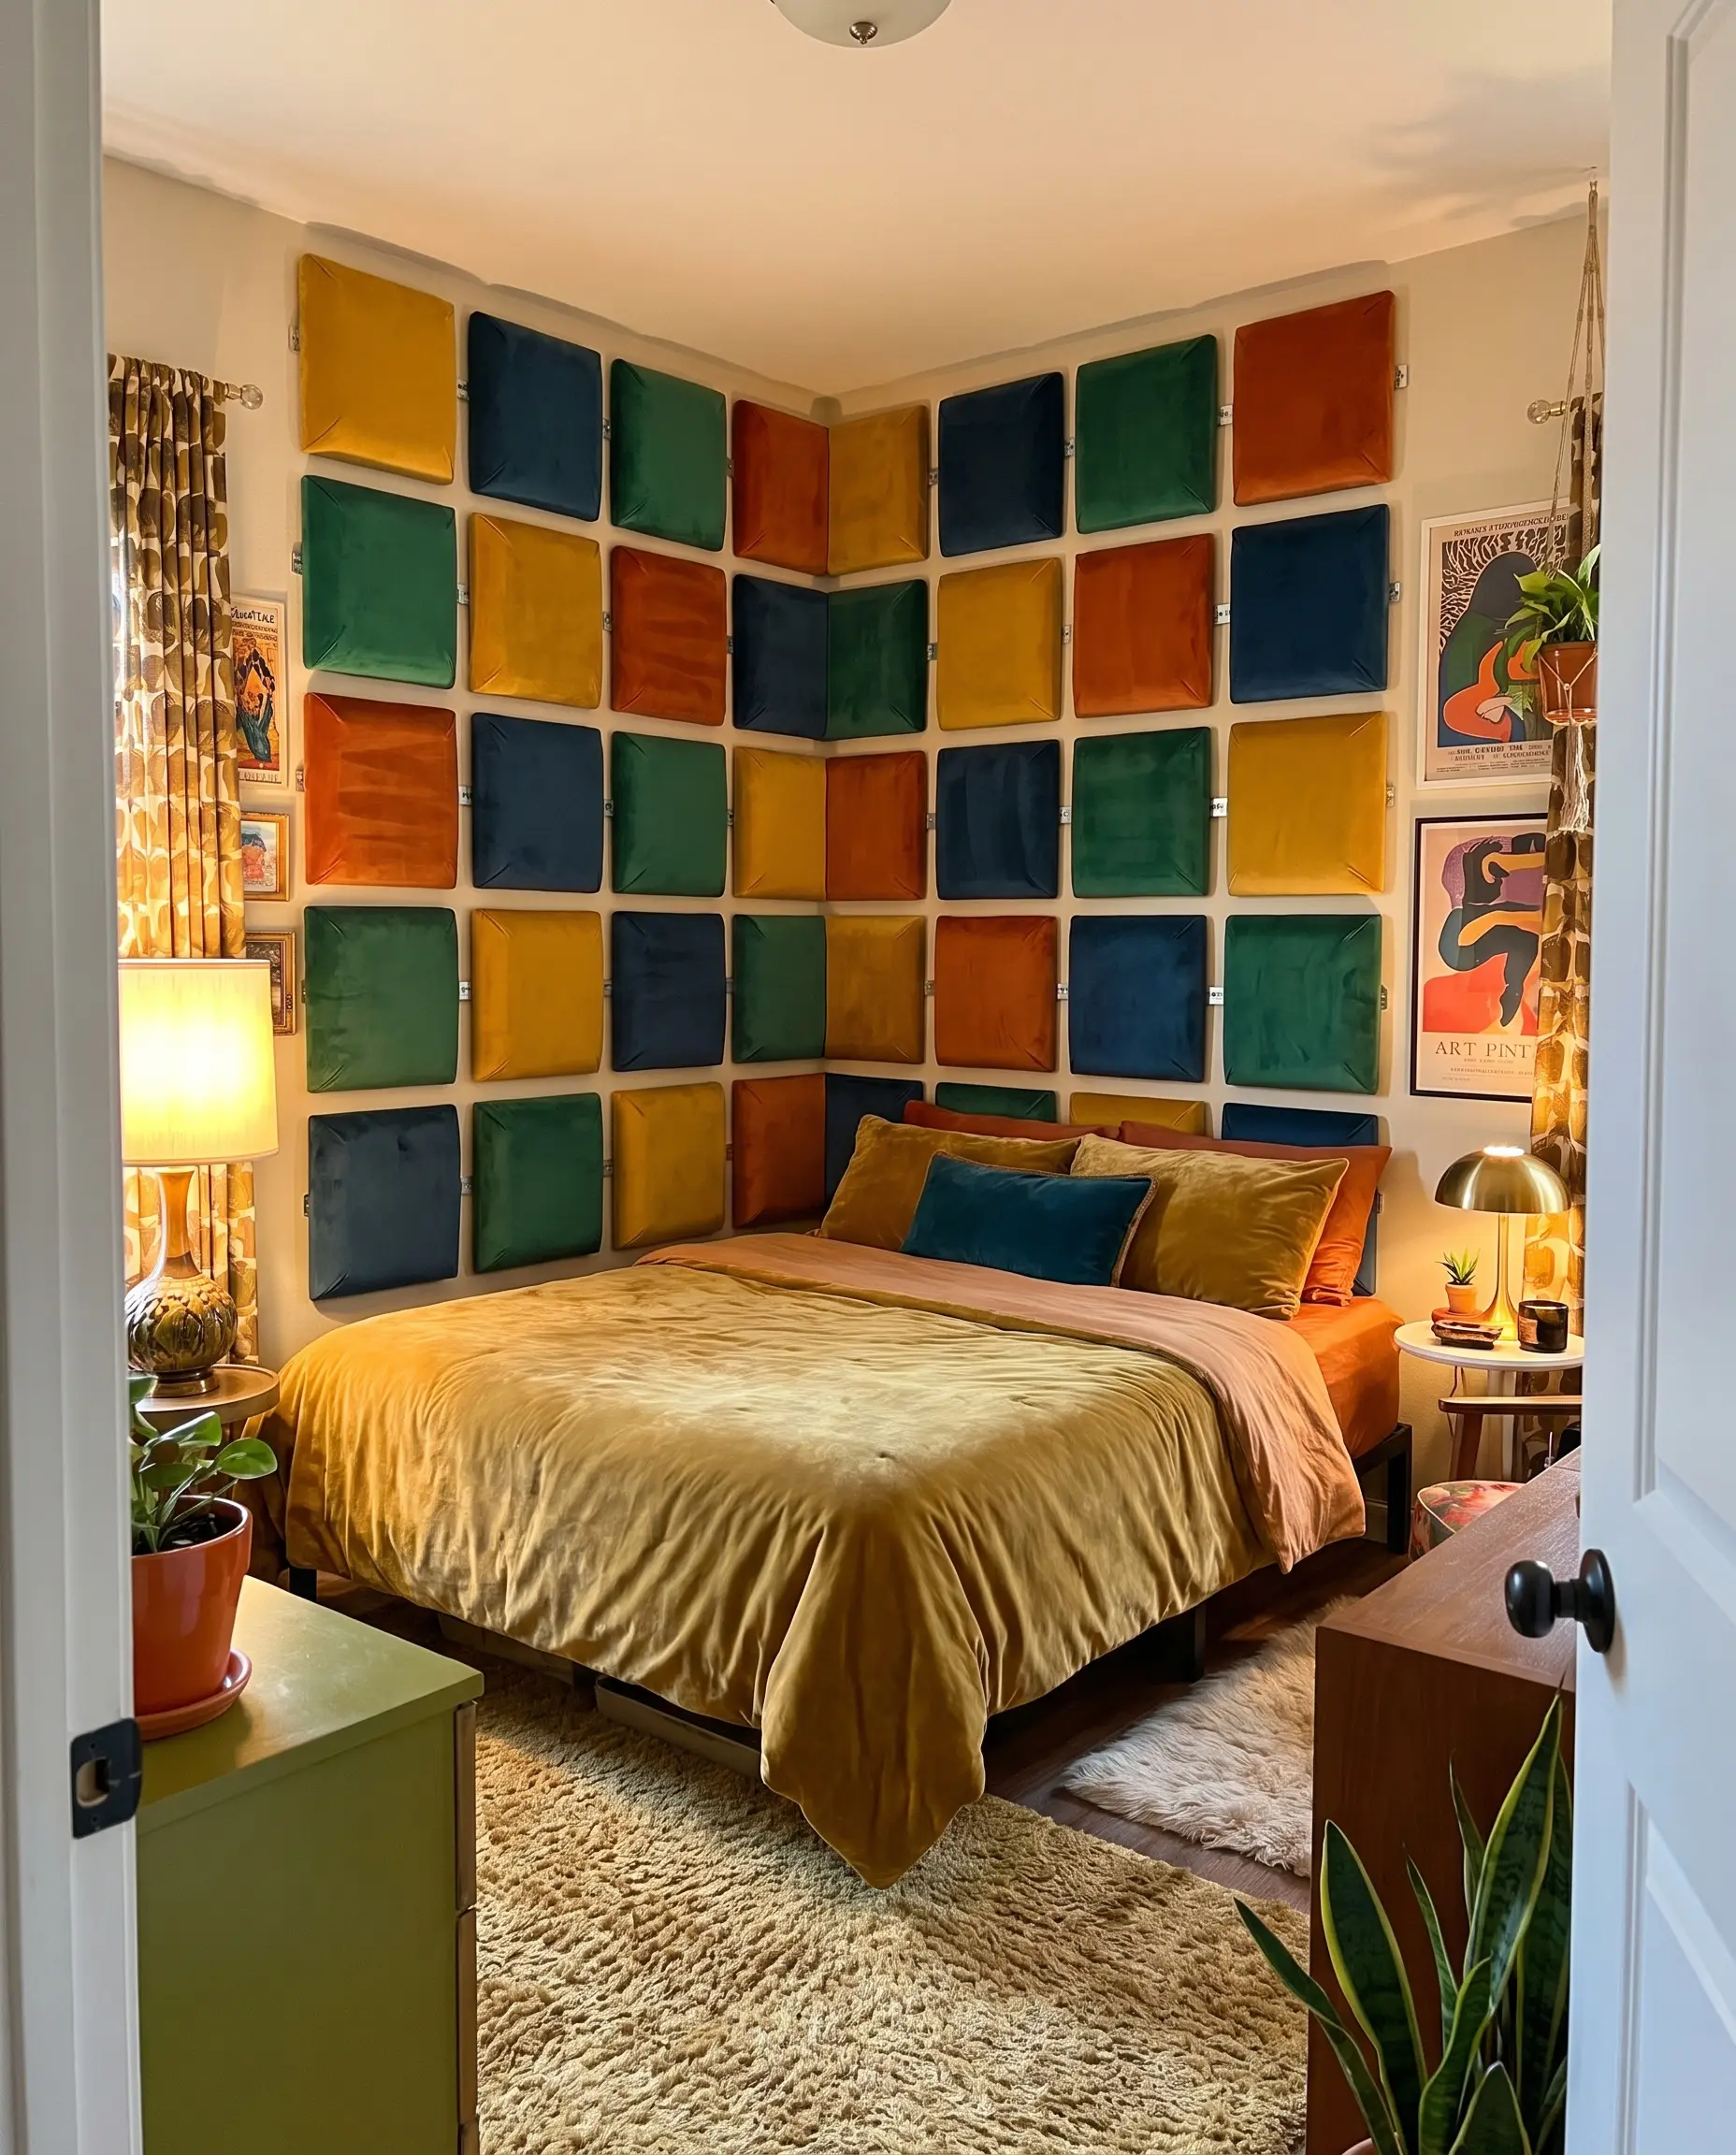
Instead of wrestling with a massive custom headboard, mounting individual upholstered rectangular pads directly to the drywall offers a modular, highly customizable solution. This allows you to mix velvet textures or create bold color-blocked patterns while fully insulating the sleep zone.
To keep the panels looking crisp and professional, pull the fabric aggressively tight across the batting before stapling, ensuring the corners are folded cleanly like a hospital corner on a bed.
Hackrea Styling Tip
- Vibe: Retro 1970s Glam or Modern Maximalism.
- Key Materials: 1/2-inch plywood squares, upholstery batting, French cleats.
- Installation Rule: Mount every single panel using aluminum French cleats so they remain perfectly level and are easy to remove for cleaning.
- Styling Pro-Tip: Alternate the grain of the velvet on every other square to create a subtle checkerboard effect.
Draping and Canopies for a “Room Within a Room”
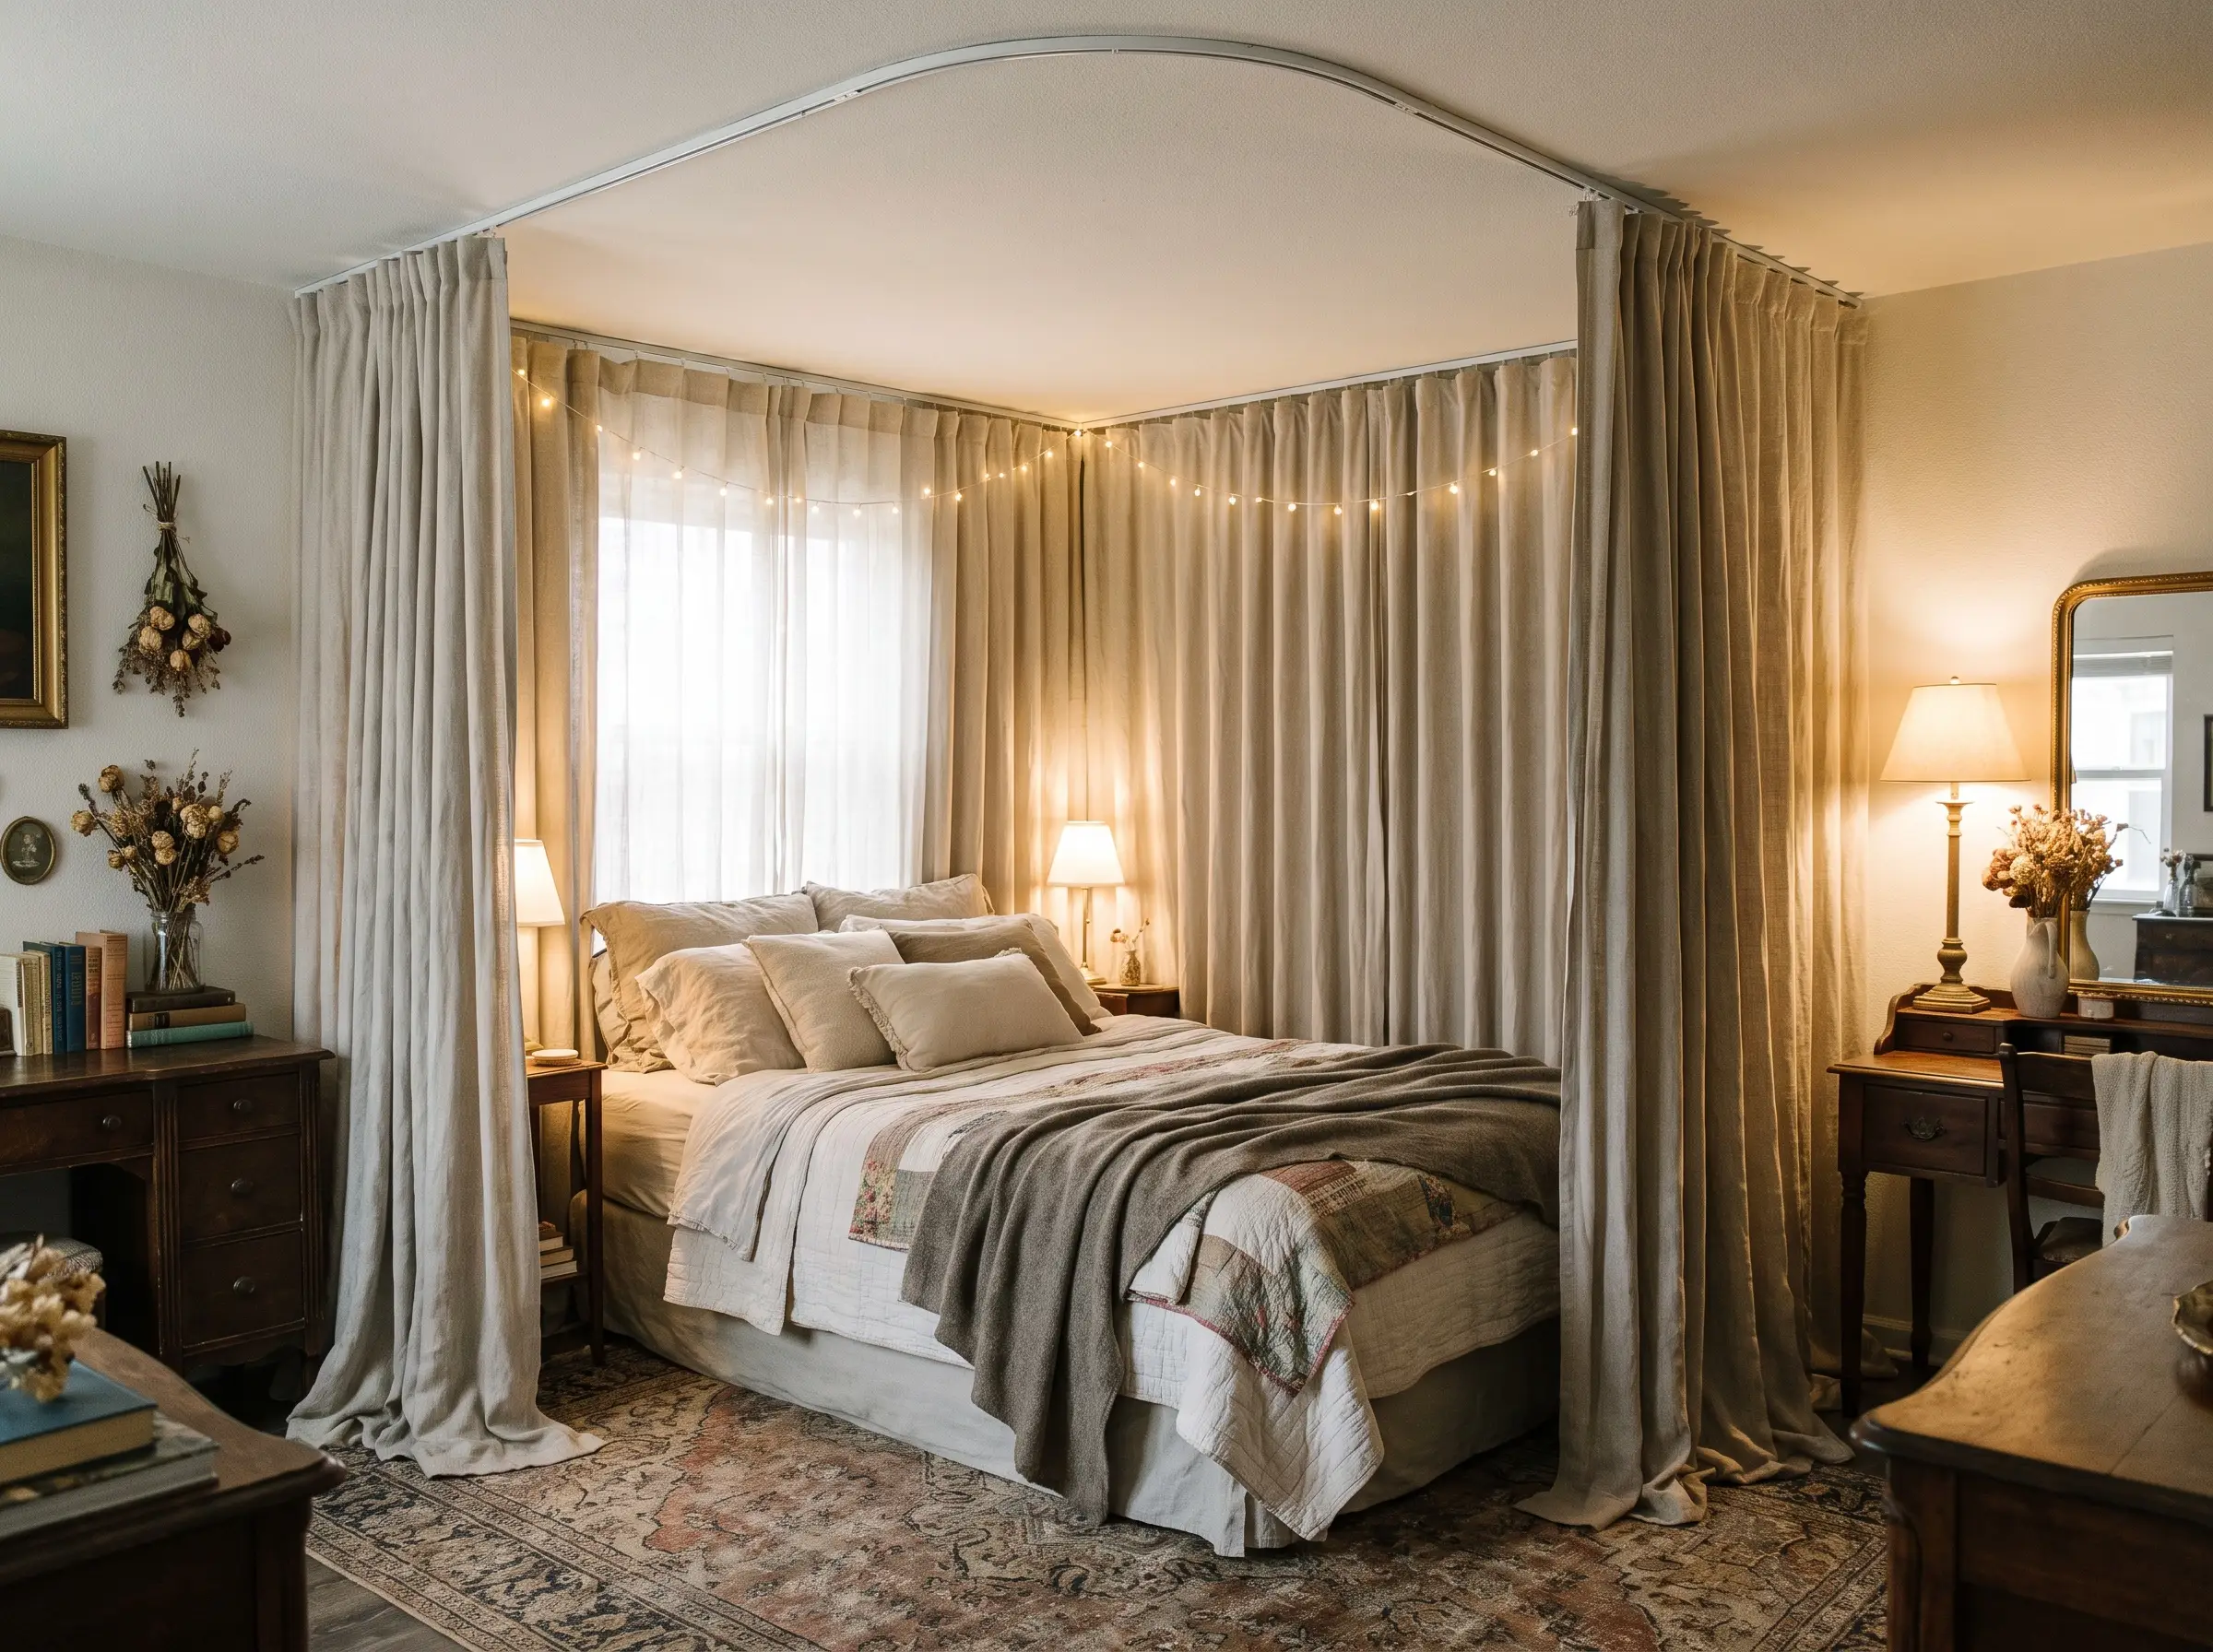
Installing a drapery system around the exposed sides of a corner bed instantly creates a private, tented sanctuary. This cottage-inspired execution softens the rigid geometry of the room and provides a cozy sense of enclosure for shared kids’ rooms or studio apartments.
- Vibe: Romantic Traditional or Whimsical Cottage.
- Key Materials: Ceiling-mounted track systems, heavy-weight linen or velvet drapery panels.
- Hardware Detail: Ensure the ceiling track curves smoothly at a 90-degree angle to match the footprint of the bed.
- Styling Pro-Tip: Mount the track flush against the ceiling to maximize the visual height of the drapery.
Layout & Configuration Strategies
Dealing with larger mattresses or multi-bed configurations requires strict adherence to spatial geometry. Pushing a bed into a corner fundamentally alters the room’s traffic flow, meaning your layout must be highly calculated to remain functional.
The Studio Apartment Queen (Managing One-Side Access)
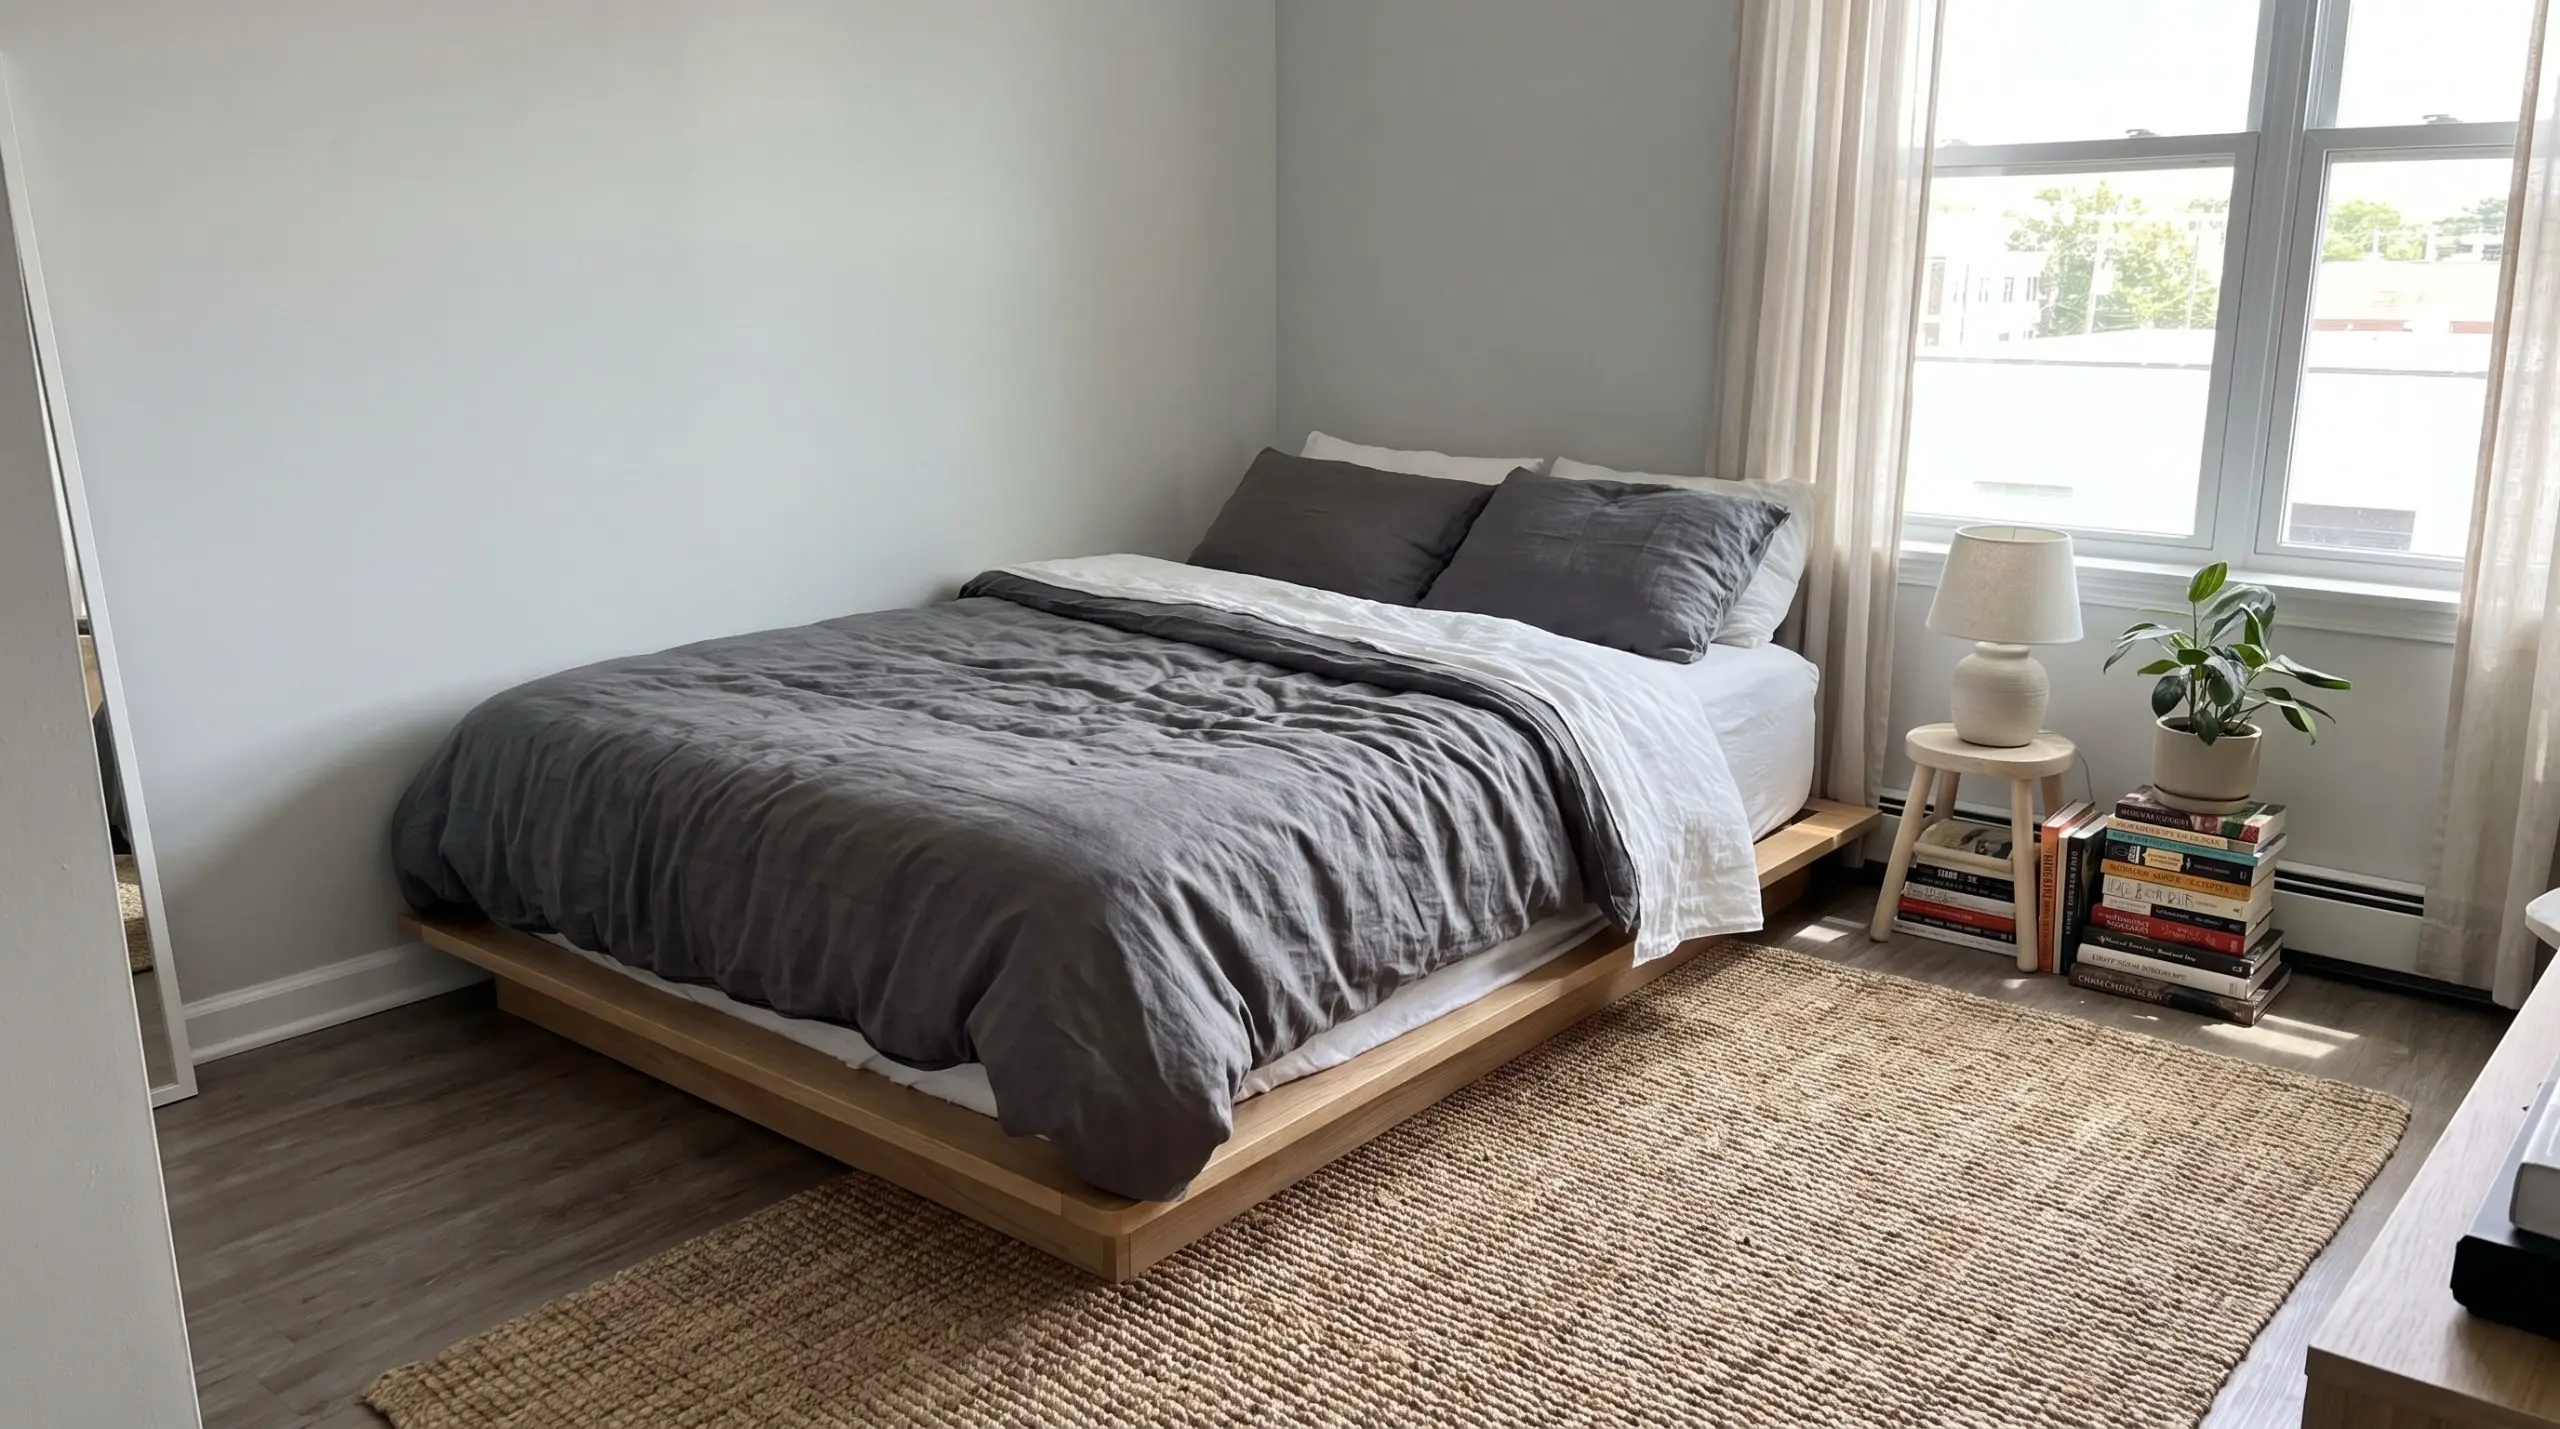
Placing a Queen bed in a corner creates a notorious pain point for changing sheets and navigating access. To make this layout viable, you must prioritize lightweight bedding systems and style the exposed side heavily so the room doesn’t feel entirely lopsided.
- Do: Leave a strict 6-inch gap between the wall and the mattress purely for tucking in blankets.
- Do: Use a modern zipper-bedding system to make sheet changes effortless from one side.
- Don’t: Use a heavy, traditional box spring that makes lifting the mattress physically impossible.
- Don’t: Center your main area rug under the room; pull it out to anchor the exposed side of the bed instead.
Twin-to-Twin L-Shaped Configurations for Shared Rooms
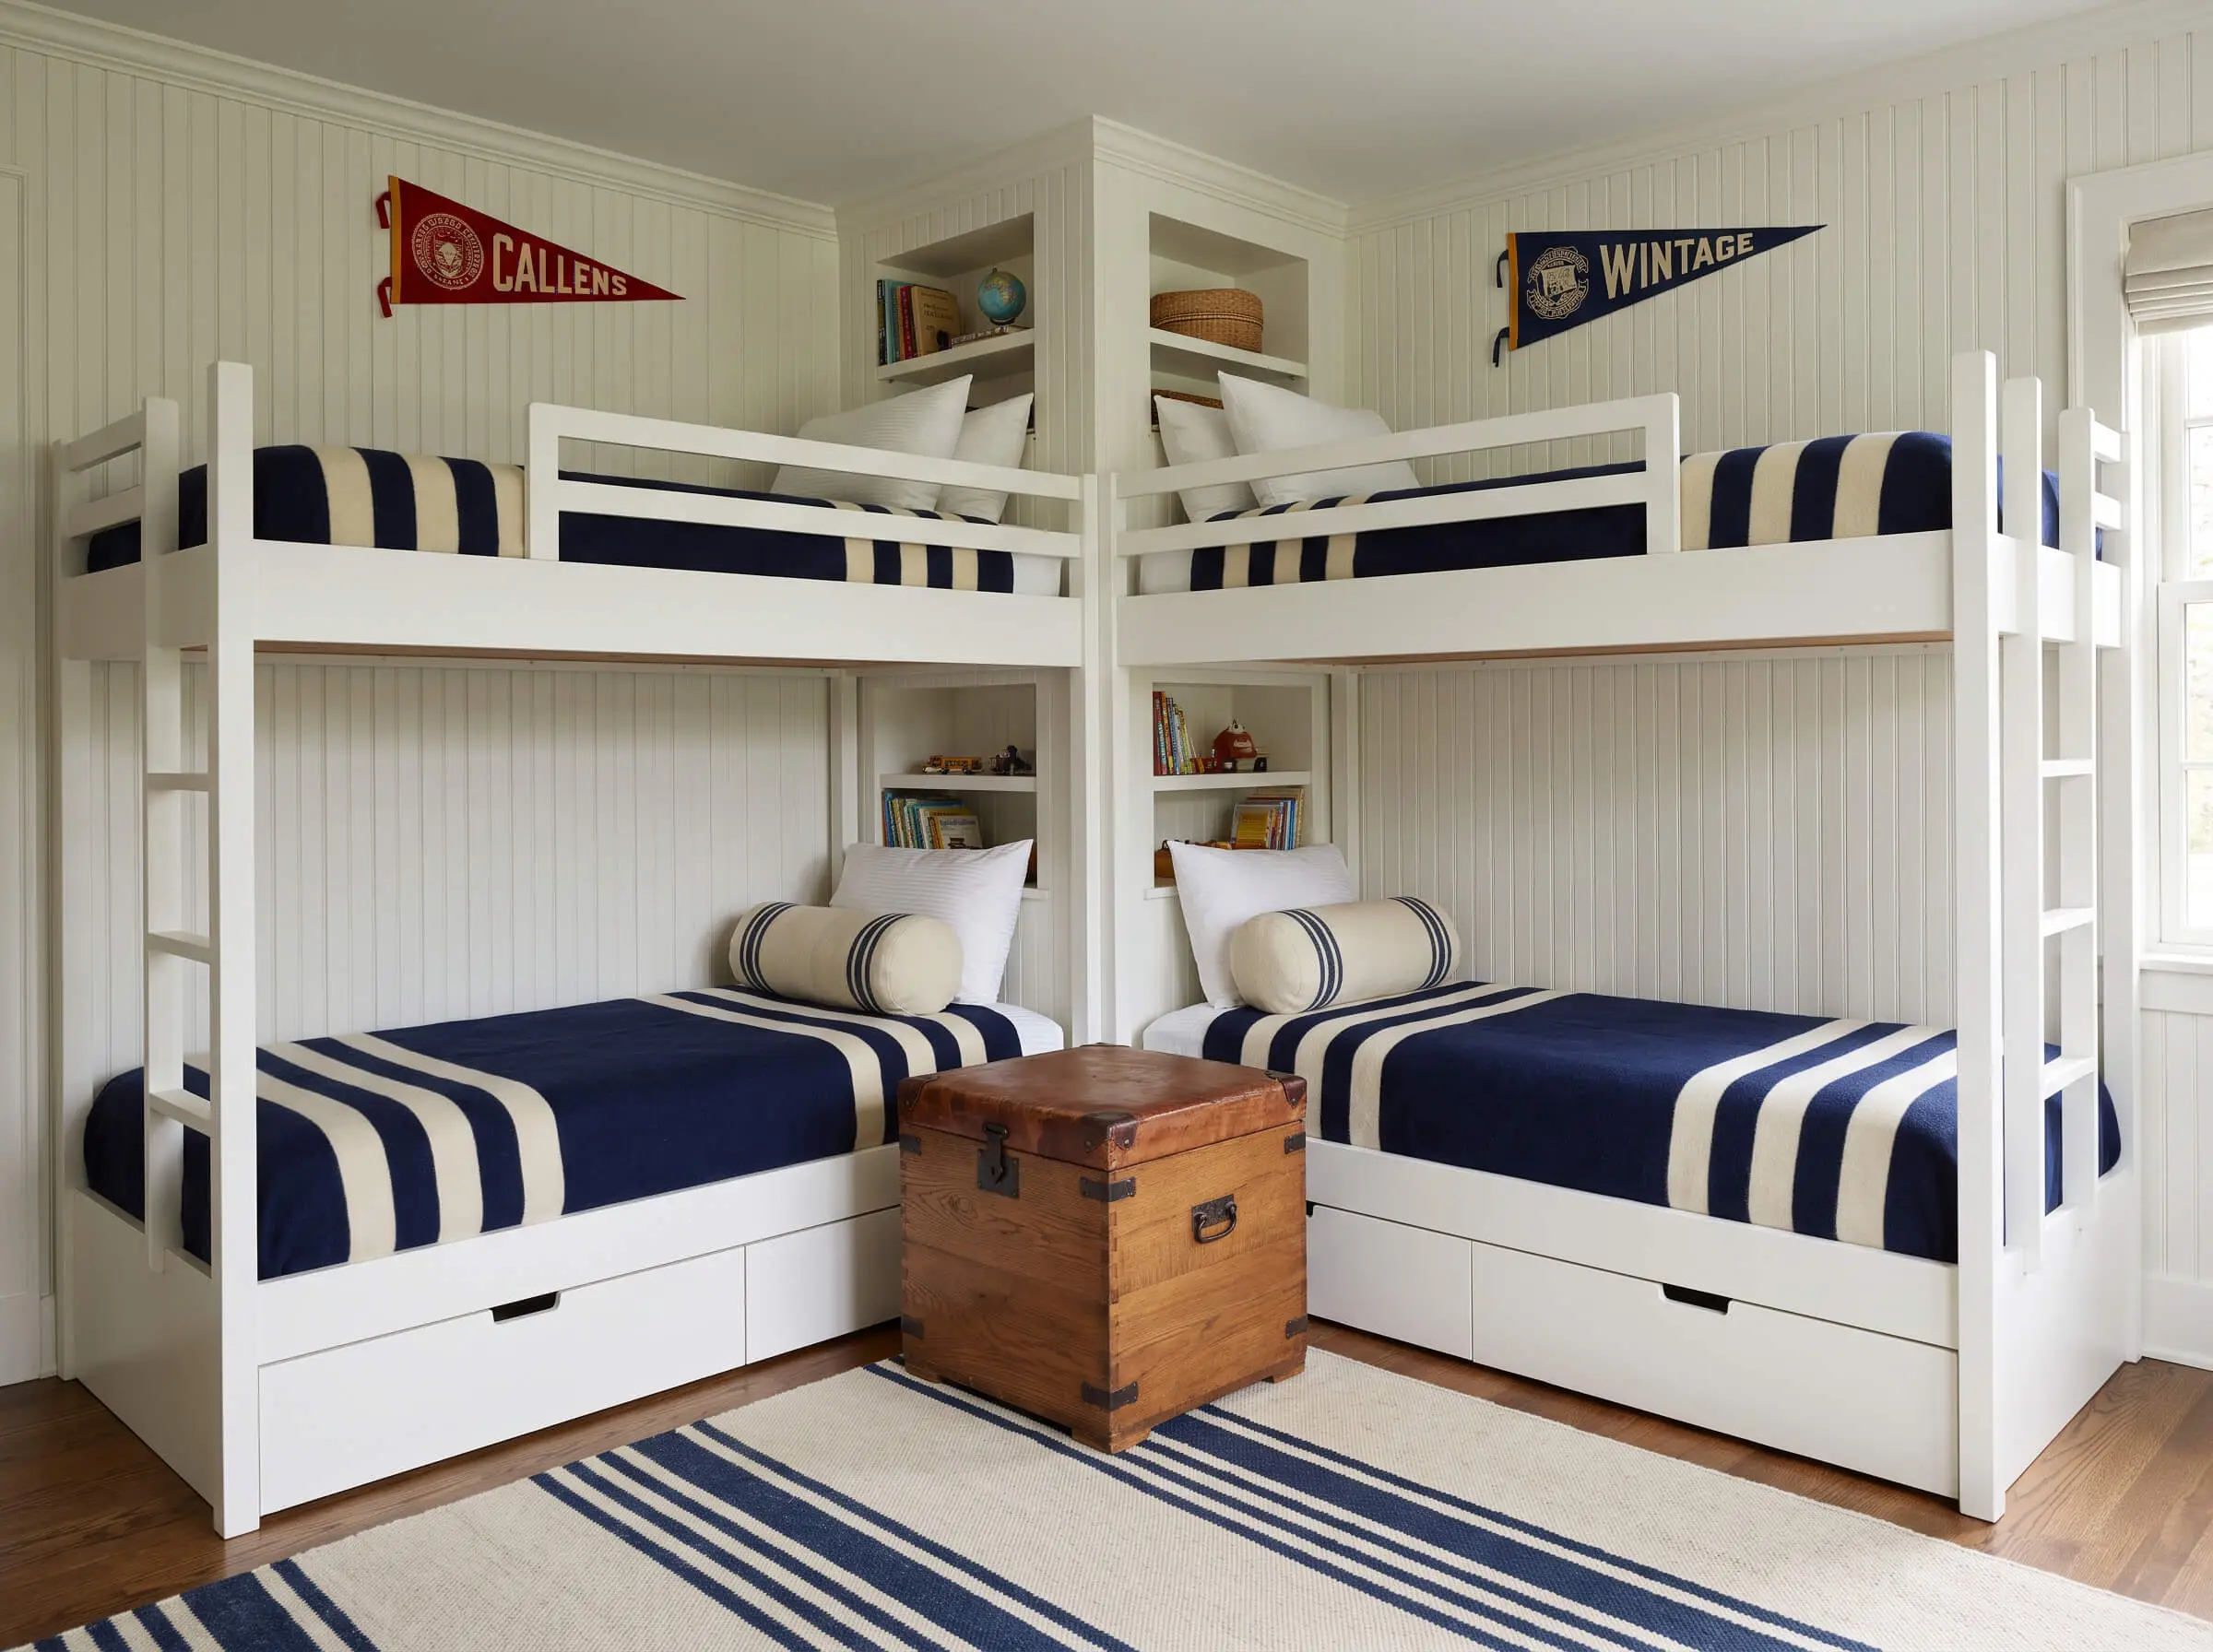
Placing two twin beds foot-to-foot at a perfect 90-degree angle maximizes floor space in shared kids’ rooms or vacation layouts. The absolute secret to making this configuration look bespoke is purposefully utilizing the dead square footage where the two beds intersect.
- Vibe: Classic Bunkhouse.
- Key Materials: Two matching twin platform beds, a heavy wooden storage trunk.
- Layout Secret: Place a custom square table or trunk exactly in the 90-degree intersection to serve as a shared nightstand and anchor the layout.
- Styling Pro-Tip: Use matching, tightly tailored bedding to keep the L-shape looking crisp and architectural rather than messy.
Slanted Ceiling Placements in Attic Bedrooms
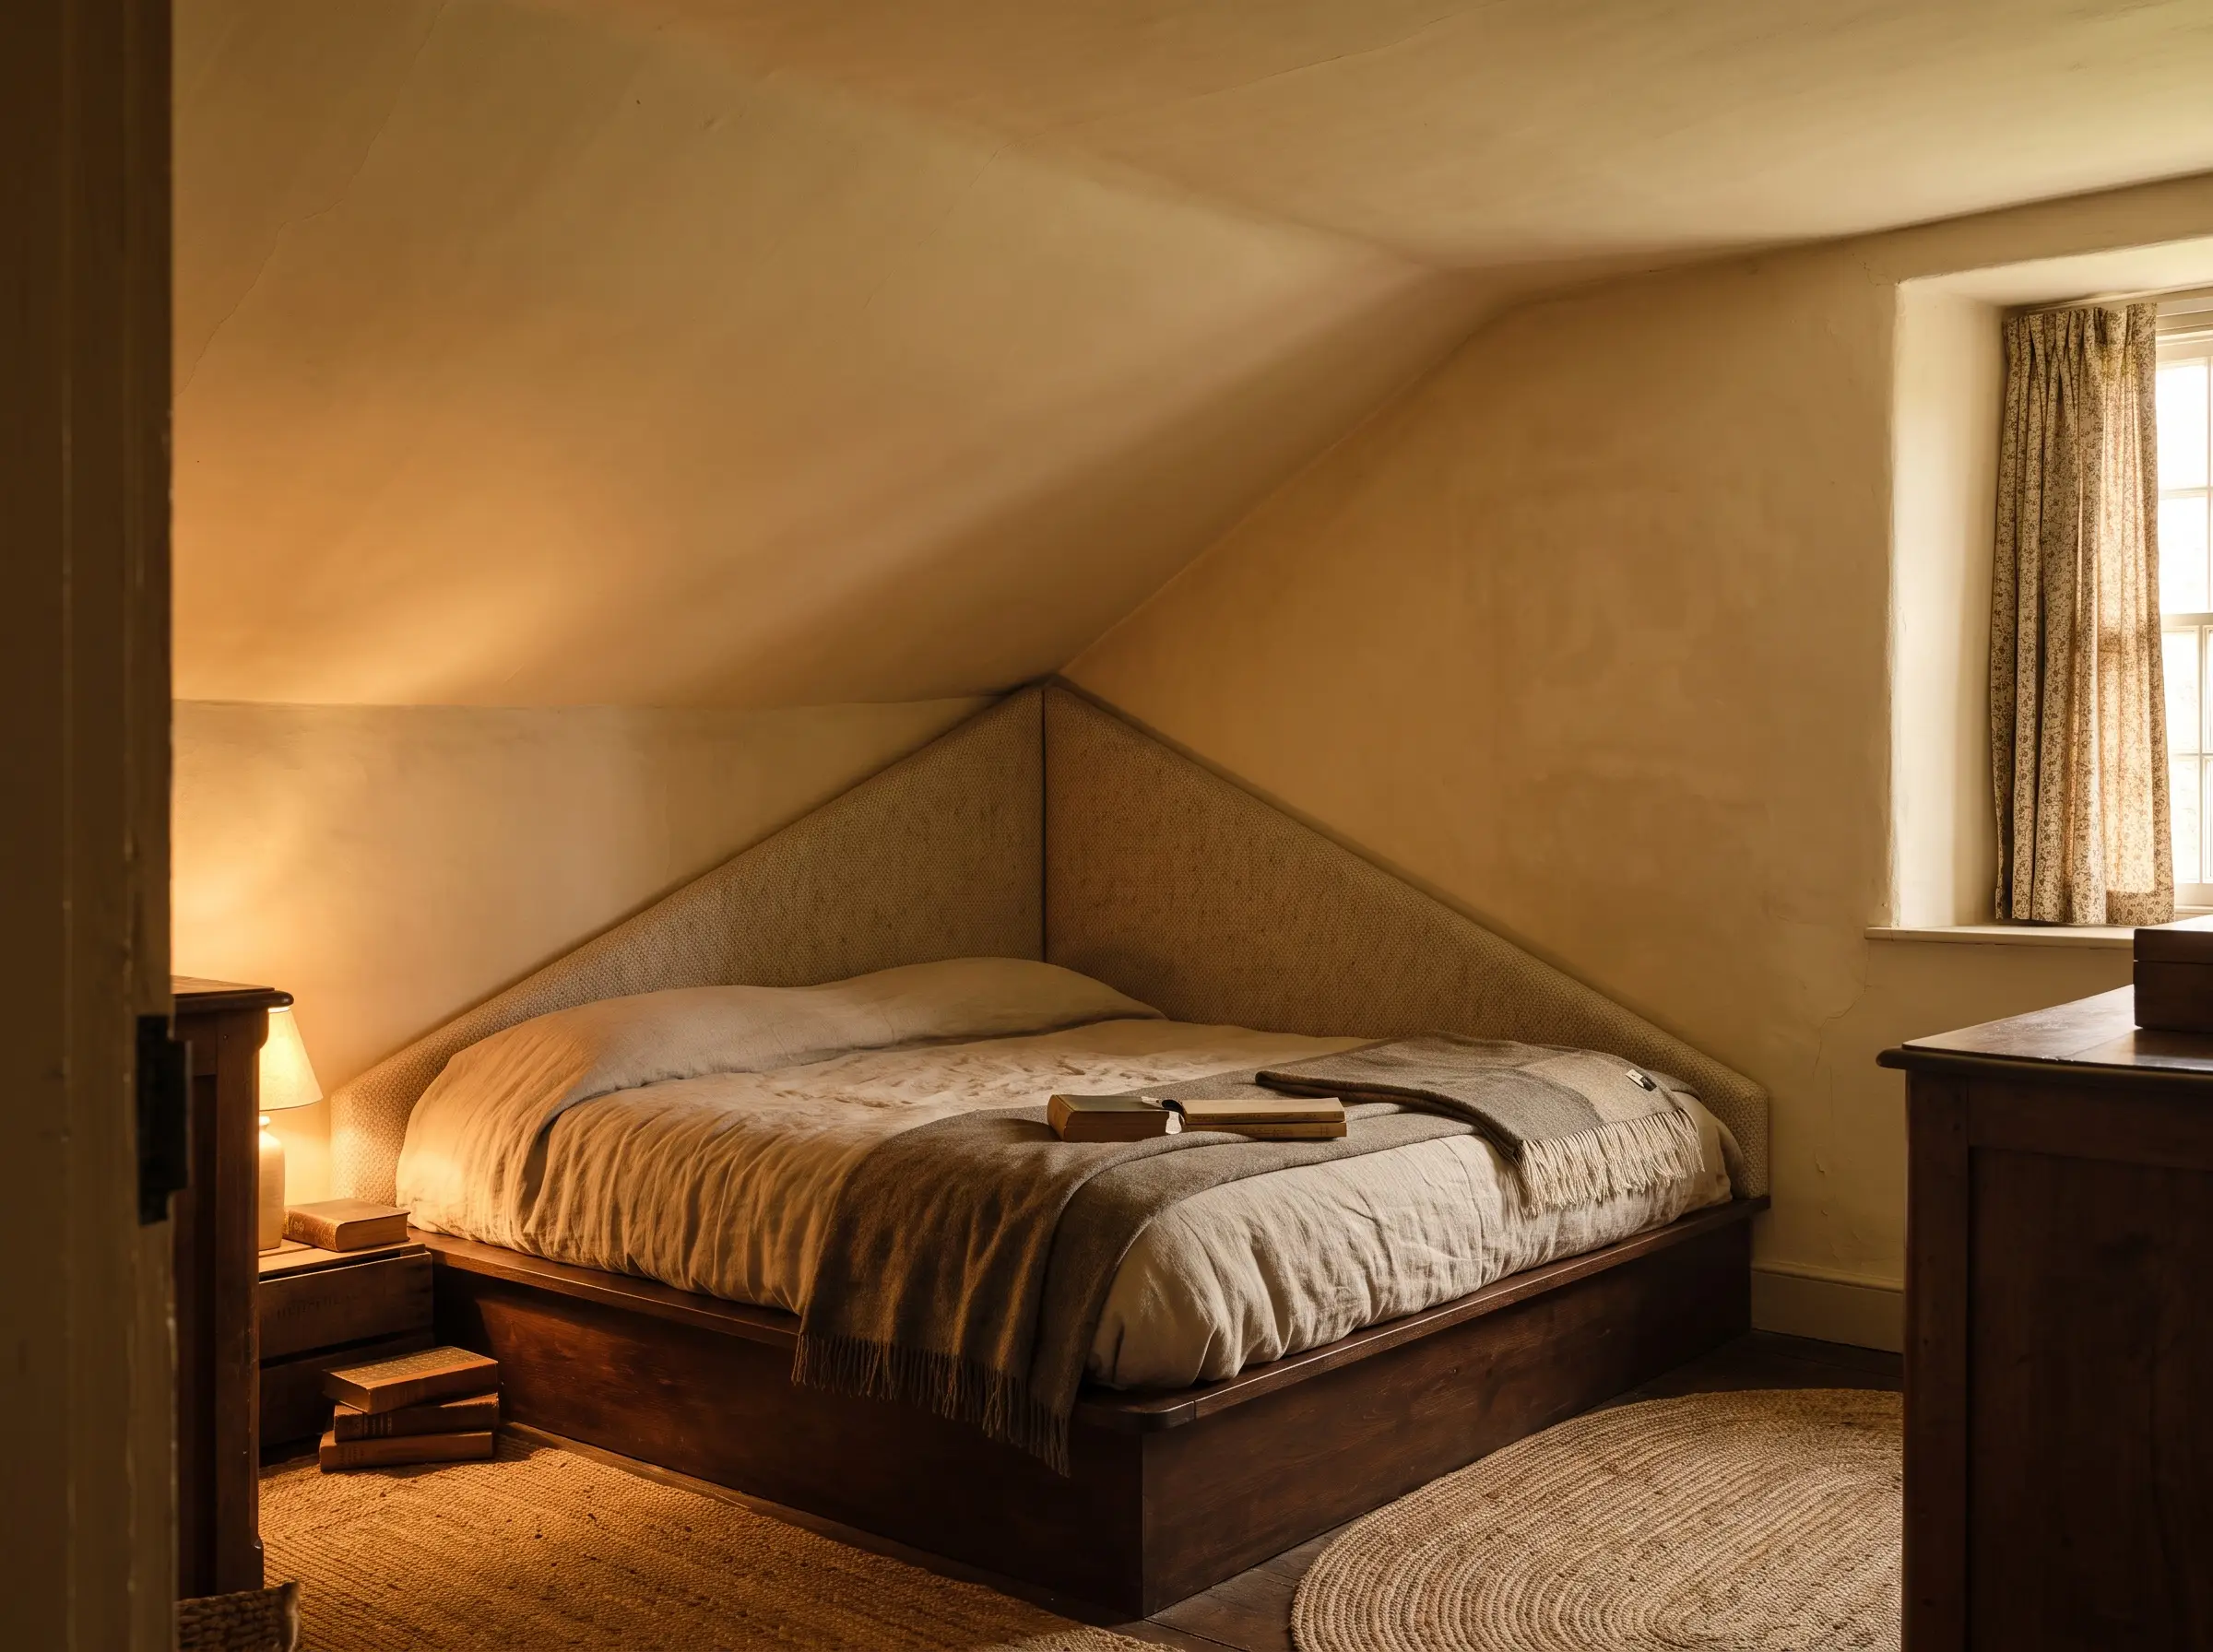
Tucking the bed directly into the lowest point of a slanted attic ceiling reclaims dead square footage while leaving the highest ceilings open for walking. Because you only sleep horizontally, this layout constraint naturally creates a deeply comforting, den-like atmosphere.
- Vibe: Cozy Historic Attic.
- Key Materials: Low-profile platform frame, custom-cut foam wedge for the headboard.
- Spatial Strategy: Push the bed deep enough into the eaves so the ceiling height at the edge of the mattress is at least 36 inches to prevent head-bumping.
- Styling Pro-Tip: Paint the slanted ceiling the exact same color as the walls to soften the harsh architectural angle.
The “Floating” Corner (Asymmetrical Placement)
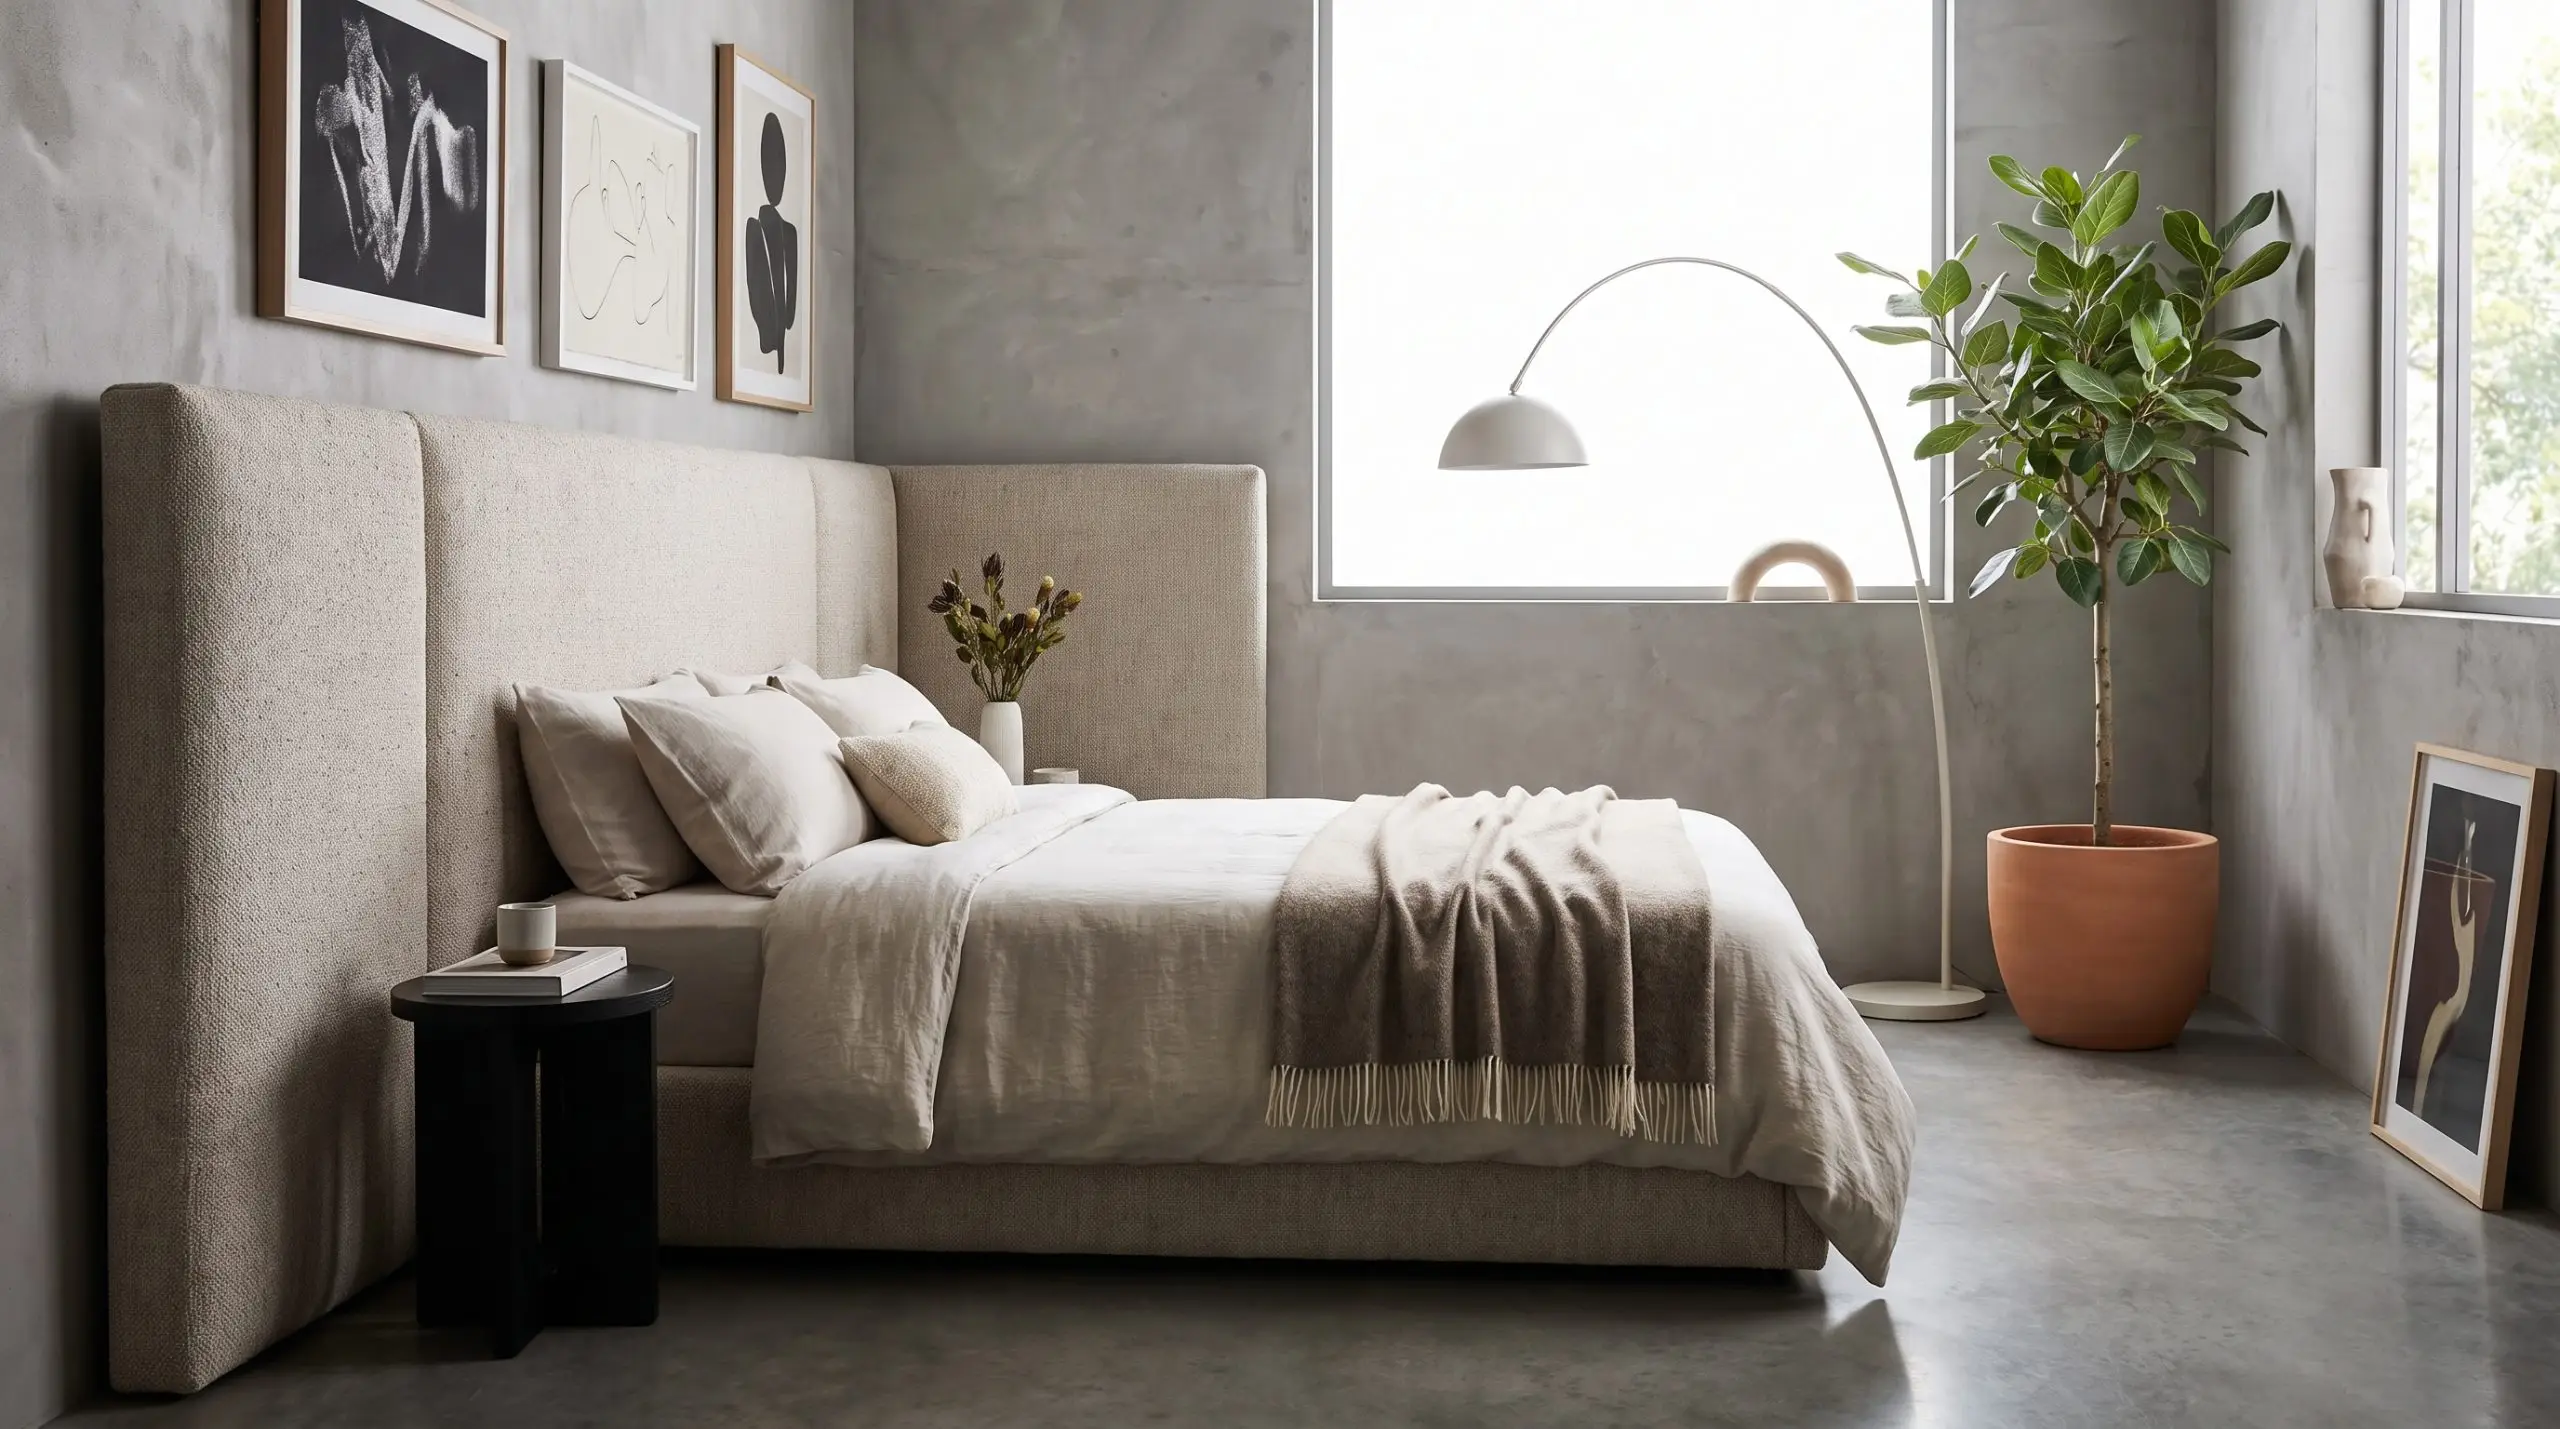
Instead of shoving the bed flush against both intersecting walls, pushing the headboard against the back wall while leaving a calculated gap on the side creates modern visual tension. This asymmetrical placement makes the corner layout look like a deliberate styling choice rather than a necessity.
- Vibe: Modern Gallery.
- Key Materials: A dramatic floor lamp, a tall structural plant (like a Ficus Audrey).
- Spatial Metric: Leave a deliberate 12 to 18-inch gap between the side of the bed and the wall to properly frame your lighting or greenery.
- Styling Pro-Tip: Use a bed frame with an extended, oversized headboard to visually bridge the gap without moving the mattress.
Styling & Lighting the Corner Footprint
When you sacrifice one side of the bed to a wall, you inherently lose the space for a traditional nightstand. Navigating this footprint requires creative, wall-mounted solutions to ensure the bed remains highly functional without cluttering the floor plan.
Swapping Nightstands for Floating Wall Shelves
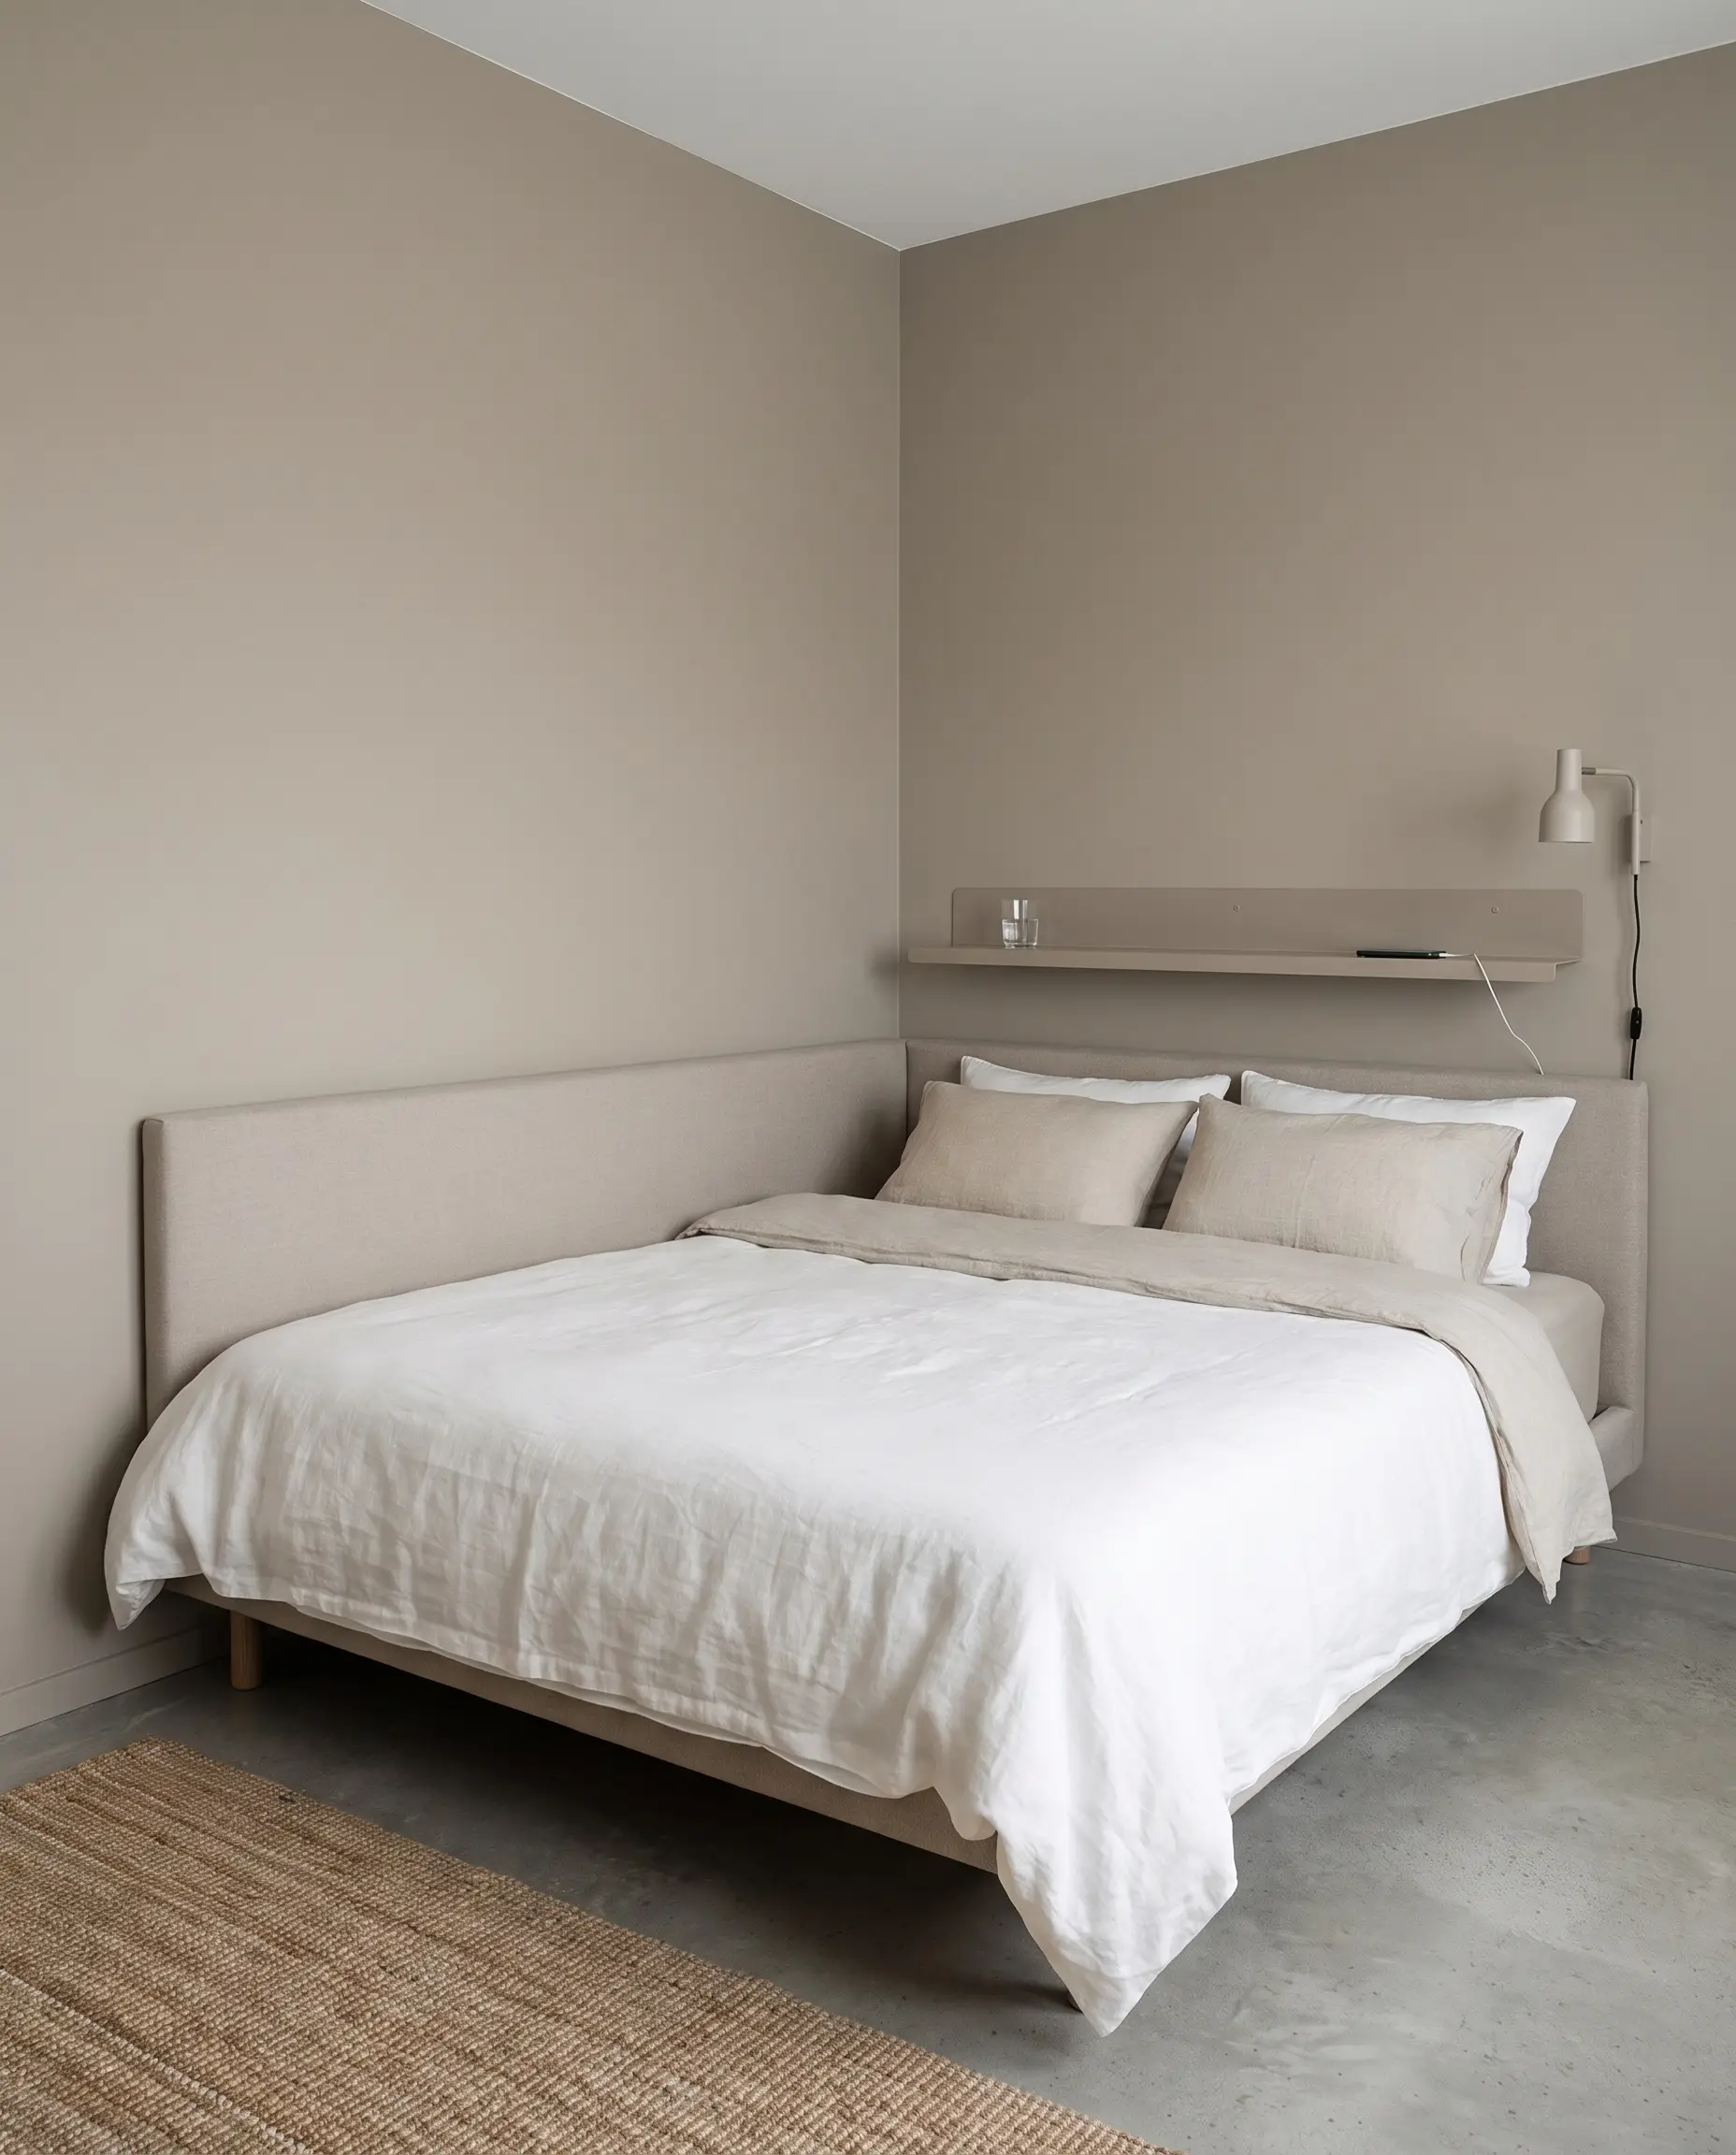
Installing a minimalist floating shelf on the side wall or directly above the headboard regains vital surface area without sacrificing a single inch of floor space. This provides just enough room for a water glass and phone while keeping the corner feeling airy.
- Vibe: Minimalist Utility.
- Key Materials: Powder-coated steel ledges for a modern look, or raw oak slabs for an organic feel.
- Weight Limit: Always secure floating hardware directly into wall studs, as resting elbows or heavy books can easily rip drywall anchors out.
- Styling Pro-Tip: Paint the floating shelf the exact same color as the wall so it visually disappears, reducing visual clutter.
Articulating Plug-In Sconces for Targeted Light
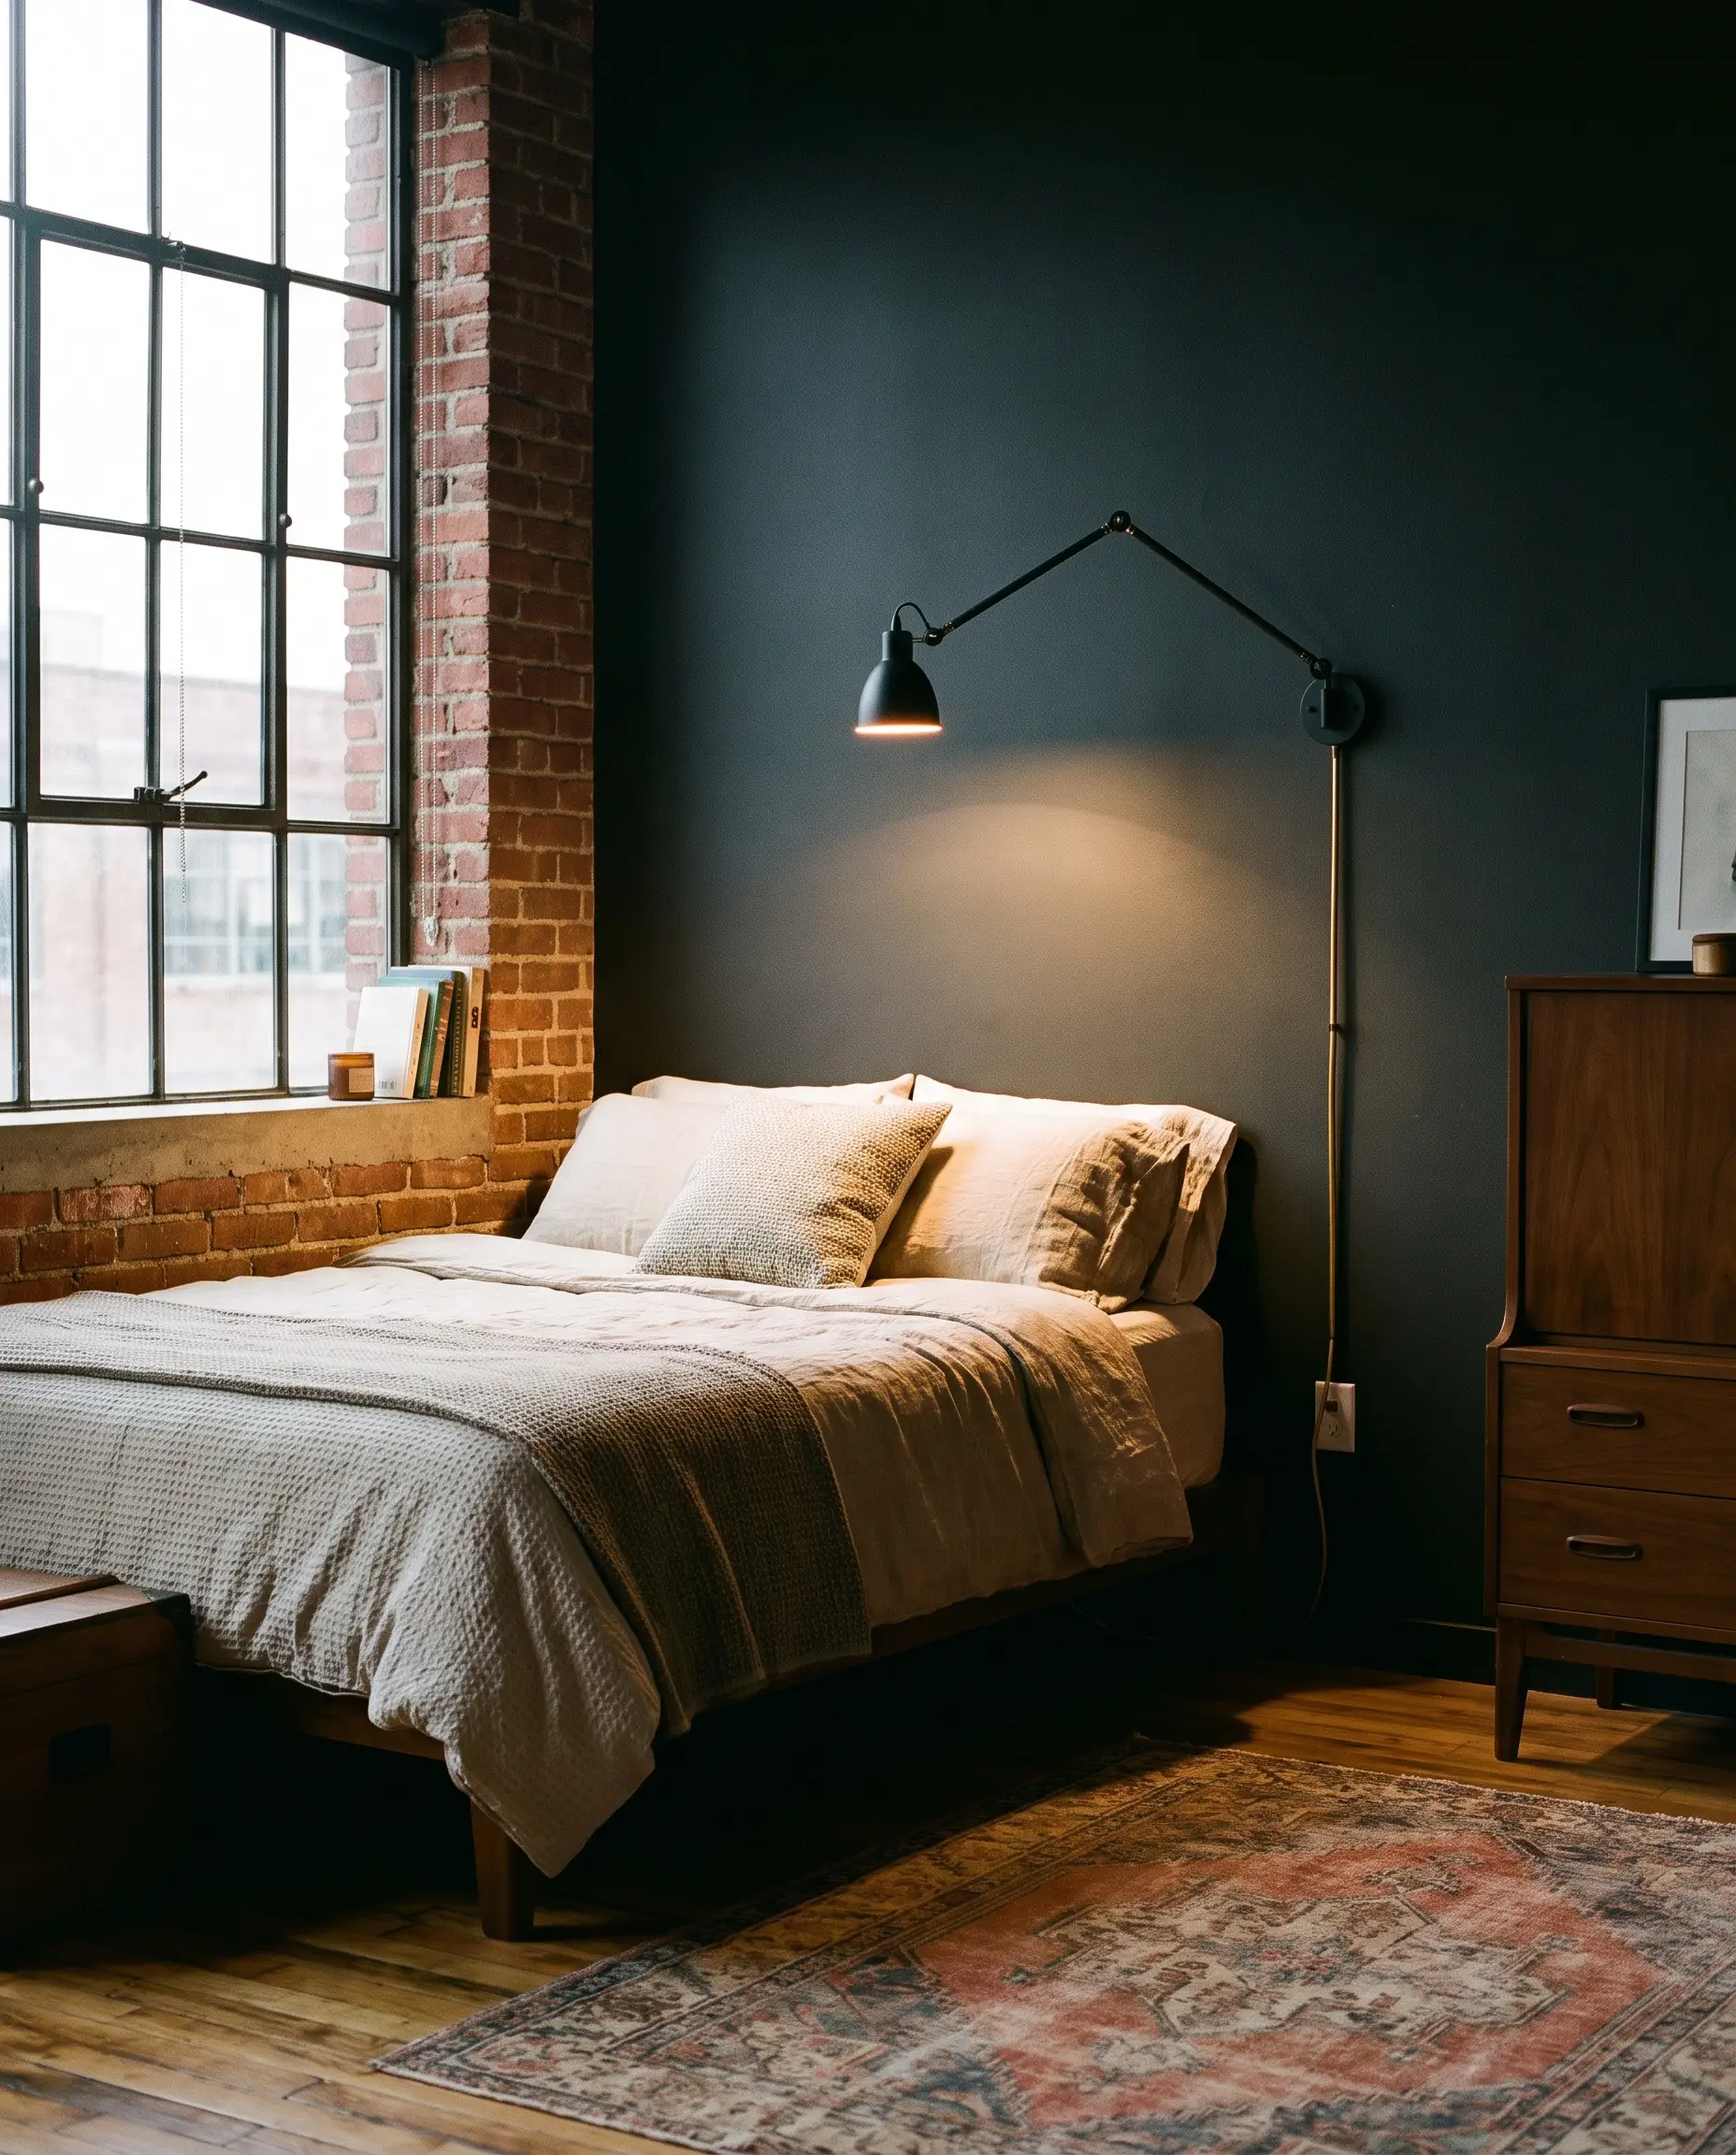
Traditional table lamps consume too much valuable surface area in a tight corner layout. Mounting an articulating swing-arm sconce on the side wall provides targeted reading light, and utilizing plug-in fixtures bypasses the need for expensive electrical hardwiring.
- Vibe: Industrial Chic or Mid-Century Modern.
- Key Materials: Brass or matte black articulating plug-in sconces, cable management clips.
- Spatial Metric: Always mount the plug-in sconce at least 30 to 36 inches above the top of the mattress to prevent head bumps while sitting up.
- Styling Pro-Tip: Run the exposed plug-in cord through a sleek brass cord cover to make the installation look intentionally hardwired.
The “Bolster Pillow” Daybed Conversion Trick
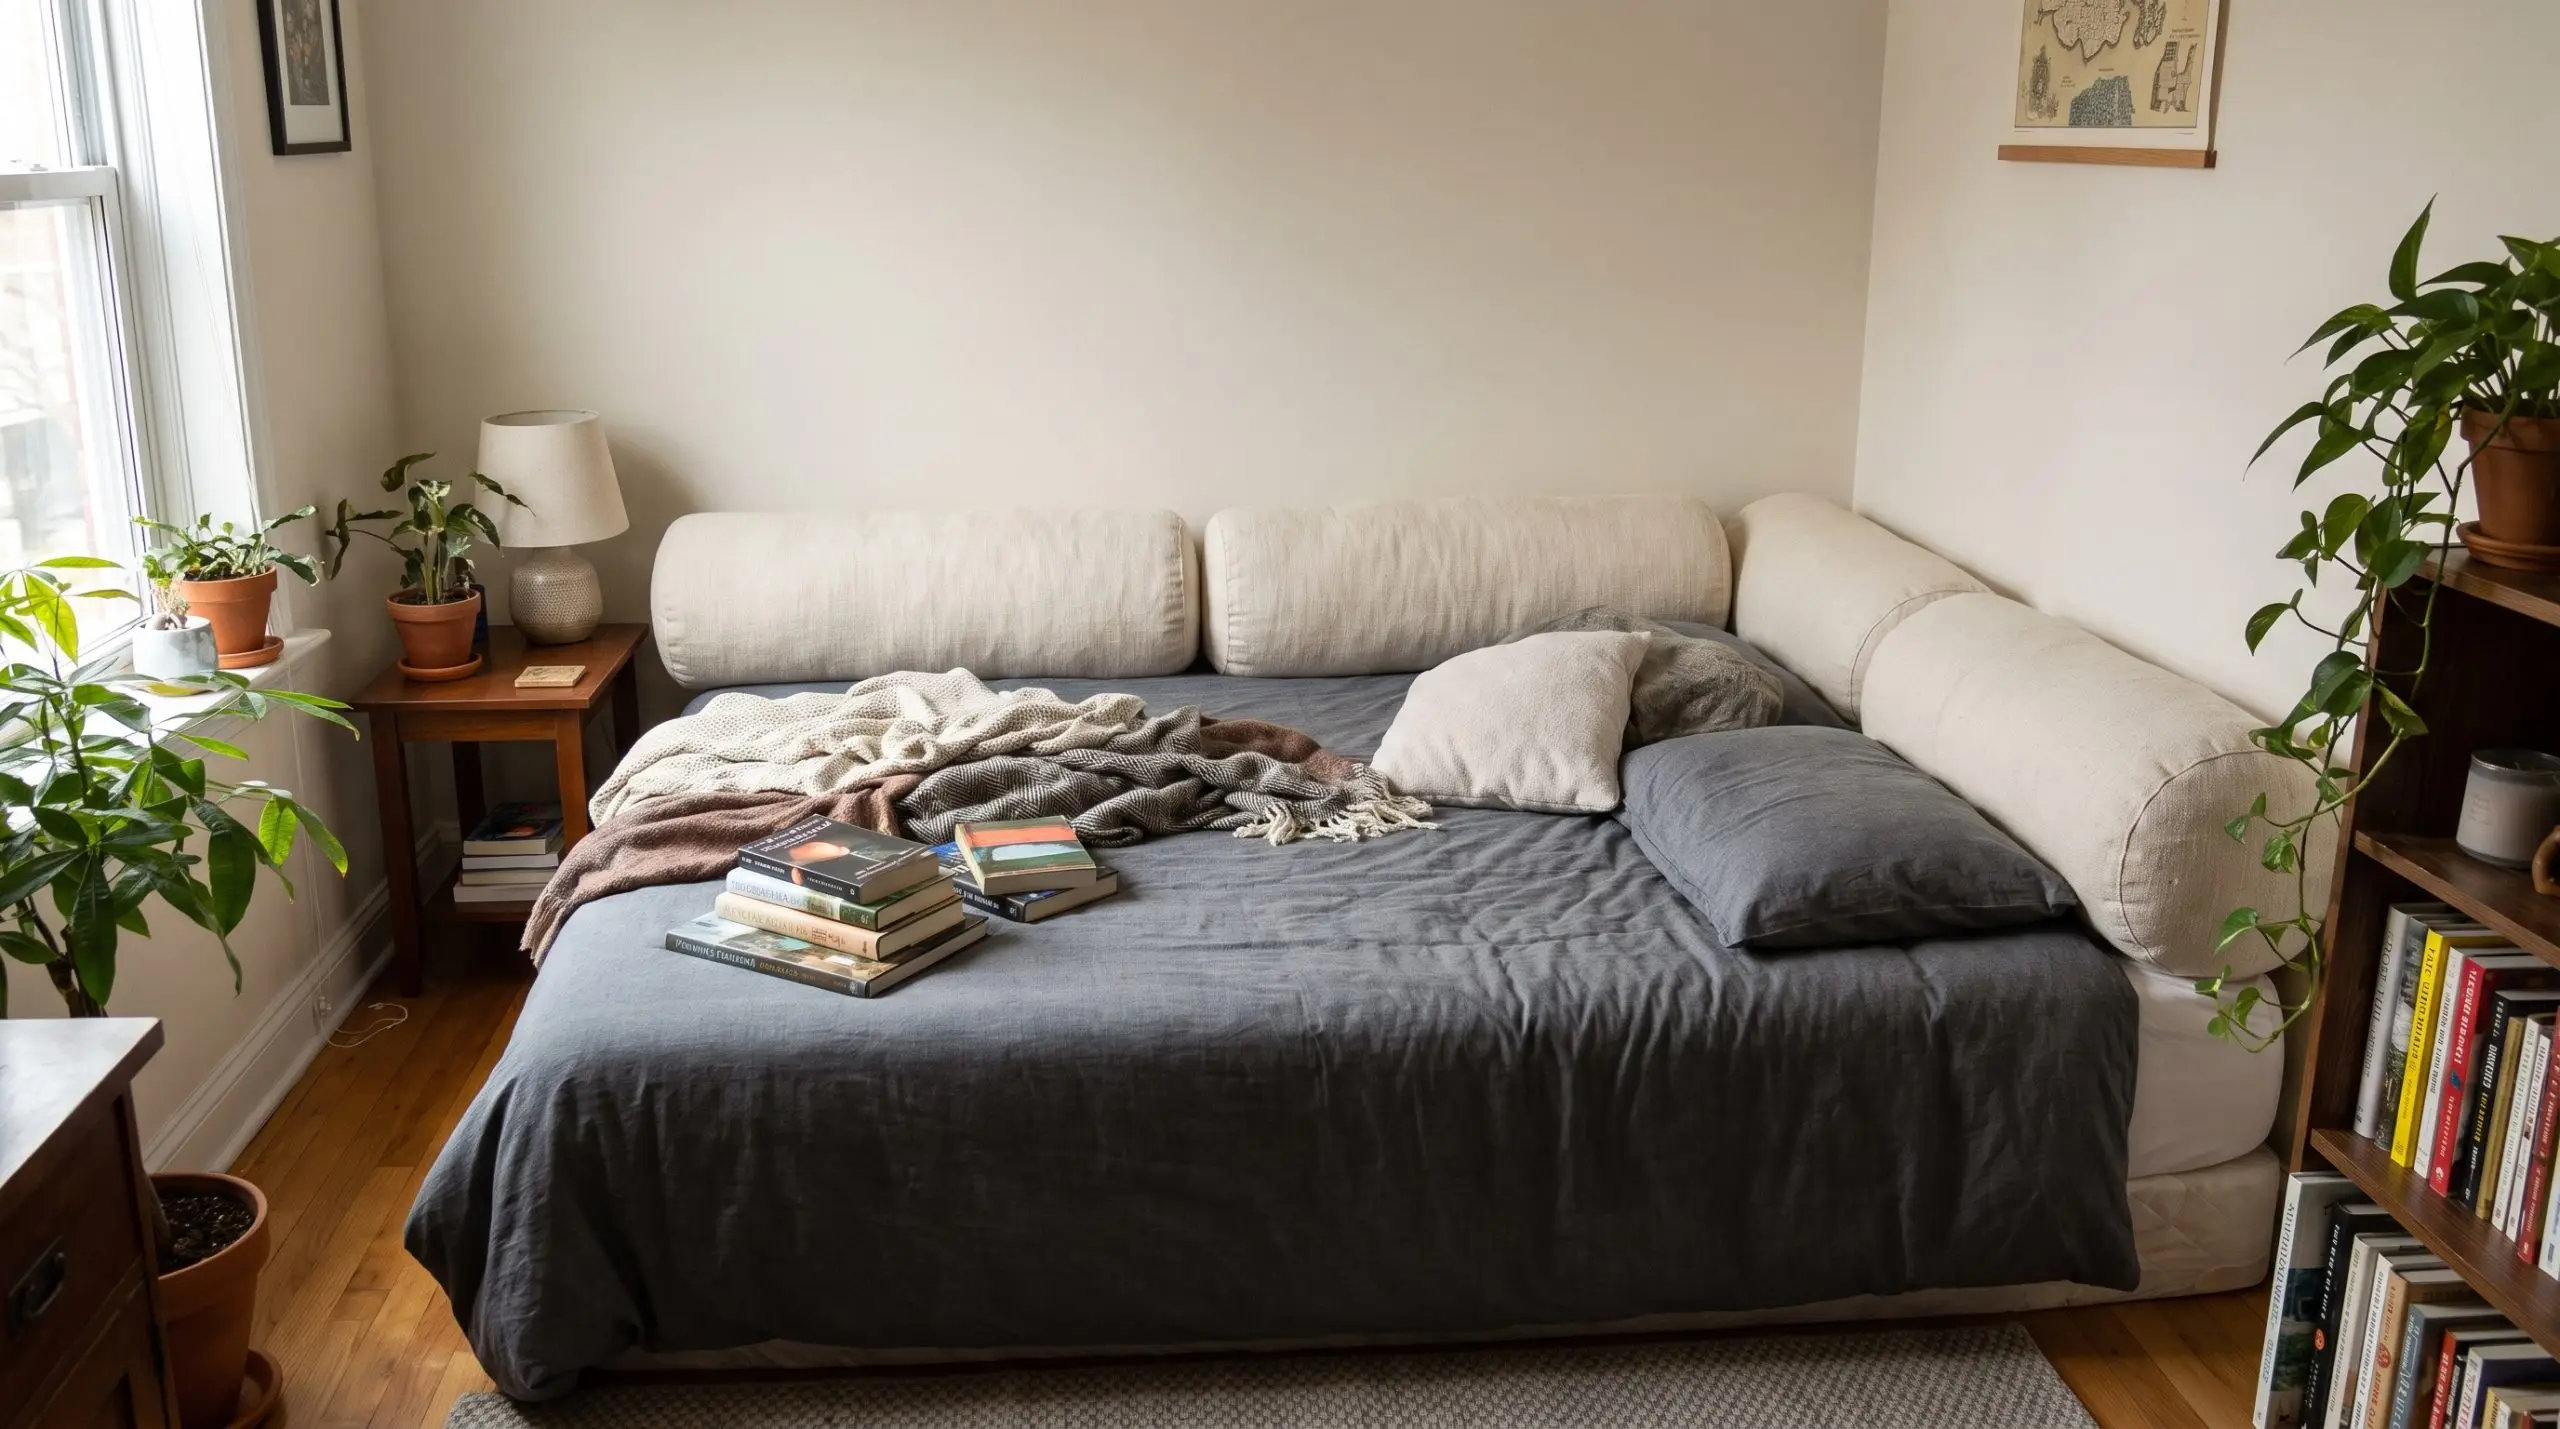
Lining the long, wall-facing side of a corner bed with large bolster pillows visually transforms the mattress into a deep, luxurious sofa for daytime use. This daybed conversion is a crucial styling hack for studio apartments where the bed must serve dual purposes.
- Vibe: Relaxed Lounge.
- Key Materials: Heavyweight linen covers, dense foam cylinders or wedge cushions.
- Insert Rule: You must use incredibly firm inserts. Floppy, standard bed pillows will immediately ruin the structural illusion of a sofa back.
- Styling Pro-Tip: Layer three identical, tightly structured bolsters end-to-end to create a clean, continuous backrest.
Layering Rugs to Redefine the Room’s Center
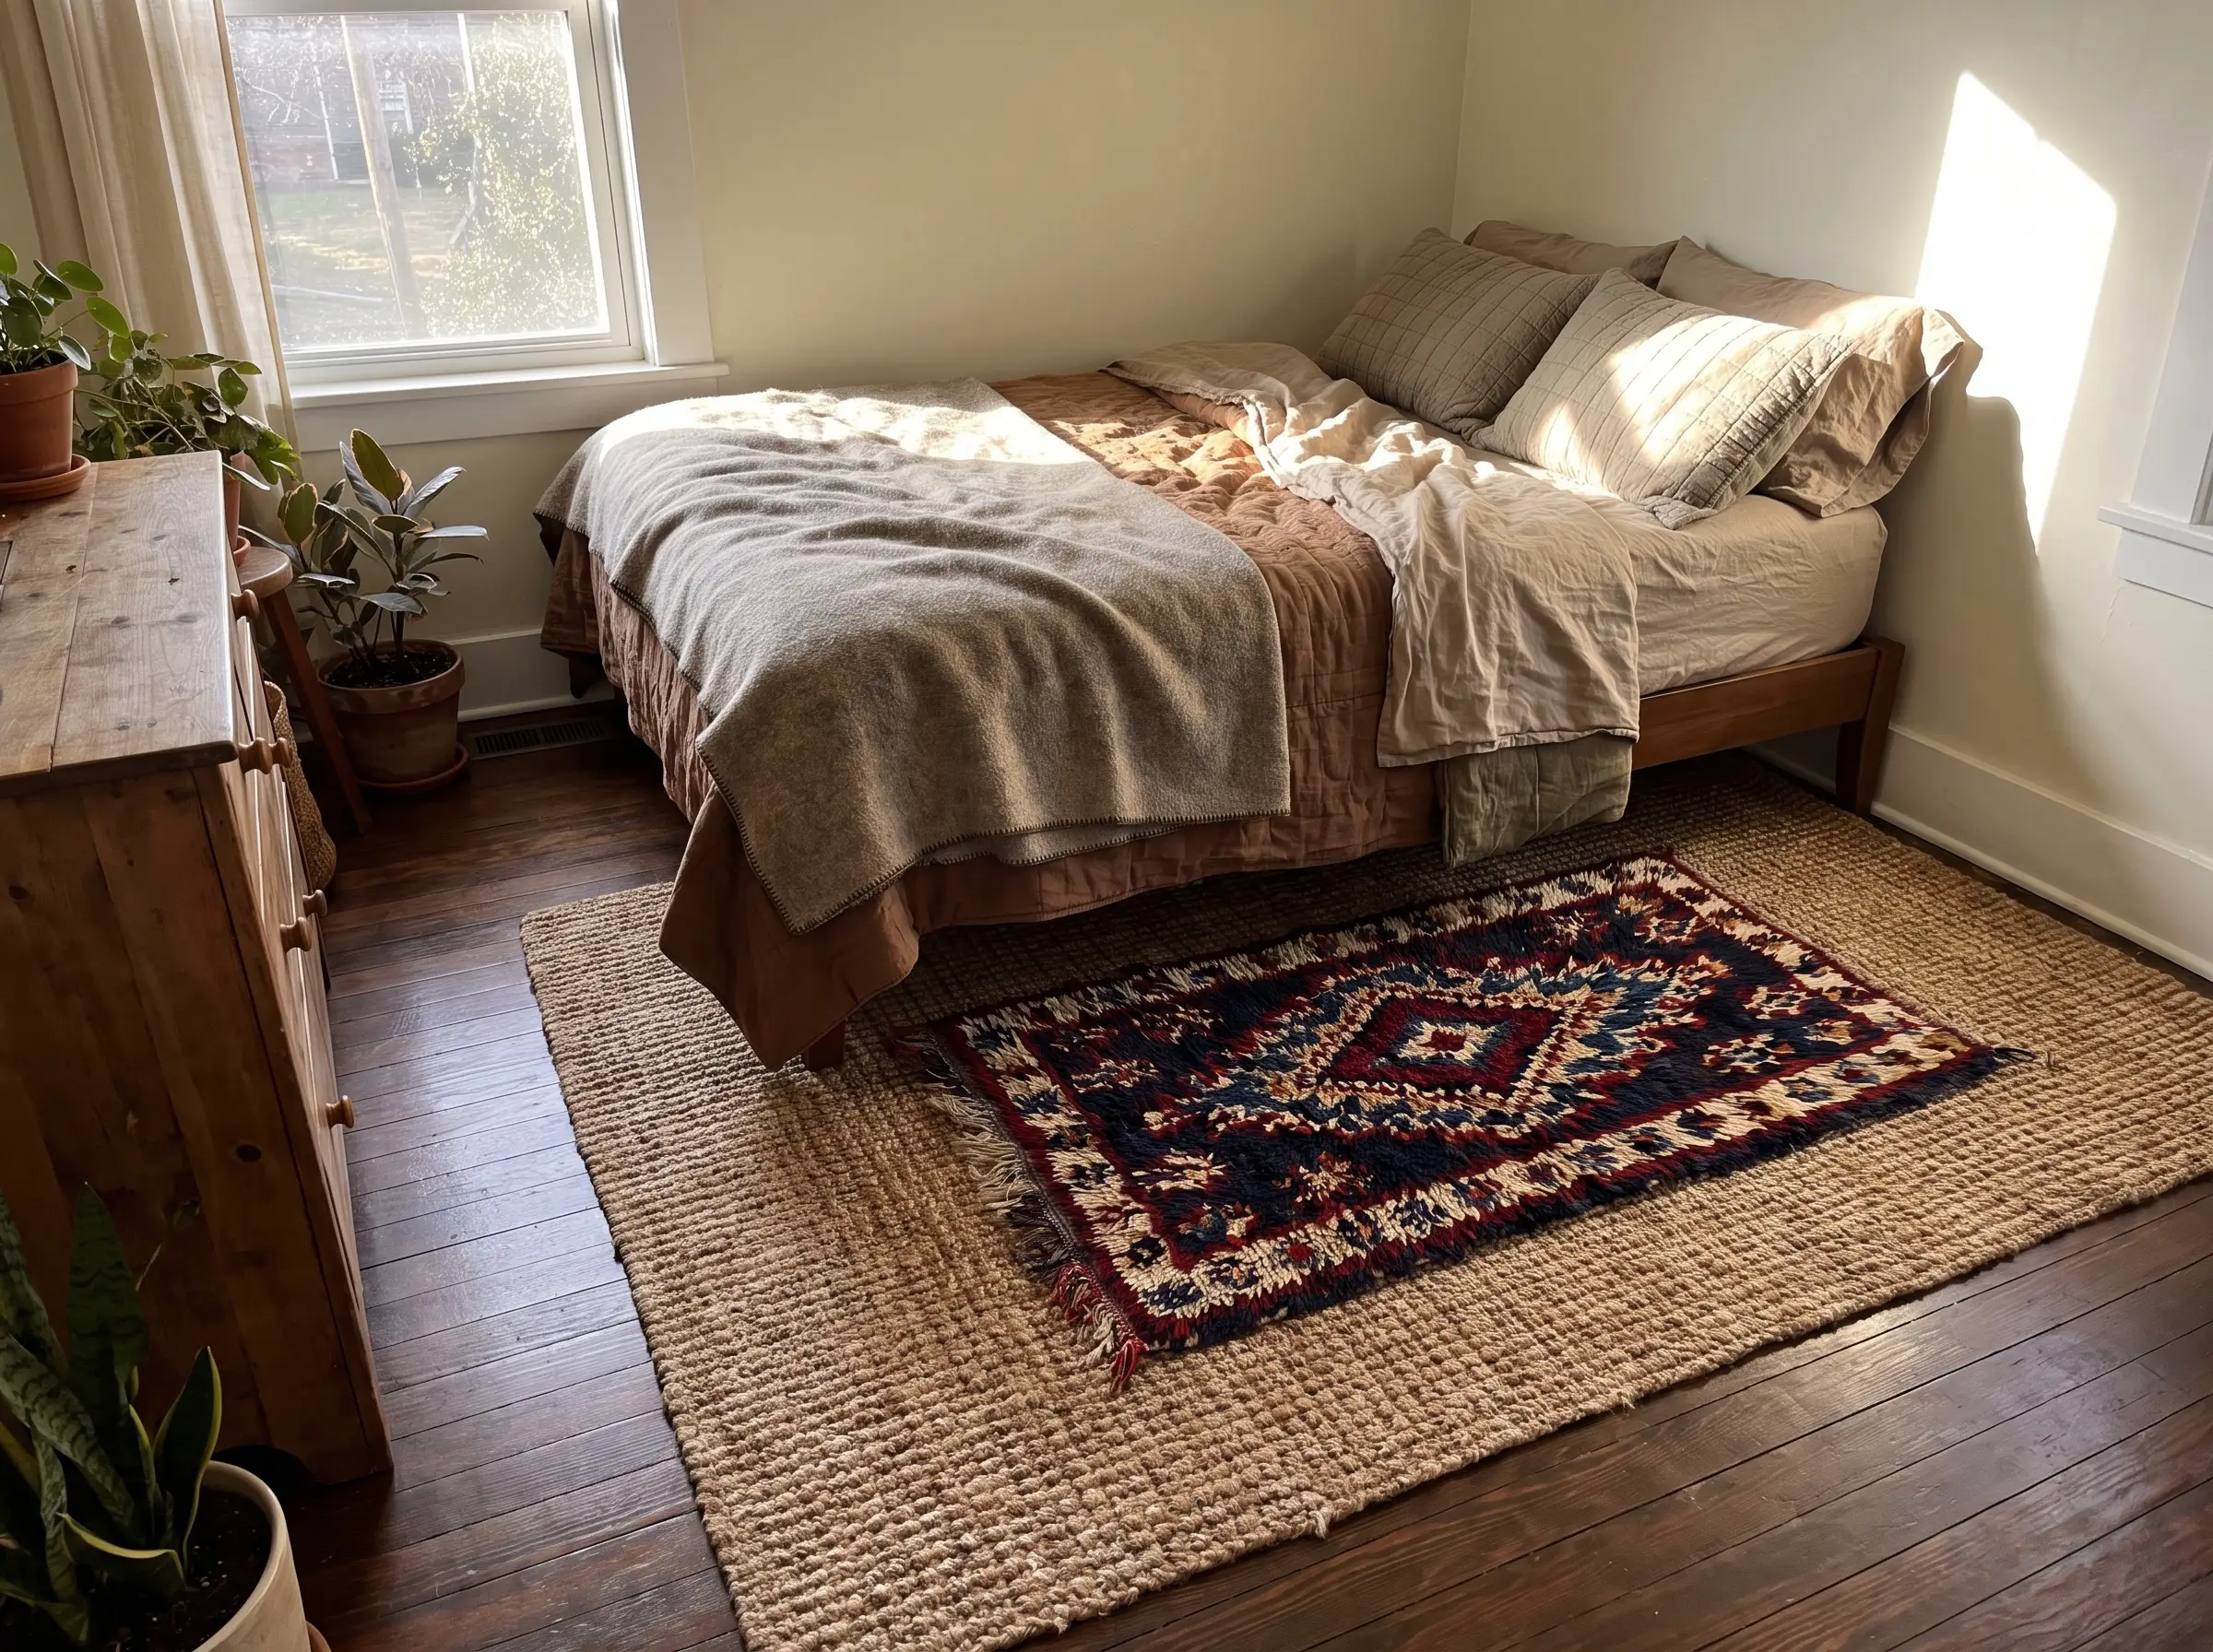
A bed pushed tightly into a corner aggressively shifts the visual weight of the room, often making the space feel lopsided. To properly counterbalance this, you must place an oversized, highly textured area rug partially under the exposed side of the bed, dragging the eye back toward the center of the floor plan.
- Vibe: Grounded and Balanced.
- Key Materials: Heavy jute, thick wool tufted rugs.
- Layout Metric: Pull the rug at least 24 to 36 inches out from the exposed side and foot of the bed to establish a new, centered footprint.
- Styling Pro-Tip: Layer a smaller, high-pile vintage rug over a larger, neutral sisal base to add complex texture to the newly established center.
Reclaiming Your Floor Plan
Moving your bed into the corner is not a design sacrifice; it is a highly strategic maneuver to reclaim the center of your room’s footprint. The difference between an awkward, temporary setup and a stunning, bespoke nook comes down entirely to intentionality. Whether you choose to invest in custom millwork, build an L-shaped headboard to defeat cold drywall, or mount a sleek articulating sconce, you have the power to engineer a space that feels deeply permanent and structurally grounded. Grab your tape measure, evaluate your intersecting walls, and decide today whether a hard architectural built-in or a soft tactile upholstery approach is the right move for your space.
The Spatial Desk heads up Hackrea’s functional design and layout planning. Obsessed with traffic flow, ergonomics, and spatial optimization, this desk tackles the most frustrating layout challenges—from narrow living rooms to awkward alcoves—ensuring every square foot of a home is as functional as it is beautiful.