The Architectural Focal Point: 18 Ways to Style a Walnut & Dark Wood Slat Media Wall
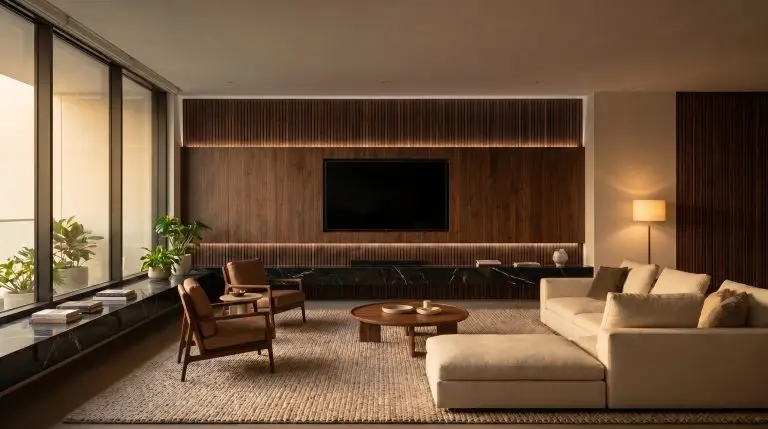
The massive, blank black rectangle of a modern television poses a distinct structural challenge in any living space. Treating this technological necessity as an afterthought often results in a disconnected, visually heavy void, but a properly executed walnut and dark wood slat media wall acts as the perfect grounding solution. Moving beyond basic paneling requires strategic material layering, precise ambient lighting, and high-contrast textures to build a bespoke architectural finish rather than a temporary weekend project.
To achieve a truly custom finish, you must treat the media wall as structural art, balancing acoustic dampening with uncompromising spatial design.
Material Pairings: Refining the Wood Slat Foundation
Walnut and dark espresso woods carry immense visual weight, demanding an intentional, high-contrast counterbalance. They require integration with premium, tactile materials to anchor the composition and prevent the dark wood from absorbing all the light in the room.
1. Anchor the Walnut with a Floating Nero Marquina Marble Hearth
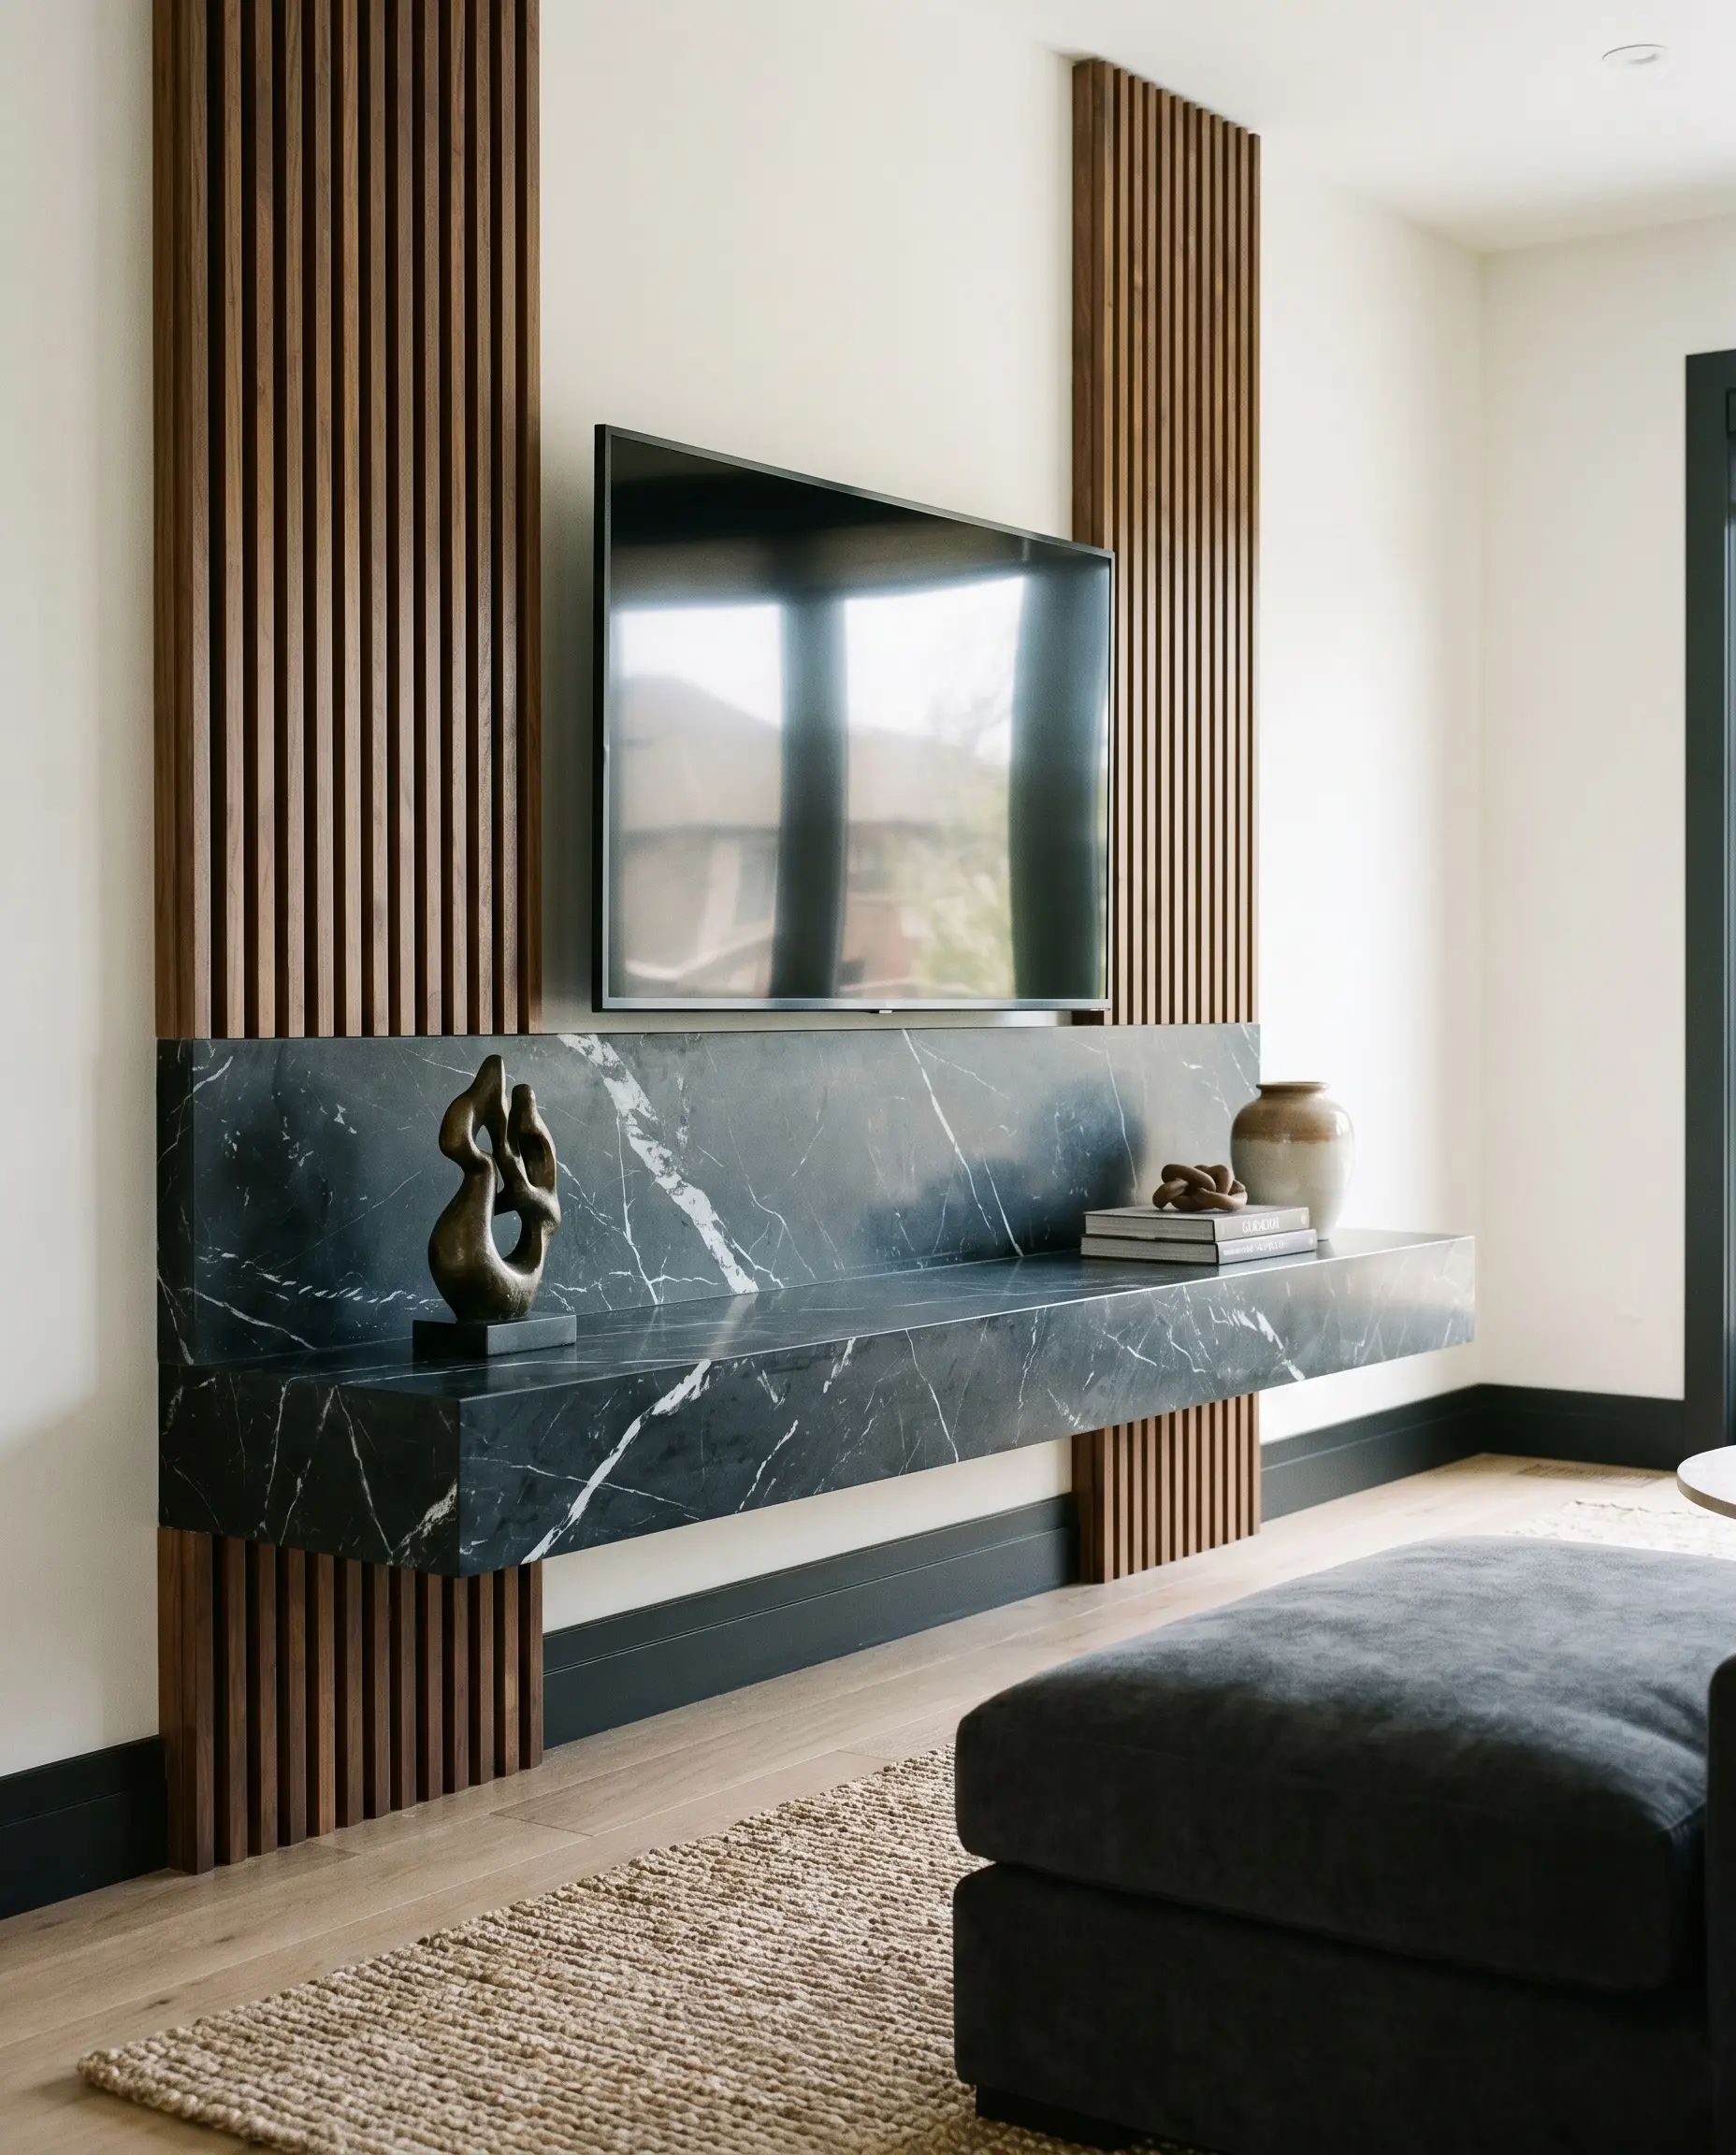
The rich, vertical repetition of wood battens demands a heavy, continuous horizontal plane to establish visual gravity. Installing a thick, cantilevered slab of dark marble with striking white veining underneath the paneling creates an instantly luxurious, grounded foundation.
A deeply veined horizontal stone base intentionally interrupts the aggressive verticality of the wood battens, establishing necessary architectural tension and preventing the wall from looking like a continuous, overwhelming barcode.
Hackrea Designer Secret
- Vibe: High-End Bespoke
- Key Materials: Nero Marquina marble slab, solid walnut acoustic slat panels
- Color Match Sherwin-Williams Tricorn Black (for baseboards or adjacent trim)
- Styling Pro-Tip: Specify a honed finish on the marble rather than polished to minimize distracting reflections from the television screen above.
2. Frame the TV with Roman Clay or Limewash Plaster Borders
Rather than running acoustic felt panels corner-to-corner, apply the walnut strictly behind the screen and coat the flanking walls in a warm beige Roman clay. This introduces a chalky, tactile finish that emphasizes the negative space and frames the wood as a deliberate architectural insert.
- Vibe: Modern Organic
- Key Materials: Portola Paints Roman Clay, rift-sawn walnut battens
- Paint Recommendation Portola Paints “Topanga”
- Styling Pro-Tip: Trowel the plaster with a subtle, sweeping motion to contrast the rigid, linear geometry of the wood slats.
3. Introduce Unlacquered Brass Wall Sconces for Metallic Warmth
Because dark wood heavily absorbs ambient lighting, introducing highly reflective, patinated hardware is structurally necessary. Mount unlacquered brass articulating sconces directly onto the wood slats to flank the television, introducing a raw metallic warmth that ages beautifully over time.
- Vibe: Accessible Luxury / Transitional
- Key Materials: Unlacquered brass sconces, dark espresso wood slats
- Hardware Rule Strictly avoid chrome or brushed nickel, which clash harshly with the warm red and brown undertones of the walnut.
- Styling Pro-Tip: Ensure the sconce backplates are perfectly sized to mount flush against the flat face of the battens without overhanging the acoustic felt grooves.
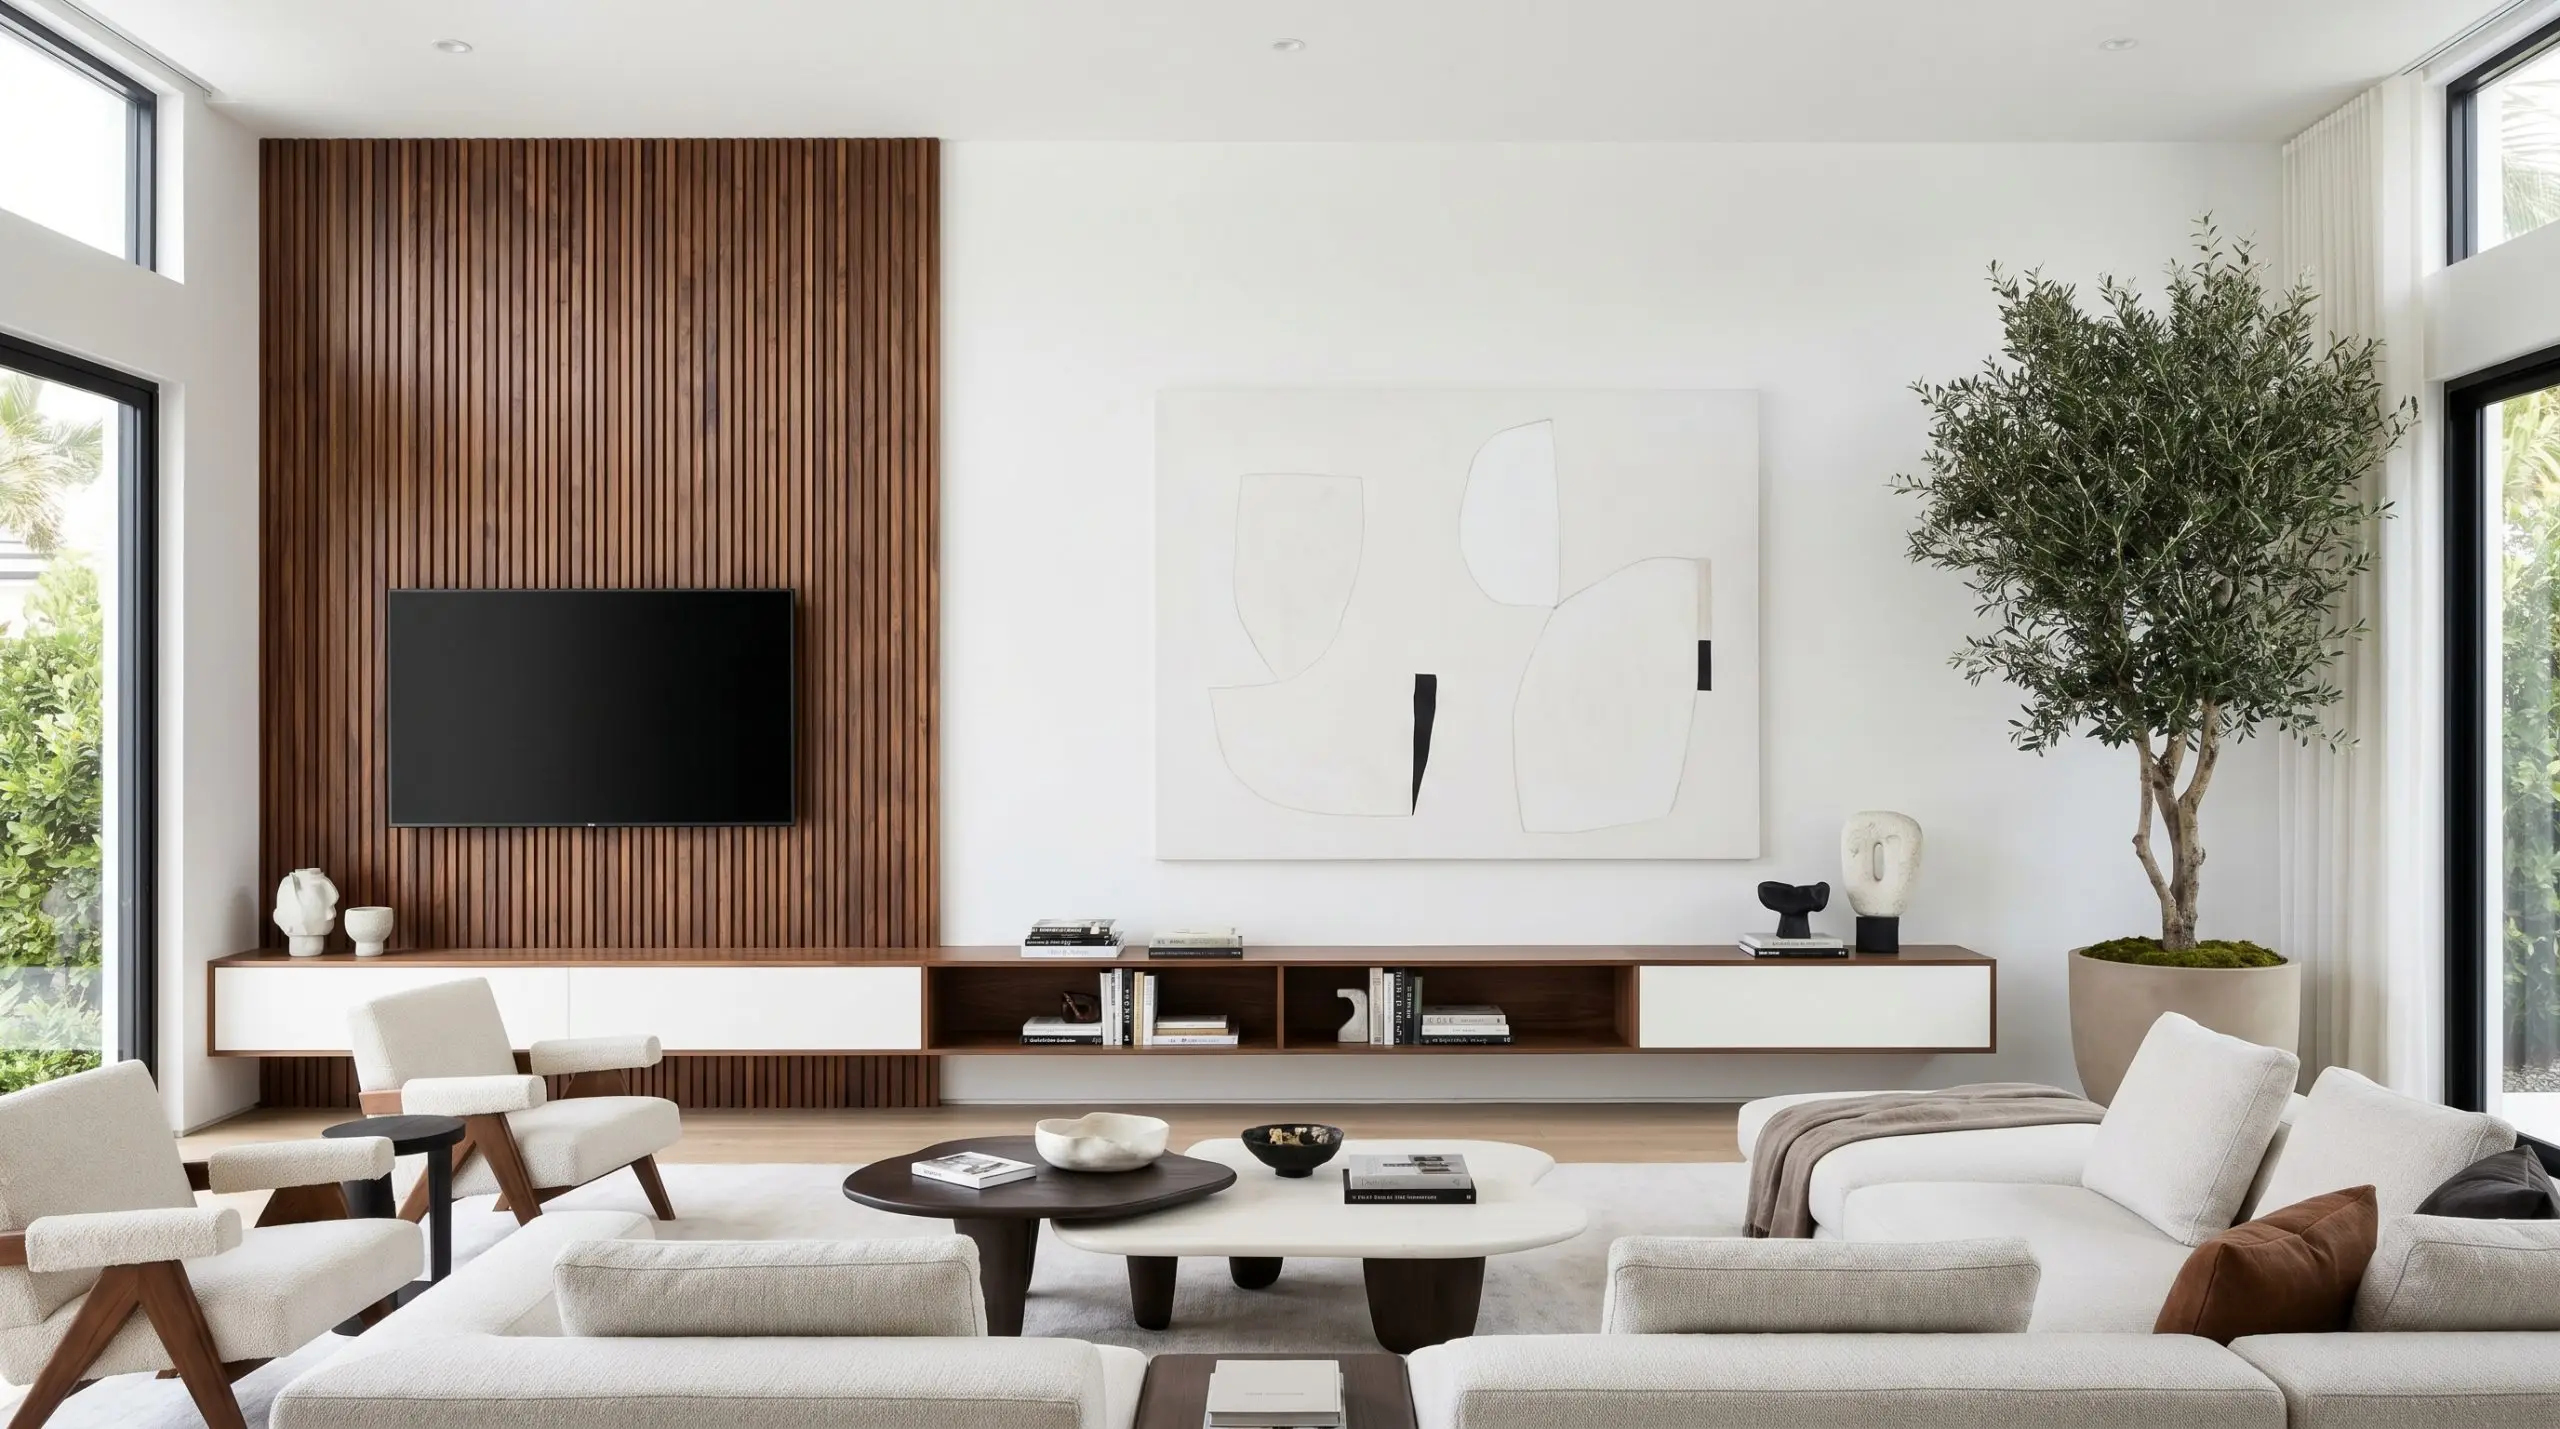
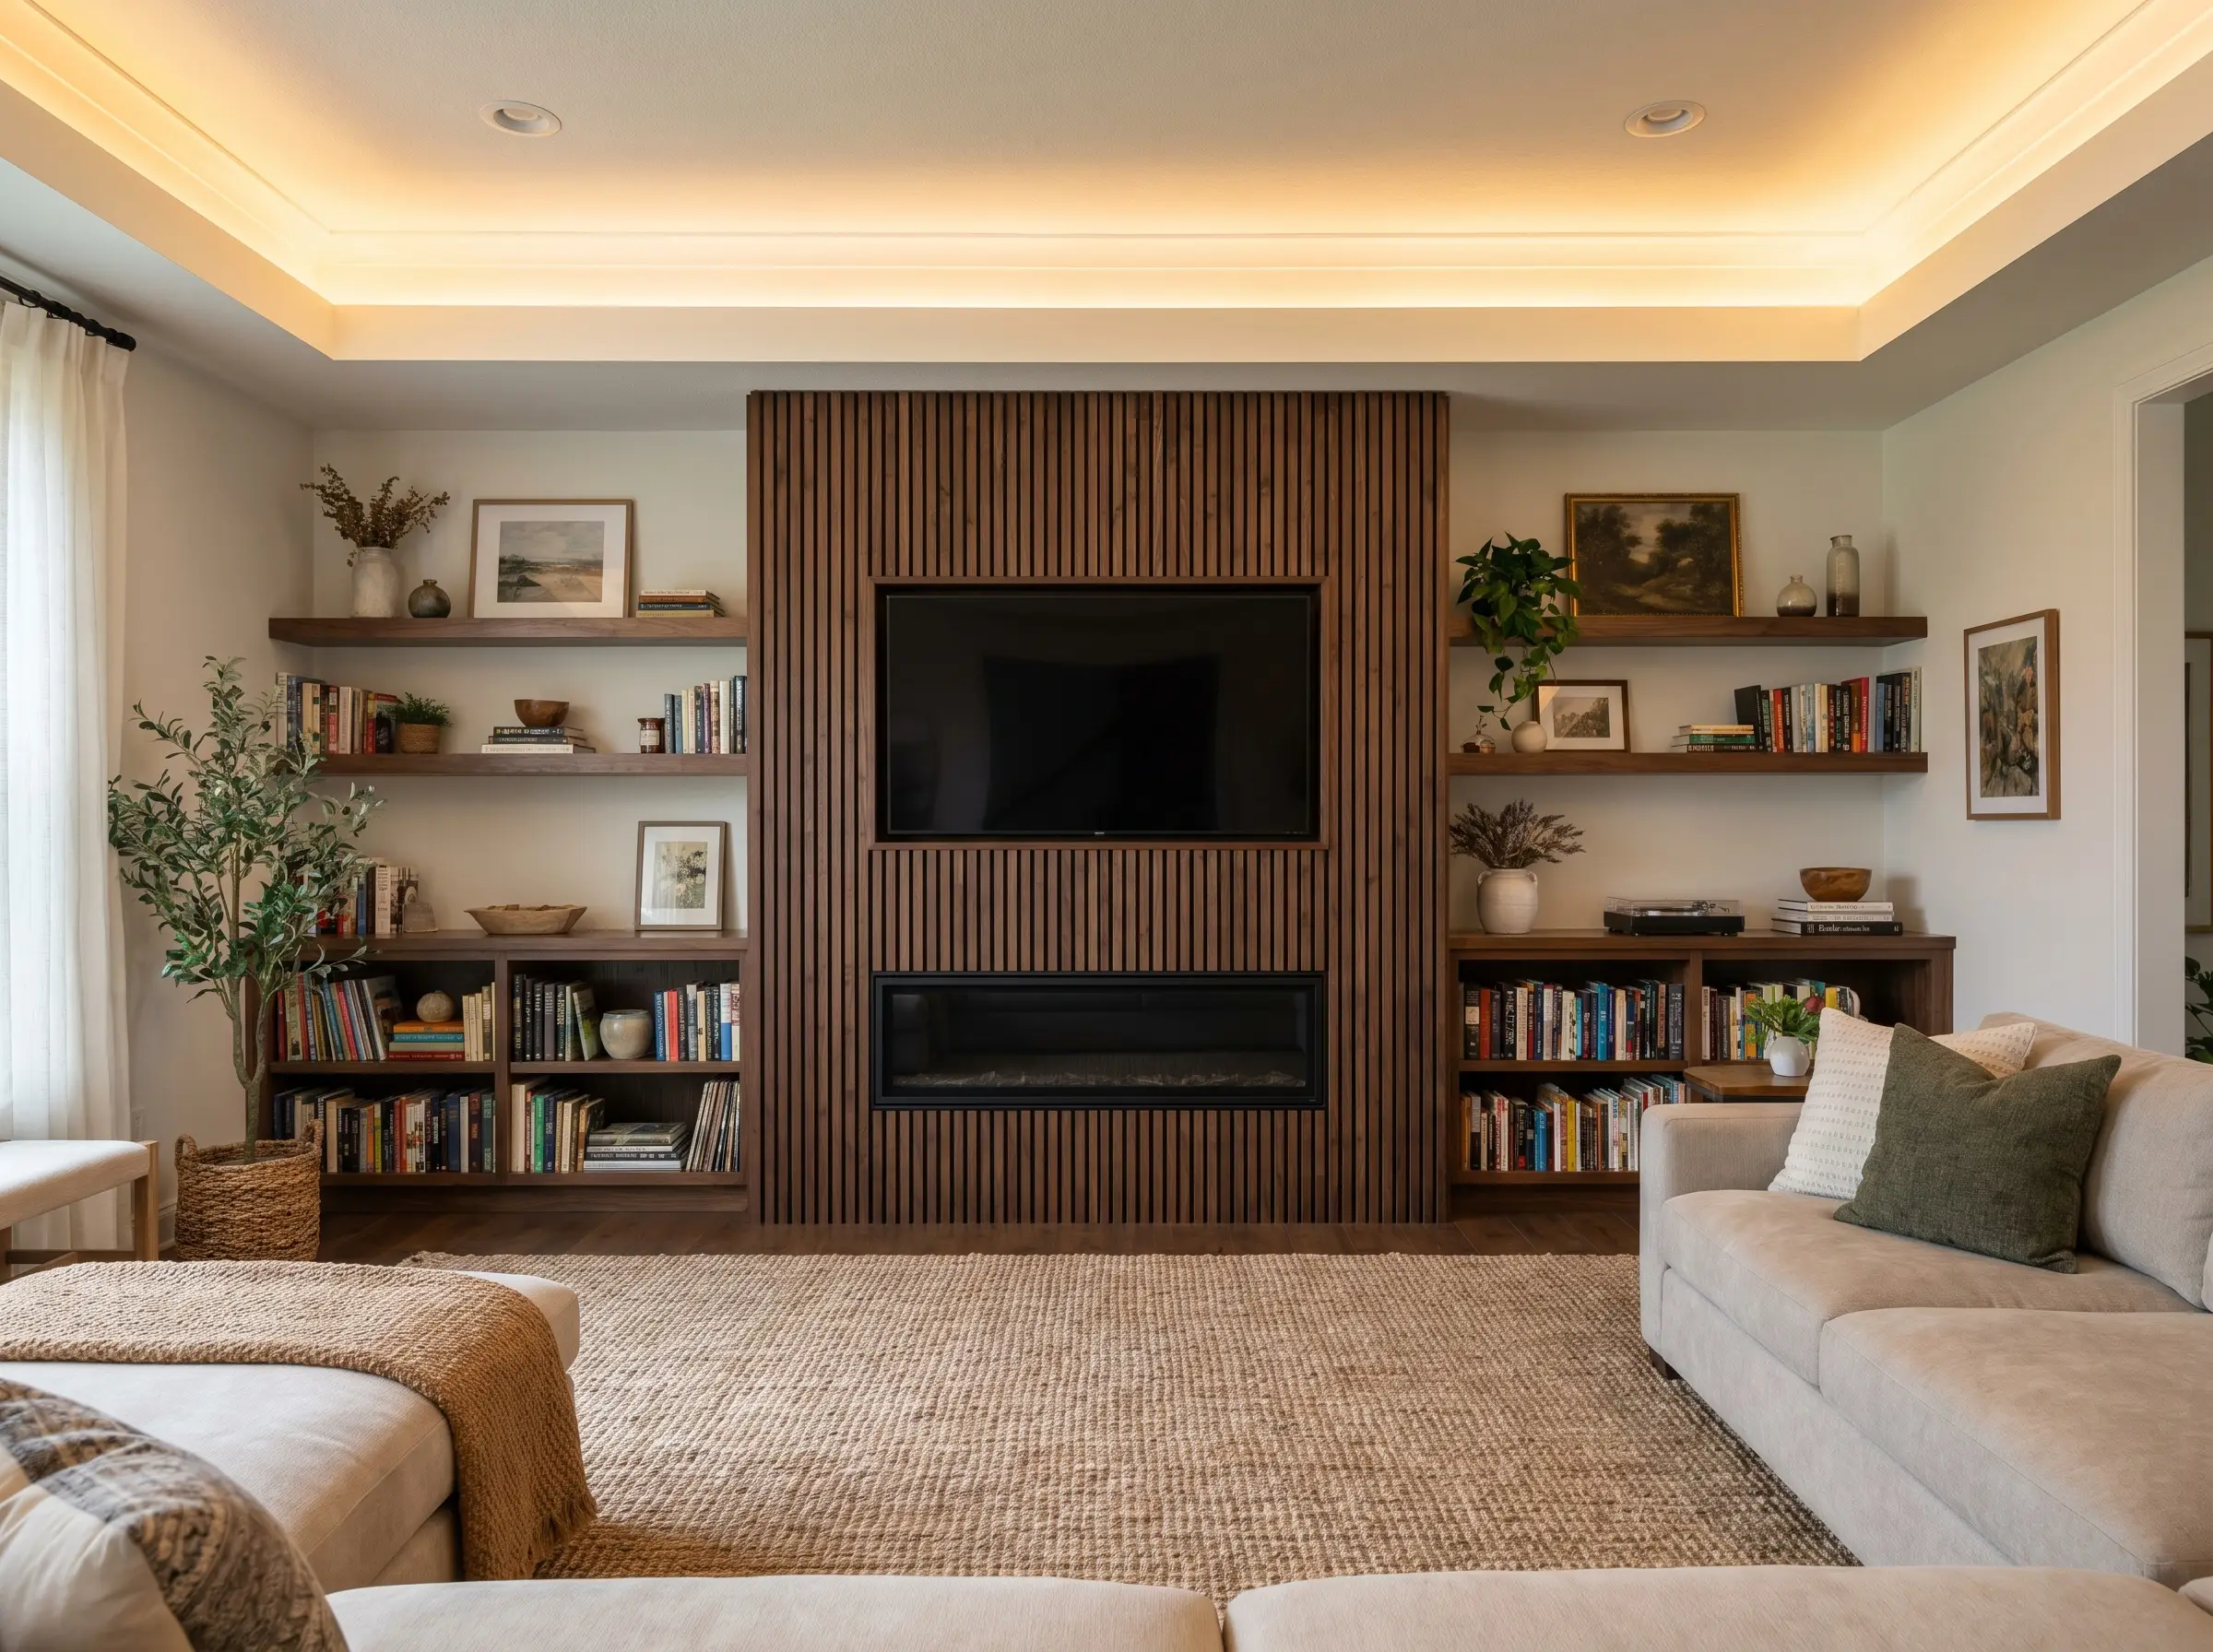
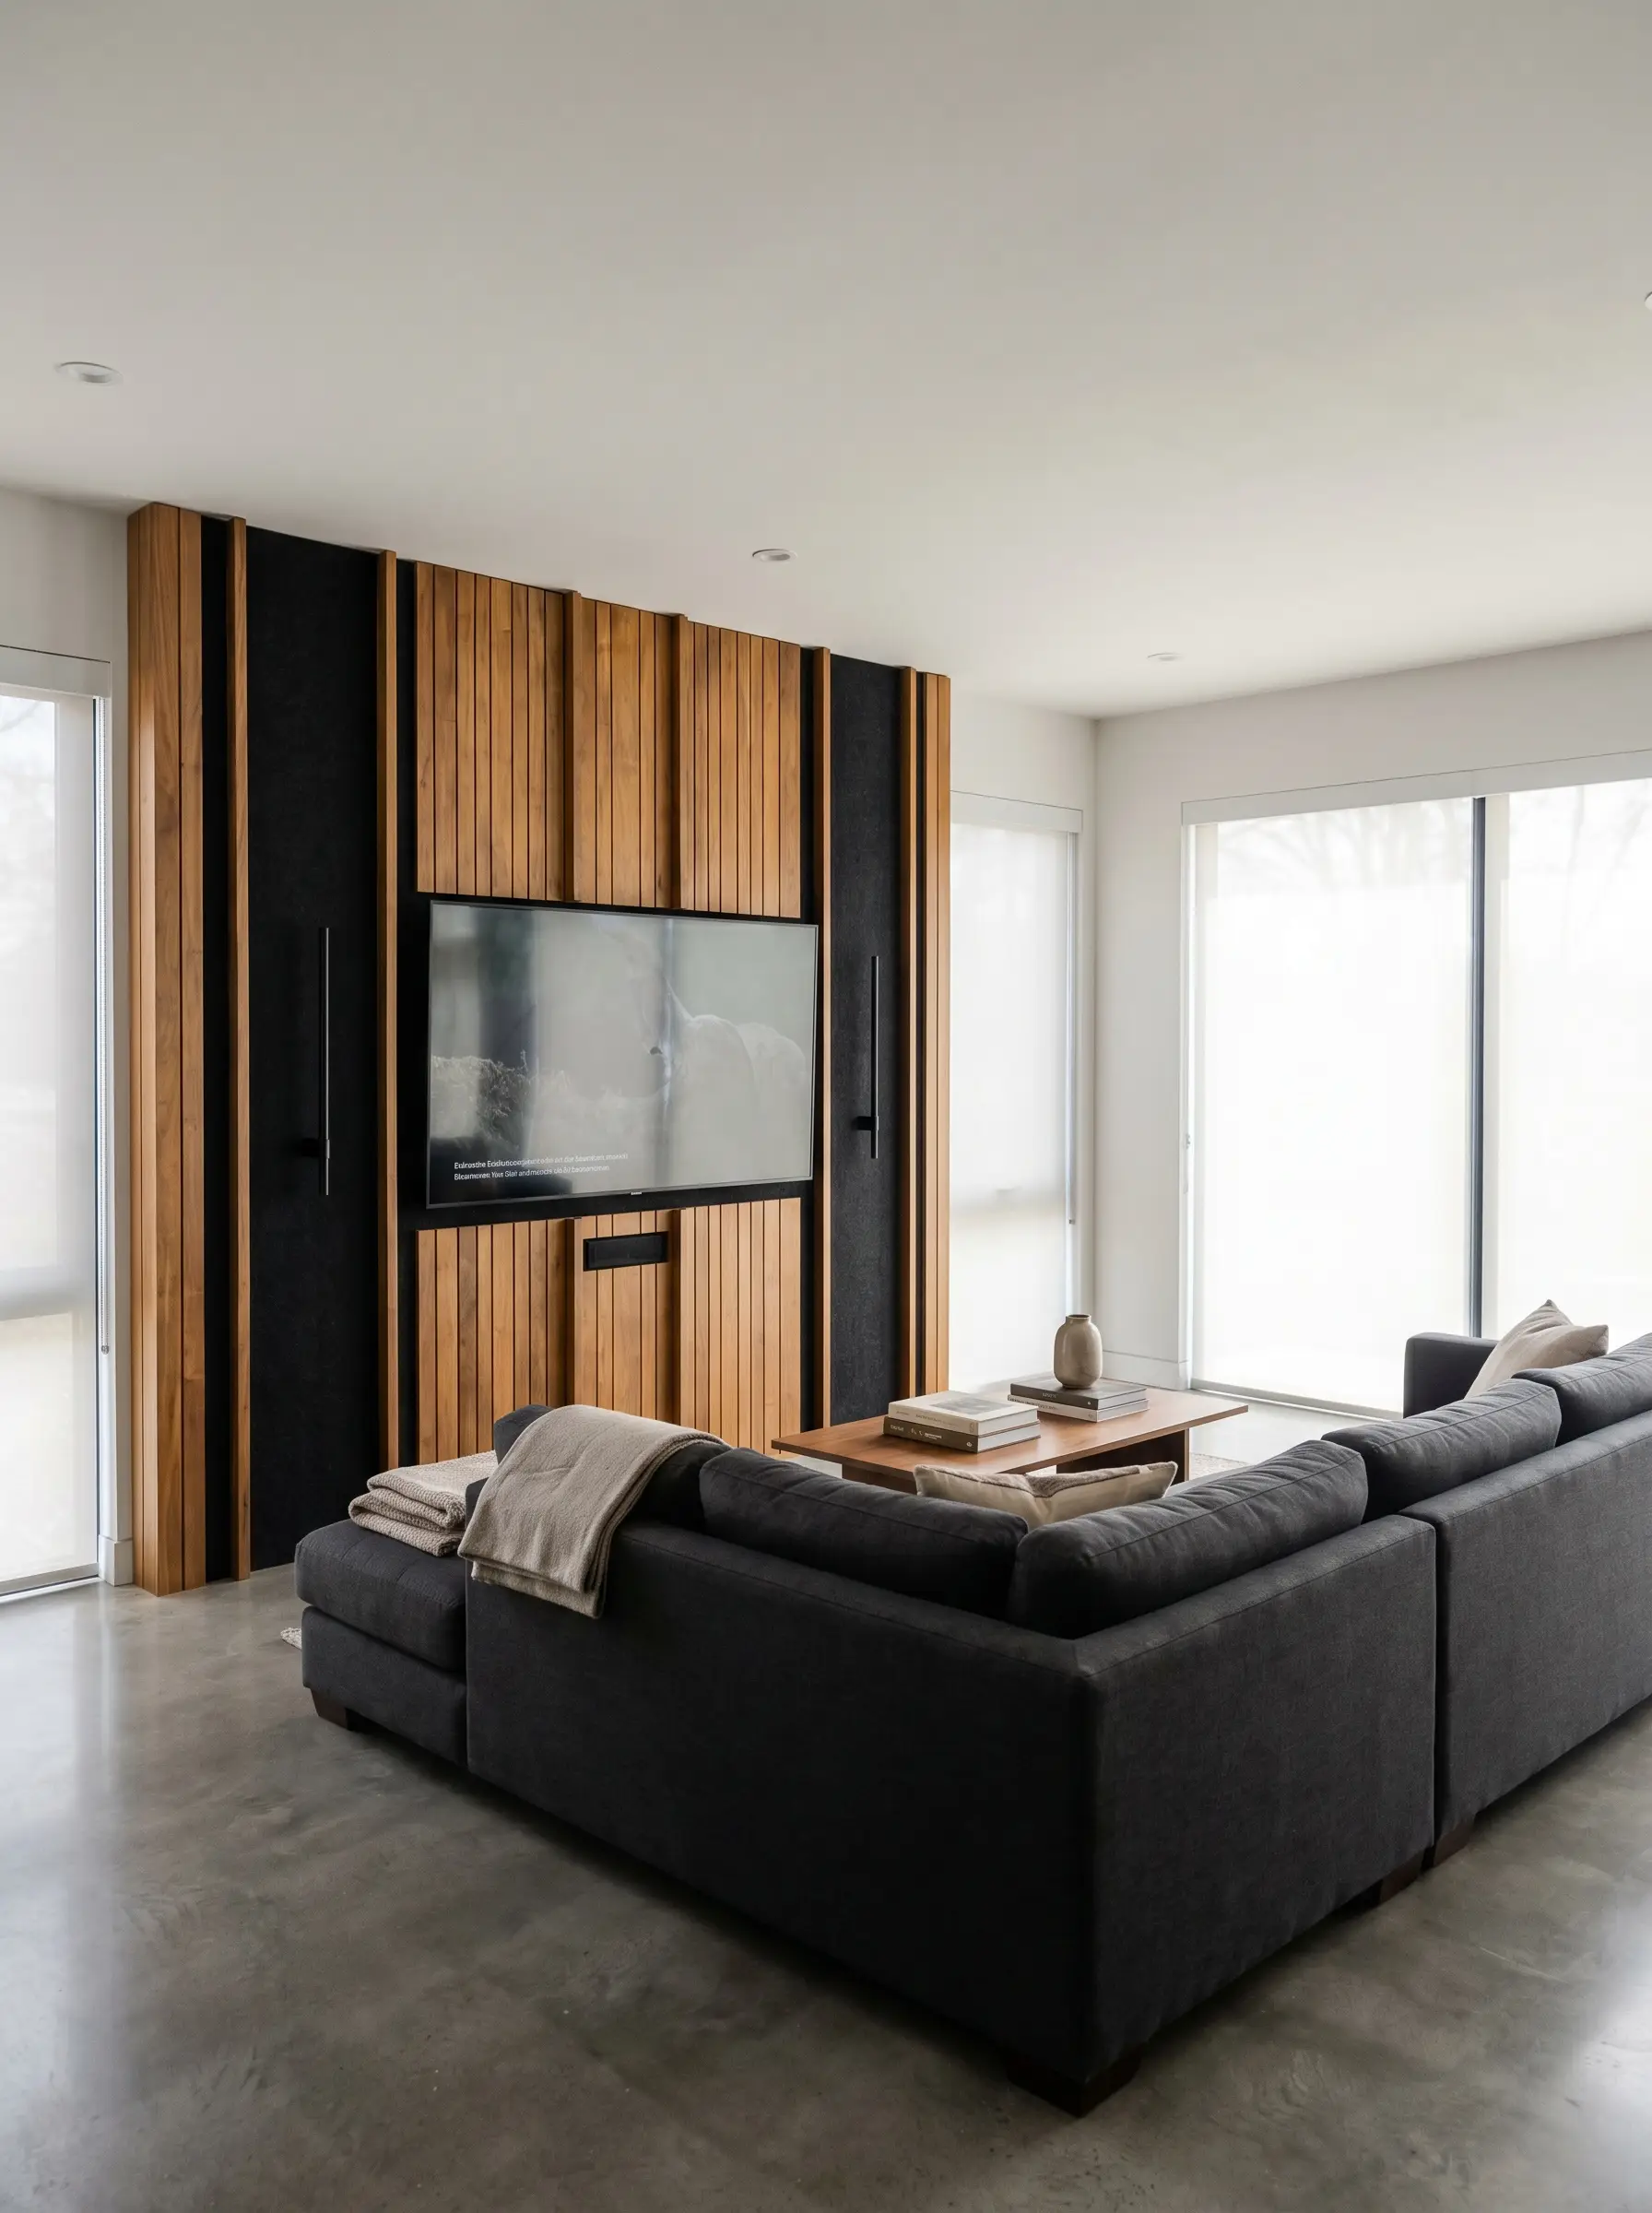
4. Contrast Dark Espresso Slats with a Matte White Fluted Console
A deeply saturated wood wall needs a clean break in tone to maintain visual balance. Suspend a floating matte white media console featuring micro-fluted doors beneath the screen to carry the linear theme while injecting necessary brightness into the layout.
- Vibe: Contemporary Bespoke
- Key Materials: Matte white MDF, micro-fluted cabinet fronts
- Design Integration Internal link: Learn how to balance this geometry in our guide to styling floating shelves.
- Styling Pro-Tip: Align the micro-fluting of the console doors to be half the width of your wall slats to create a refined, layered proportion.
You can apply wallpapers, paints, etc. on walls and see how they look in various interiors.
Spatial Layouts: Moving Beyond the Basic Slat Backdrop
Centering a square patch of wood on a blank wall is a missed opportunity; structural placement fundamentally alters a room’s entire geometry. By manipulating asymmetry, depth, and ceiling plains, you can trick the eye into perceiving a much grander, custom-built space.
5. Execute an Asymmetric Slat Installation for Modern Balance
Applying the “Rule of Thirds” to your media layout creates a highly contemporary, designer-grade aesthetic. Mount the TV off-center on a wider wall, using the walnut slats to visually anchor the heavier side, while leaving the other two-thirds minimal and understated.
Off-setting the television forces the eye to travel across the entire wall, transforming the TV from a static focal point into just one element of a larger architectural composition.
Hackrea Designer Secret
How to Balance Asymmetry:
- Visual Weight: Counterbalance the heavy wood-slat side with a large, structurally significant piece of floor-standing art or a towering structural plant (like a Black Olive tree) on the negative side.
- Art Placement: Hang a single, oversized minimalist canvas on the empty drywall side to anchor the negative space.Console Length: Run a low-profile floating console across the entire width of the wall, bridging the slatted zone and the blank zone together harmoniously.
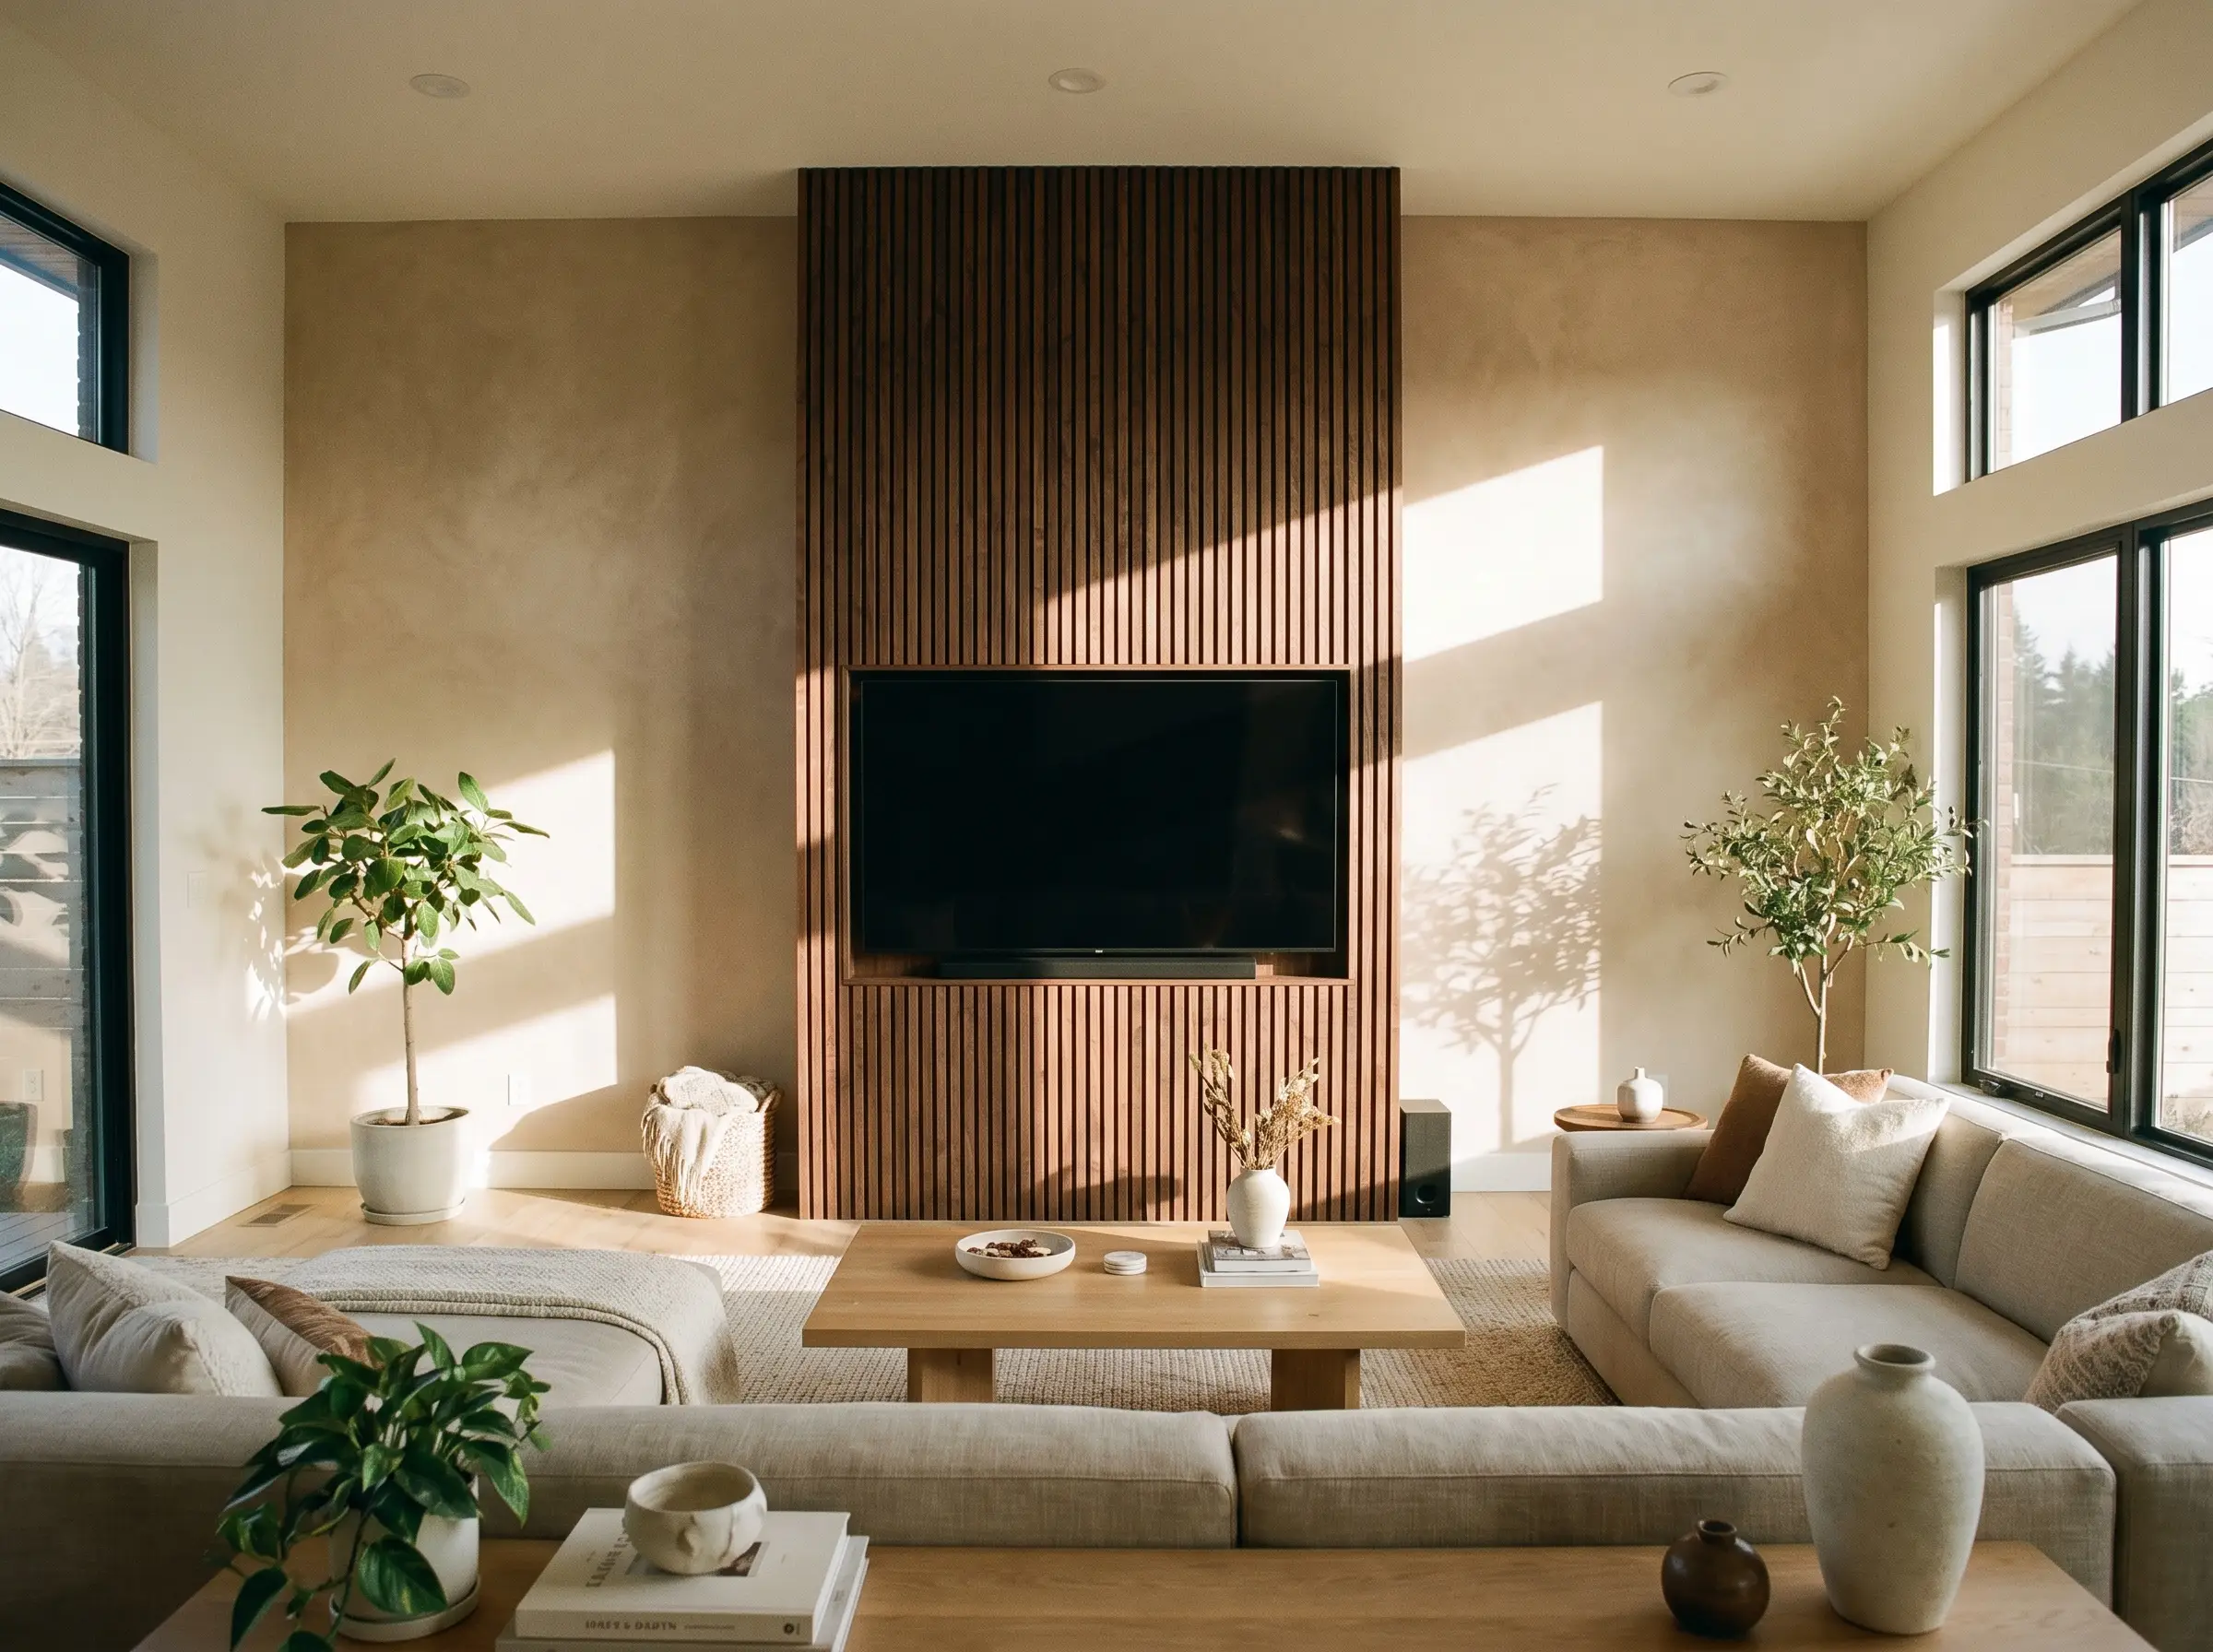
6. Wrap the Walnut Slats onto the Ceiling for Architectural Depth
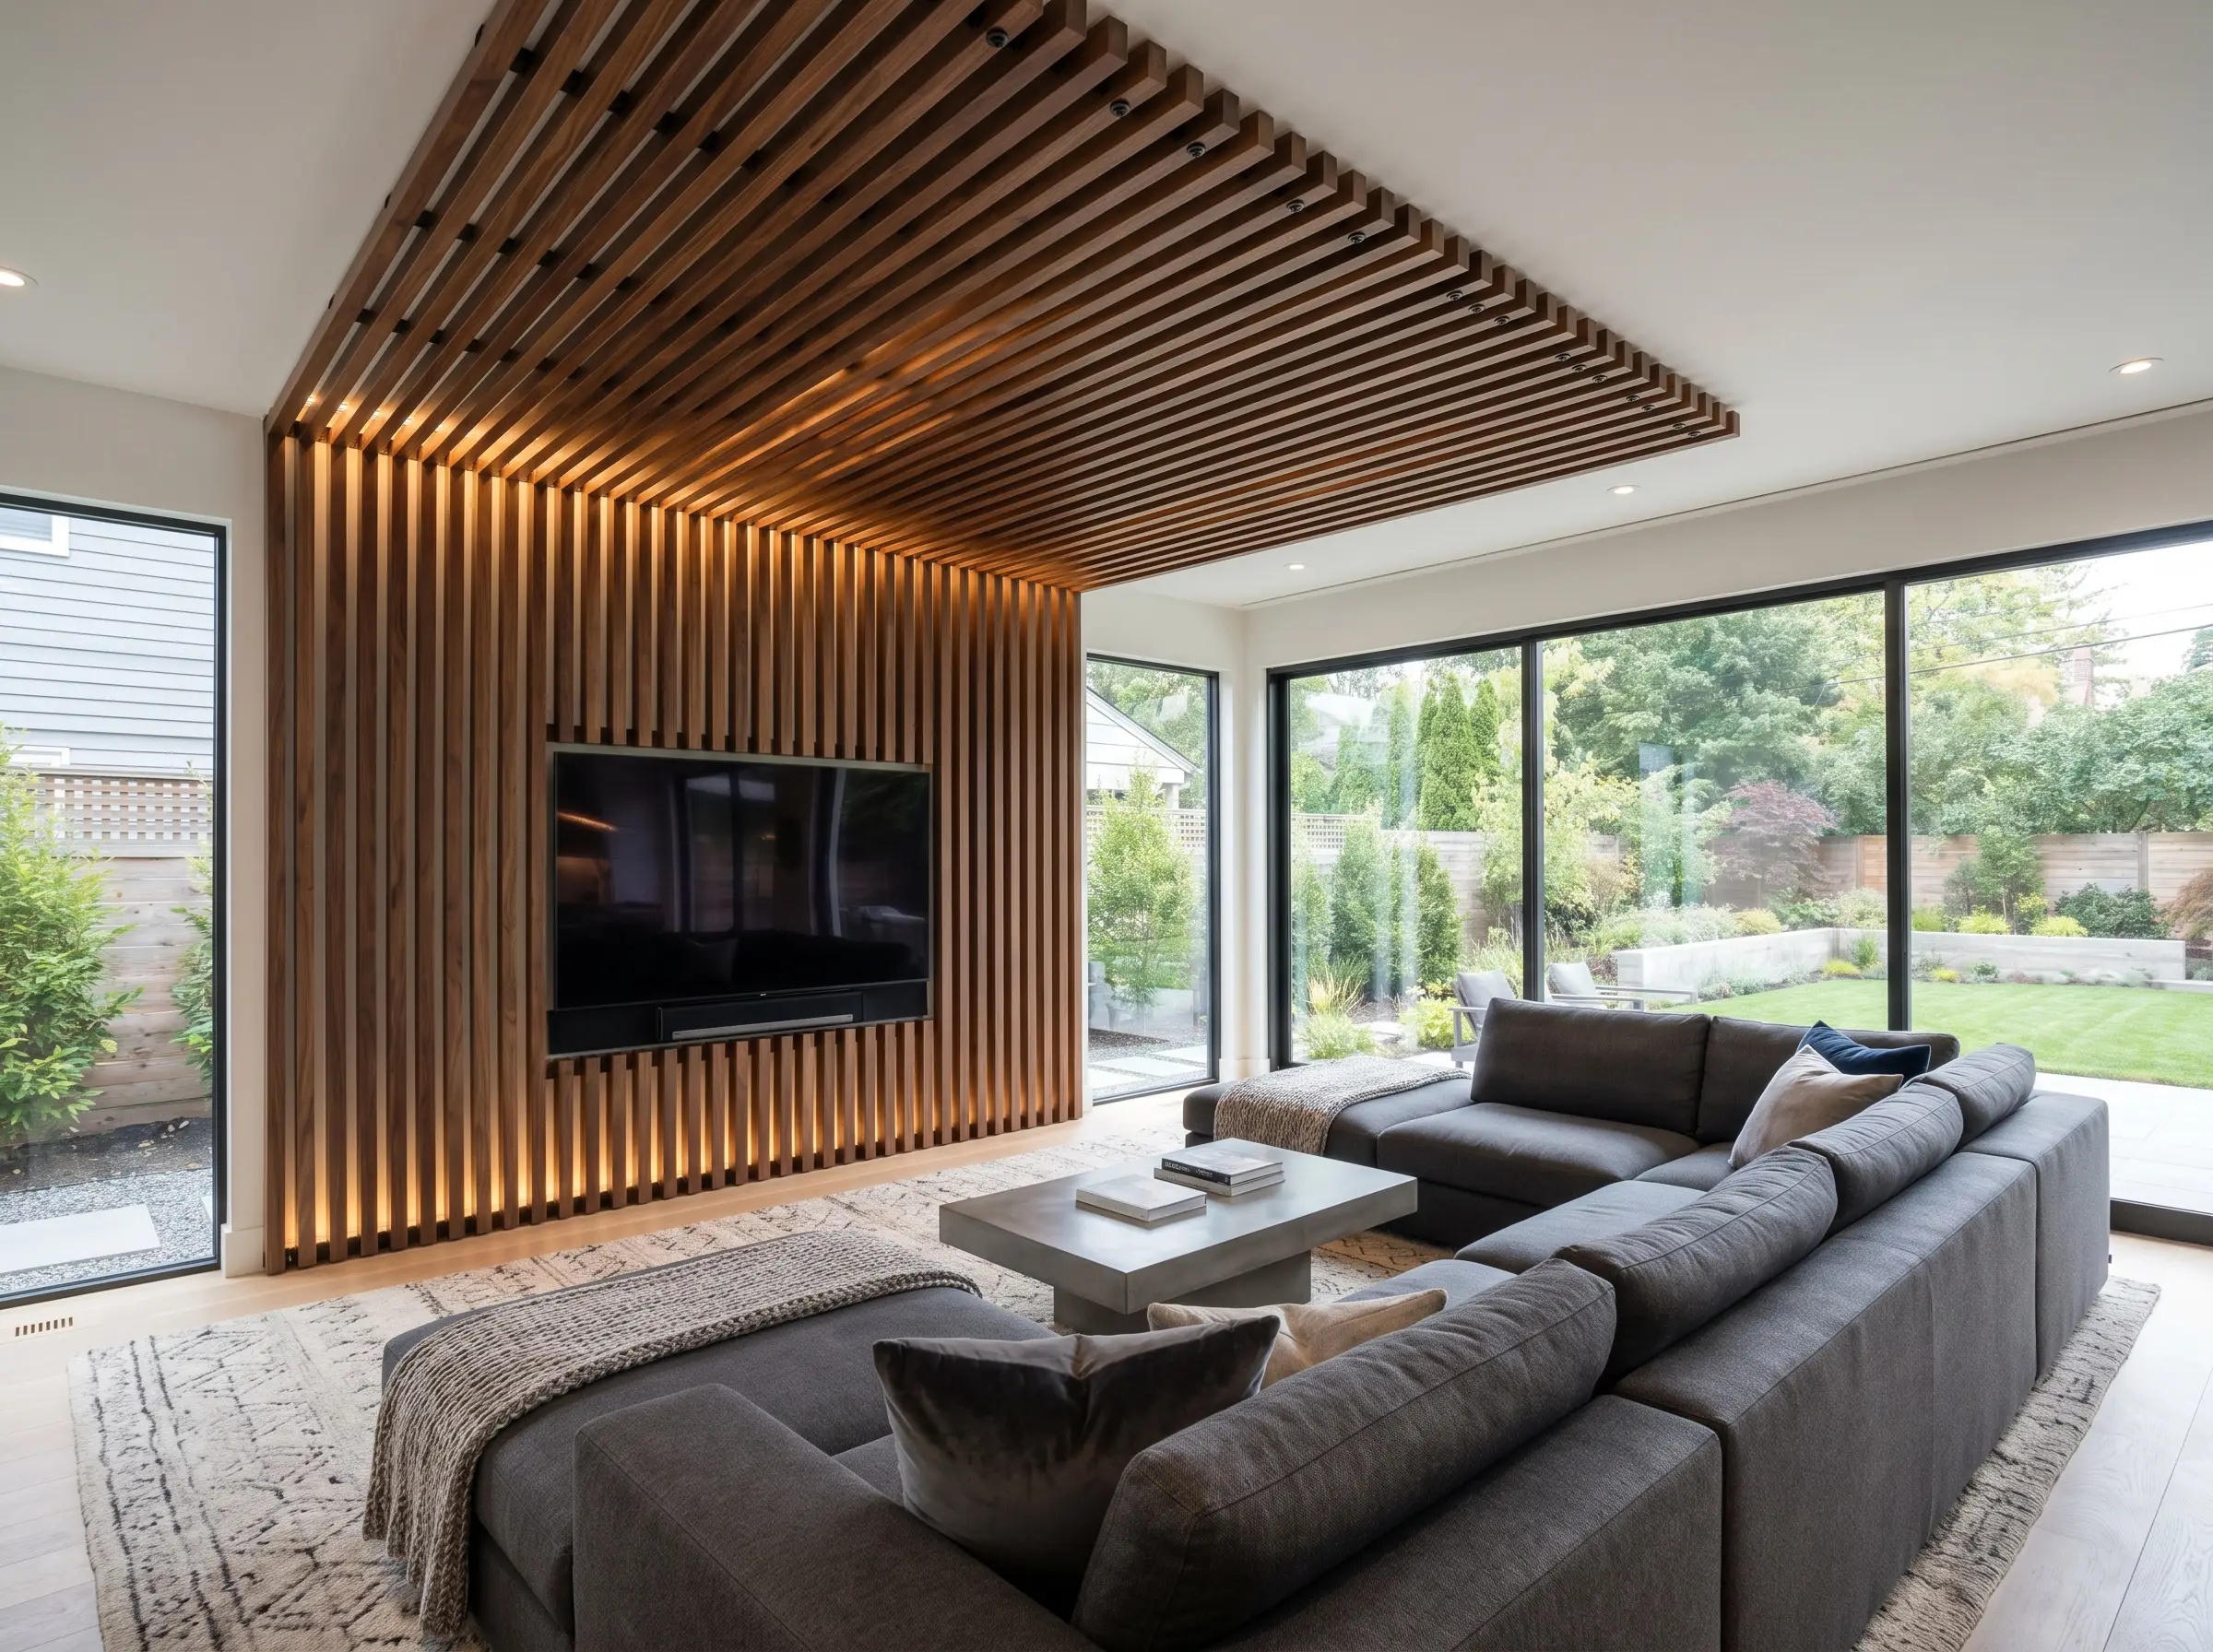
To create a high-end canopy effect, run the acoustic slats up the wall behind the TV and extend them three to four feet out onto the ceiling above the media zone. This continuous wrap creates an intimate, custom “room within a room,” which is exceptionally effective in vast, open-concept spaces.
- Vibe: High-End Bespoke
- Key Materials: Extra-long continuous walnut battens, black ceiling screws
- Structural Requirement Ensure your ceiling joists can support the suspended weight of the MDF and wood veneer panels.
- Styling Pro-Tip: Terminate the ceiling slats precisely above the front edge of your media console or coffee table to create a perfectly aligned invisible boundary.
7. Integrate Seamless Hidden Doors into the Acoustic Paneling
For those executing custom millwork, the vertical battens offer the perfect camouflage for hidden storage or adjacent room access. Fabricate flush-mount doors clad in the exact same slat profile, utilizing invisible hardware to completely conceal AV equipment and gaming consoles.
- Vibe: Minimalist Luxury
- Key Materials: Concealed Soss hinges, push-to-open magnetic latches
- Execution Note The vertical gap between the door and the wall must perfectly match the width of the acoustic felt grooves to maintain the illusion.
- Styling Pro-Tip: Run the baseboard continuously across the bottom of the hidden door for absolute seamlessness.
8. Build Out a Faux Chimney Breast with Vertical Batten
Instead of applying slats flat against builder-grade drywall, frame out a physical bump-out specifically for the TV and fireplace. Wrap the front and sides of this new structure in dark wood to build a bold, three-dimensional architectural pillar.
- Vibe: Transitional Architectural
- Key Materials: 2×4 framing lumber, drywall, walnut slat panels
- Spatial Strategy A bump-out naturally creates alcoves on either side, perfect for installing floating shelves or built-in library cabinetry.
- Styling Pro-Tip: Keep the depth of the faux chimney breast between 12 and 16 inches—just deep enough to recess a fireplace and conceal television wiring.
9. Create a Recessed TV Niche to Eliminate Side Glare
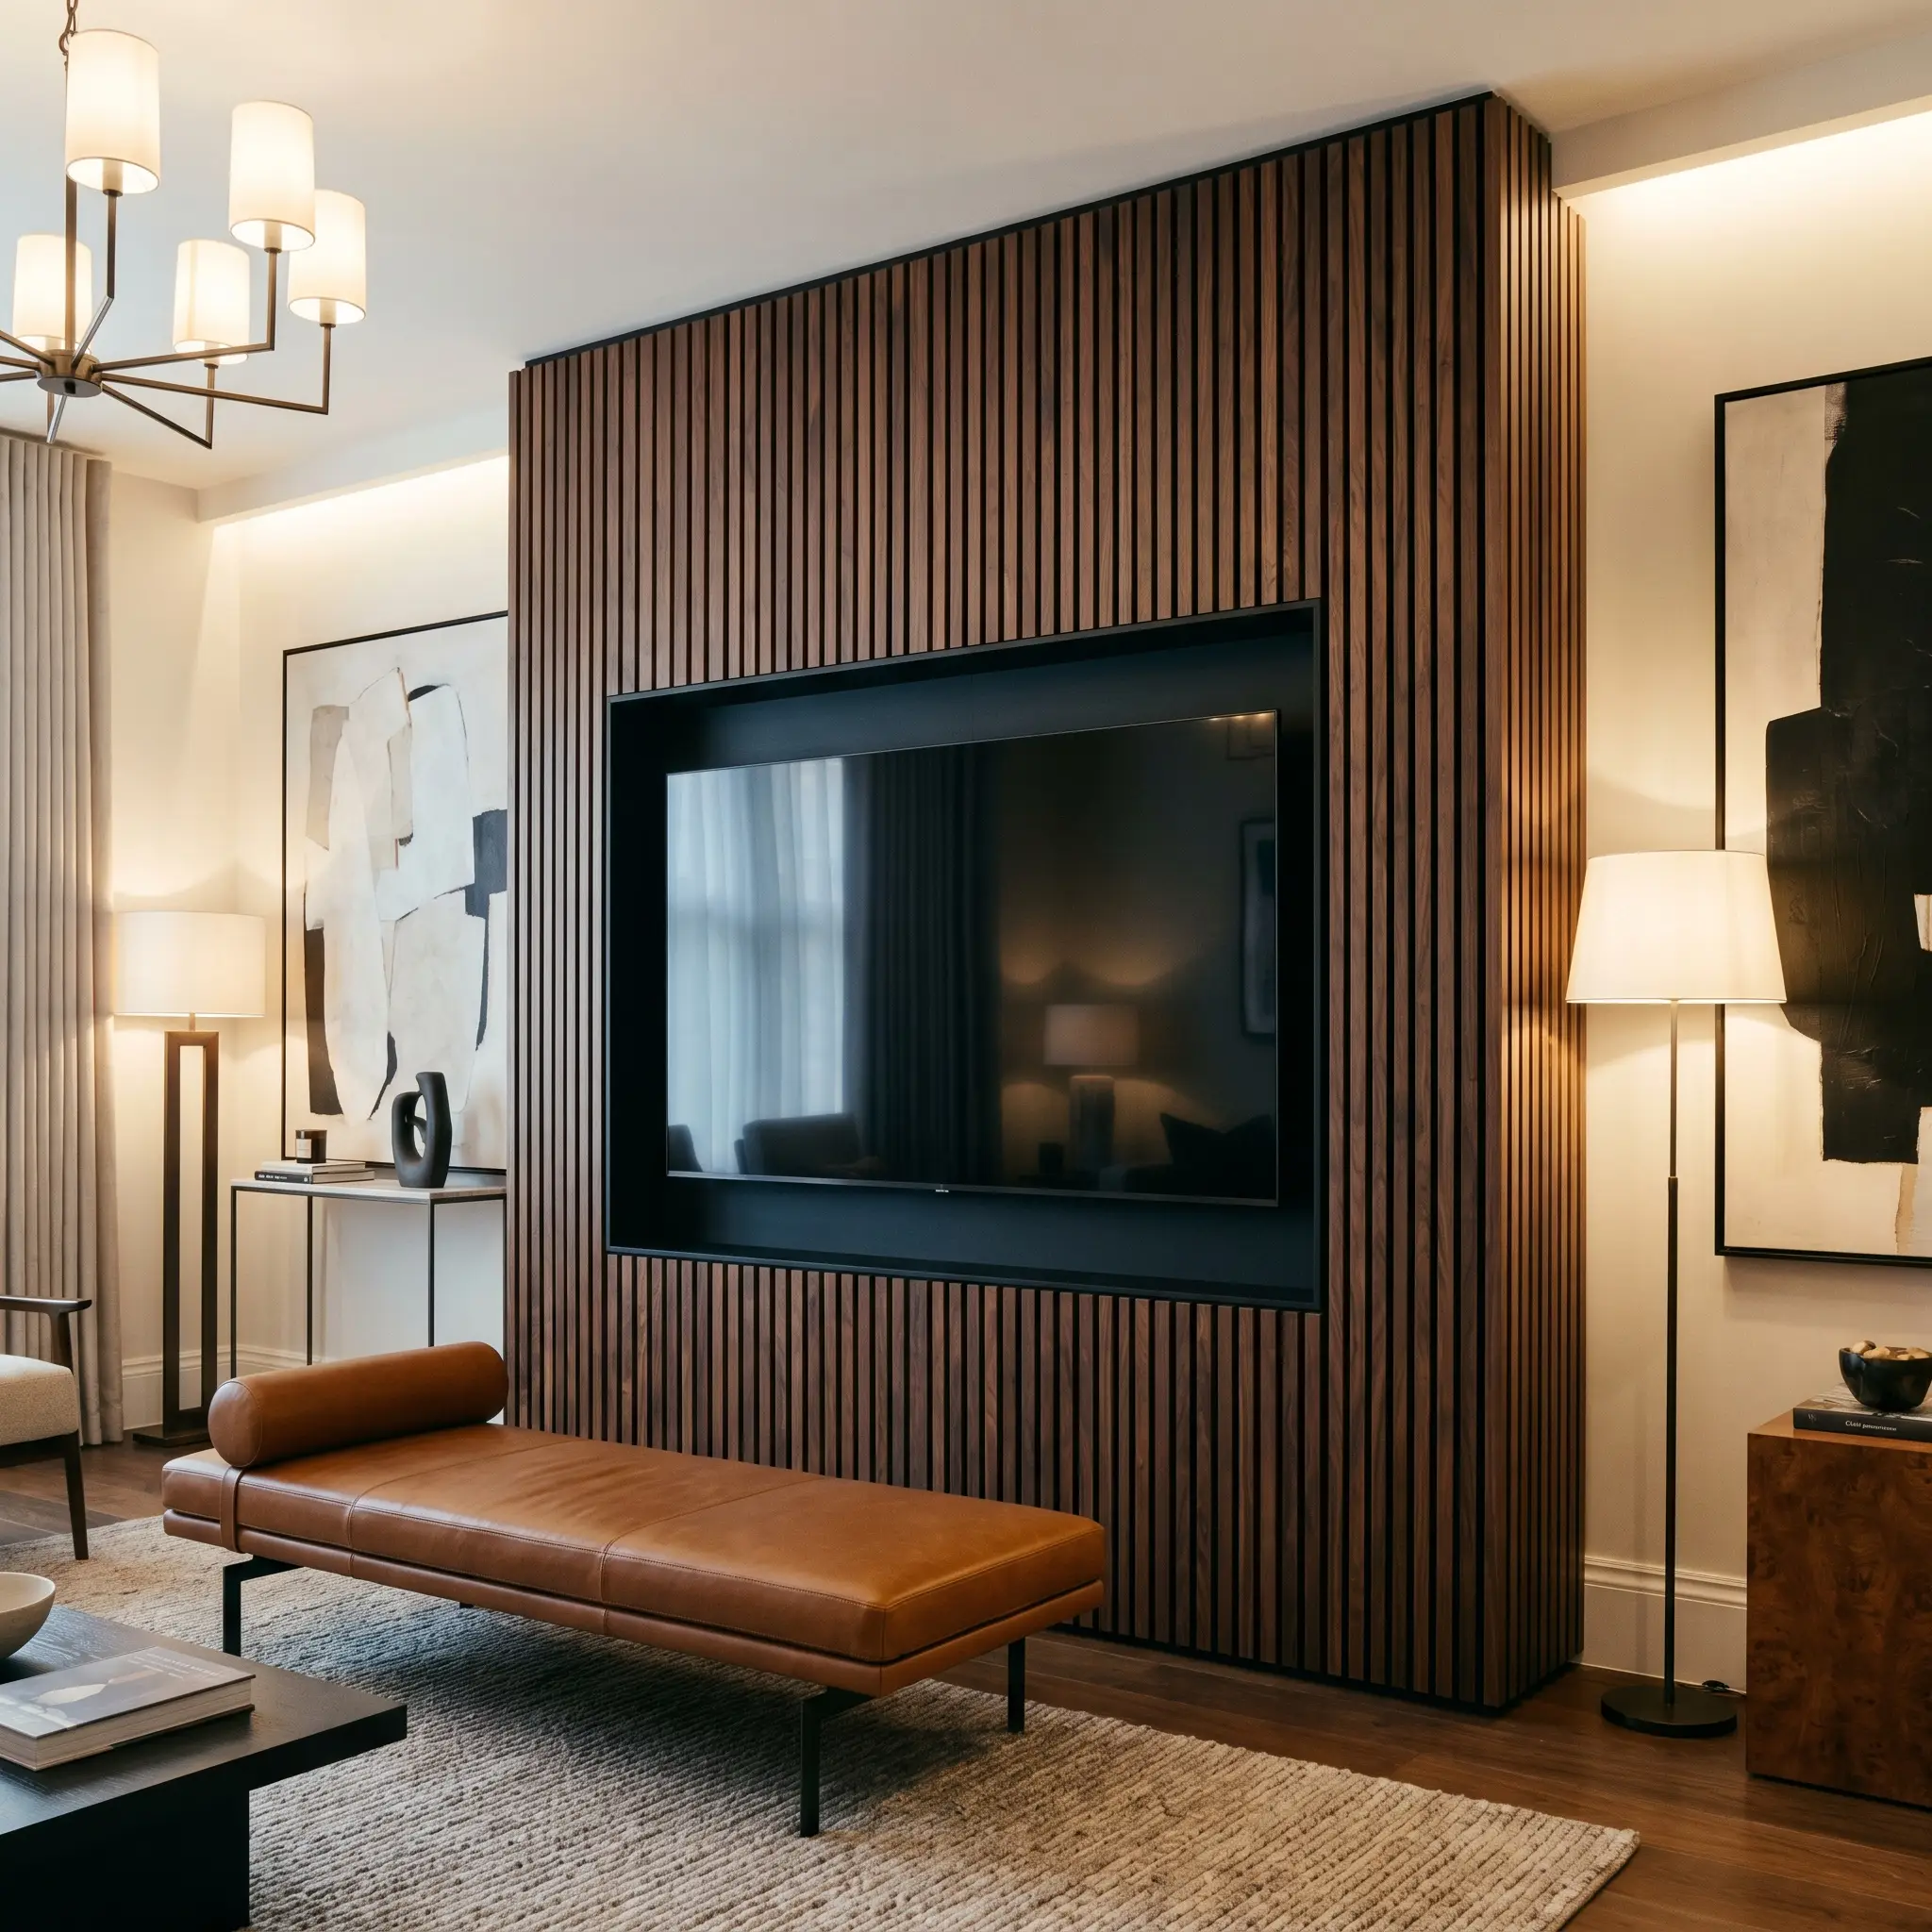
To achieve a flawless gallery aesthetic, build the slat wall outwards while leaving a perfectly sized negative cavity for the television. This bespoke execution allows the screen to sit completely flush with the front face of the wood battens, hiding the mounting bracket and eliminating side-profile glare.
- Vibe: High-End Bespoke
- Key Materials: Articulating heavy-duty TV mount, custom millwork framing
- Ventilation Warning You must leave a minimum half-inch gap around the perimeter of the television inside the niche to prevent heat buildup.
- Styling Pro-Tip: Paint the inside of the recessed niche in a matte black to make the television screen blend seamlessly into the shadows when turned off.
Lighting & Fireplace Integration
Because dark wood heavily absorbs ambient light, relying solely on natural windows or standard overhead fixtures will leave your feature wall looking flat and cavernous. Integrated architectural lighting and fire features are absolute mandates for bringing the rich textures of the walnut to life.
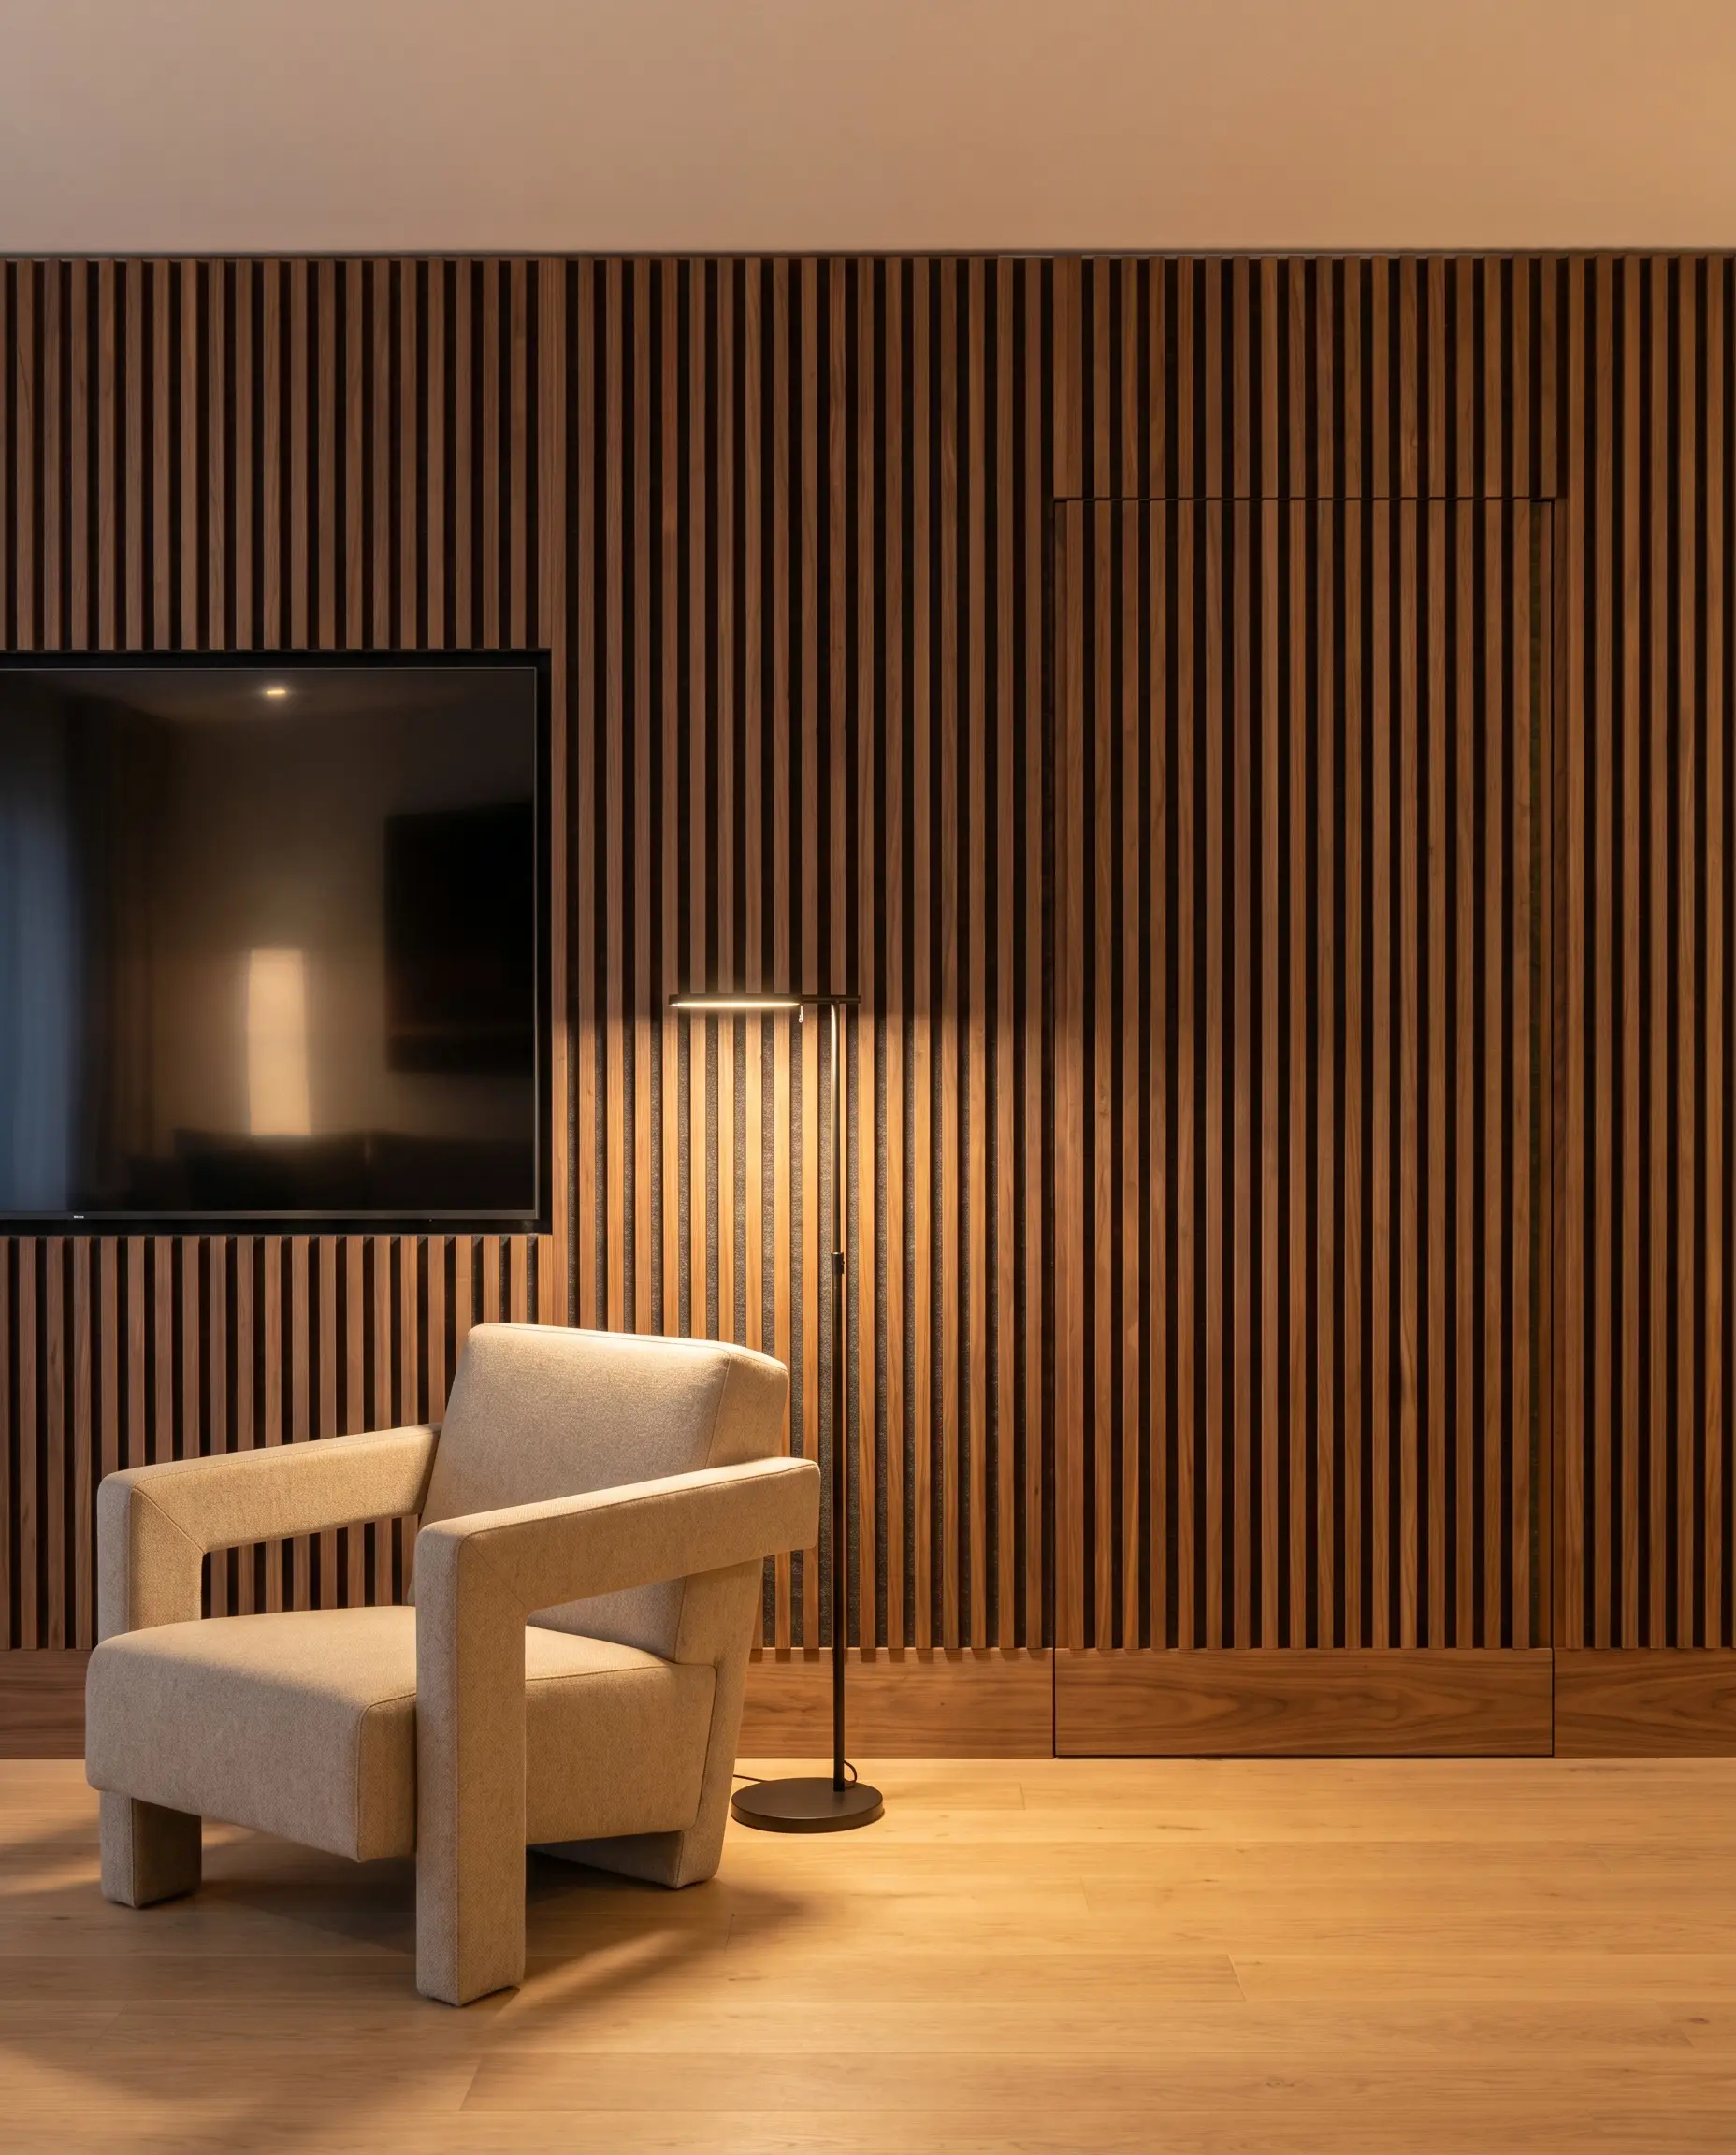
10. Recess Linear LED Channels Directly Between the Wood Batten
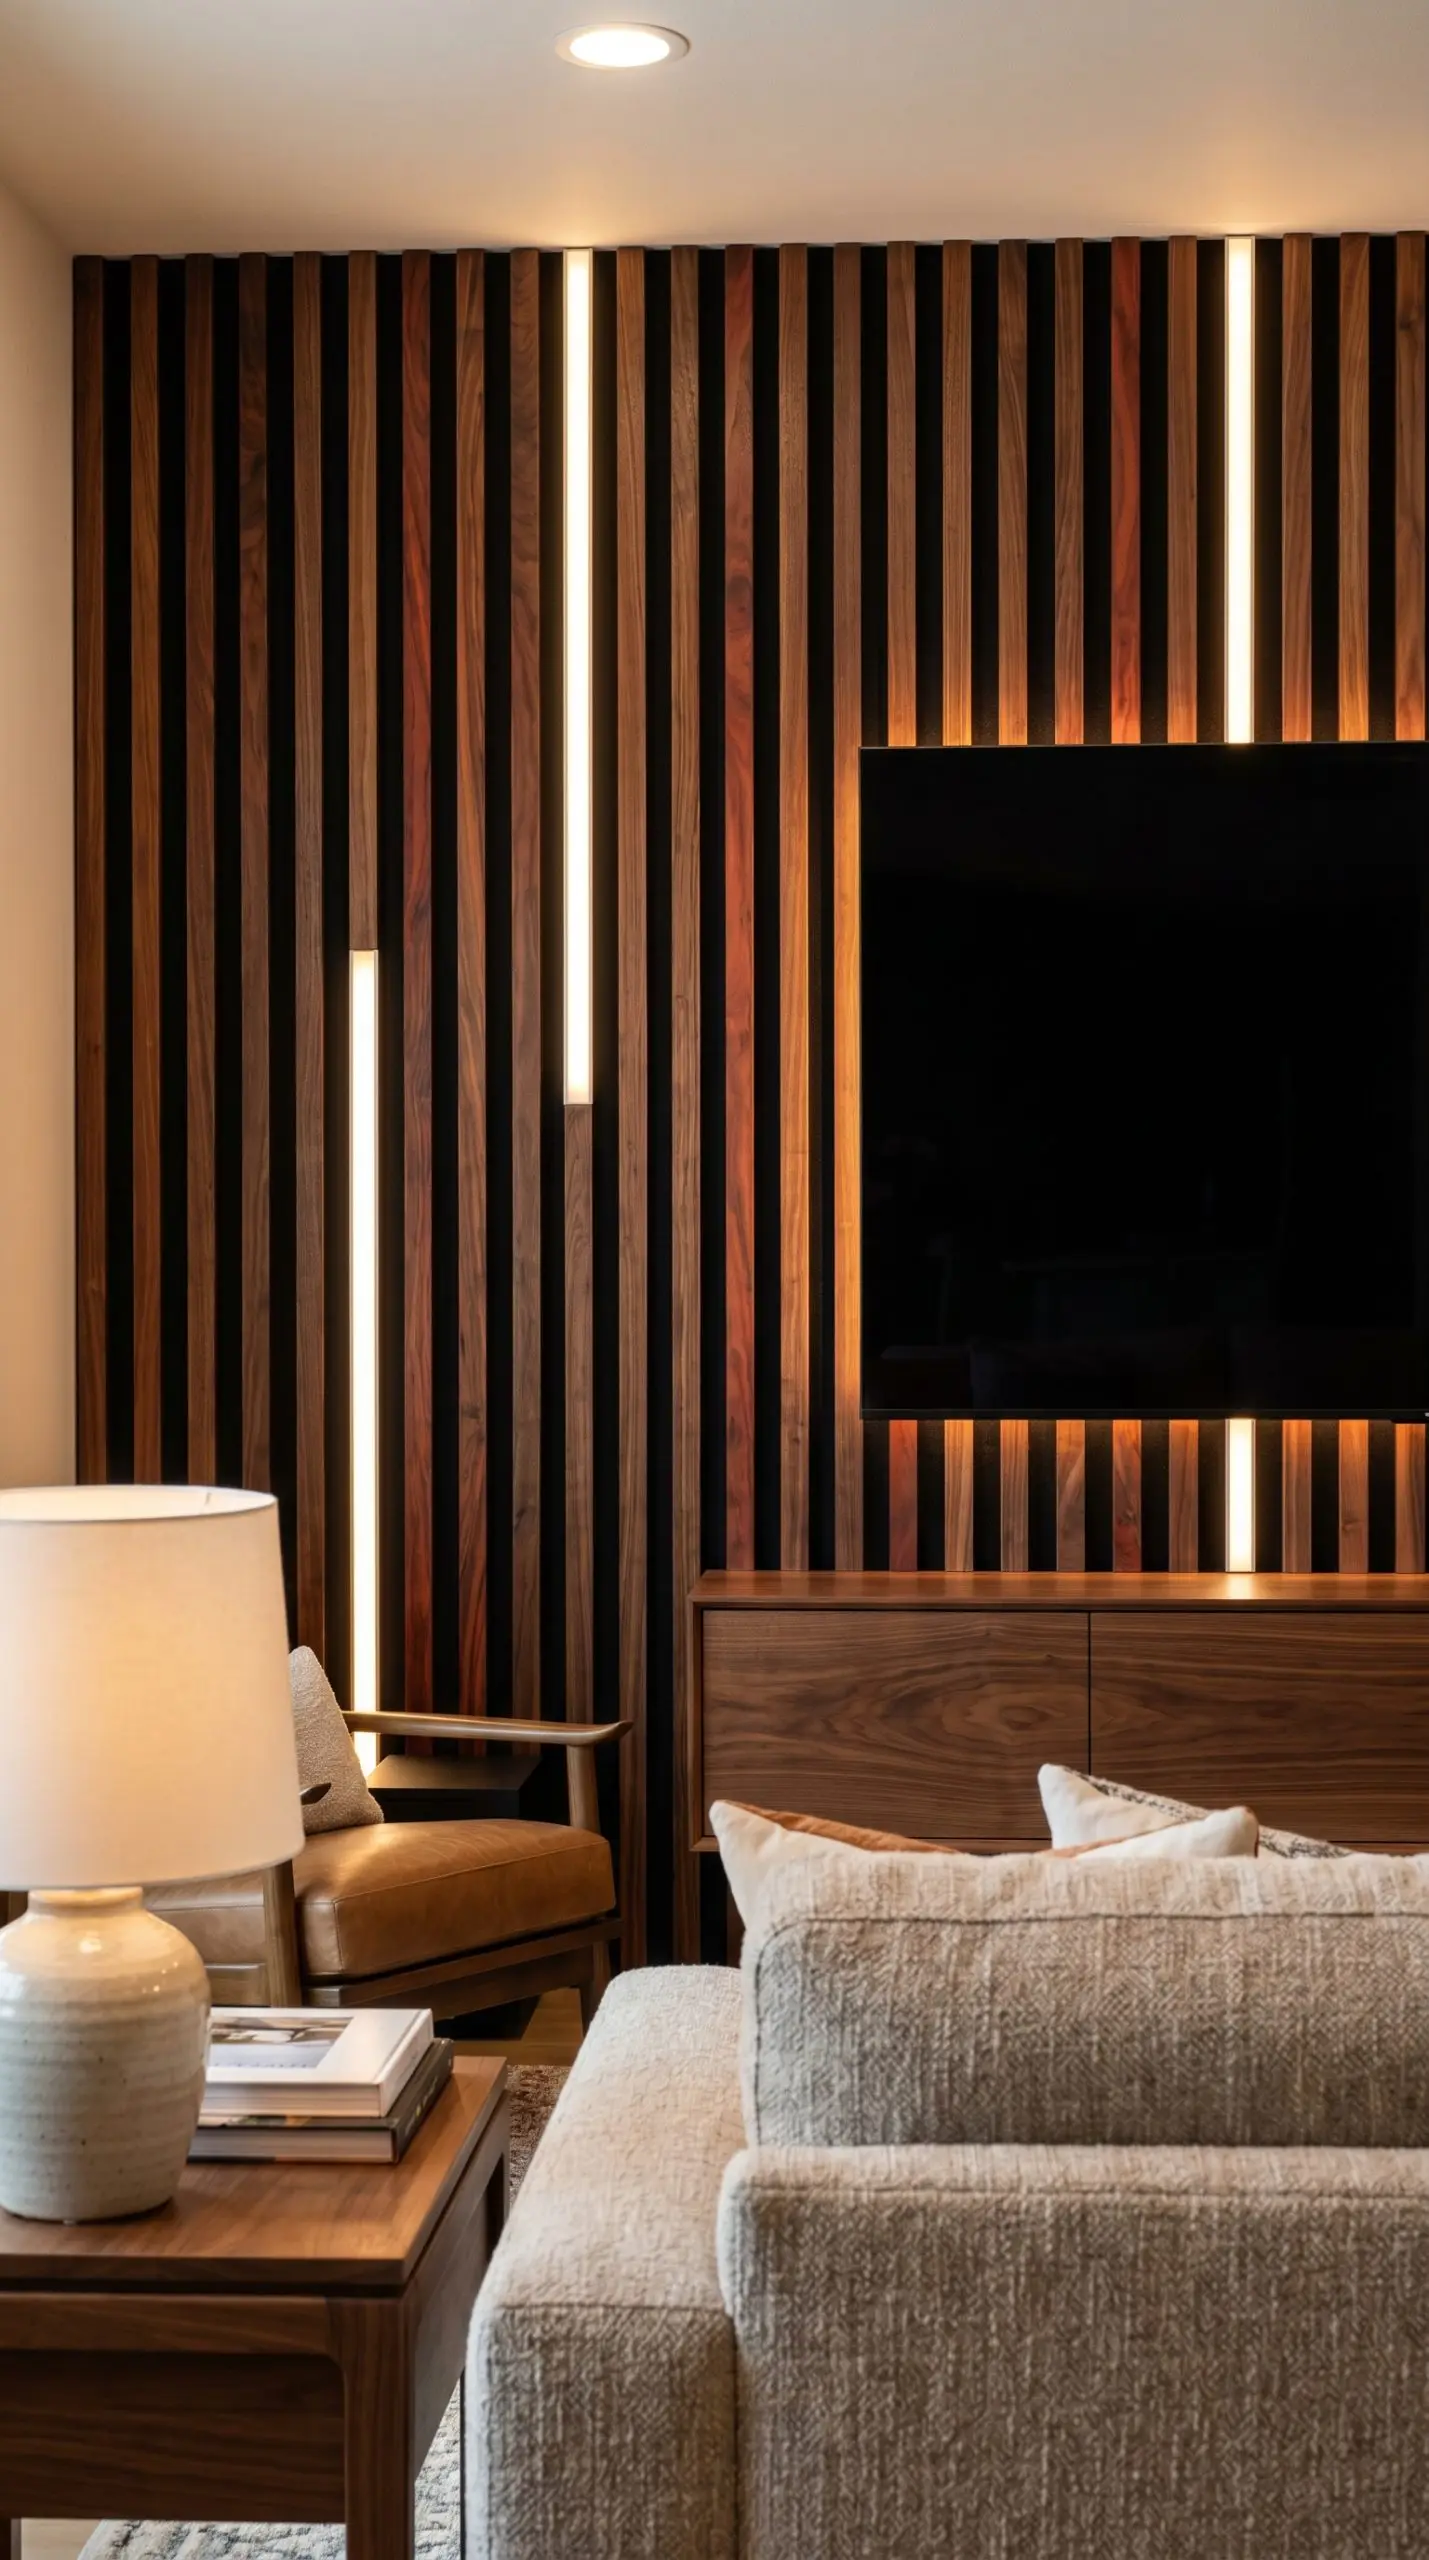
Abandon cheap, exposed stick-on LED strips in favor of professional-grade aluminum channels with frosted diffusers. Recess these channels directly into the acoustic felt between the walnut slats, dictating a strictly 2700K color temperature to draw out the natural warmth of the wood.
A 2700K bulb temperature is absolutely mandatory; anything higher or cooler will cast a blue tint, turning the walnut’s rich red and brown undertones into a sickly, artificial yellow.
Hackrea Designer Secret
- Vibe: Modern Bespoke
- Key Materials: Aluminum LED extrusions, frosted milky diffusers, 2700K COB LED tape
- Lighting Spec Use COB (Chip on Board) LED strips to ensure a continuous, dotless glow through the diffuser.
- Styling Pro-Tip: Run the light channels asymmetrically—place two on the far left and one on the far right—rather than spacing them evenly, for a more custom, architectural look.
11. Pair Dark Wood with an Edge-to-Edge Bioethanol Fireplace
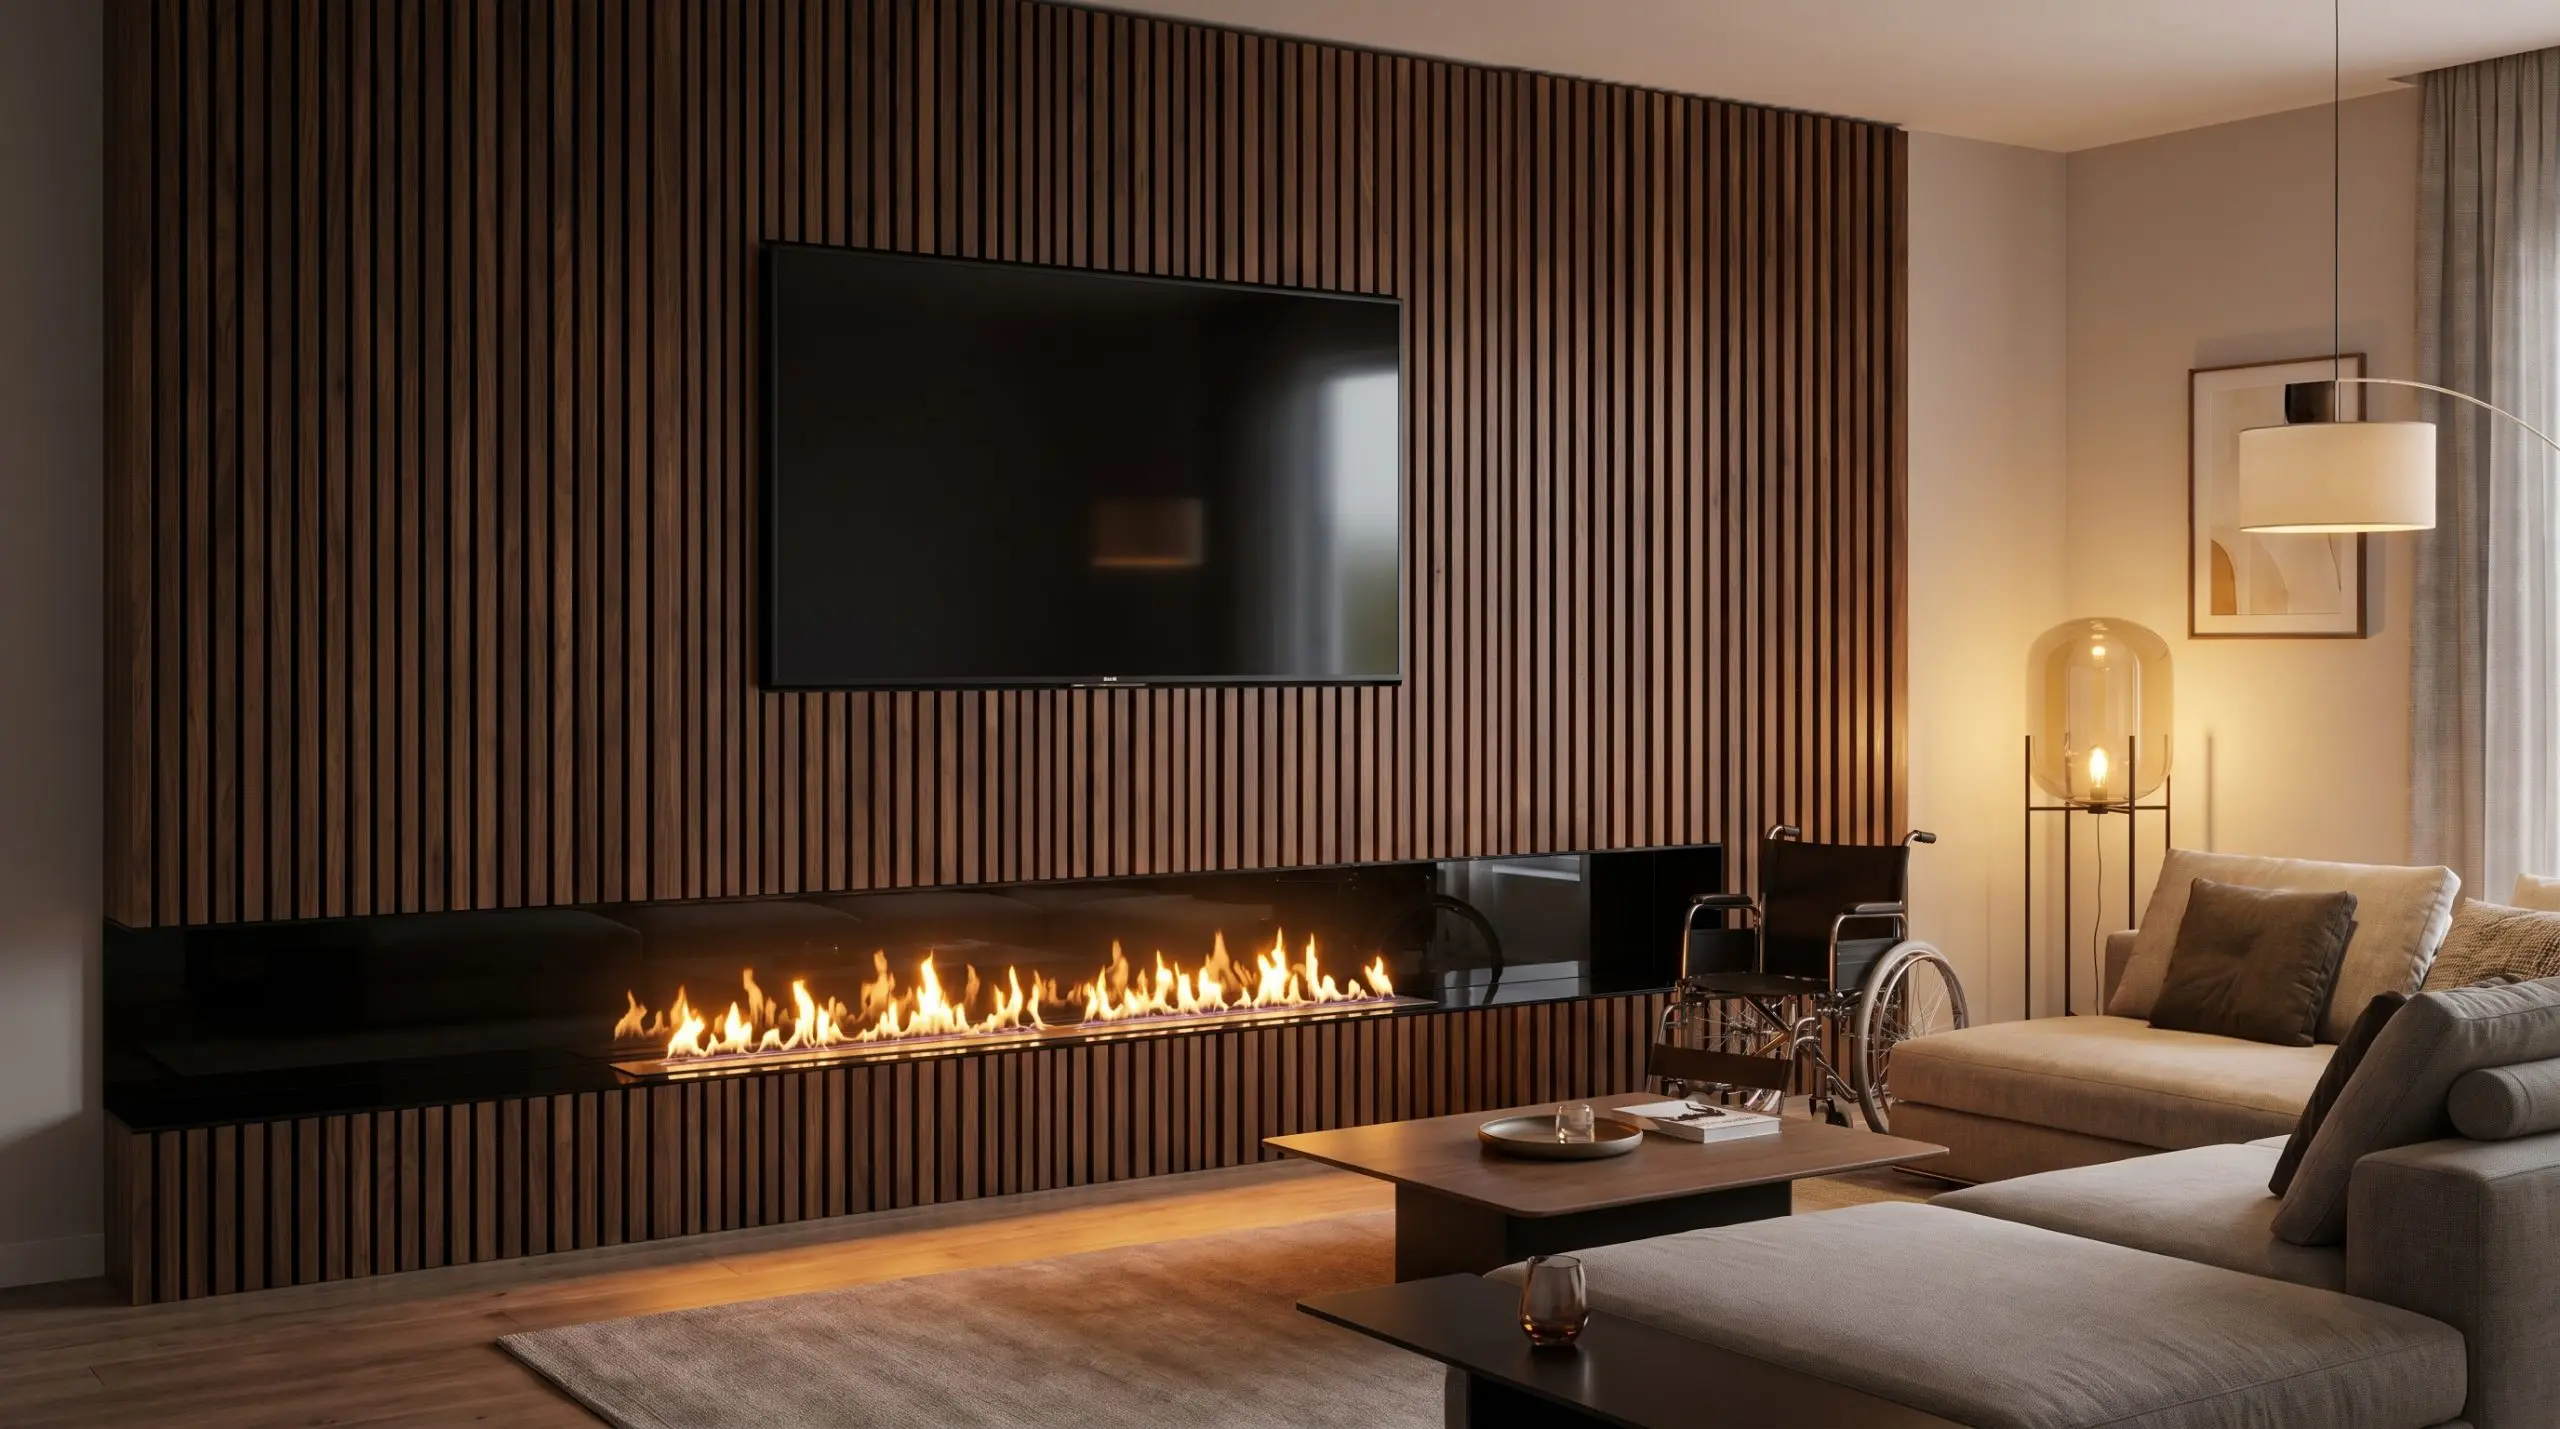
The most highly sought-after media wall aesthetic involves mounting the TV high and installing an ultra-wide, linear bioethanol or water-vapor fireplace at the base. The long, horizontal stretch of black glass on the fireplace perfectly balances the heavy black rectangle of the television screen above.
- Vibe: Accessible Luxury
- Key Materials: Linear bioethanol fireplace insert, heat-resistant clearances
- Safety Check Ensure the PET acoustic felt backing is rated for the heat output of your specific fireplace model, or strip the felt away behind the firebox.
- Styling Pro-Tip: Match the width of the fireplace exactly to the width of the television to create perfect vertical symmetry.
12. Backlight a Floating TV Console for a Zero-Gravity Effect
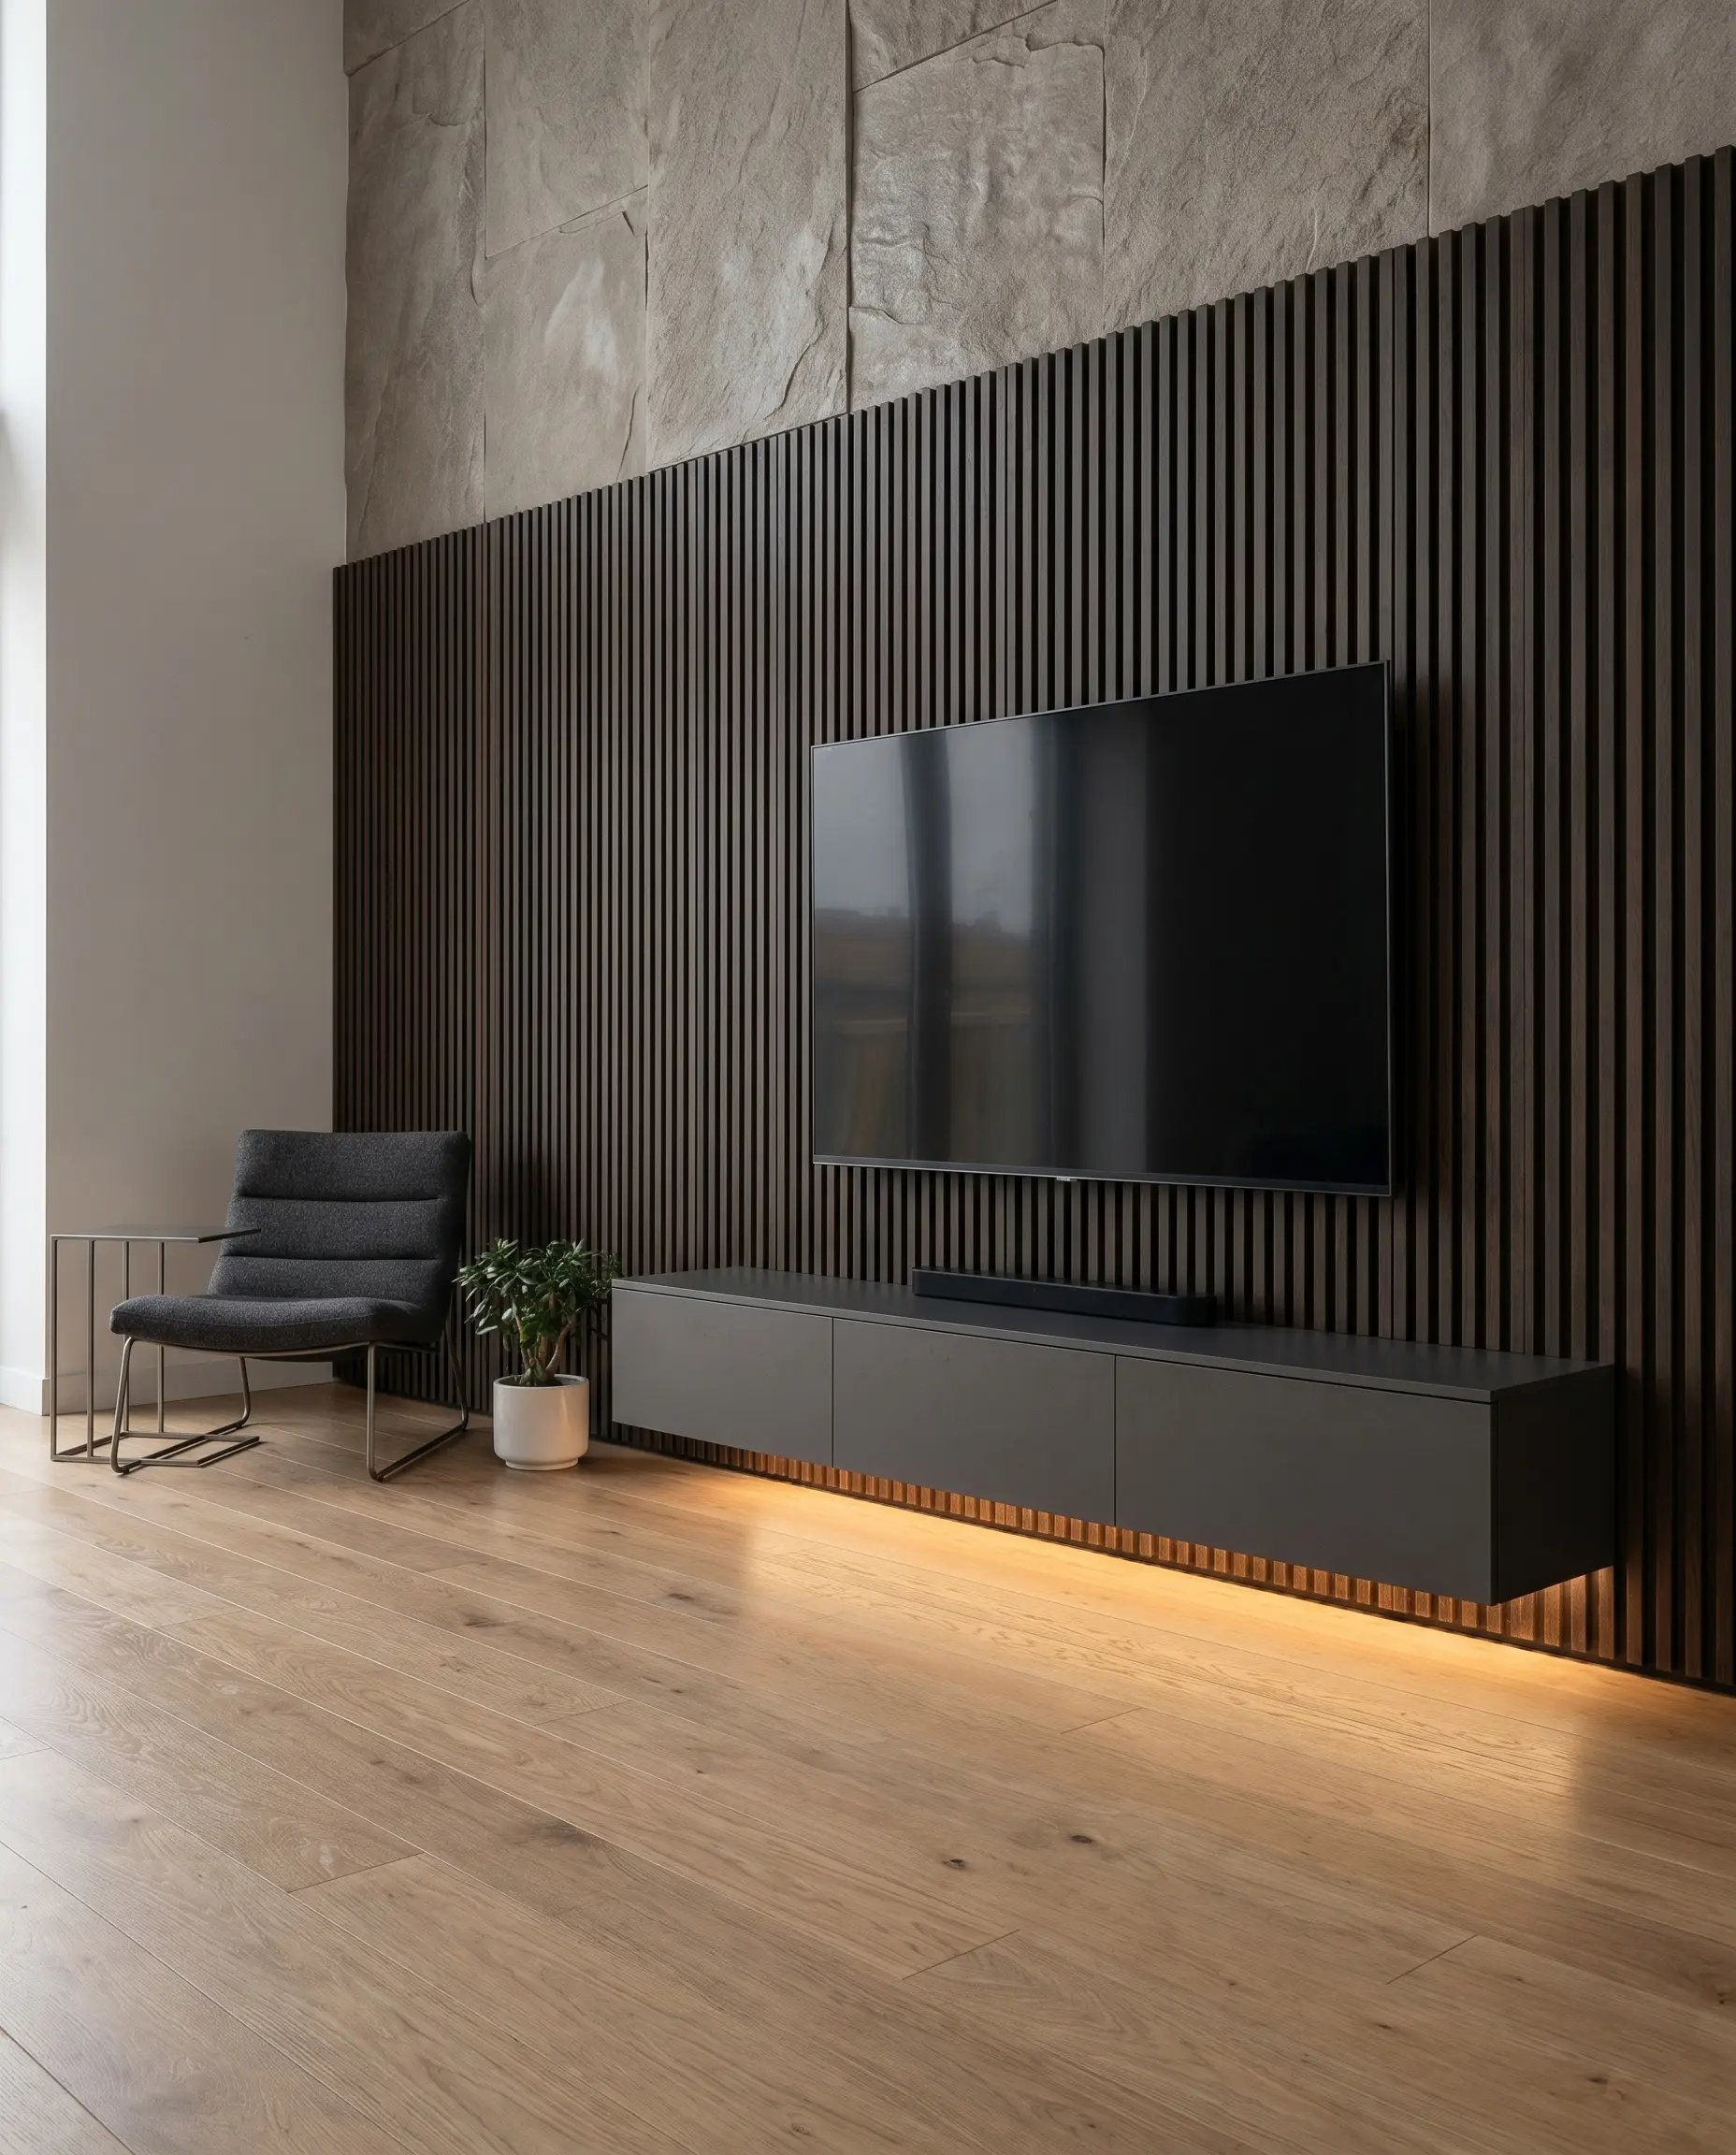
To prevent a heavily slatted wall from feeling oppressive, you must introduce light at the floor level. Run warm LED lighting strictly under the floating media console, washing the floor with light to make the heavy wood and stone elements above appear to be in a state of zero-gravity.
- Vibe: Contemporary Minimalist
- Key Materials: Floating MDF console, under-cabinet LED tracks
- Visual Illusion This under-lighting technique tricks the eye into perceiving more floor space, making the living room feel significantly larger.
- Styling Pro-Tip: Hide the LED transformer and excess cabling inside the console, routing a single low-voltage wire through the back panel.
13. Wash the Texture with Adjustable Ceiling-Mounted Gimbal Lights
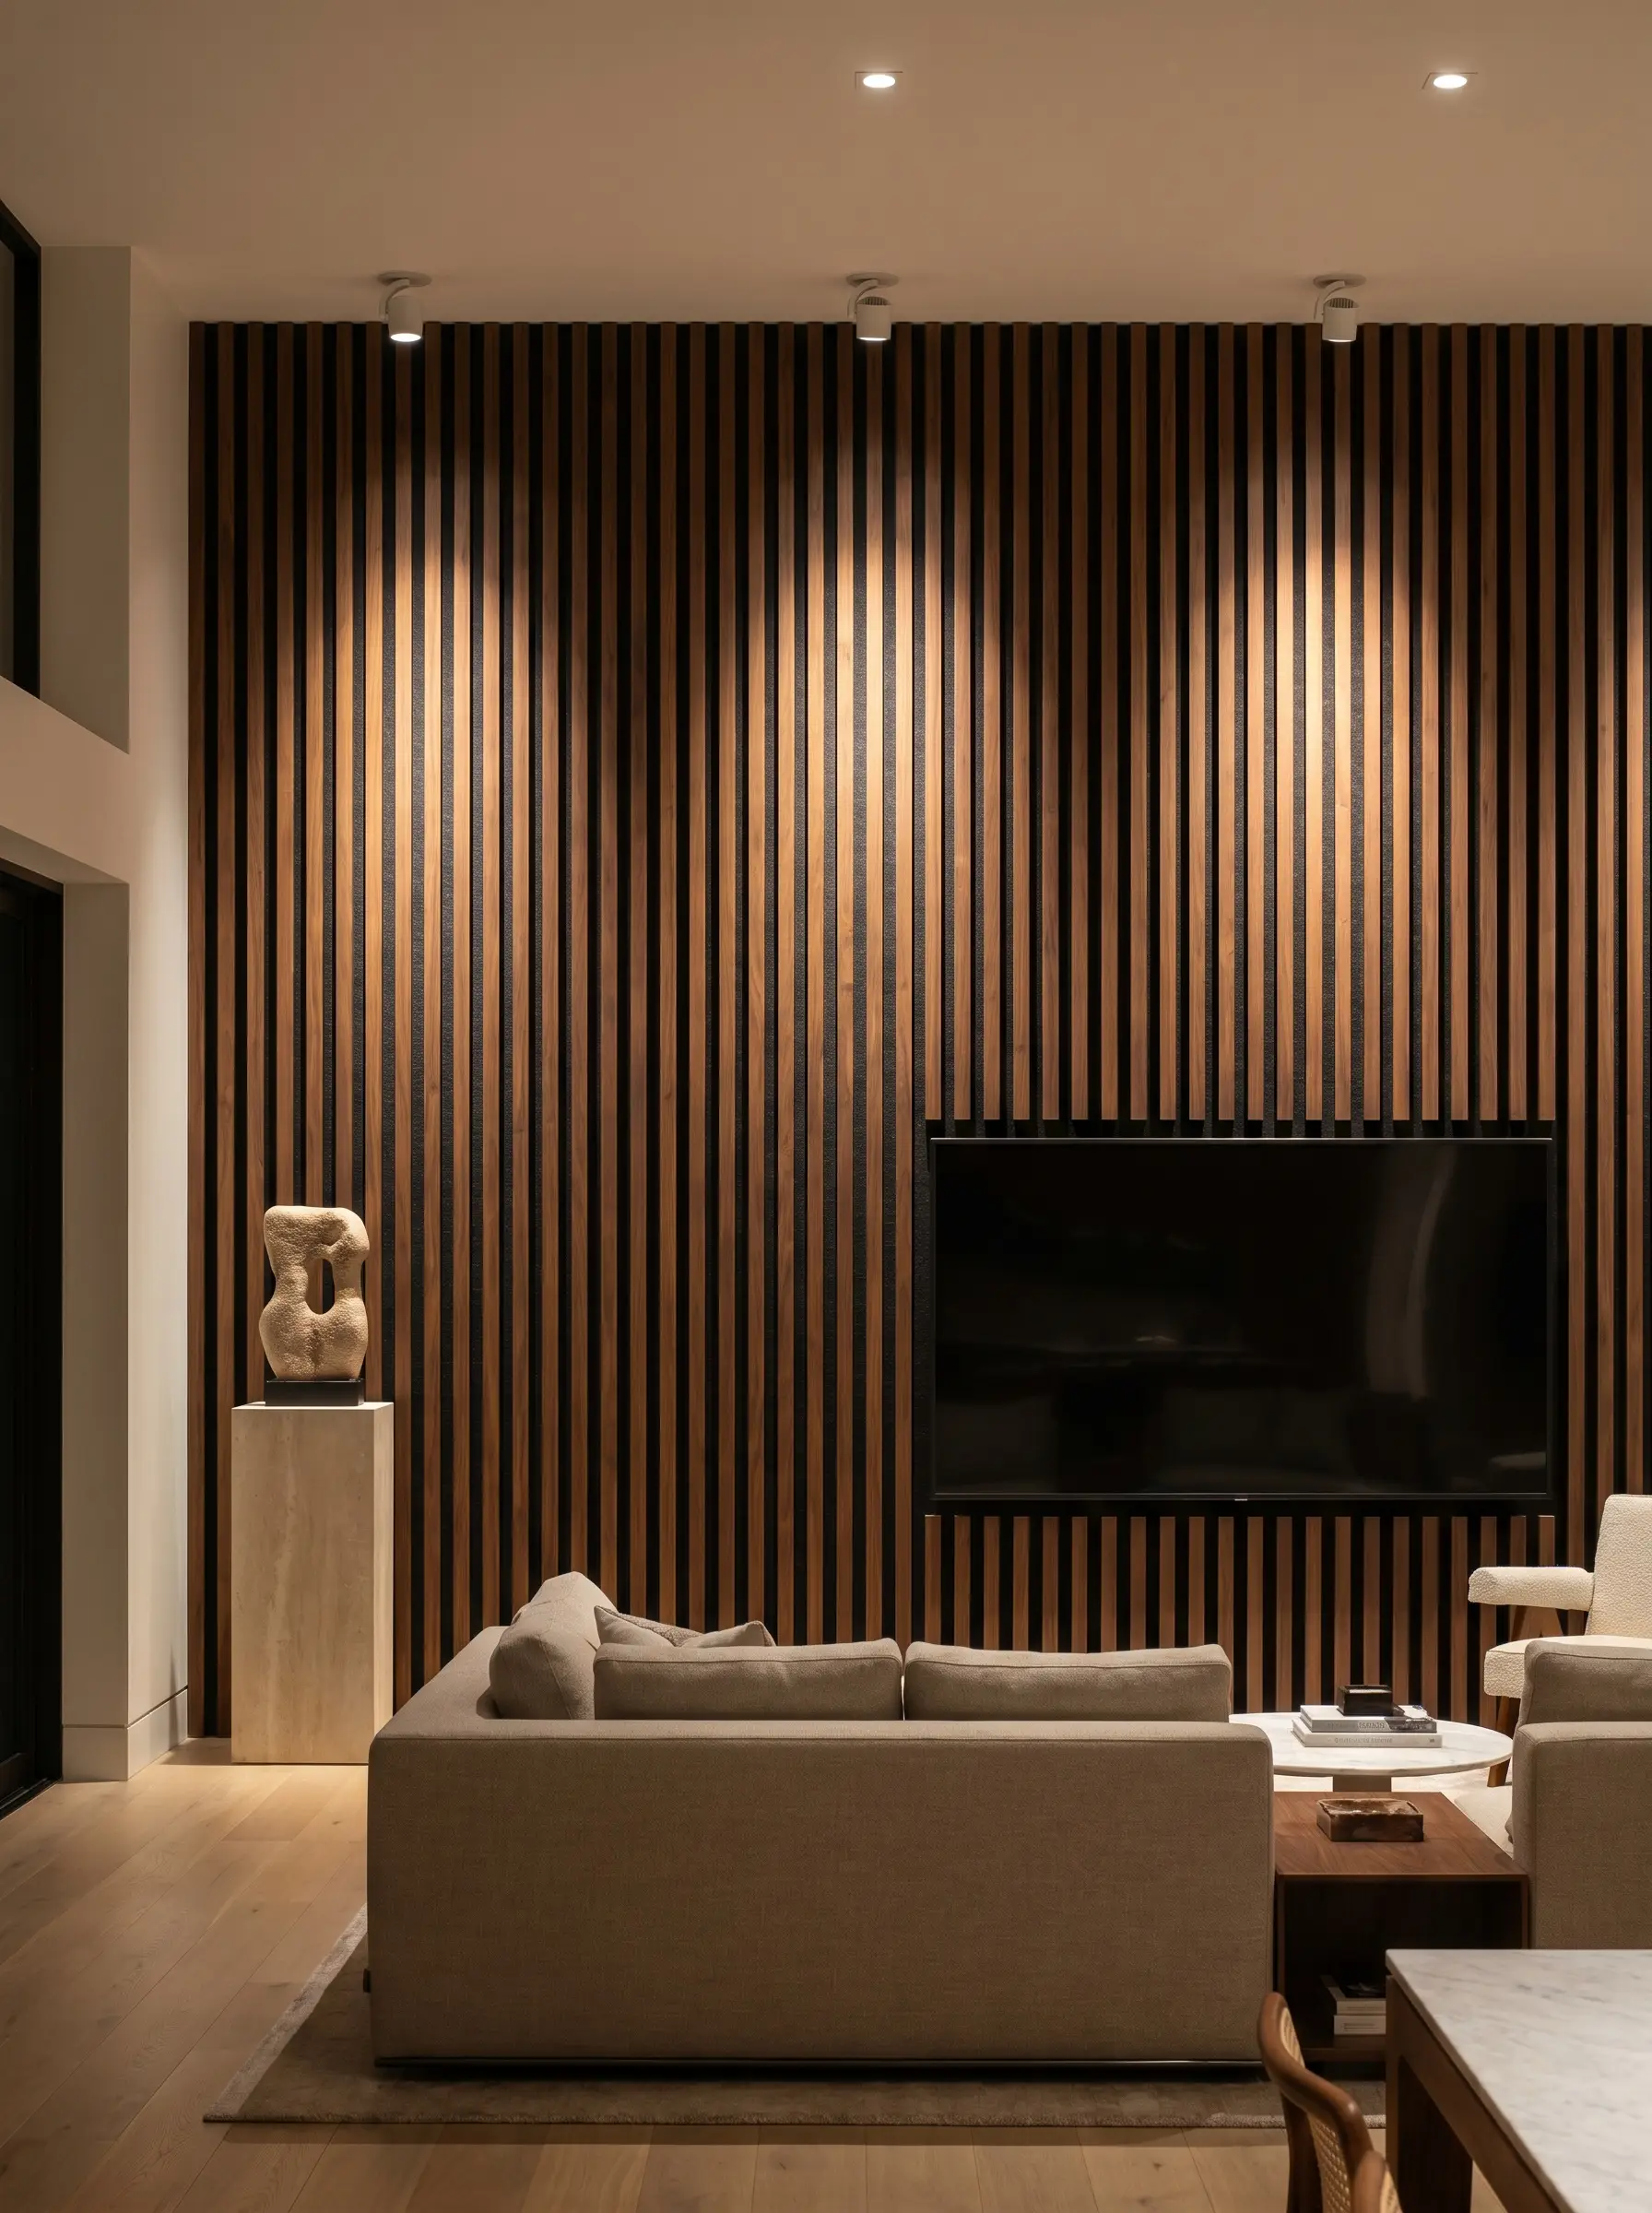
If you prefer a cleaner wall surface without integrated LED strips, install recessed gimbal spotlights in the ceiling directly above the media zone. Angle these directional lights perfectly to graze down the vertical wood slats, creating dramatic, elongated shadows deep within the acoustic felt grooves.
- Vibe: Architectural Gallery
- Key Materials: 3-inch adjustable gimbal recessed lights, narrow beam spread bulbs
- Lighting Theory Differentiate between “washing” (which flattens texture) and “grazing” (which enhances texture by casting shadows). Gimbal lights graze the wood.
- Styling Pro-Tip: Position the ceiling fixtures exactly 12 to 18 inches away from the slat wall to achieve the optimal grazing angle.
Moody Aesthetics & Dark Tonal Design
Moving into the “Moody Modern” and “Dark Academia” aesthetics requires leaning confidently into the darkness rather than fighting it with stark white contrasts. This approach utilizes tonal layering and deeply saturated hues to create a highly atmospheric, cinema-like viewing experience.
14. Drench the Surrounding Walls in Matte Charcoal Paint
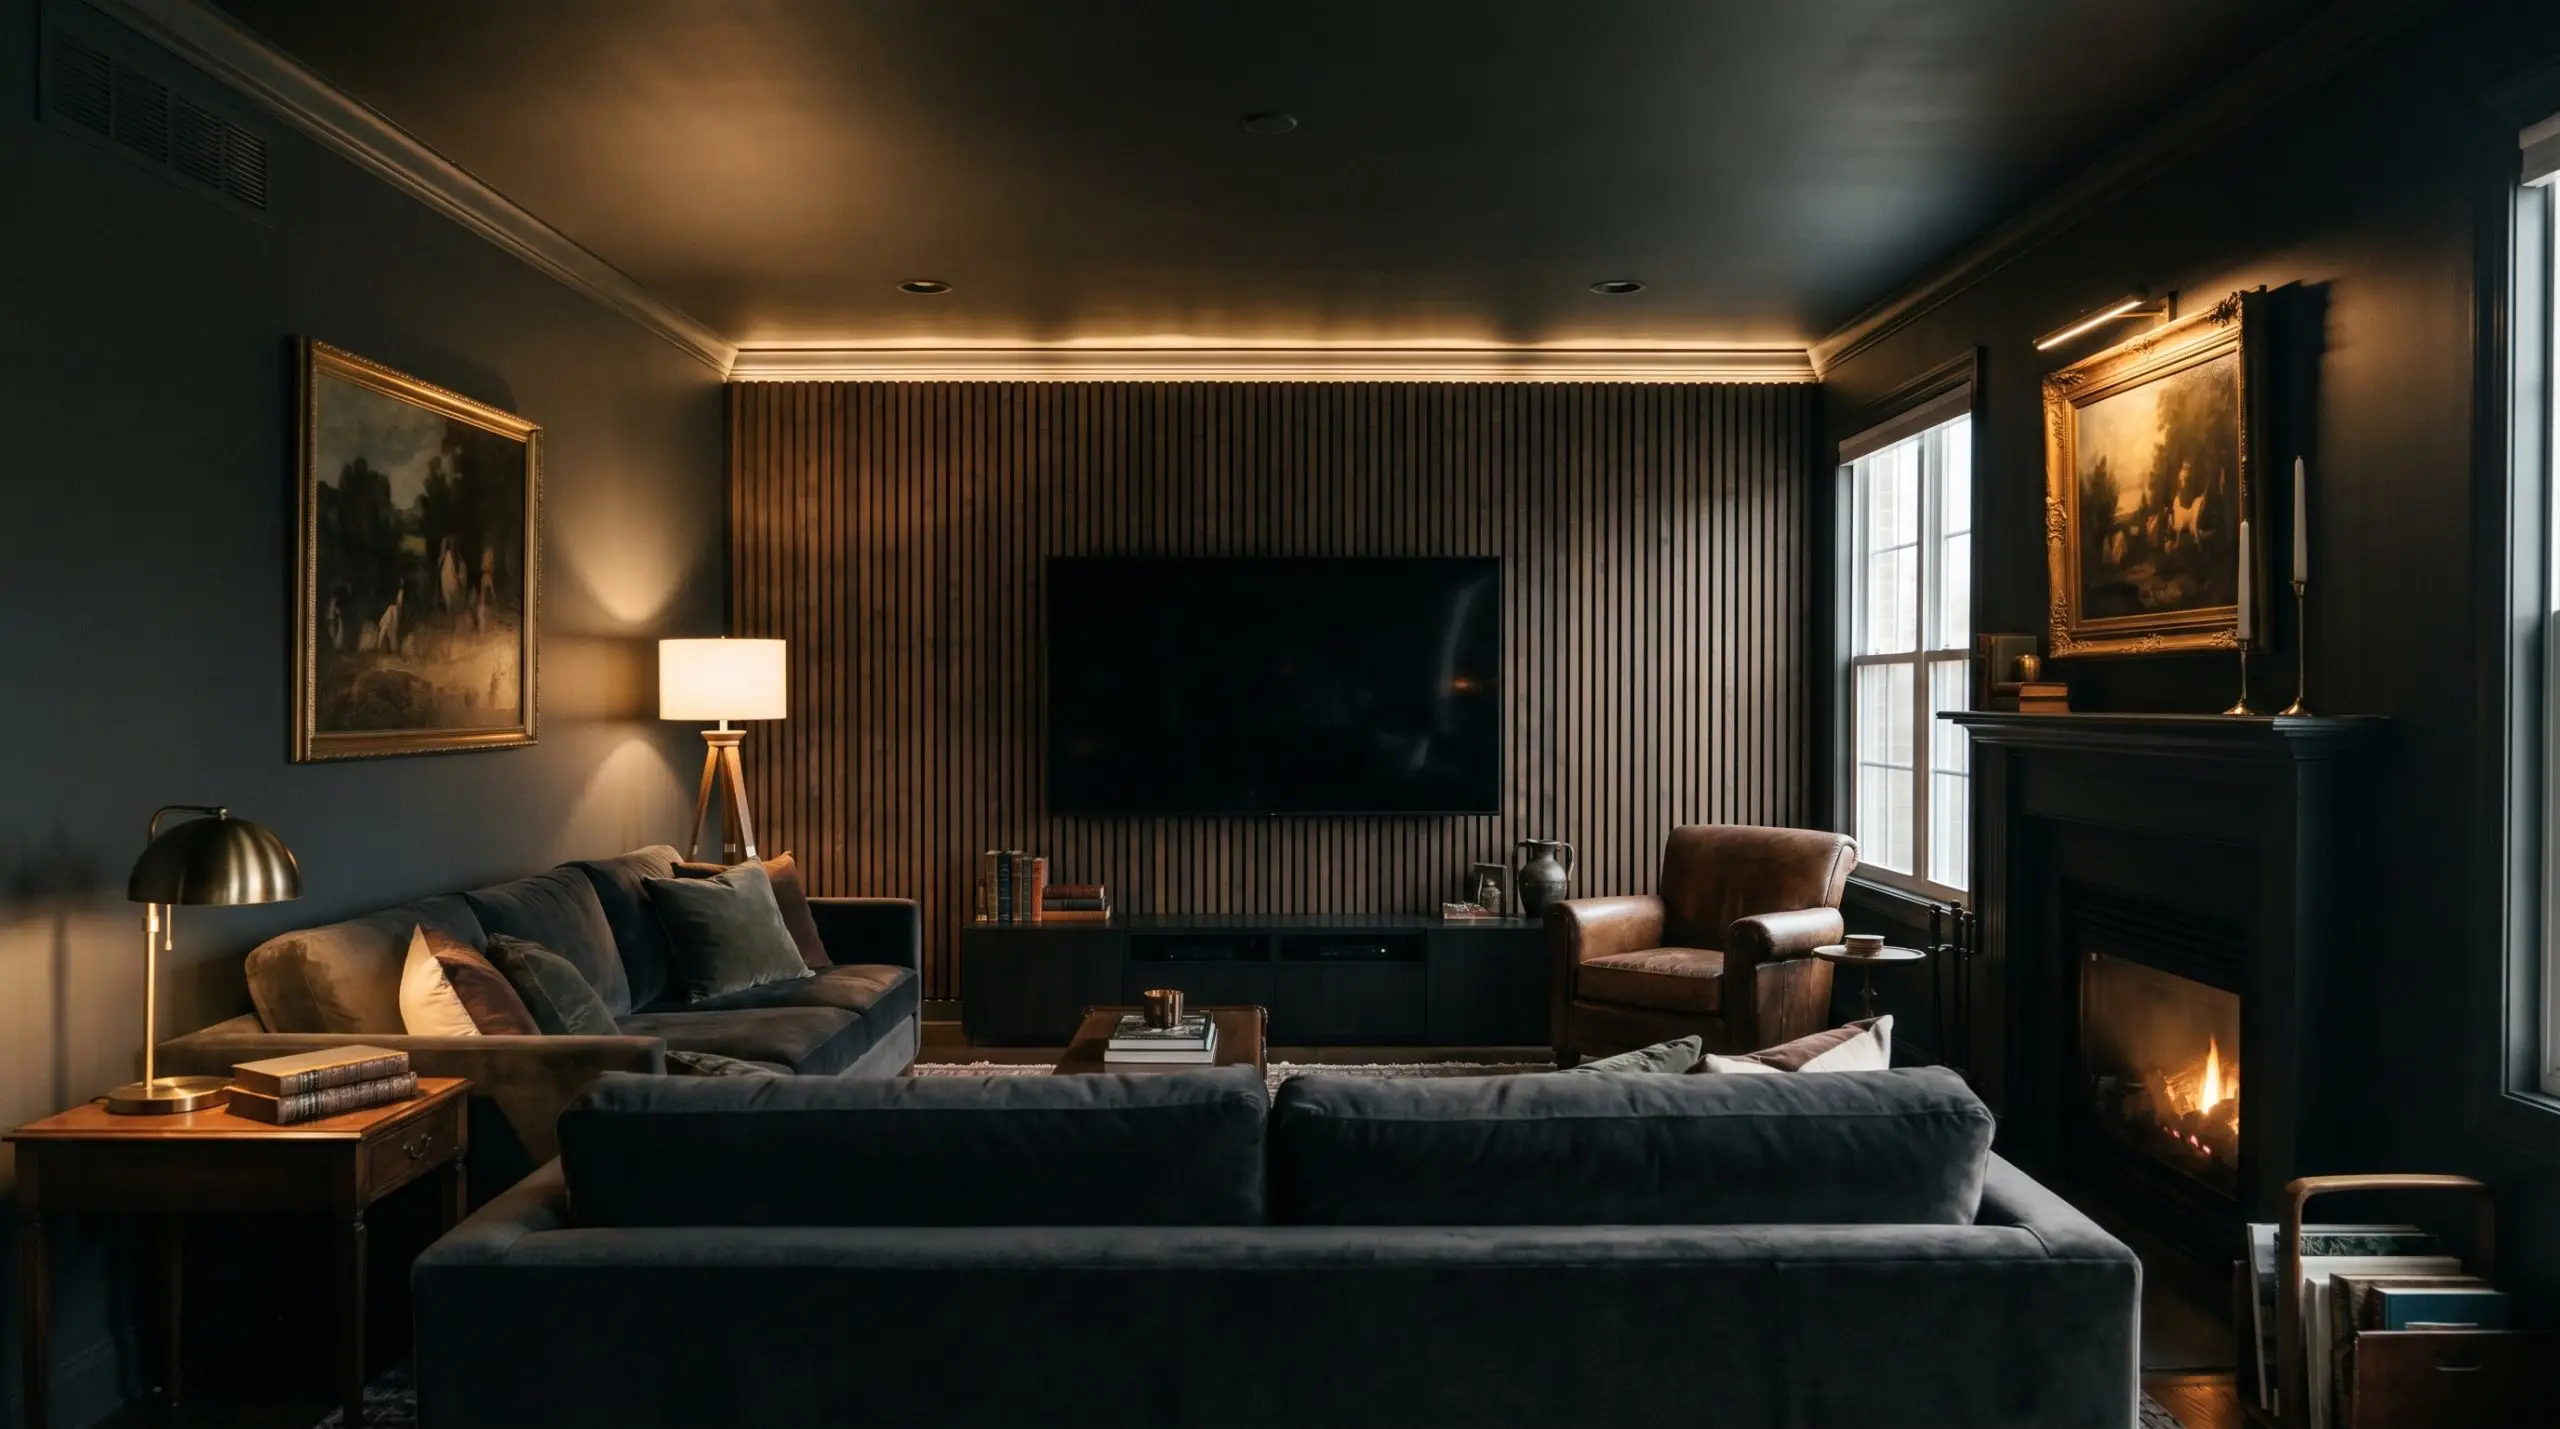
Instead of relying on standard white drywall, paint the surrounding living room walls, trim, and ceiling in a deeply saturated matte charcoal or black-green. This color-drenching technique makes the dark wood slat wall blend and envelop the room, rather than standing out as a harsh, isolated contrast.
Wrapping the room in a dark, light-absorbing matte paint minimizes screen glare and completely hides television bezels, creating the ultimate immersive viewing environment.
Hackrea Designer Secret
- Vibe: Moody Modern / Dark Academia
- Key Materials: High-quality matte interior paint, premium dark wood battens
- Paint Recommendation Sherwin-Williams Iron Ore or Farrow & Ball Studio Green
- Styling Pro-Tip: Paint the ceiling the exact same dark hue as the walls to blur the room’s boundaries and make the ceiling feel infinitely higher.
15. Use Smoked Glass Cabinetry Below the Walnut Panels
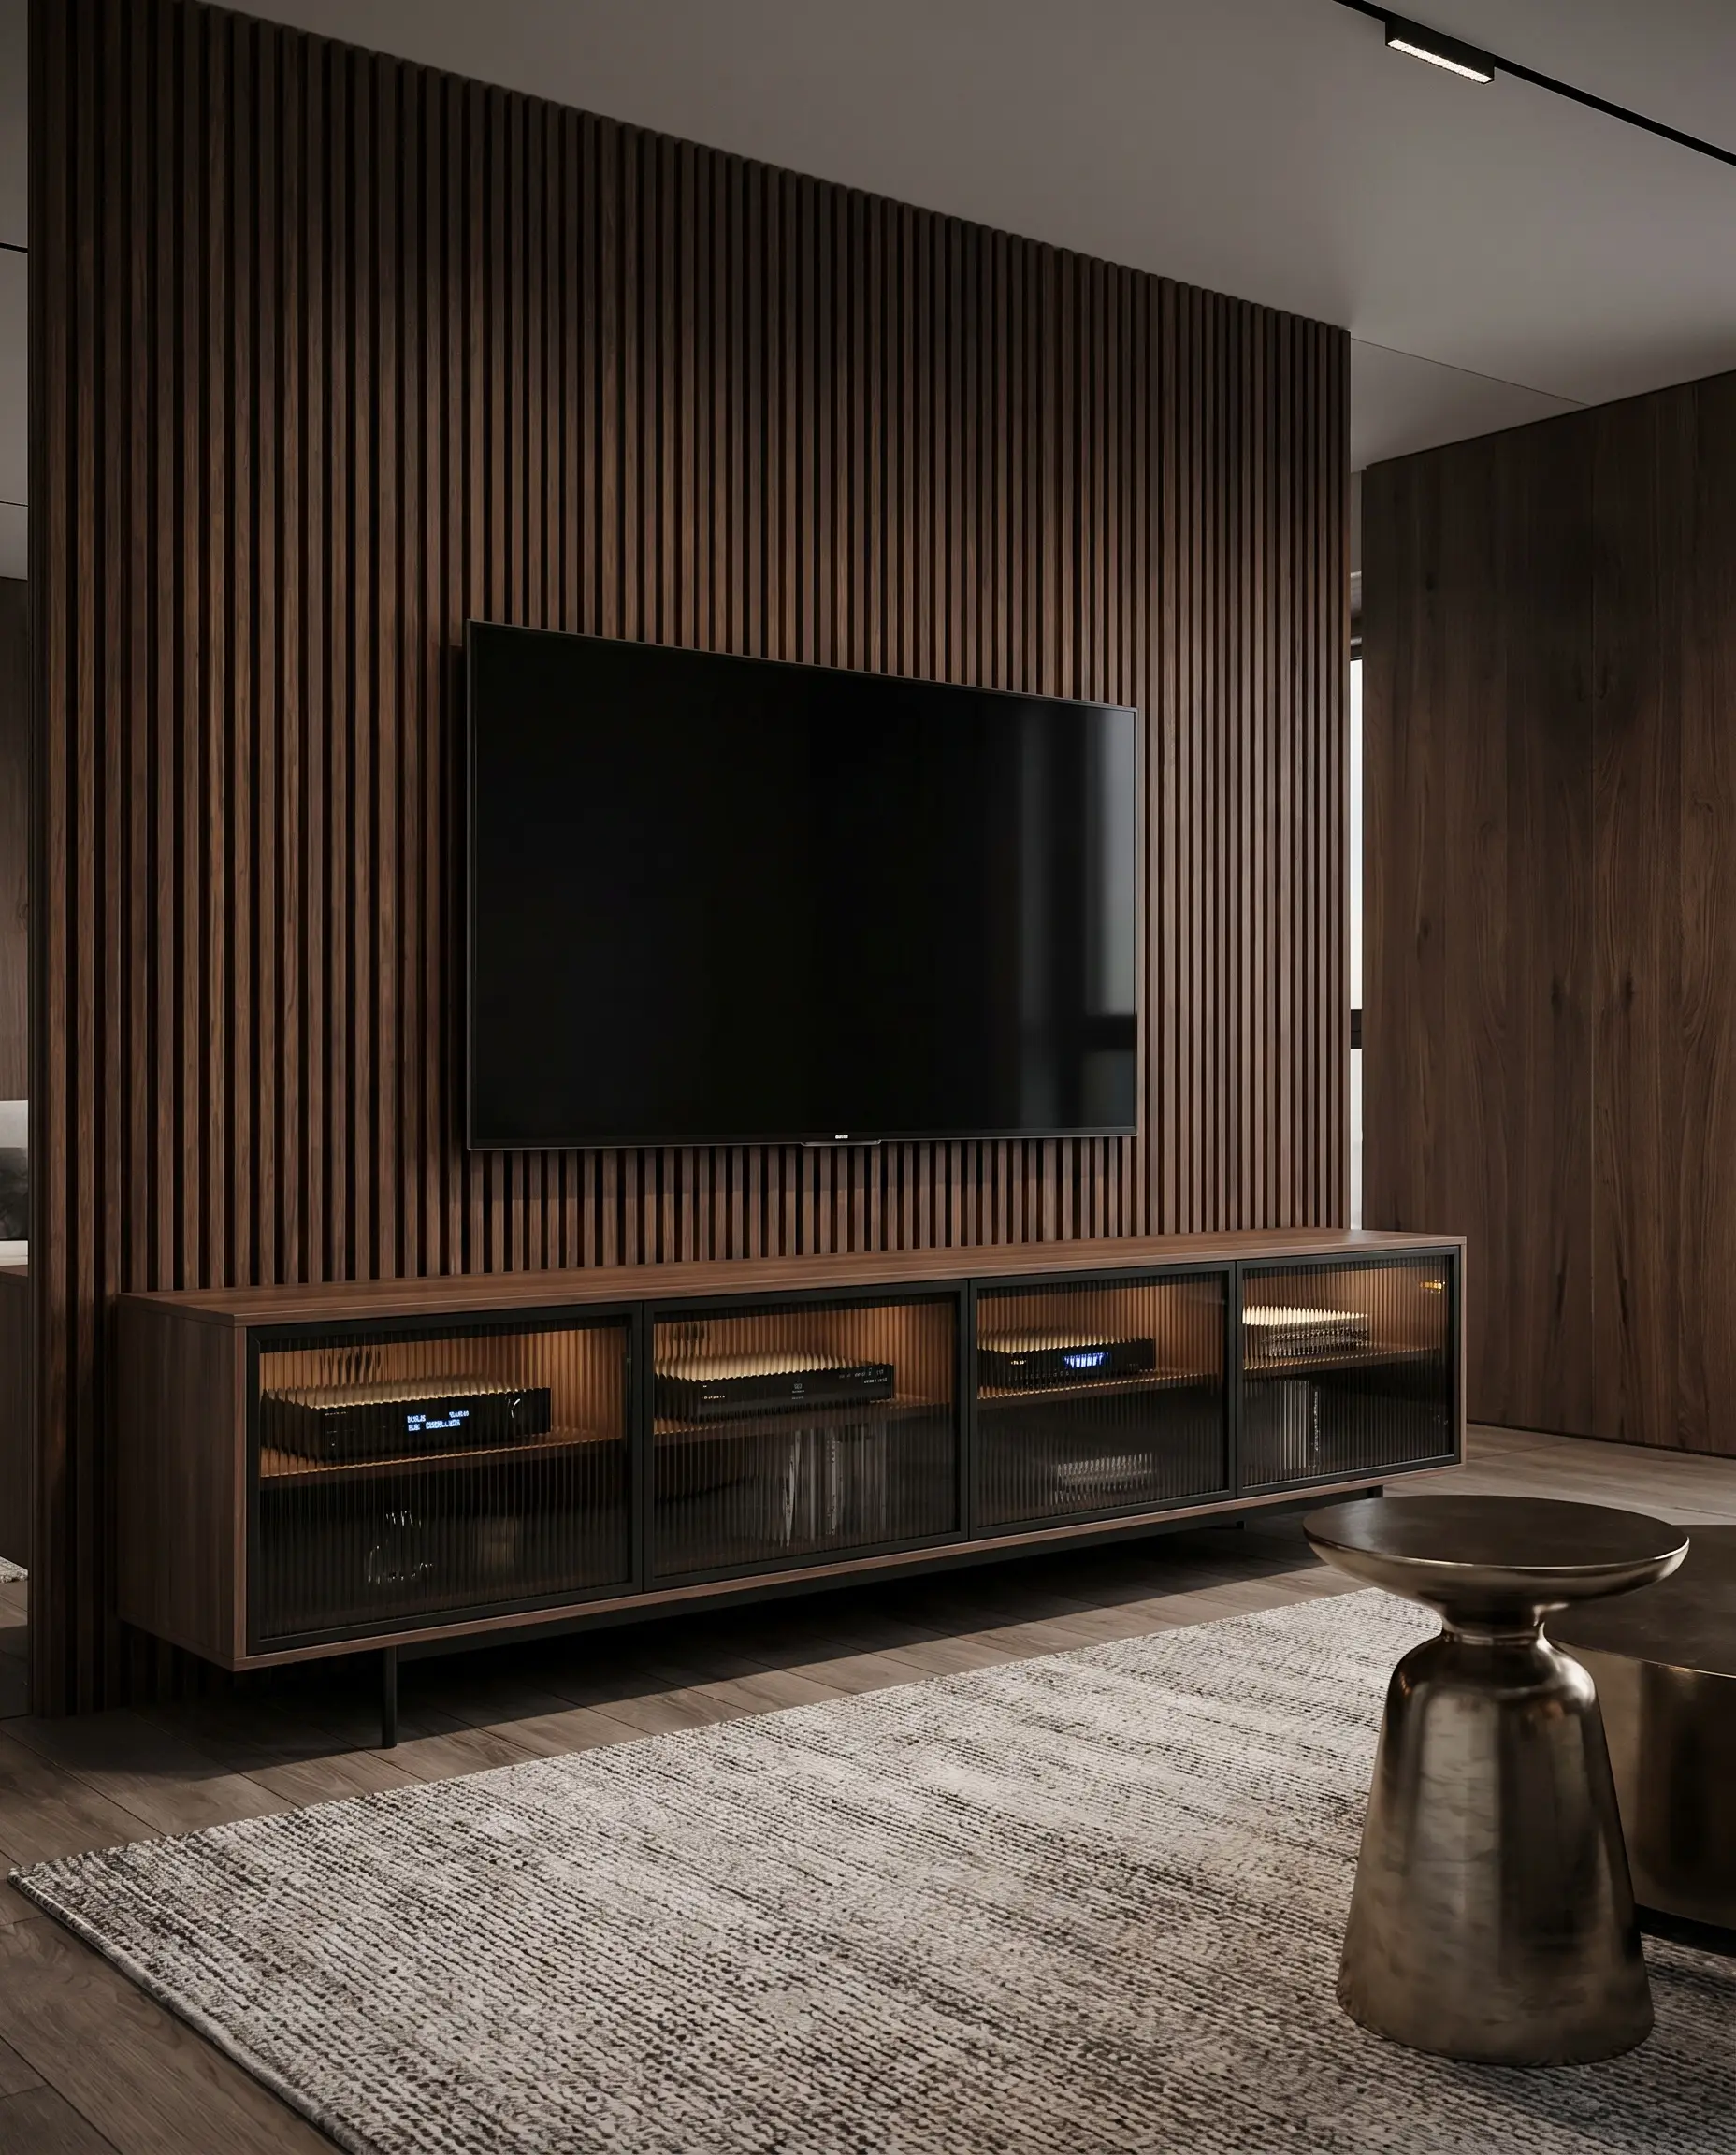
Solid, heavy wood console doors can make a dark media wall feel overly dense and monolithic. Replace standard cabinetry fronts with ribbed or smoked black glass to successfully hide AV receivers and gaming consoles while maintaining infrared remote functionality and a sleek, moody vibe.
- Vibe: High-End Contemporary
- Key Materials: Smoked tempered glass, black anodized aluminum frames
- Tech Integration Smoked glass allows the subtle LED displays of high-end audio equipment to show through, adding a layer of technical sophistication.
- Styling Pro-Tip: Use internal cabinet lighting set to a dim glow to highlight the silhouettes of your media equipment through the tinted glass.
16. Match the Slats to Dark Chevron or Herringbone Flooring
For absolute foundational cohesion, ensure the vertical lines of the wall slats visually flow into the geometric patterns of a dark chevron or herringbone hardwood floor. This intersection anchors the room in classic, intentional architectural shapes that feel exceptionally expensive.
- Vibe: Bespoke Heritage
- Key Materials: Walnut wall panels, dark oak or walnut parquet flooring
- Styling Rule Never mix cool grey faux-wood floors with warm natural walnut slats; the clashing undertones will instantly make the space feel cheap and uncoordinated.
- Styling Pro-Tip: Run the points of the chevron flooring directly toward the media wall to draw the eye naturally to the architectural focal point.
17. Integrate Matte Black Acoustic Felt to Absorb Living Room Echo
Beyond aesthetics, the thick black PET felt backing behind the wood battens serves a critical function in media rooms with hard floors and minimal upholstery. This material acts as a high-performance acoustic dampener, absorbing the harsh sound waves from soundbars and preventing echo in minimalist spaces.
| Feature | Pre-Fab Acoustic Slat Panels (PET Felt) | Custom Solid Wood Millwork |
|---|---|---|
| Acoustic Dampening | High (Absorbs mid-to-high frequencies) | Low (Reflects sound waves) |
| Installation Speed | Fast (Large panels screw directly to drywall) | Slow (Individual batten measuring/nailing) |
| Visual Depth | High (Deep black negative space) | Variable (Depends on painted background) |
| Budget Tier | Accessible Luxury | High-End Bespoke |
- Vibe: Functional Luxury
- Key Materials: 9mm to 12mm thick black PET acoustic felt
- Acoustic Benefit This dampening is especially crucial if you are utilizing Dolby Atmos up-firing speakers, as it controls rogue sound reflections.
- Styling Pro-Tip: Use black drywall screws driven directly through the felt (between the slats) into the studs to make the mounting hardware completely invisible.
18. Style Open Shelving with Monochromatic Ceramic Vessels
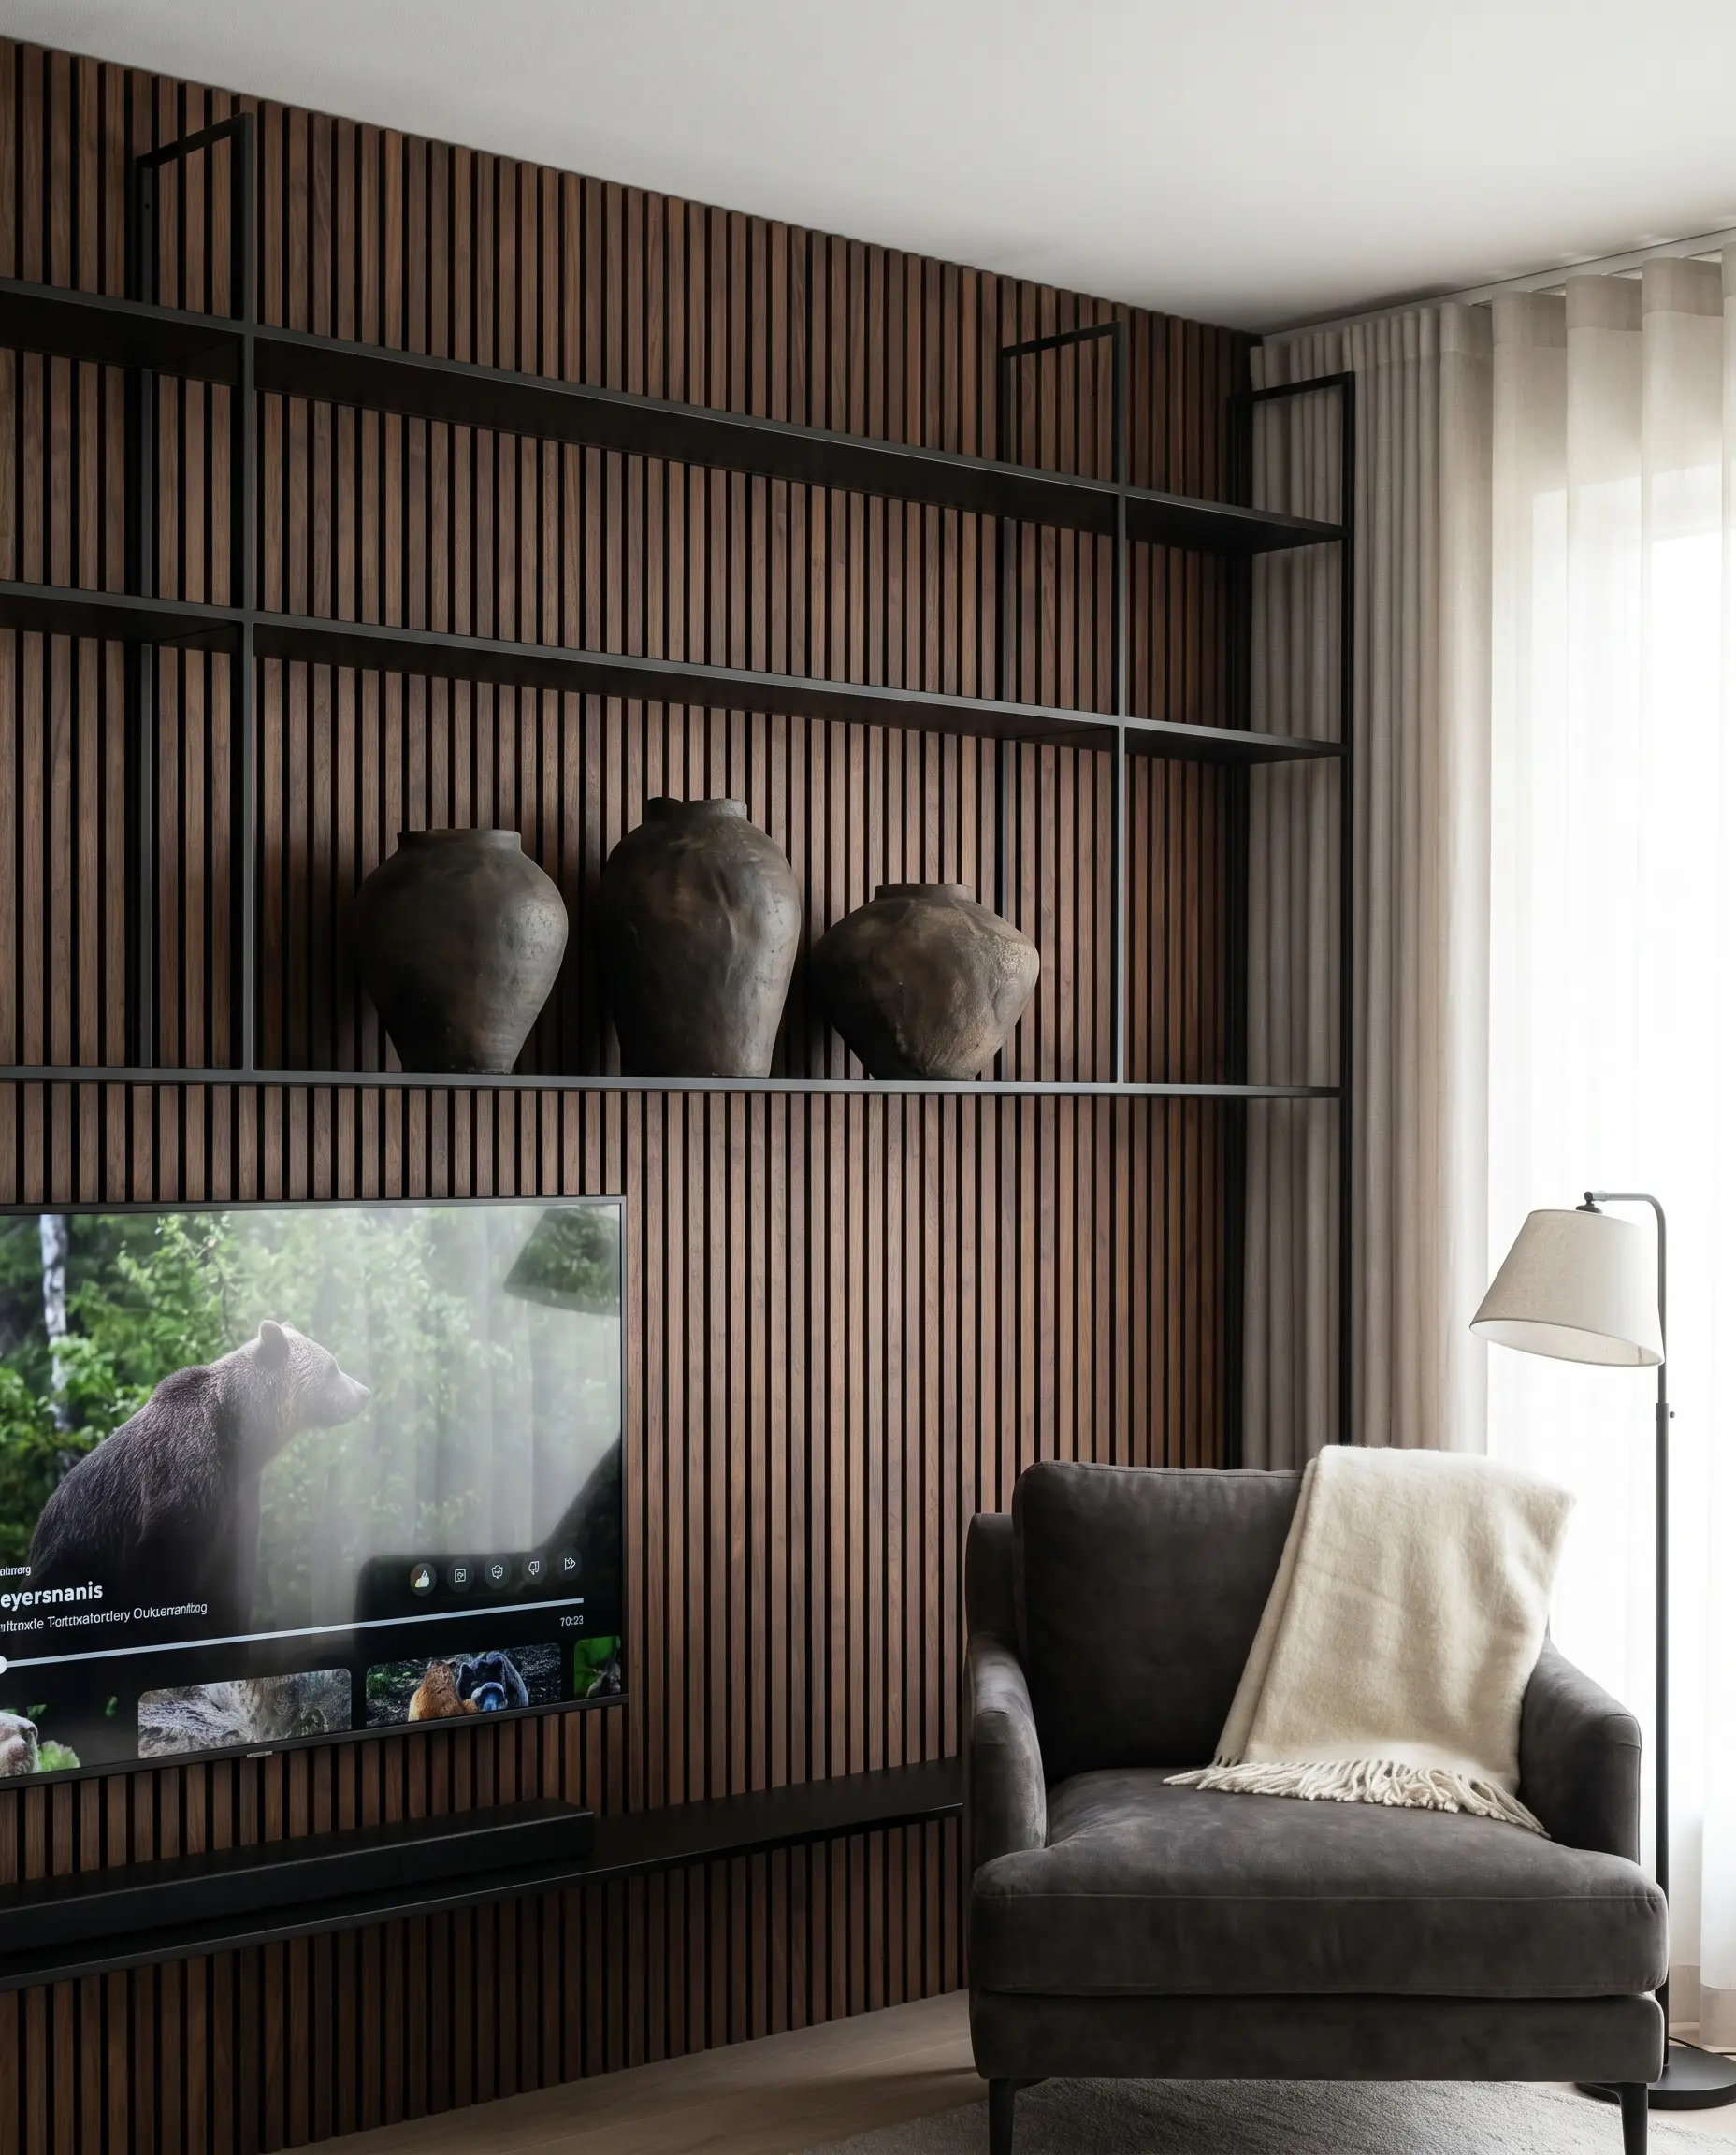
If you choose to incorporate floating shelves alongside or within the slat wall, you must exercise extreme restraint with your decor. Utilize oversized, matte black or dark clay ceramics to complement the heavy architecture, avoiding small, cluttered trinkets that fight aggressively with the busy linear pattern of the slats.
- Vibe: Modern Organic / Minimalist
- Key Materials: Dark clay ceramics, matte black steel floating shelves
- Styling Rule: Always utilize the 80/20 rule of negative space on slatted wall shelves; leave 80% of the shelf completely empty to let the wood texture breathe.
- Styling Pro-Tip: Group ceramic vessels in odd numbers (threes or fives) and vary their heights to create organic, sweeping sightlines against the rigid vertical wood.
The Architect’s Guide: Executing Your Media Wall Installation
Executing a flawless, high-end media wall requires meticulous logistical planning long before a single piece of wood is cut. Treat this phase with the precision of a master tradesperson to ensure your final product looks architectural rather than amateur.
- Order Physical Samples: Never trust a screen. Order physical slat samples and view them in your living room under both natural daylight and your evening artificial lighting to verify the wood’s true undertone.
- Pre-Plan Cable Management: Industry standards dictate installing recessed structured media enclosures (smurf tube or in-wall conduit) behind the drywall before the acoustic panels go up. You cannot easily route thick HDMI cables through acoustic felt after the fact.
- Locate and Mark Studs: Acoustic panels are heavy. Map out every stud on your wall with painter’s tape on the floor and ceiling so you know exactly where to drive your structural screws once the panels cover the drywall.
- Account for Outlet Clearances: Measure the exact locations of your wall outlets and use a multi-tool to cut precise rectangular cutouts into the PET felt and wood battens. Frame the cutouts with matte black outlet covers for a seamless finish.
Ready to perfect the ambiance of your newly designed space? Review Hackrea’s comprehensive guide on living room lighting to ensure your structural textures are illuminated flawlessly.
The Hackrea Style Desk treats interior decoration as an exact visual science. Rather than focusing on demolition or floor plans, this desk masters the art of color theory, undertone matching, material pairings, and spatial proportion. From balancing the visual weight of mixed metals to finding the perfect bridging tone between disparate wood species, this desk provides the rigorous aesthetic rules needed to achieve high-end, editorial-quality harmony in any space.