The Ultimate Wood Slat TV Wall Guide: 21 Modern Living Room Ideas
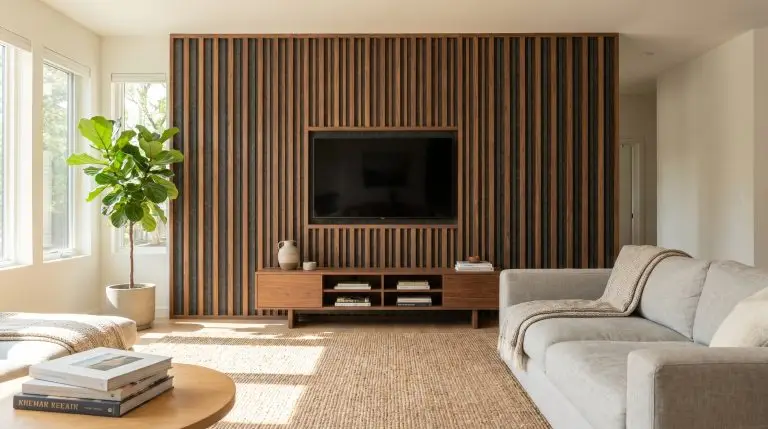
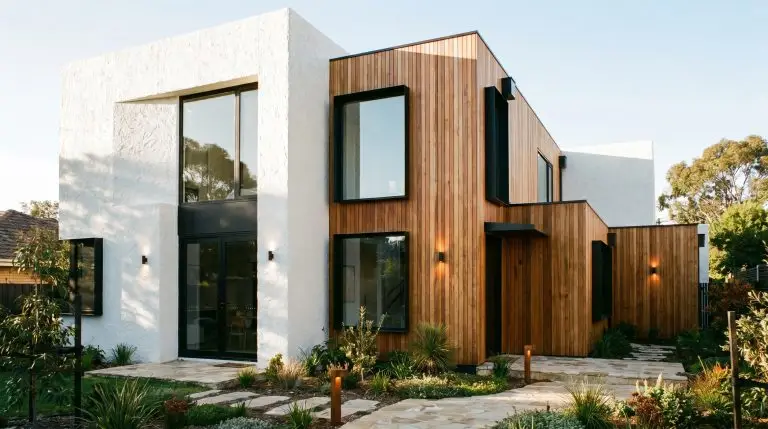
The modern television presents a massive design dilemma: when turned off, it becomes a giant, lifeless black box that drains the energy from your space. A wood slat tv wall modern living room application completely flips this dynamic, transforming a blank drywall void into a bespoke, architectural focal point. By blending the natural warmth of Biophilic design with sharp, modern geometric lines, you create a media center that looks intentional, rather than like an afterthought.
Fortunately, the rise of pre-made acoustic slat panels has democratized custom millwork, allowing prosumer DIYers to achieve a luxury aesthetic without the bespoke carpenter price tag. Whether you are aiming for severe minimalism or rich, moody home theater vibes, mastering the vertical plane behind your screen requires precise material selection and clever tech integration. Here is how to execute a flawless media wall upgrade.
The Aesthetics: Wood Species, Tones & Layouts
Not all slats are created equal; the specific width—ideally 1 to 1.5 inches—combined with your chosen wood species and layout dictates the entire room’s visual foundation. Before you ever pick up a drill, you must establish the structural vibe of your vertical canvas.
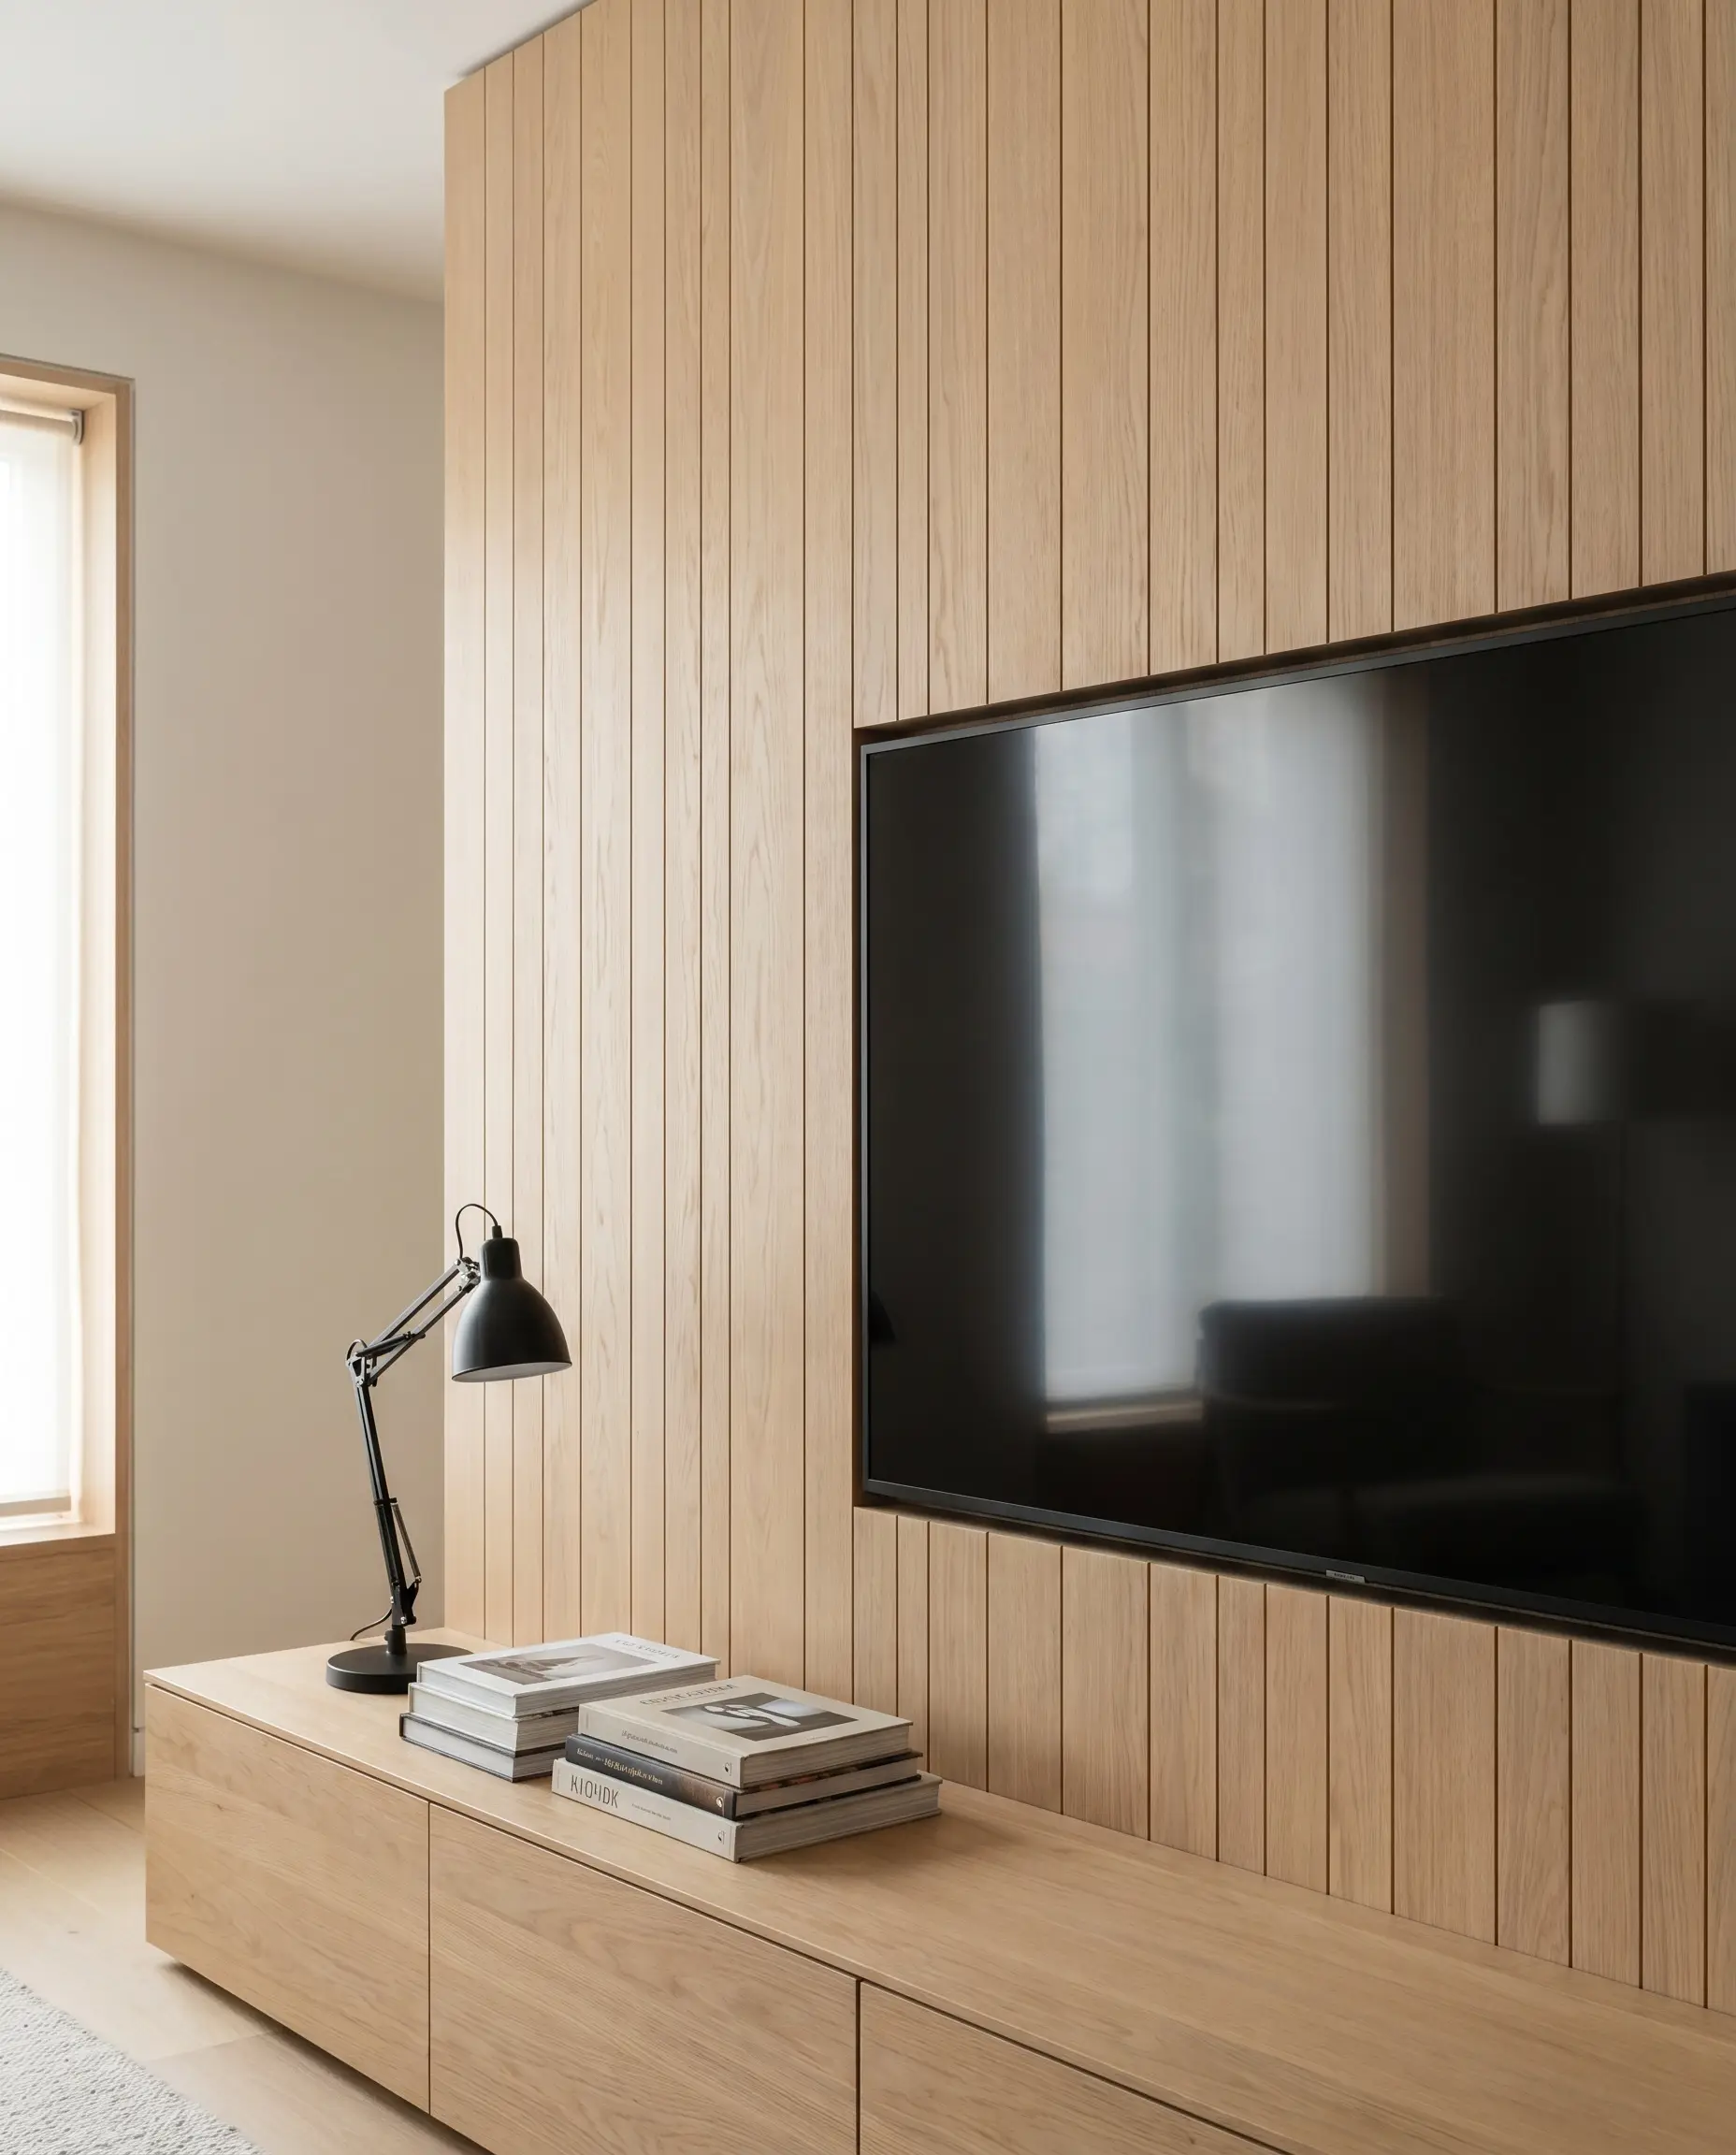
Embrace the Japandi Vibe with Rift-Sawn White Oak
Rift-sawn white oak panels strip away heavy knots and erratic grain patterns, offering a pristine, uniform backdrop. This specific cut creates a soothing, highly structured surface that perfectly complements low-profile, neutral furniture.
White oak’s incredibly tight, linear grain provides the clean lines necessary for Japandi minimalism without veering into rustic, cabin-like territory.
Designer’s Note
- Vibe: Serene, highly disciplined minimalism.
- Key Material: Rift-sawn white oak veneer with an MDF core.
- Finish Recommendation: Matte clear coat to prevent glare.
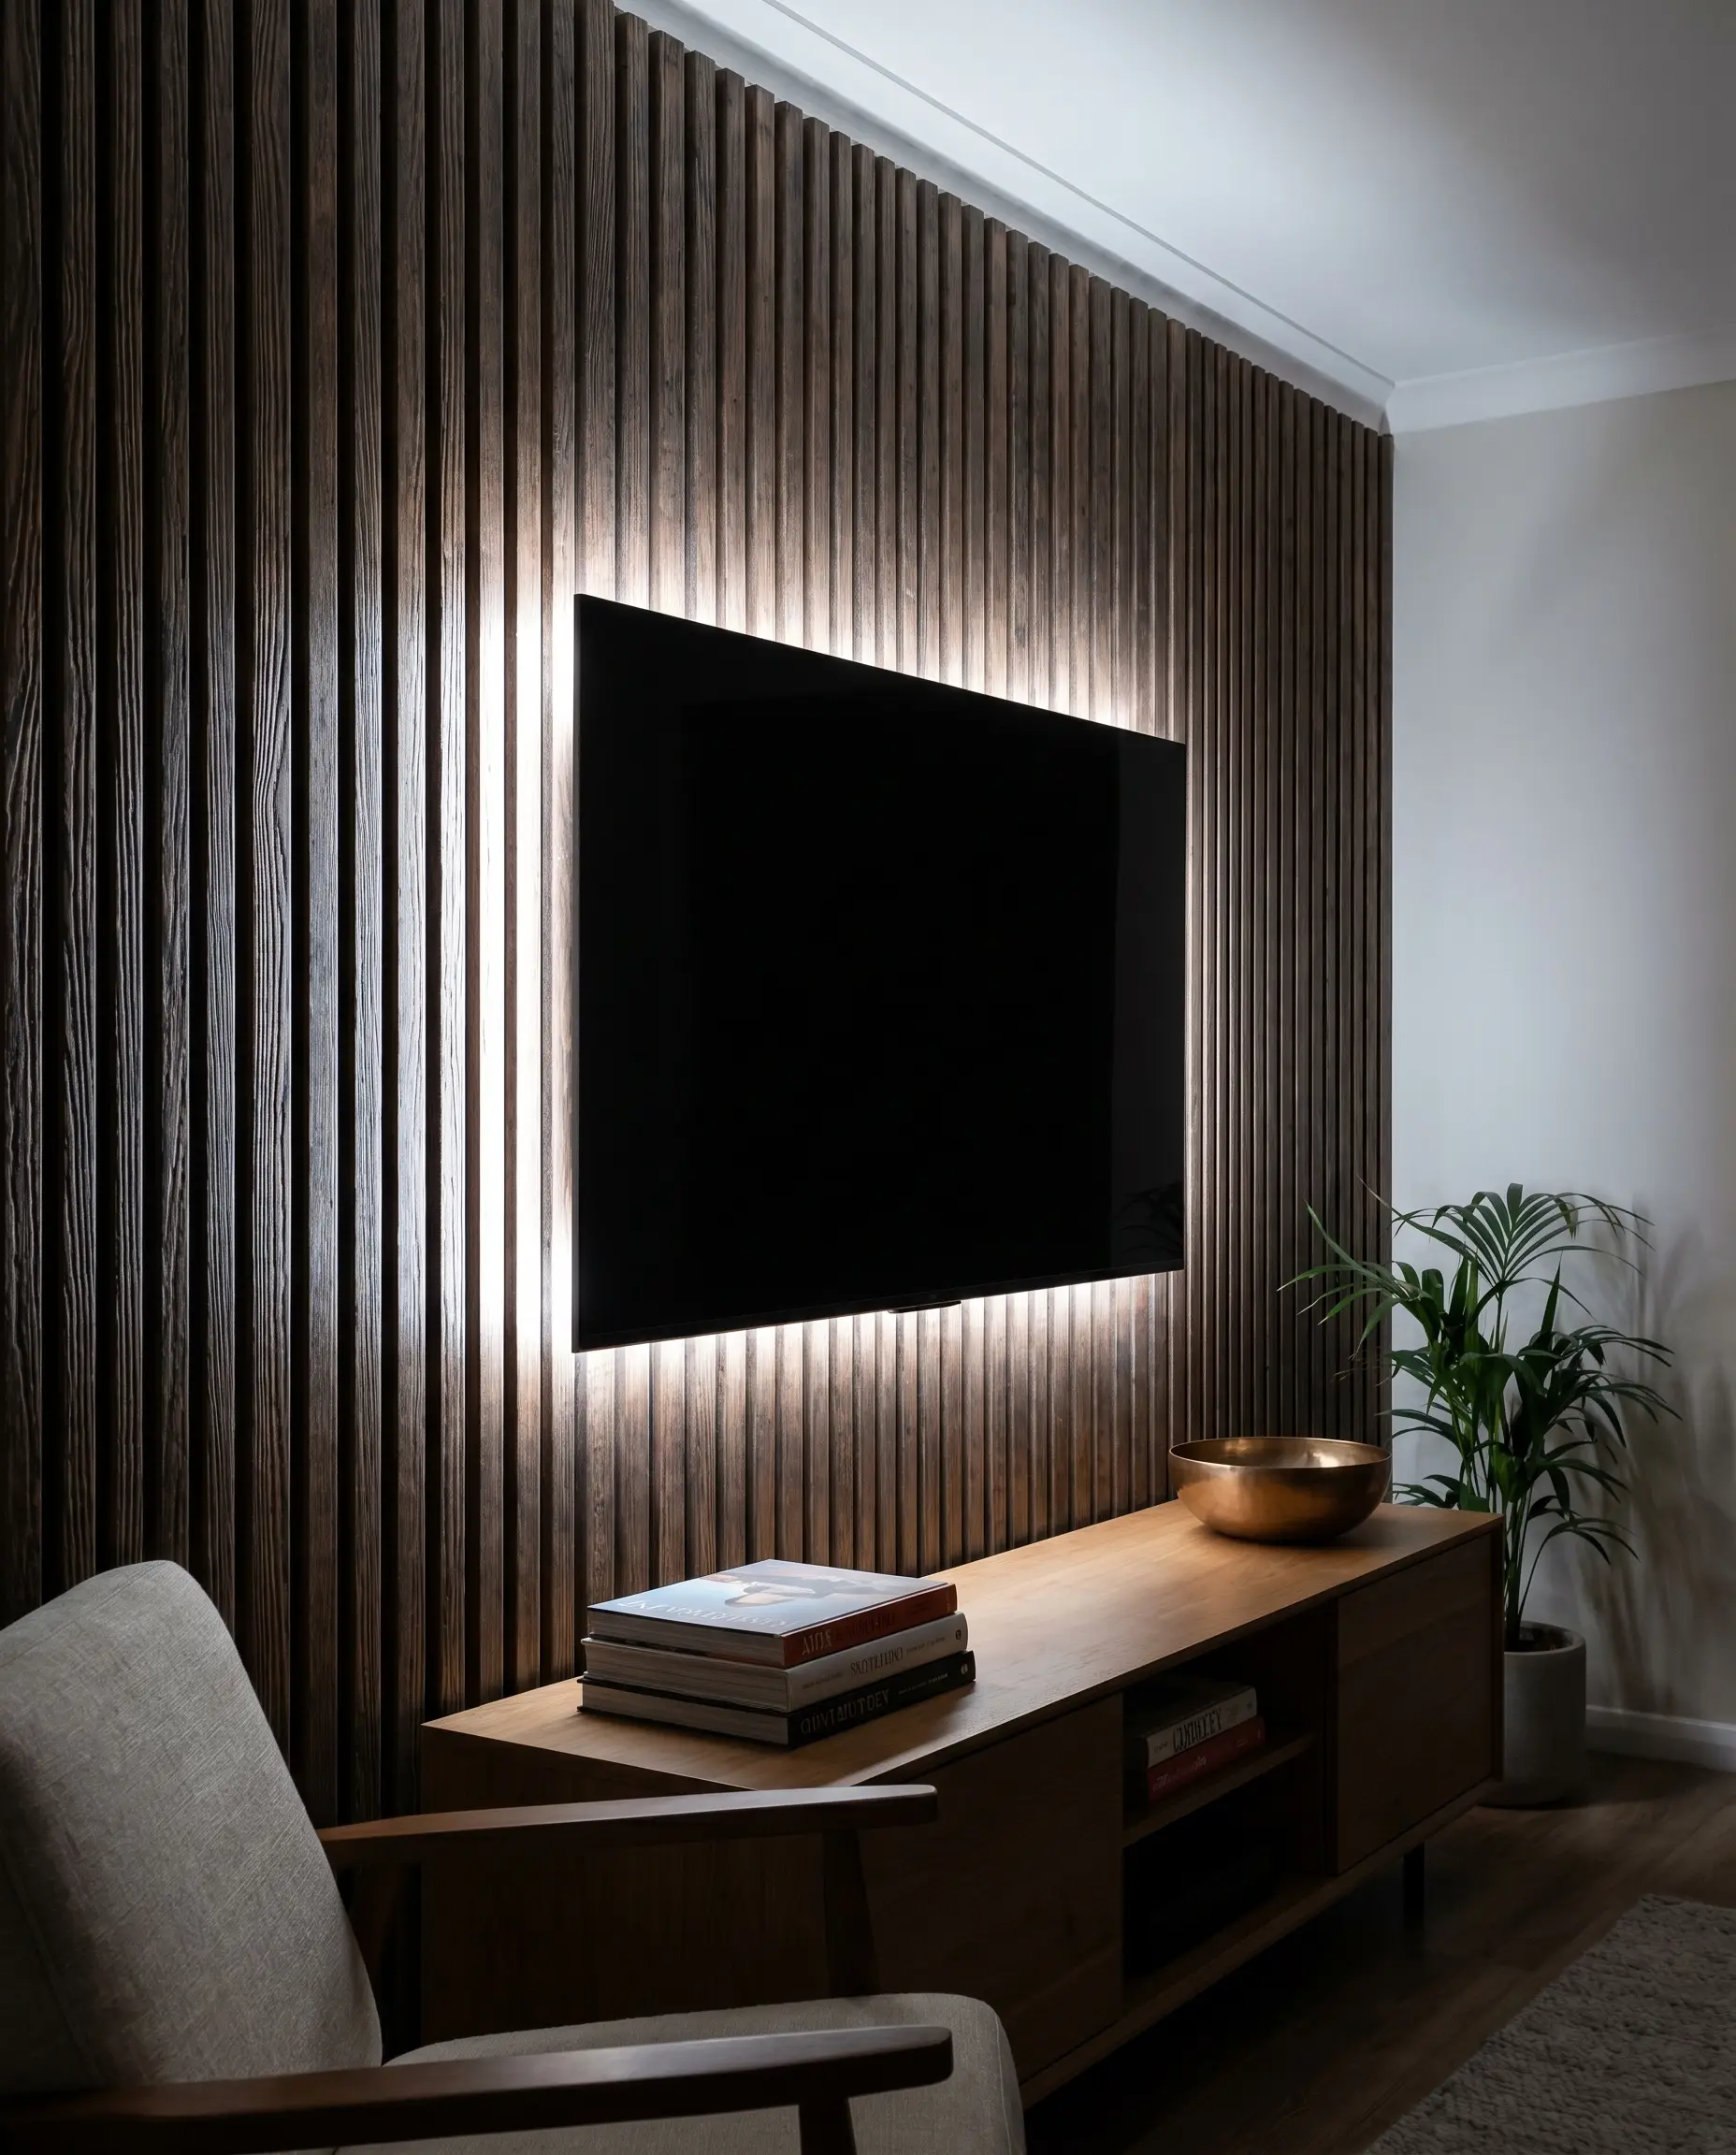
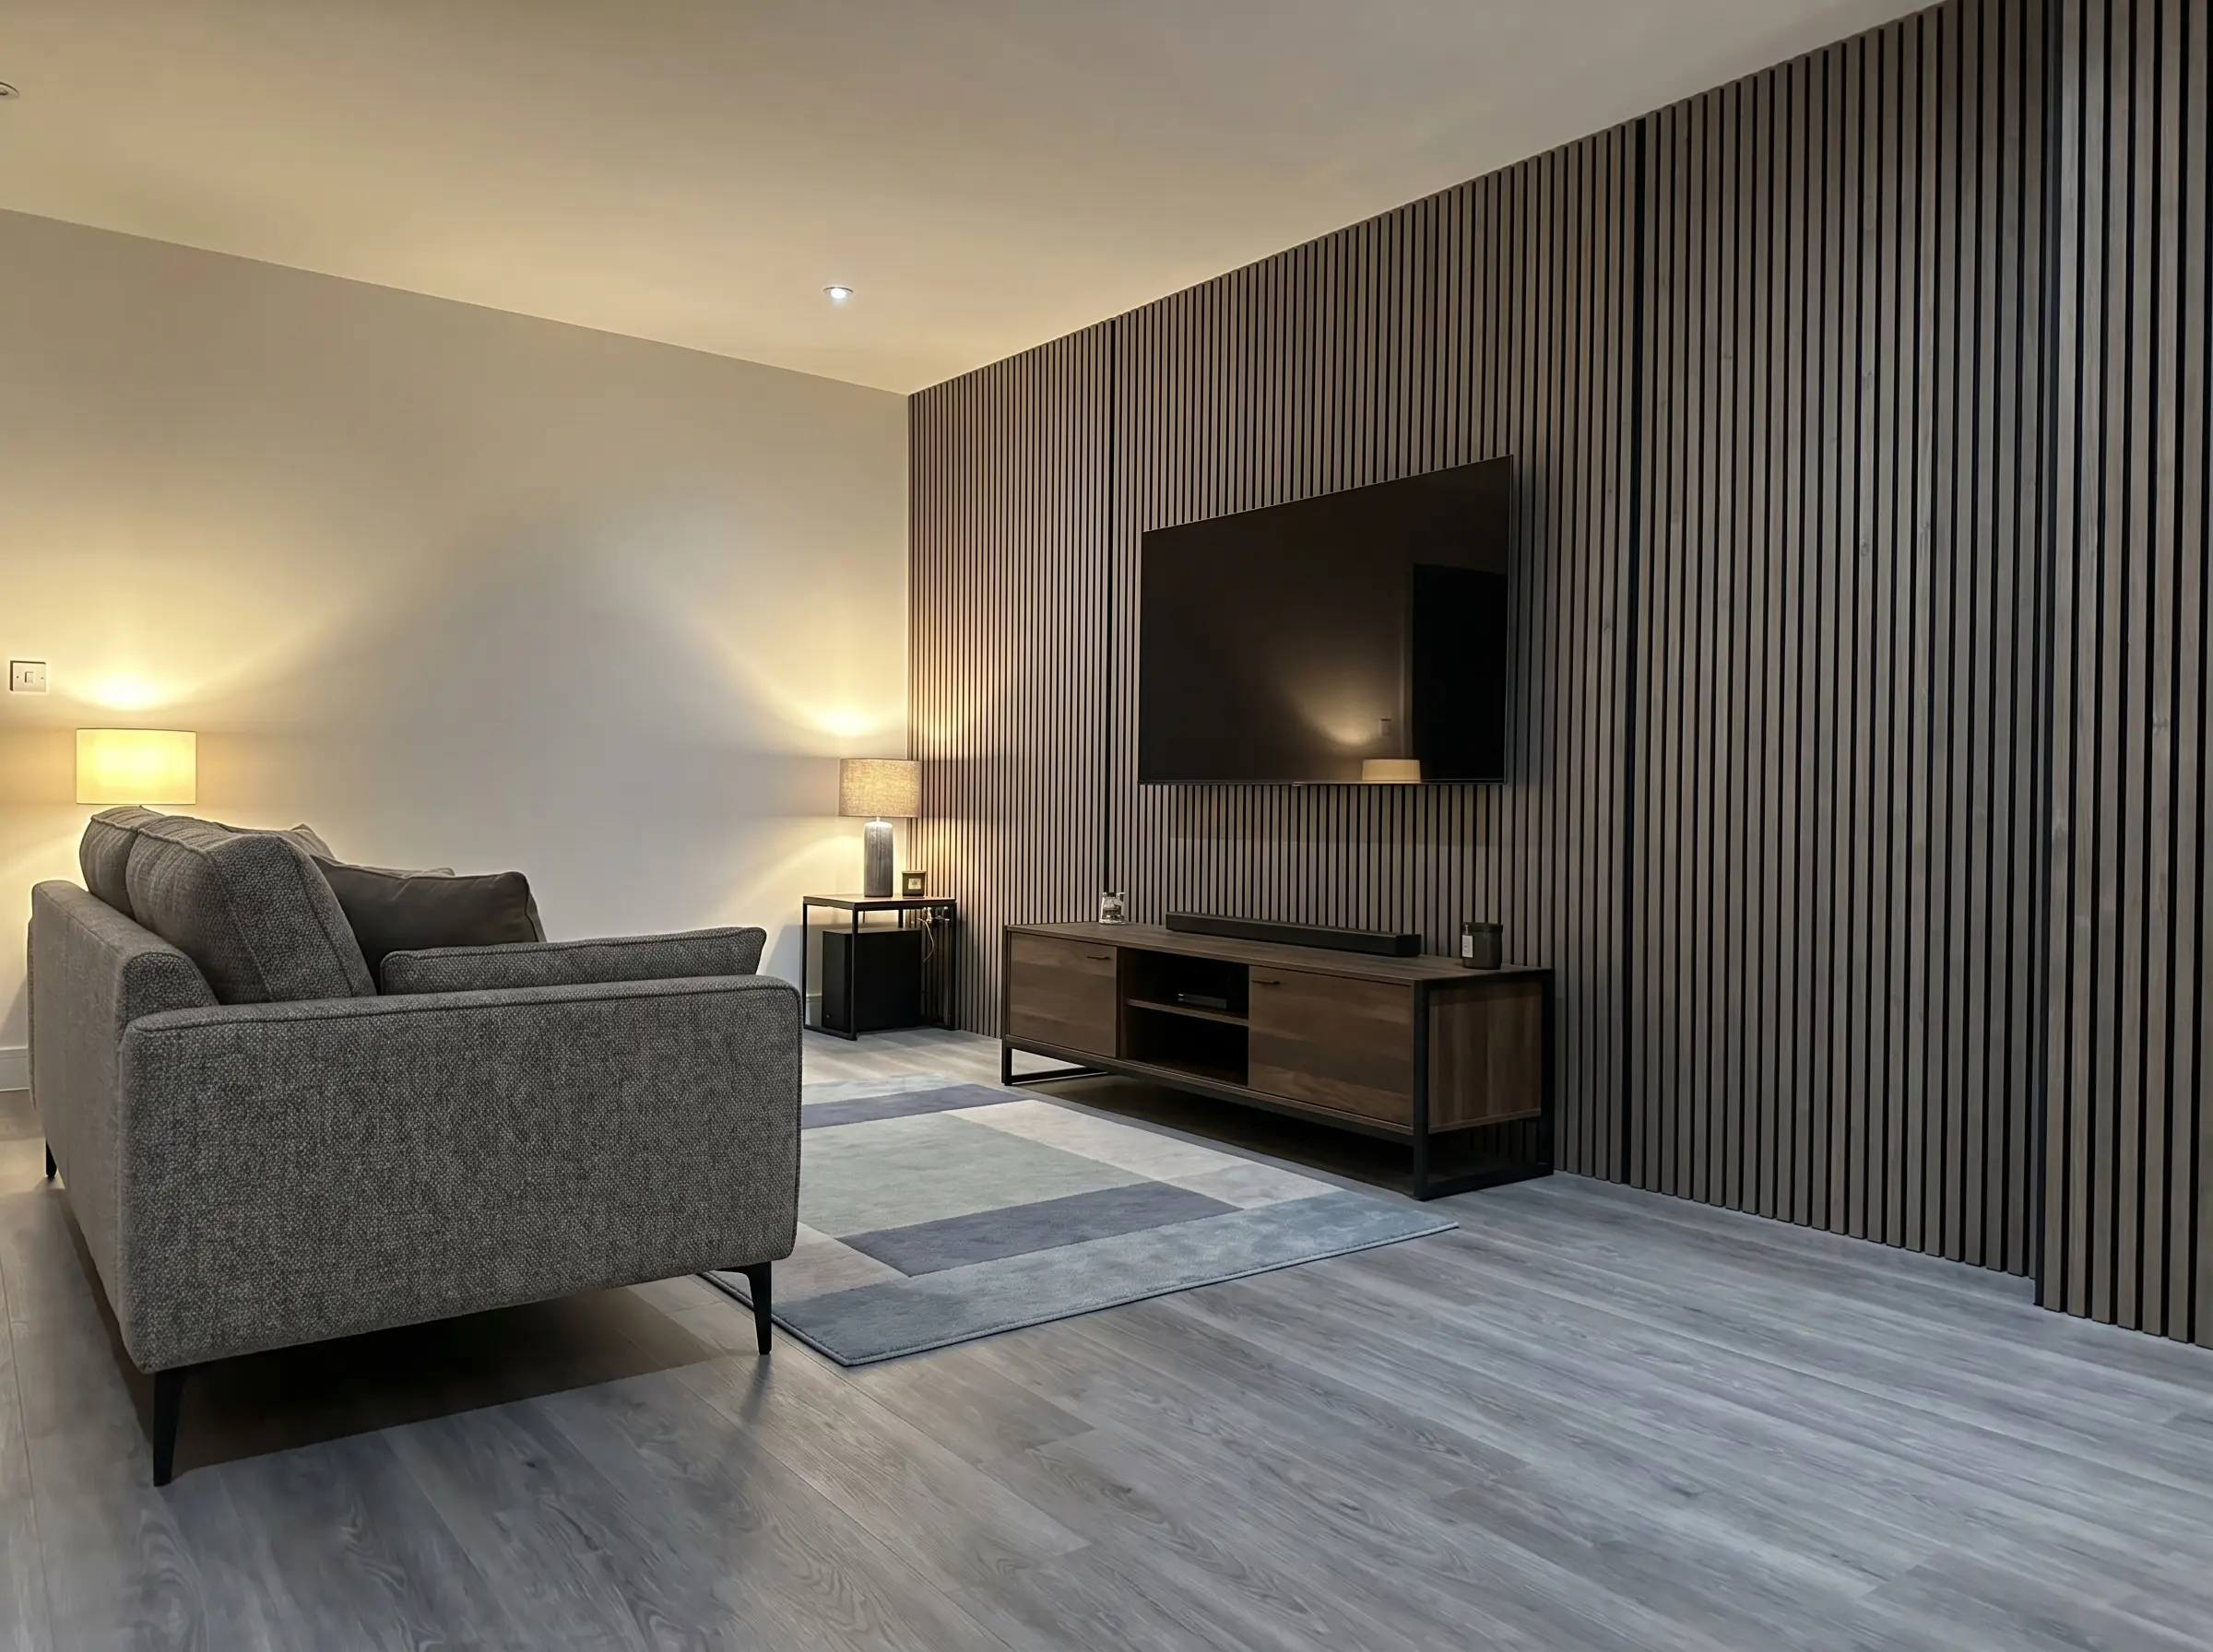
Go “Dark Mode” with Matte Black Slats for Reduced Eye Strain
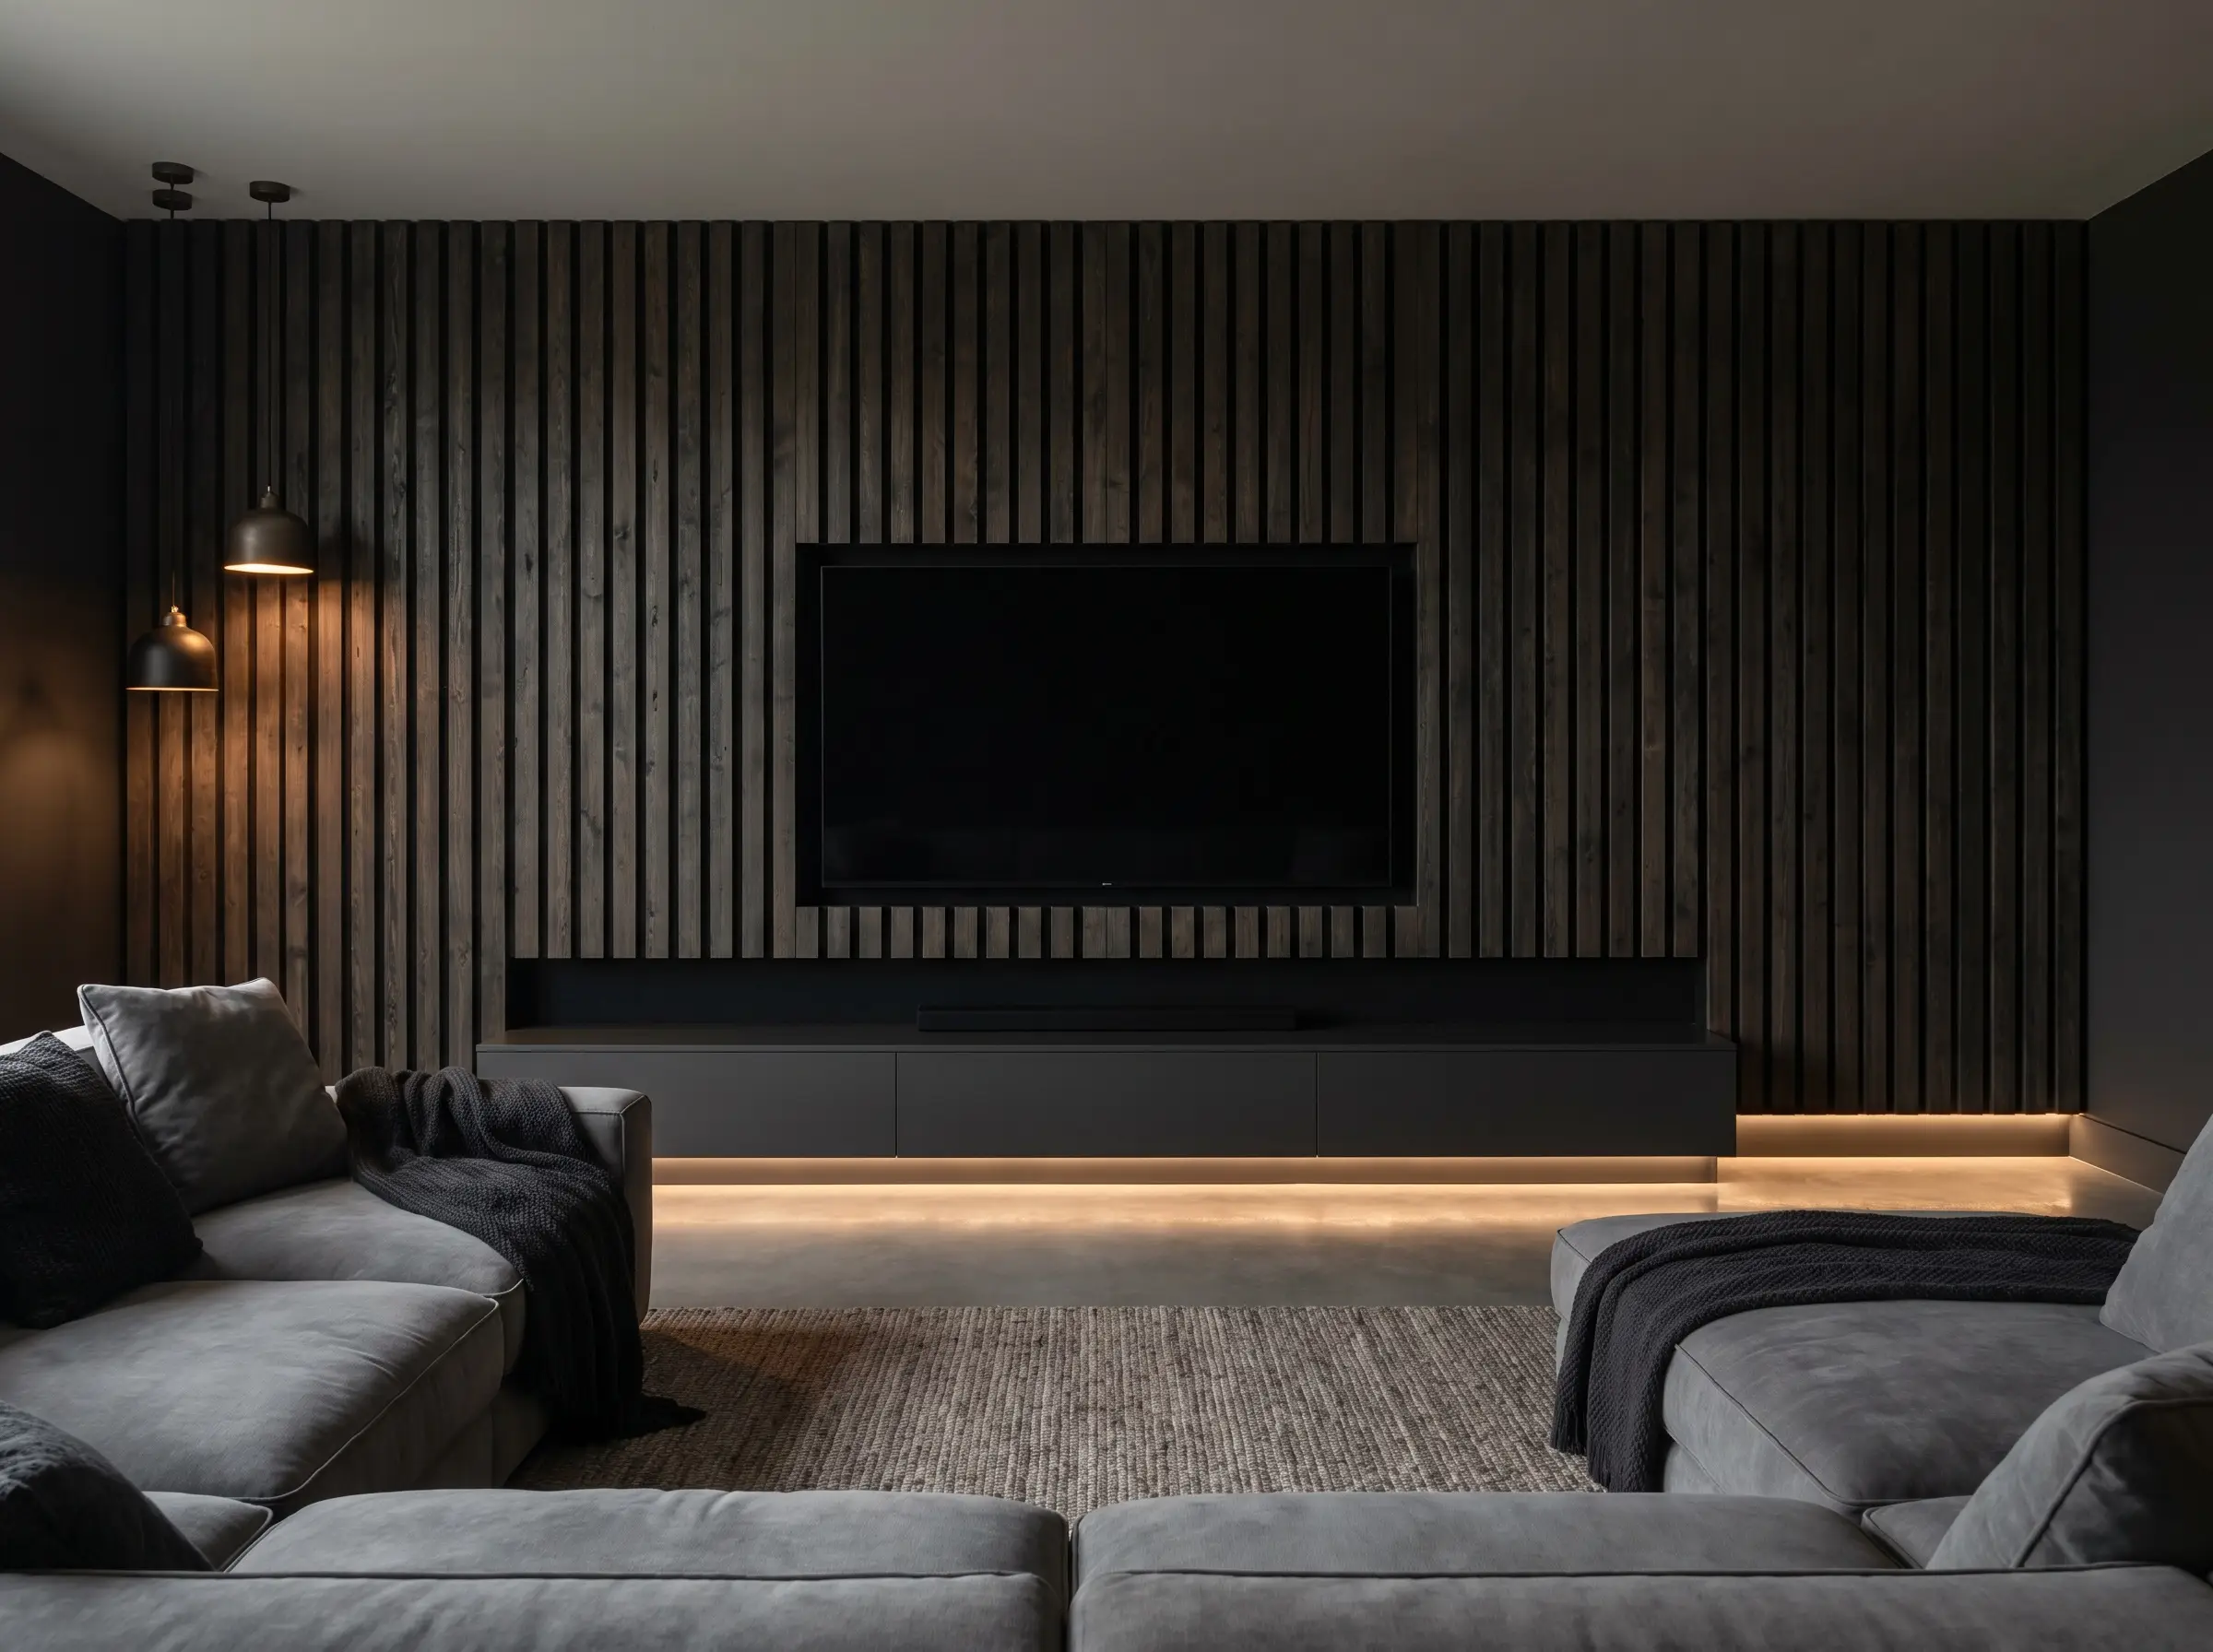
This home theater trend turns the structural dilemma of the “black box” into a deliberate design asset by camouflaging the screen entirely when powered down. The acoustic felt backing and the slats merge into a single, deeply textured void that absorbs both light and sound.
Painting the wall treatment matte black significantly reduces the harsh visual contrast between a bright television screen and the surrounding wall, actively preventing eye fatigue during movie nights.
Designer’s Note
- Vibe: Moody, cinematic contemporary.
- Paint Match: Sherwin-Williams Tricorn Black (Matte Finish).
- Acoustic Benefit: Class A sound absorption for crisp home audio.
Asymmetrical Slat Placement for a Contemporary Edge
Instead of spanning the entire wall, install acoustic slat panels only on the left or right third of your media zone. This off-center structural mass creates a striking contrast against an adjacent flat, painted surface, leaving negative space for dramatic sconce lighting.
Ditching perfect symmetry forces the eye to travel across the room, creating dynamic tension that makes standard drywall feel intentional rather than unfinished.
Designer’s Note
- Vibe: Avant-garde, gallery-inspired modern.
- Layout Strategy: Rule of thirds (33% slats, 67% negative space).
- Styling Pro-Tip: Anchor the negative space with an oversized floor lamp.
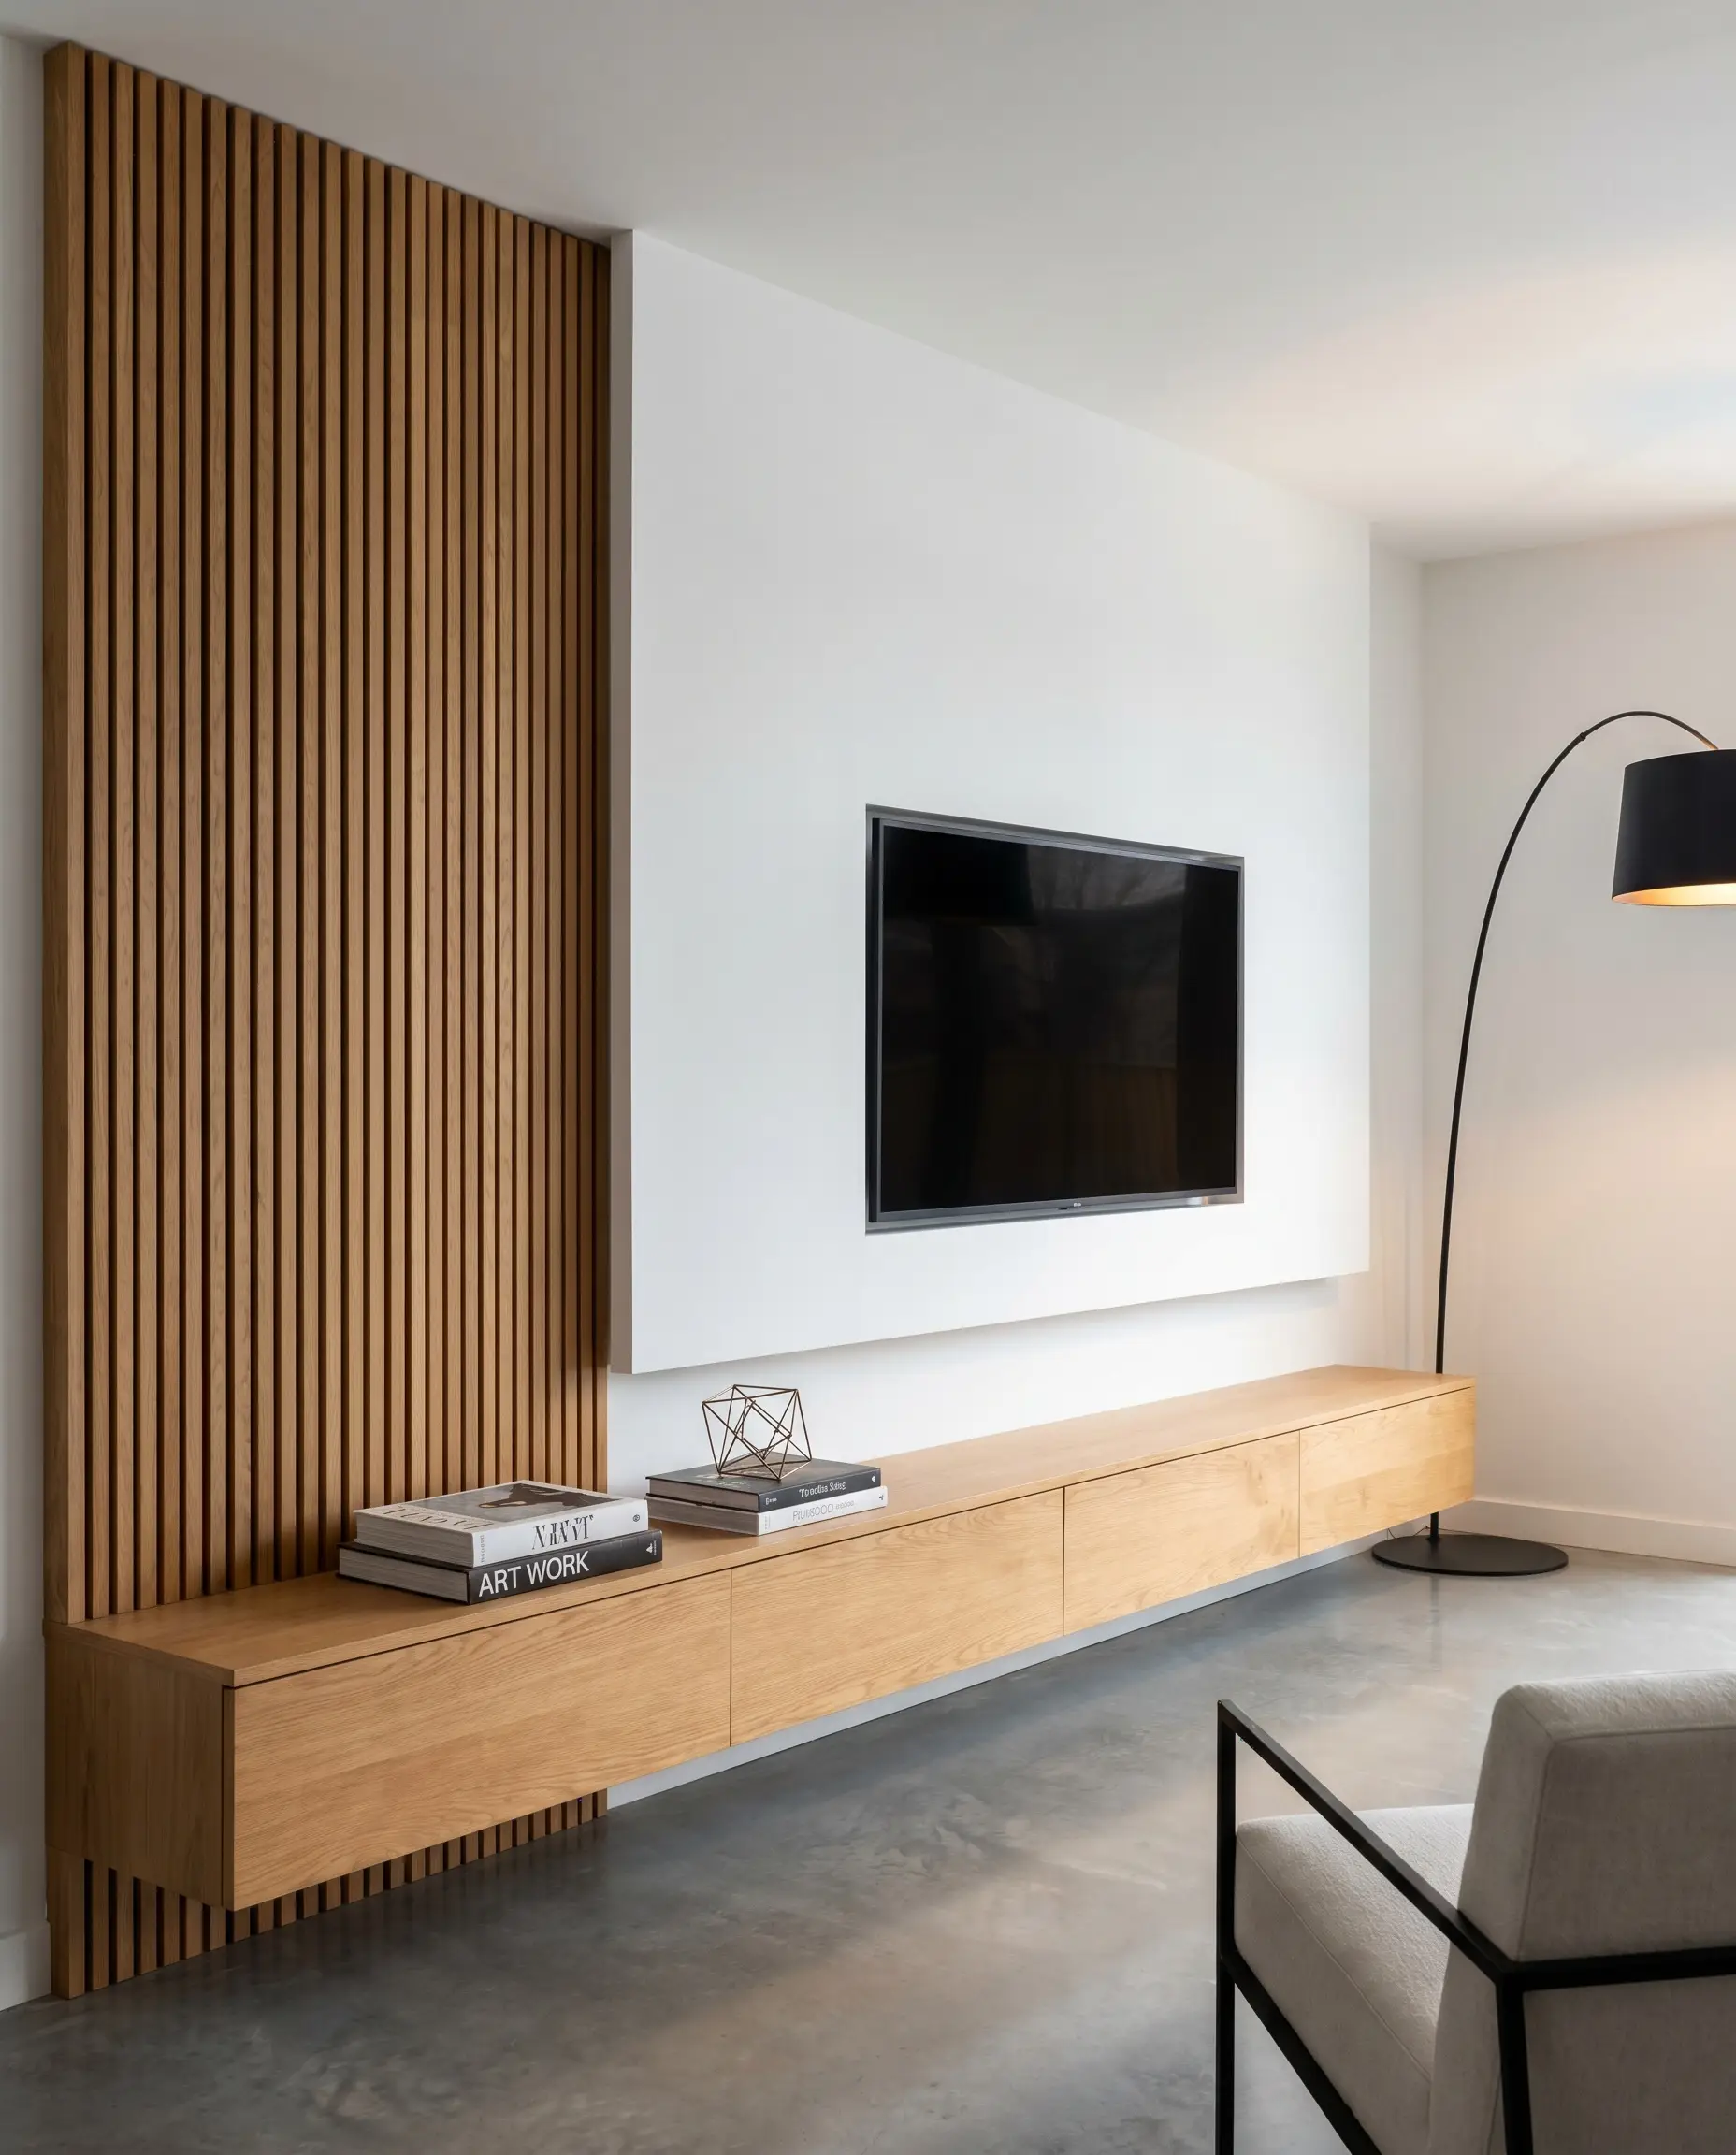
Floor-to-Ceiling Vertical Slats to Elongate the Room

To execute this properly, you must remove existing baseboards and crown molding so the wood panels run flush against the floor and ceiling planes. This seamless integration replicates the look of high-end, site-built millwork.
The unbroken vertical lines of floor-to-ceiling slats create a powerful optical illusion, drawing the eye upward and making standard 8-foot ceilings feel custom and vaulted.
Designer’s Note
- Vibe: Grand, architectural luxury.
- Installation Rule: Scribe panels directly to the ceiling line.
- Hardware Prep: Relocate lower outlets before panel installation.
Pair Warm Walnut Slats with Limewashed Drywall

Walnut brings a heavy, luxurious visual weight that grounds the media center. Flanking these dark, rich slats with a highly textured Roman clay or limewash application prevents the surrounding wall from looking flat and sterile.
Contrasting the rigid, mid-century warmth of walnut wood against the soft, suede-like texture of a limewash finish strikes a perfect balance between structured and organic.
Designer’s Note
- Vibe: Mid-century modern meets organic luxury.
- Wood Species: American Walnut veneer.
- Paint Match: Portola Paints Roman Clay.
Introduce Horizontal Slats for a Widening Optical Illusion

This orientation grounds the television closer to the floor, making it highly effective for rooms with low ceilings or exceptionally wide, low-profile media consoles. The horizontal shadow lines catch natural light beautifully throughout the day.
While vertical is the industry standard, running slats horizontally creates a tambour-style effect that visually stretches a narrow living room, making it feel expansive.
Designer’s Note
- Vibe: Retro-futuristic modern.
- Slat Width: Keep slats under 1 inch to avoid a heavy, siding-like appearance.
- Mounting Strategy: Ensure horizontal seams align perfectly across multiple panels.
The “Half-Wall” Slat Design with a Marble Backsplash
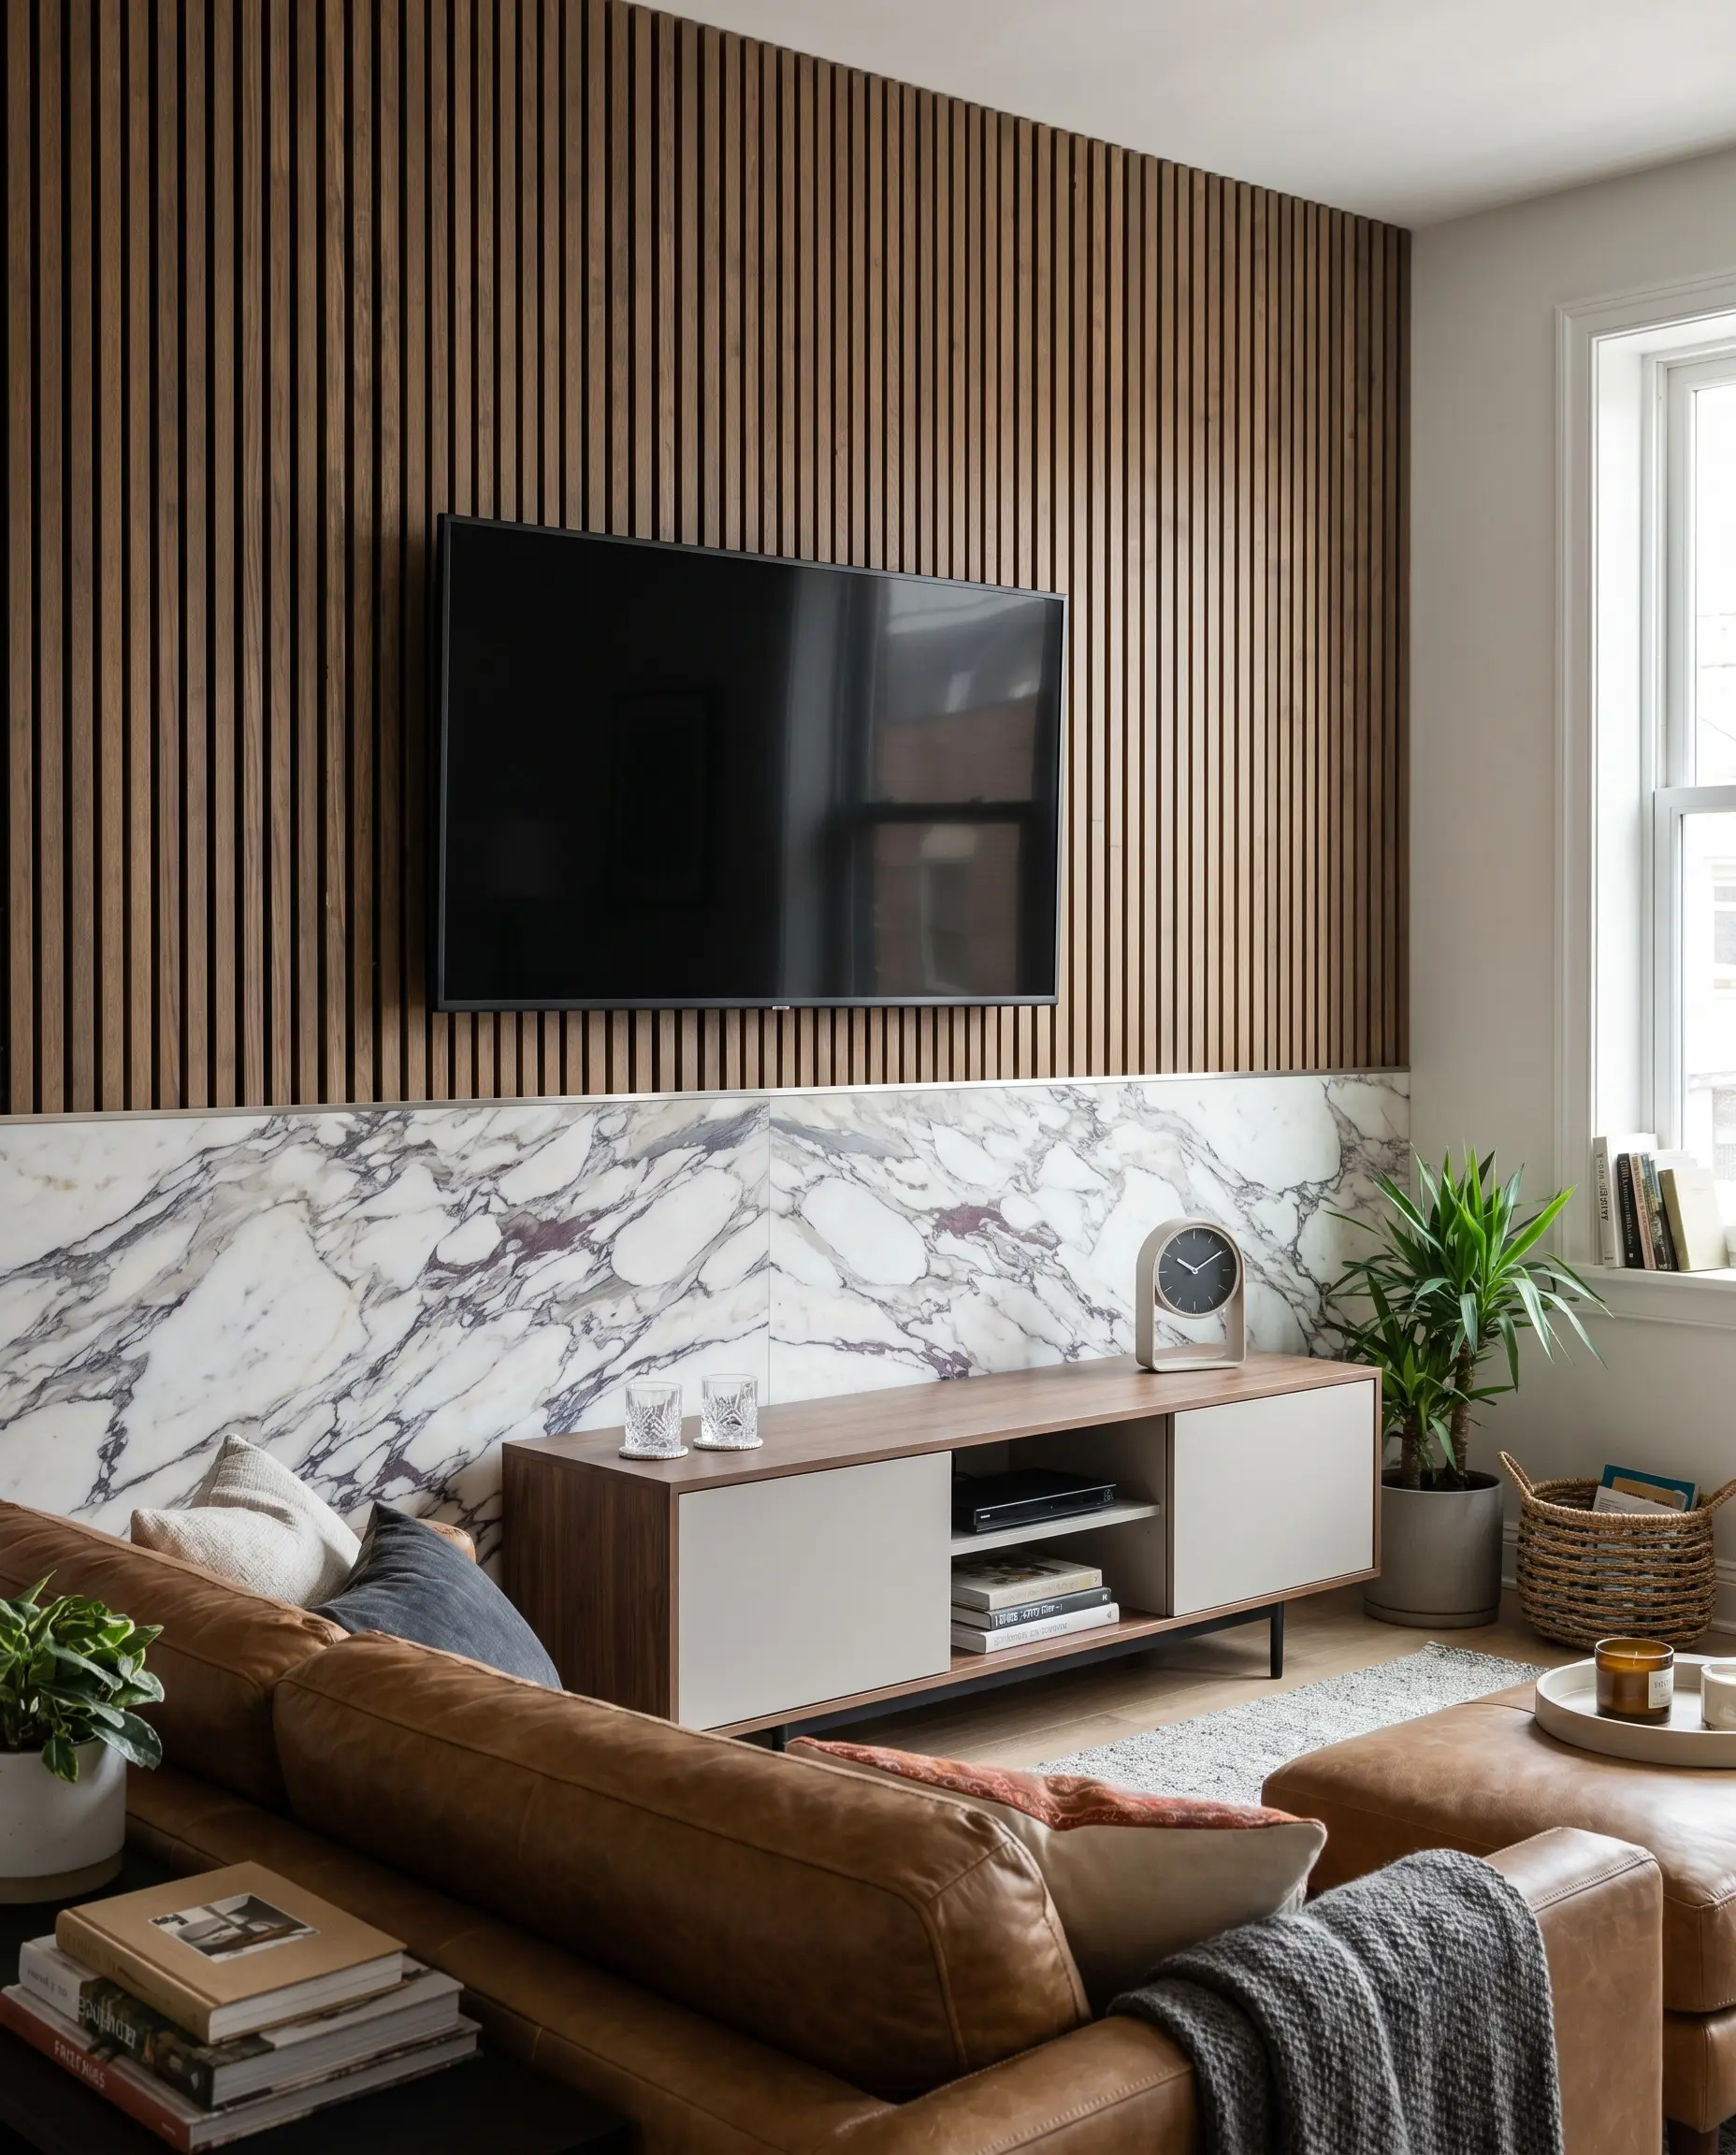
Install the acoustic panels on the upper half of the wall to handle sound dampening, while anchoring the lower half behind the console with a slab of heavily veined marble or sintered stone. This requires precise depth matching so the stone and wood sit flush.
Splitting the wall horizontally with wood on top and stone on the bottom establishes a hyper-luxury, bespoke material palette reminiscent of high-end hotel lobbies.
Designer’s Note
- Vibe: Unapologetic, high-end luxury.
- Material Pairing: Smoked Larch slats with Calacatta Viola marble.
- Fabrication Detail: Use a slim metal Schluter strip to transition between the wood and stone.
You can apply wallpapers, paints, etc. on walls and see how they look in various interiors.
Tech & Integration: Mounting, Wires, and Lighting
A beautifully paneled surface is instantly ruined by dangling HDMI cables and exposed power cords. This phase of the build dictates how seamlessly your technology merges into the millwork.
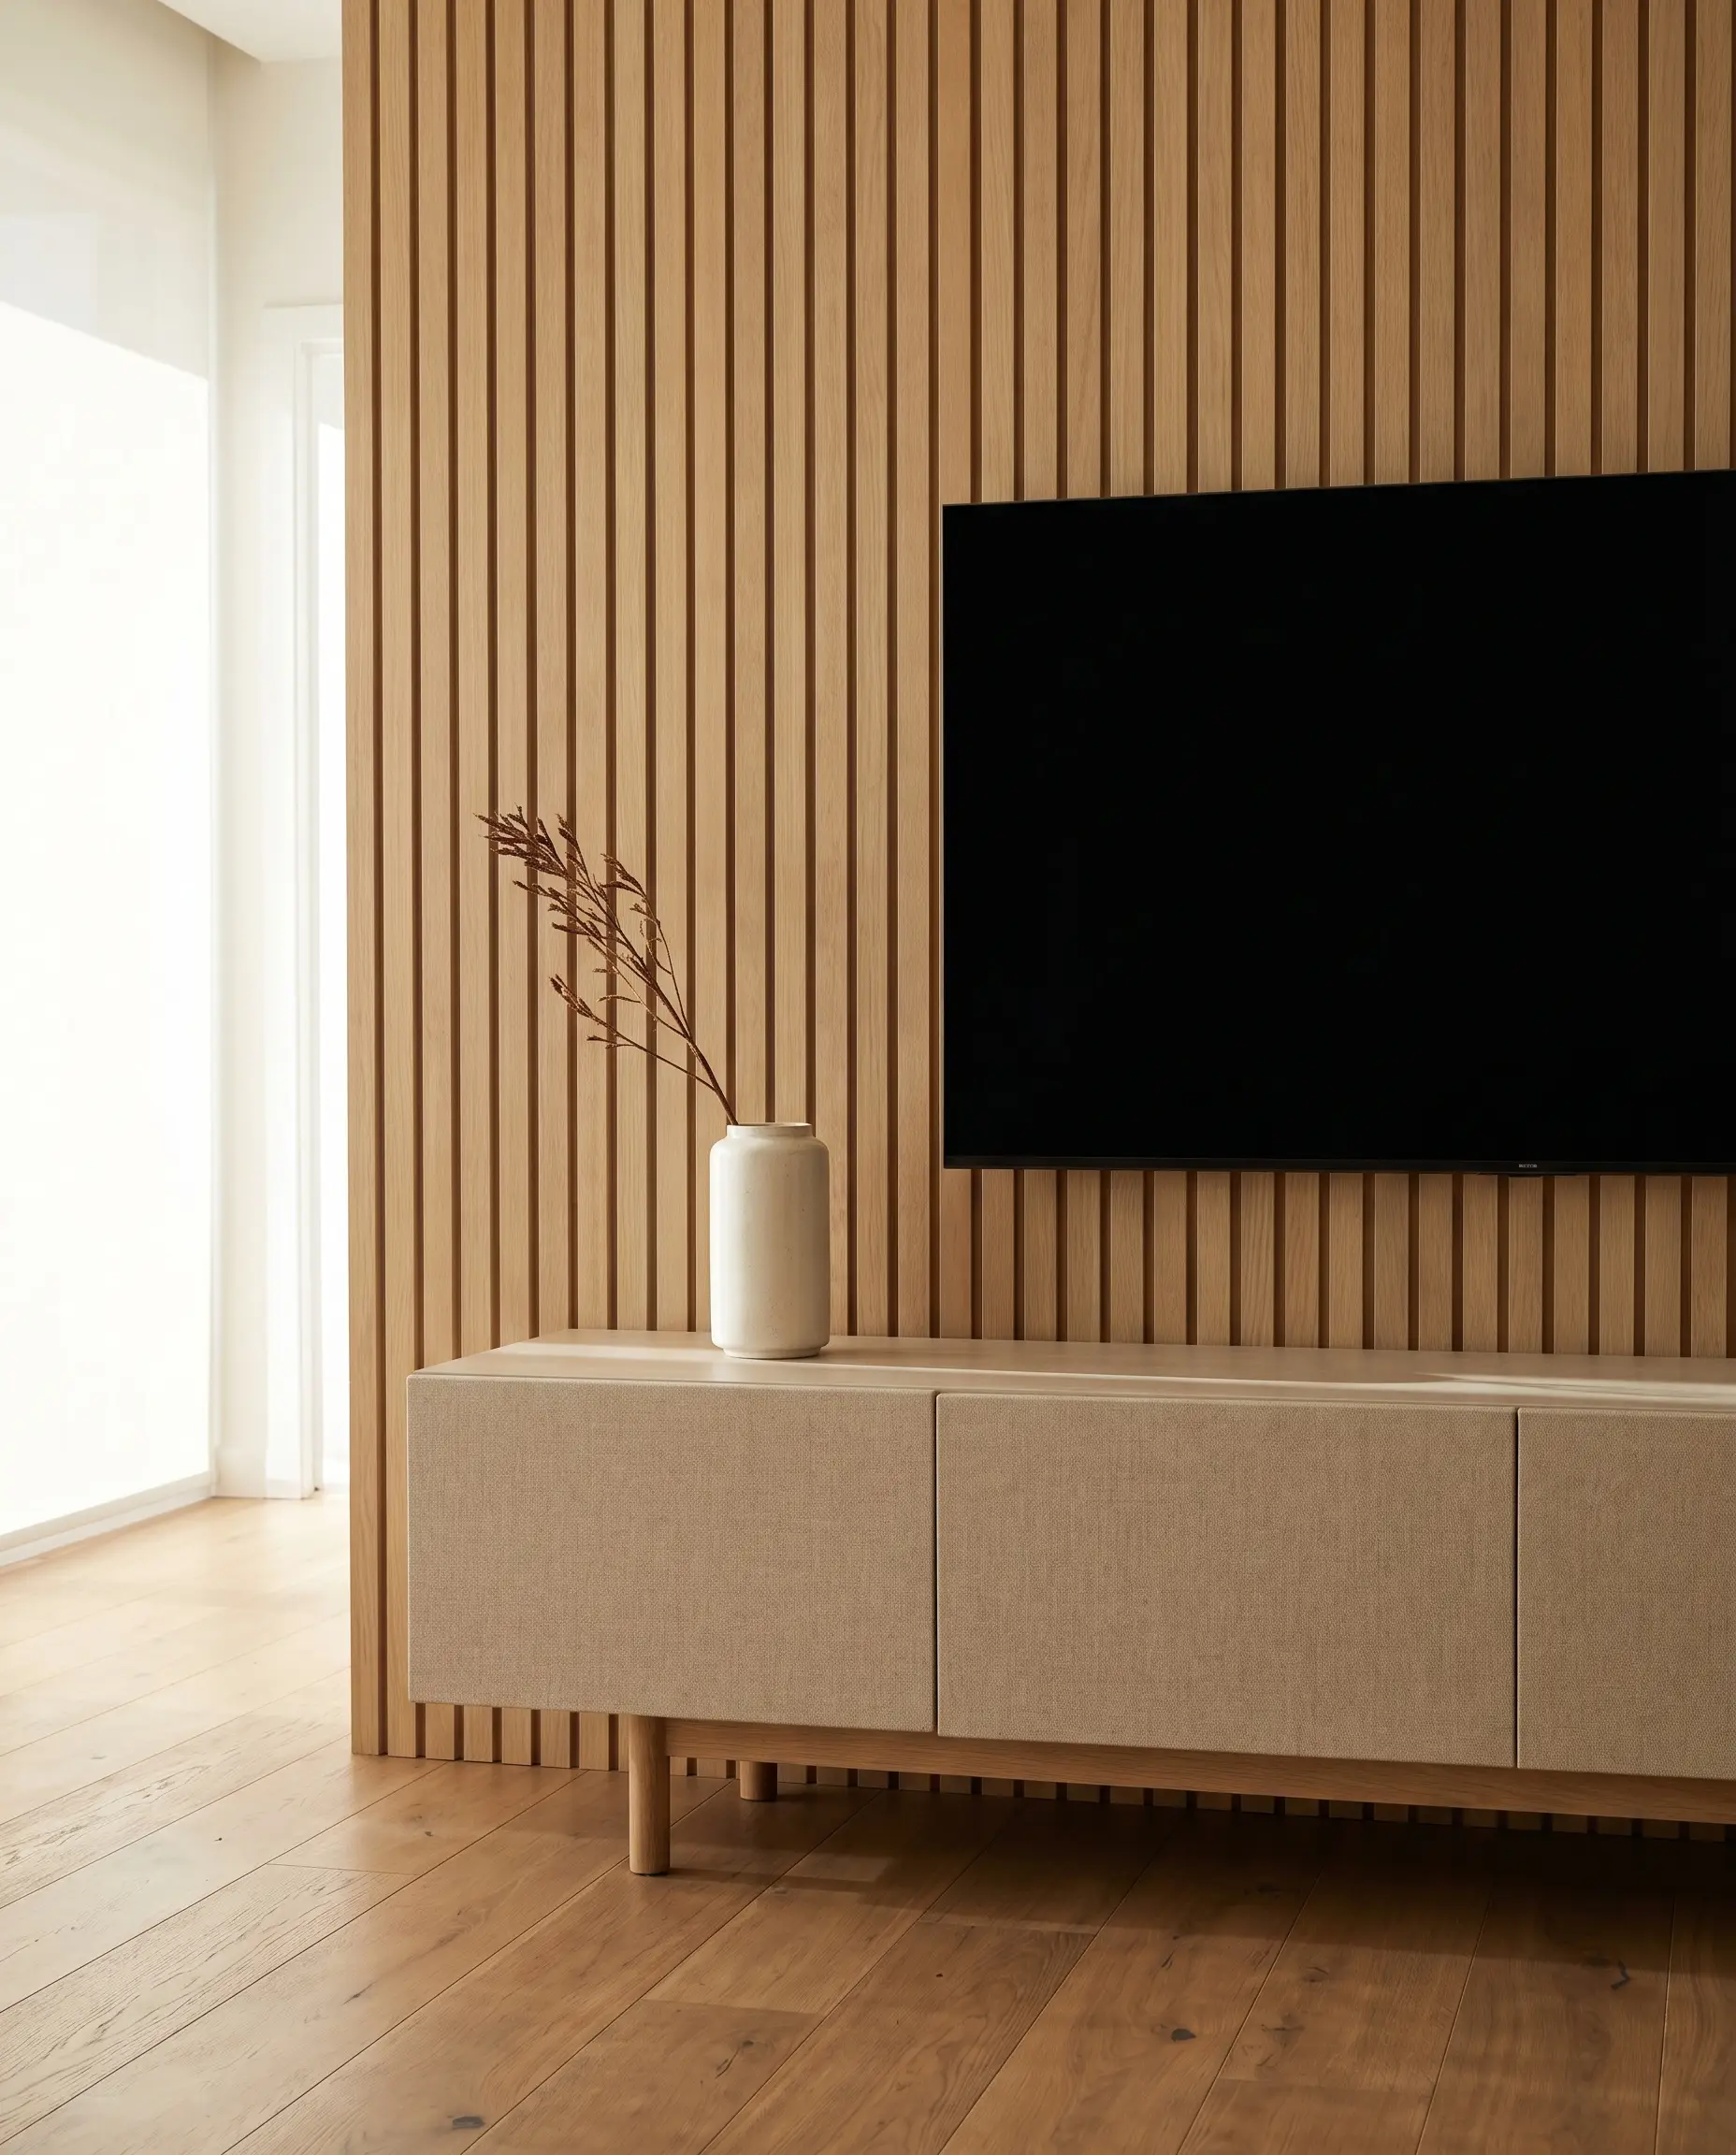
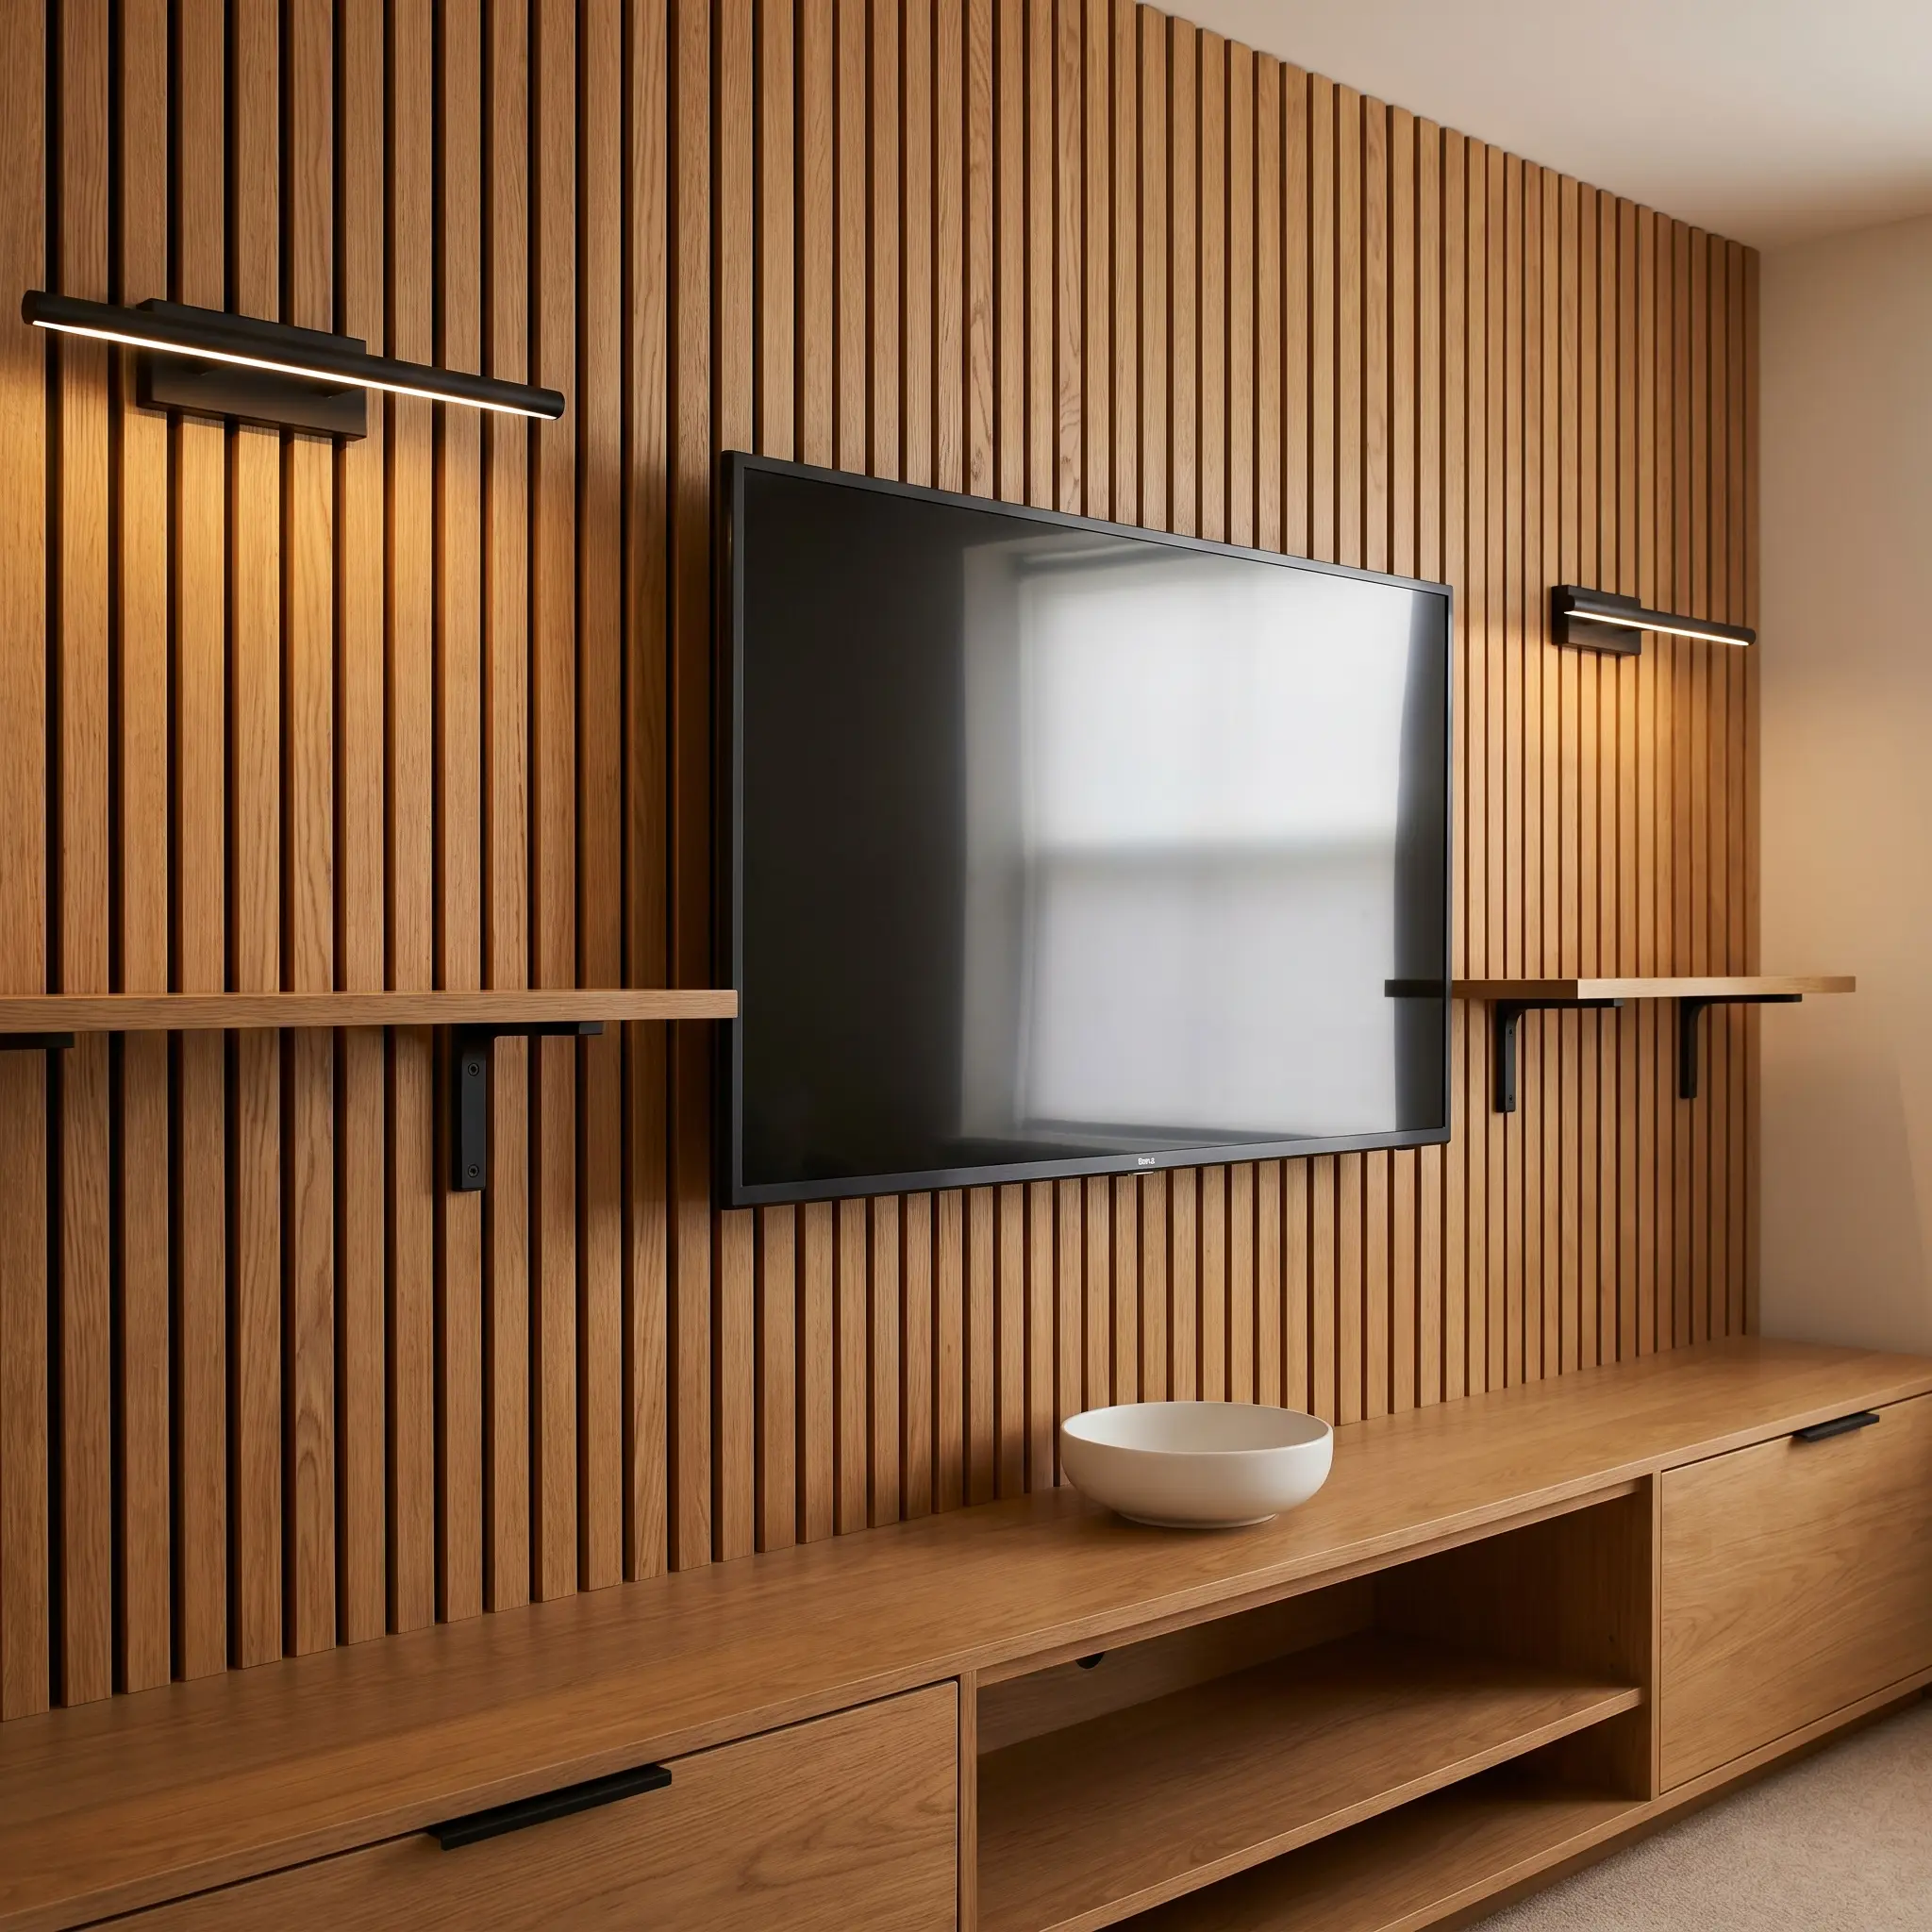
Inset LED Aluminum Channels Between Wood Slats
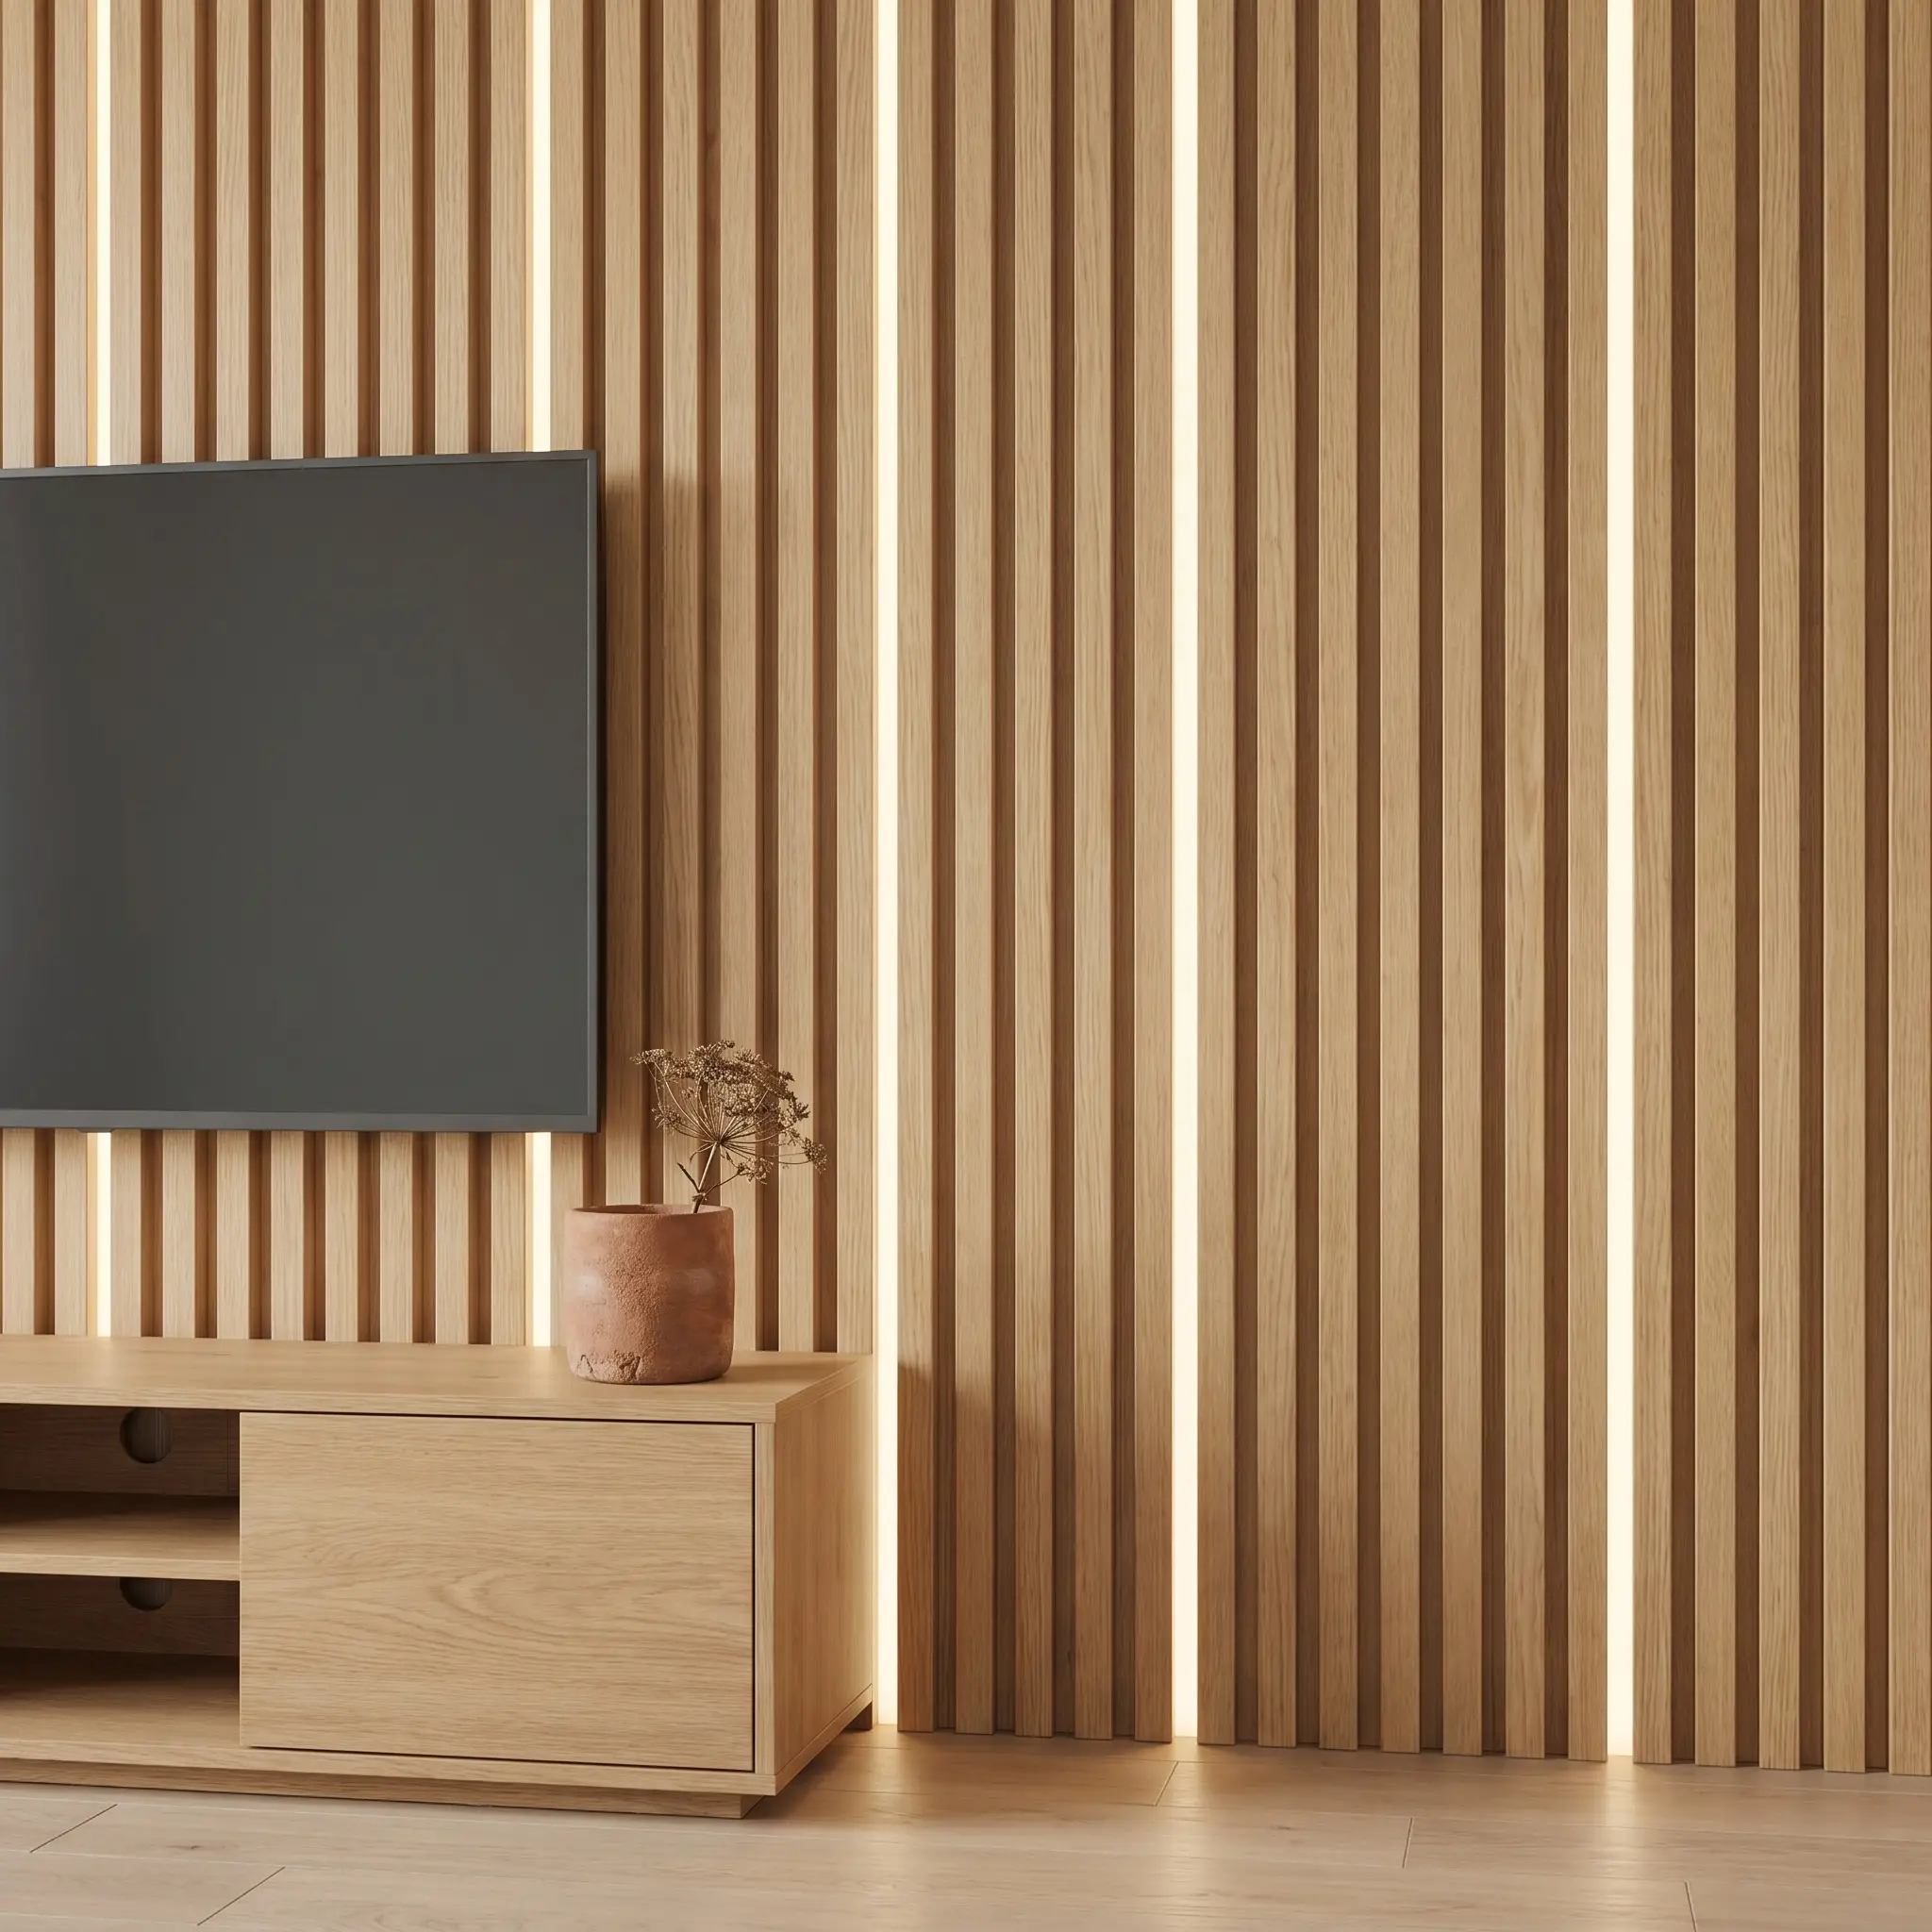
Instead of haphazardly sticking raw LED tape to the wood face, integrate the lighting directly into the architecture. By seating aluminum extrusions fitted with milky diffusers into the exact gaps between the slats, you achieve a flush, premium glow that looks factory-installed.
- Lighting Goal: Architectural accent lighting.
- Diffuser Choice: Spotless milky white covers to eliminate visible LED dots.
- Tech Spec: Source 12mm wide aluminum LED channels that perfectly friction-fit into the standard 13mm gaps of pre-made acoustic panels.
Hide Cables Behind Acoustic Felt Backing
The greatest advantage of pre-made panels like WoodUpp Akupanel is the forgiving nature of the recycled felt. You can strategically slice through the black acoustic felt backing to drop cables straight down the wall cavity, rendering them completely invisible.
- Goal: Zero visible wires.
- Safety Rule: Only route low-voltage cables (HDMI, Ethernet) through the wall cavity unless using an in-wall rated power kit.
- Tech Spec: Cut a 2-inch vertical slit in the felt directly behind the TV mount and another directly behind the media console to route cords behind the MDF core.
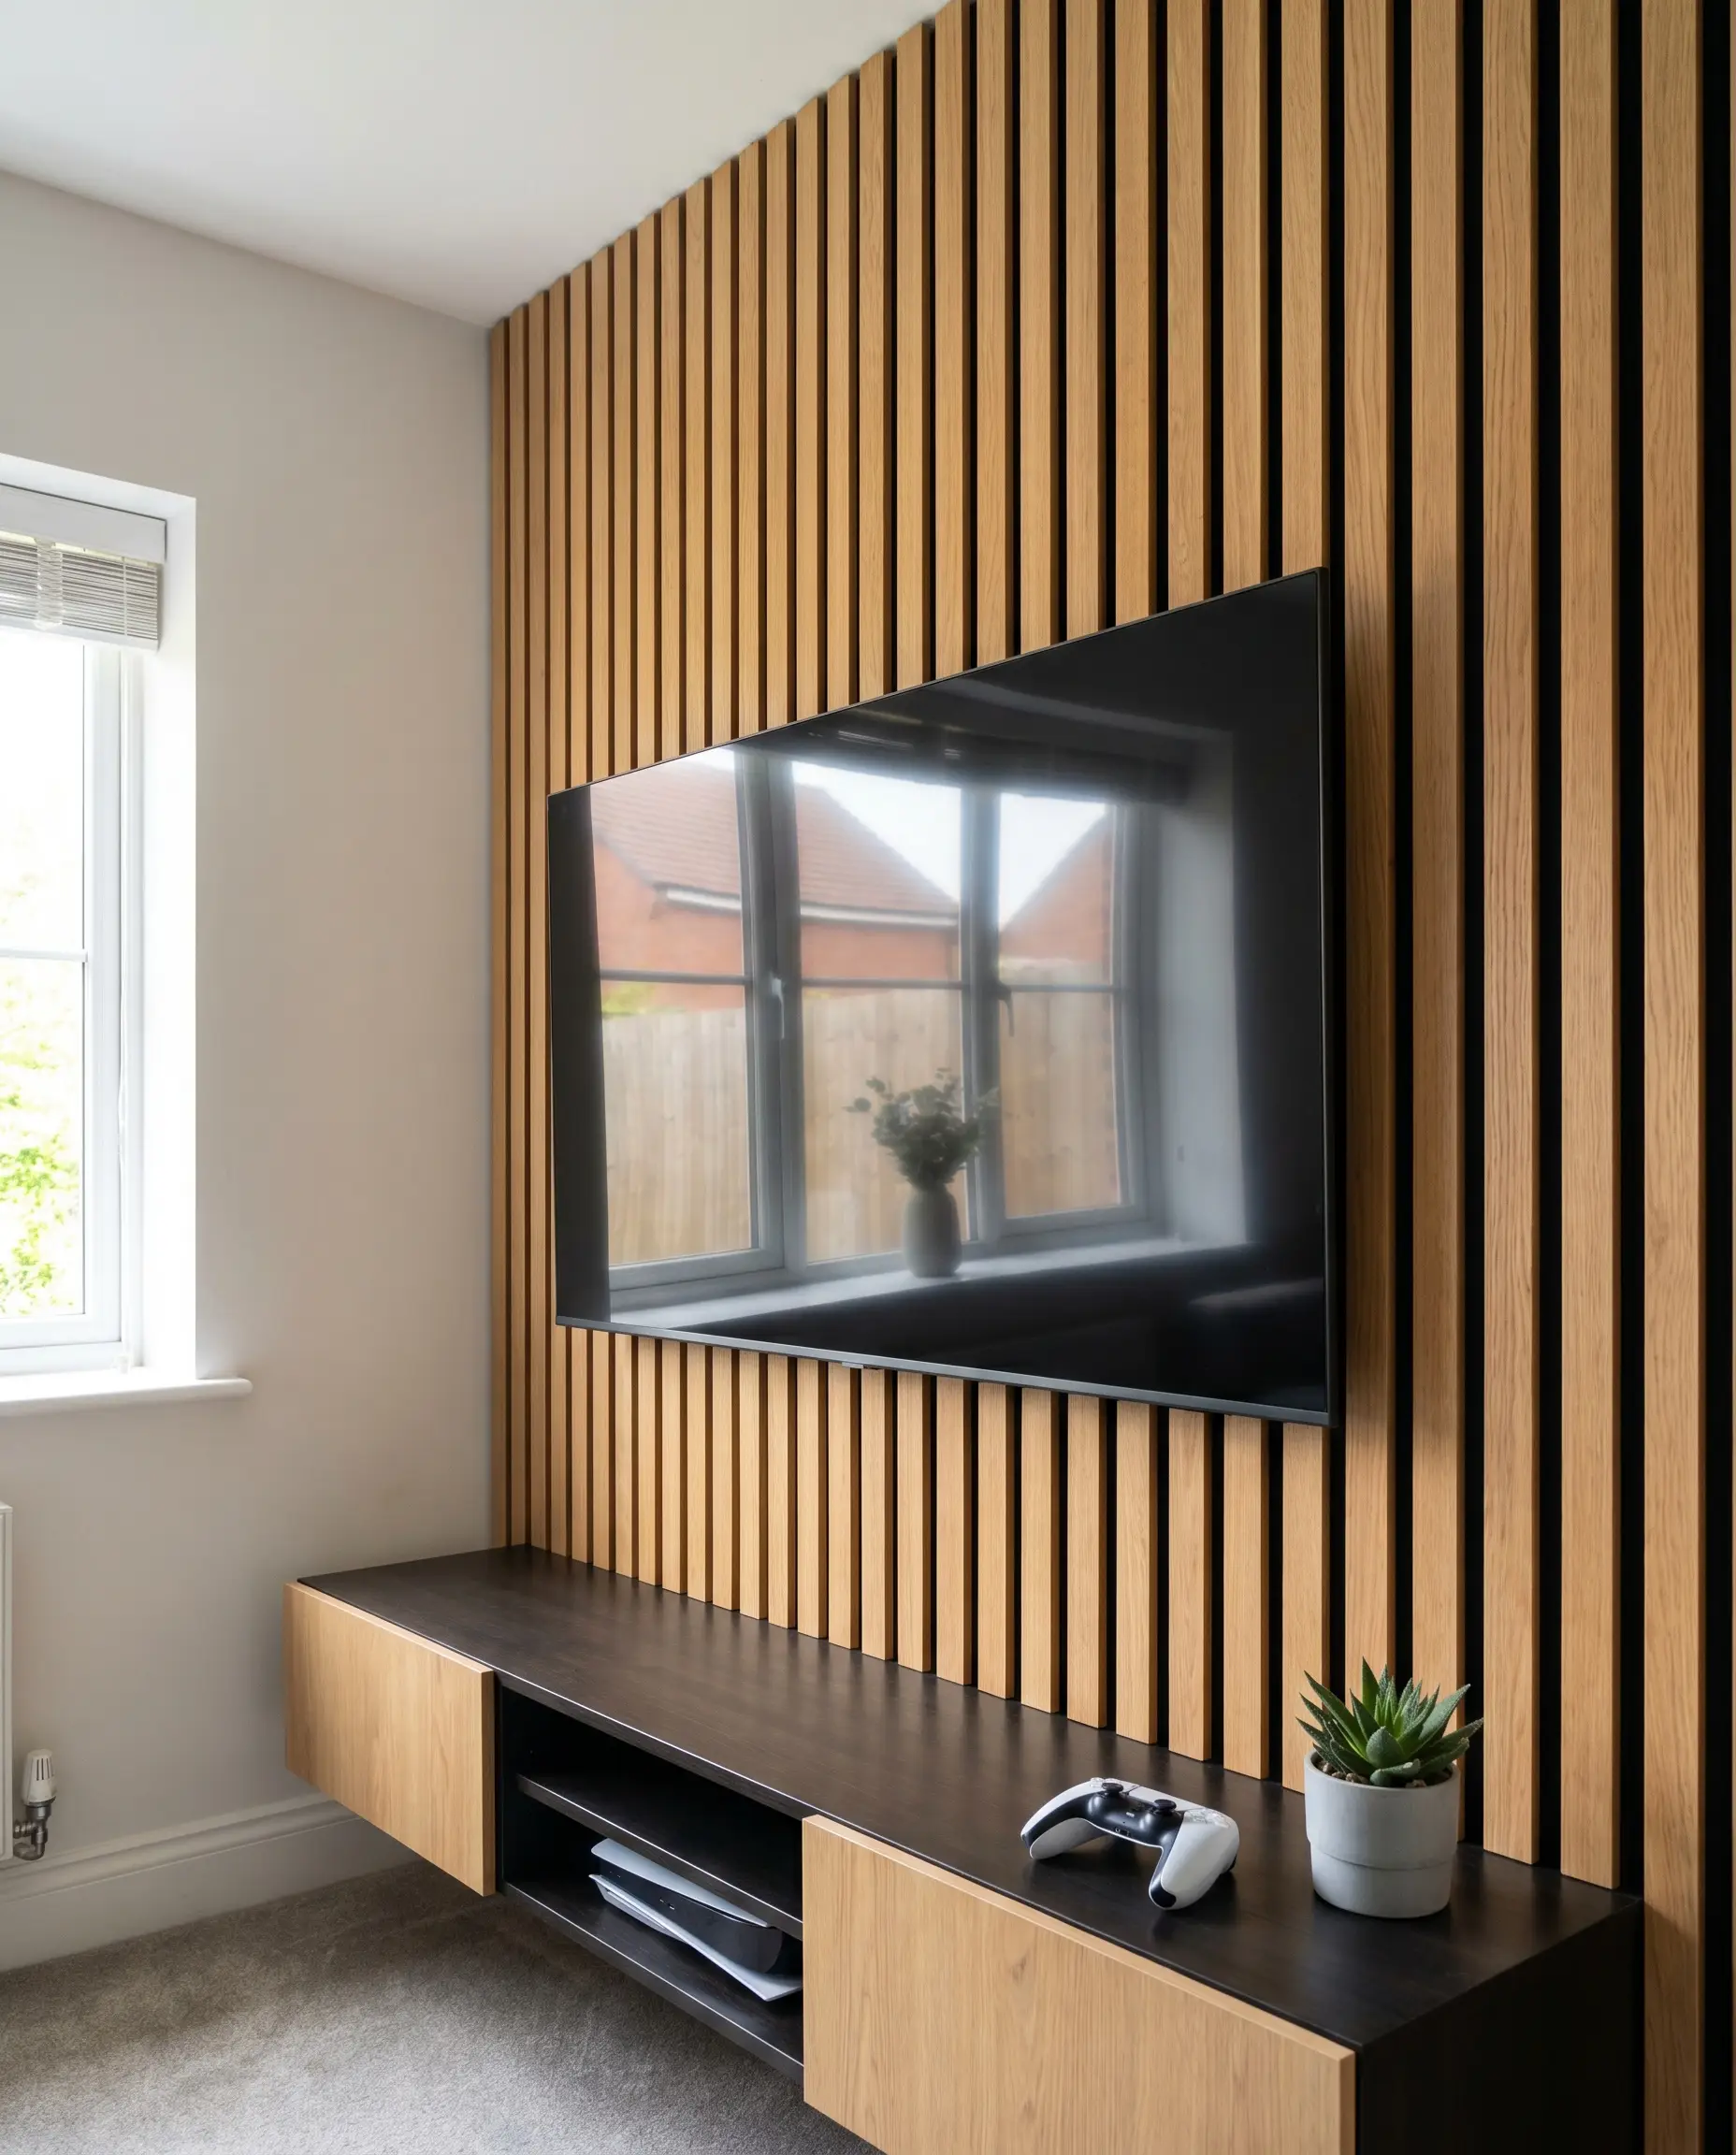
Float the TV with an Ultra-Slim VESA Mount
To make the television look like an integrated piece of the architecture rather than an afterthought bolted to the surface, the screen must sit absolutely flush against the wood. Standard articulating arms push the screen too far forward, breaking the clean geometric lines.
- Goal: Flush, built-in aesthetic.
- Recessed Box: Install a recessed media box in the drywall behind the mount to house the plug heads.
- Tech Spec: Utilize a zero-clearance or ultra-slim VESA mount that keeps the back of the television within 0.5 inches of the slat face.
Recess the TV into a Slat-Framed Niche
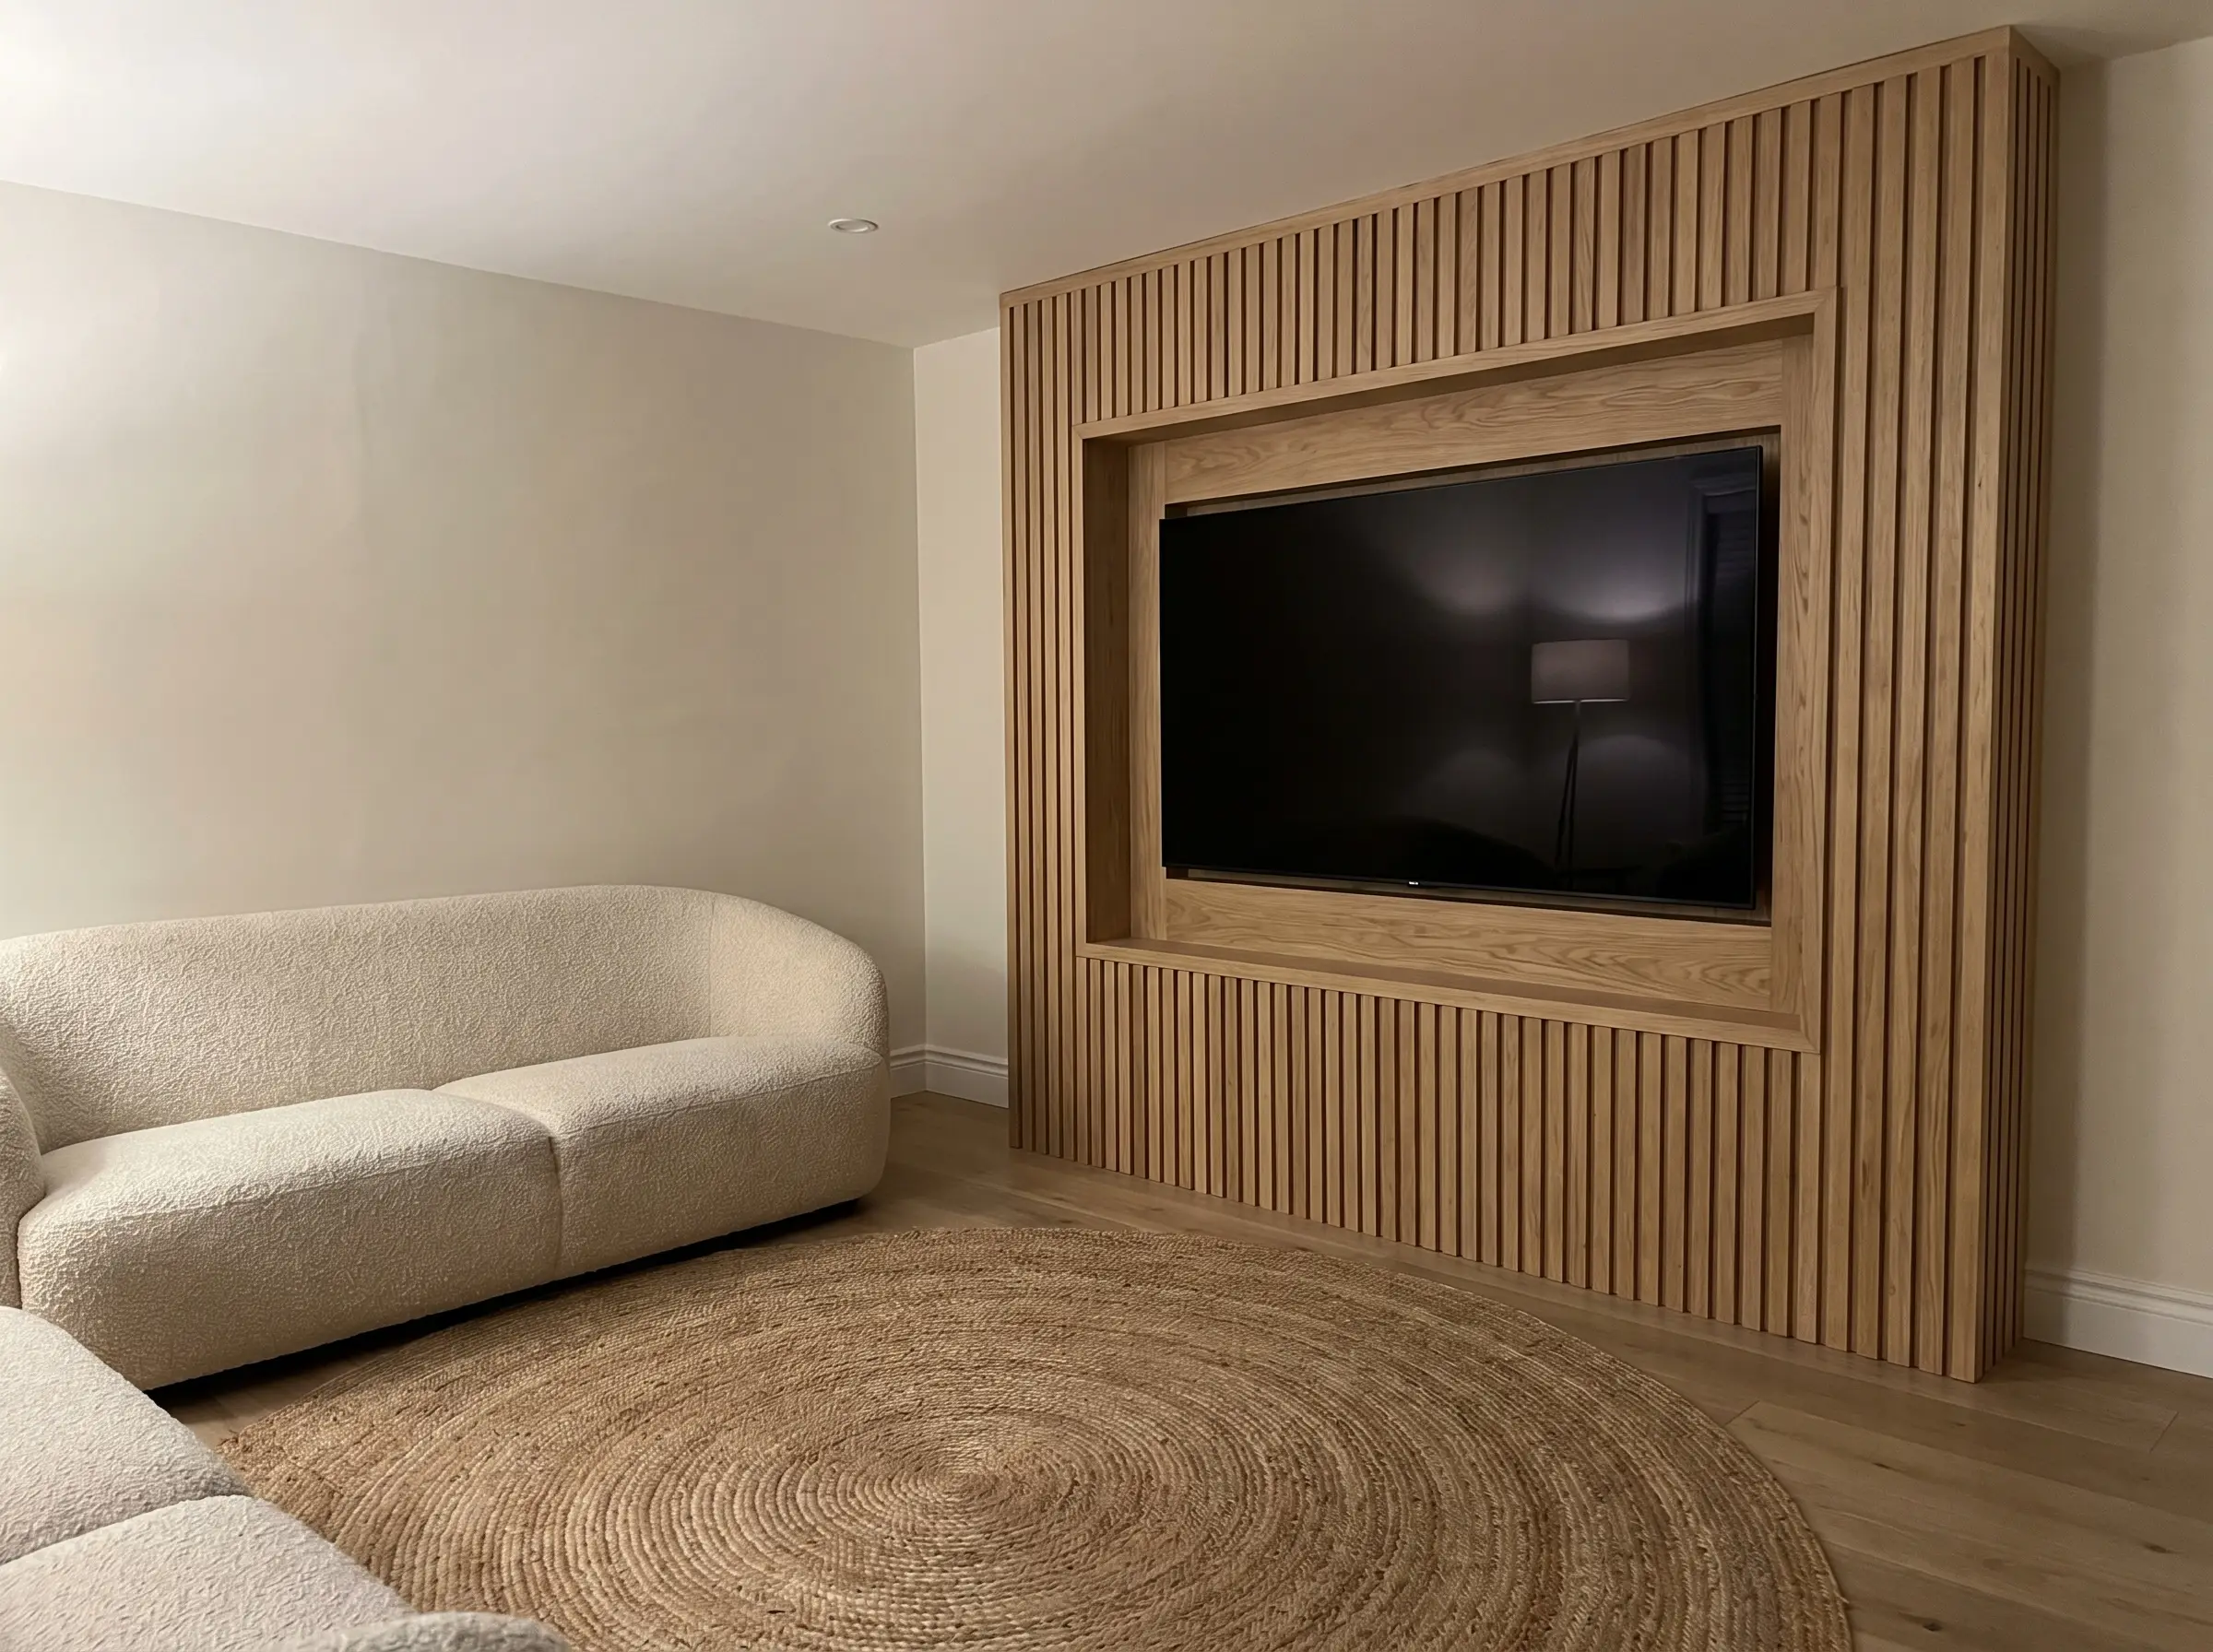
If you are building a custom drywall bump-out, framing a recessed niche specifically for the television creates a flawless, bespoke look. The surrounding vertical wood panels then act as a deep, architectural picture frame for the screen.
- Goal: Custom architectural containment.
- Ventilation: Leave a 1-inch perimeter gap inside the niche to prevent the screen from overheating.
- Tech Spec: Build the framing niche 1.5 inches deeper than the total depth of your TV and mount combined to ensure the screen sits perfectly flush with the outer slat face.
Backlight the TV Screen with RGB Bias Lighting
Adding smart LED strips to the rear perimeter of the television does more than look highly futuristic; it actively enhances the perceived contrast of your screen. When this ambient bias lighting bounces off the textured wood grooves, it creates a striking three-dimensional halo effect.
- Goal: Enhanced viewing contrast and depth.
- Control Integration: Sync the lighting strip to your television’s USB port so it powers on automatically.
- Tech Spec: Install a 6500K pure white or RGB bias lighting strip positioned 2 inches inward from the television’s outer edge.
Conceal Soundbars Within a Slatted Media Console
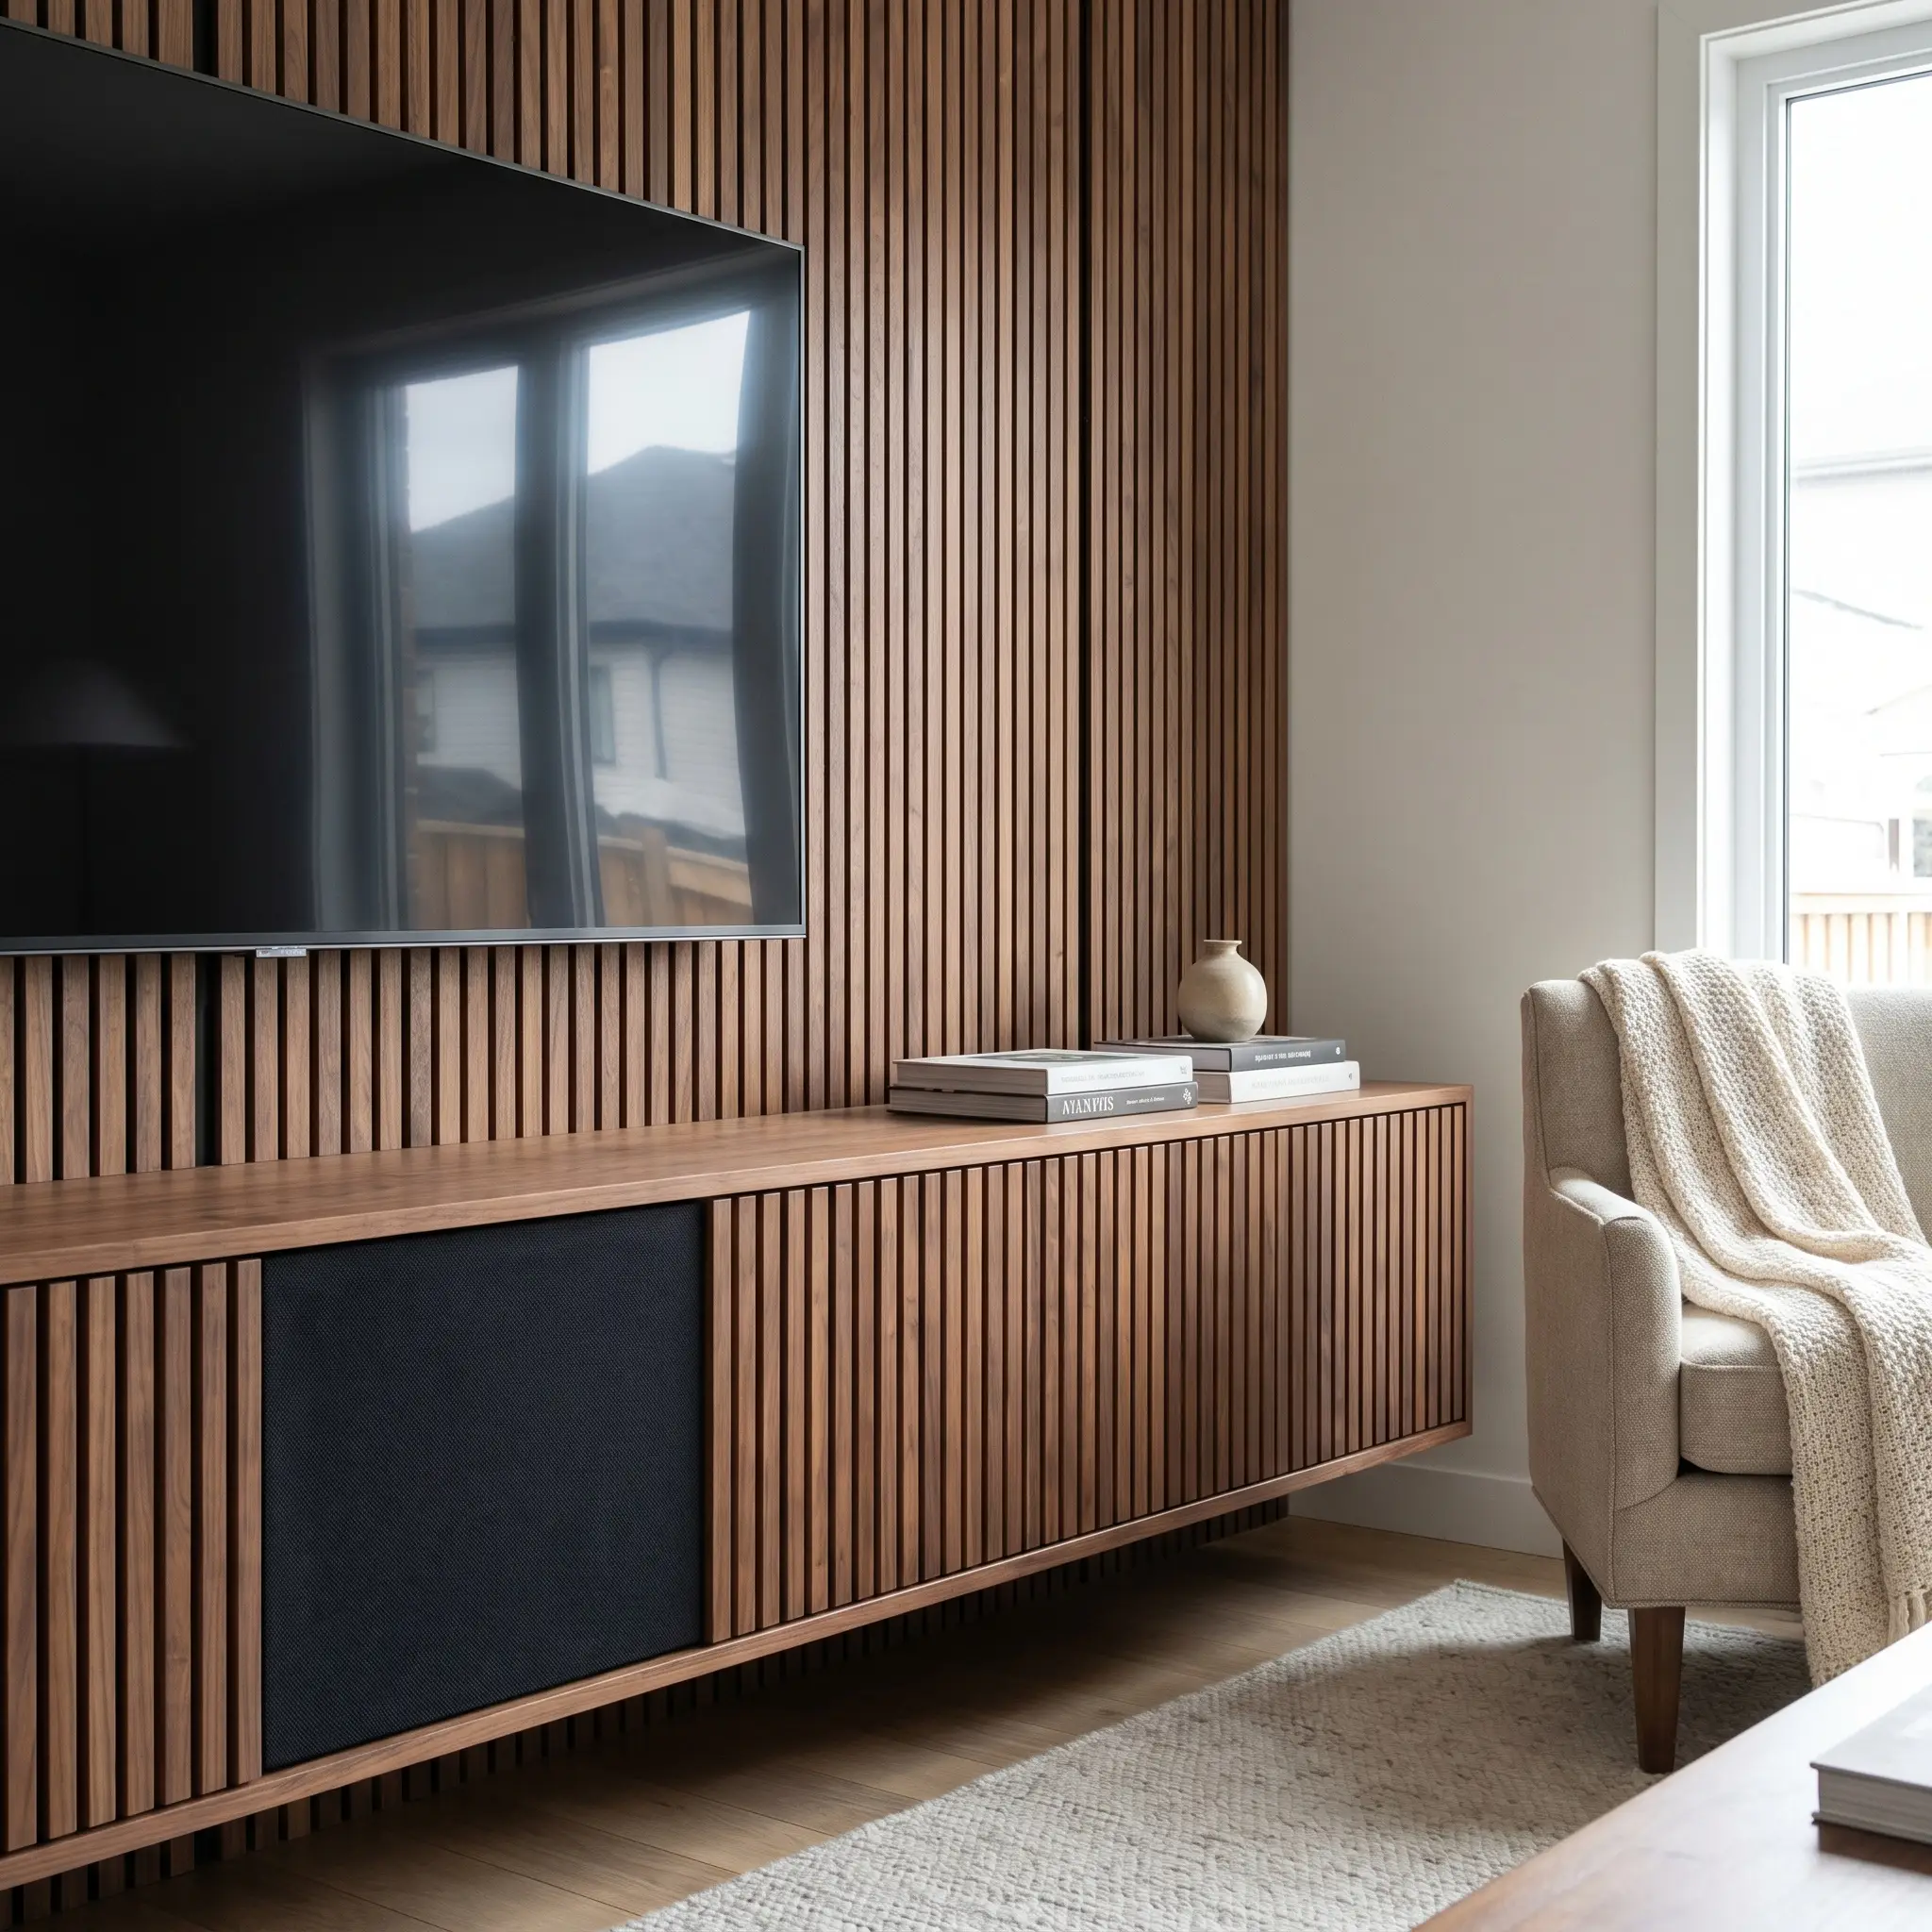
Do not let a bulky, plastic soundbar interrupt your pristine wood wall. By matching your wall slats to a custom floating media console featuring identical slatted doors, you can hide your audio equipment completely out of sight.
- Goal: Hidden, high-fidelity audio.
- Vibration Control: Place the soundbar on neoprene isolation pads inside the cabinet to prevent rattling.
- Tech Spec: Ensure the console doors feature a minimum 0.5-inch gap between slats to allow infrared remote signals and high-frequency sound waves to pass through unobstructed.
Create a “False Chimney” Media Wall for Fireplace Integration
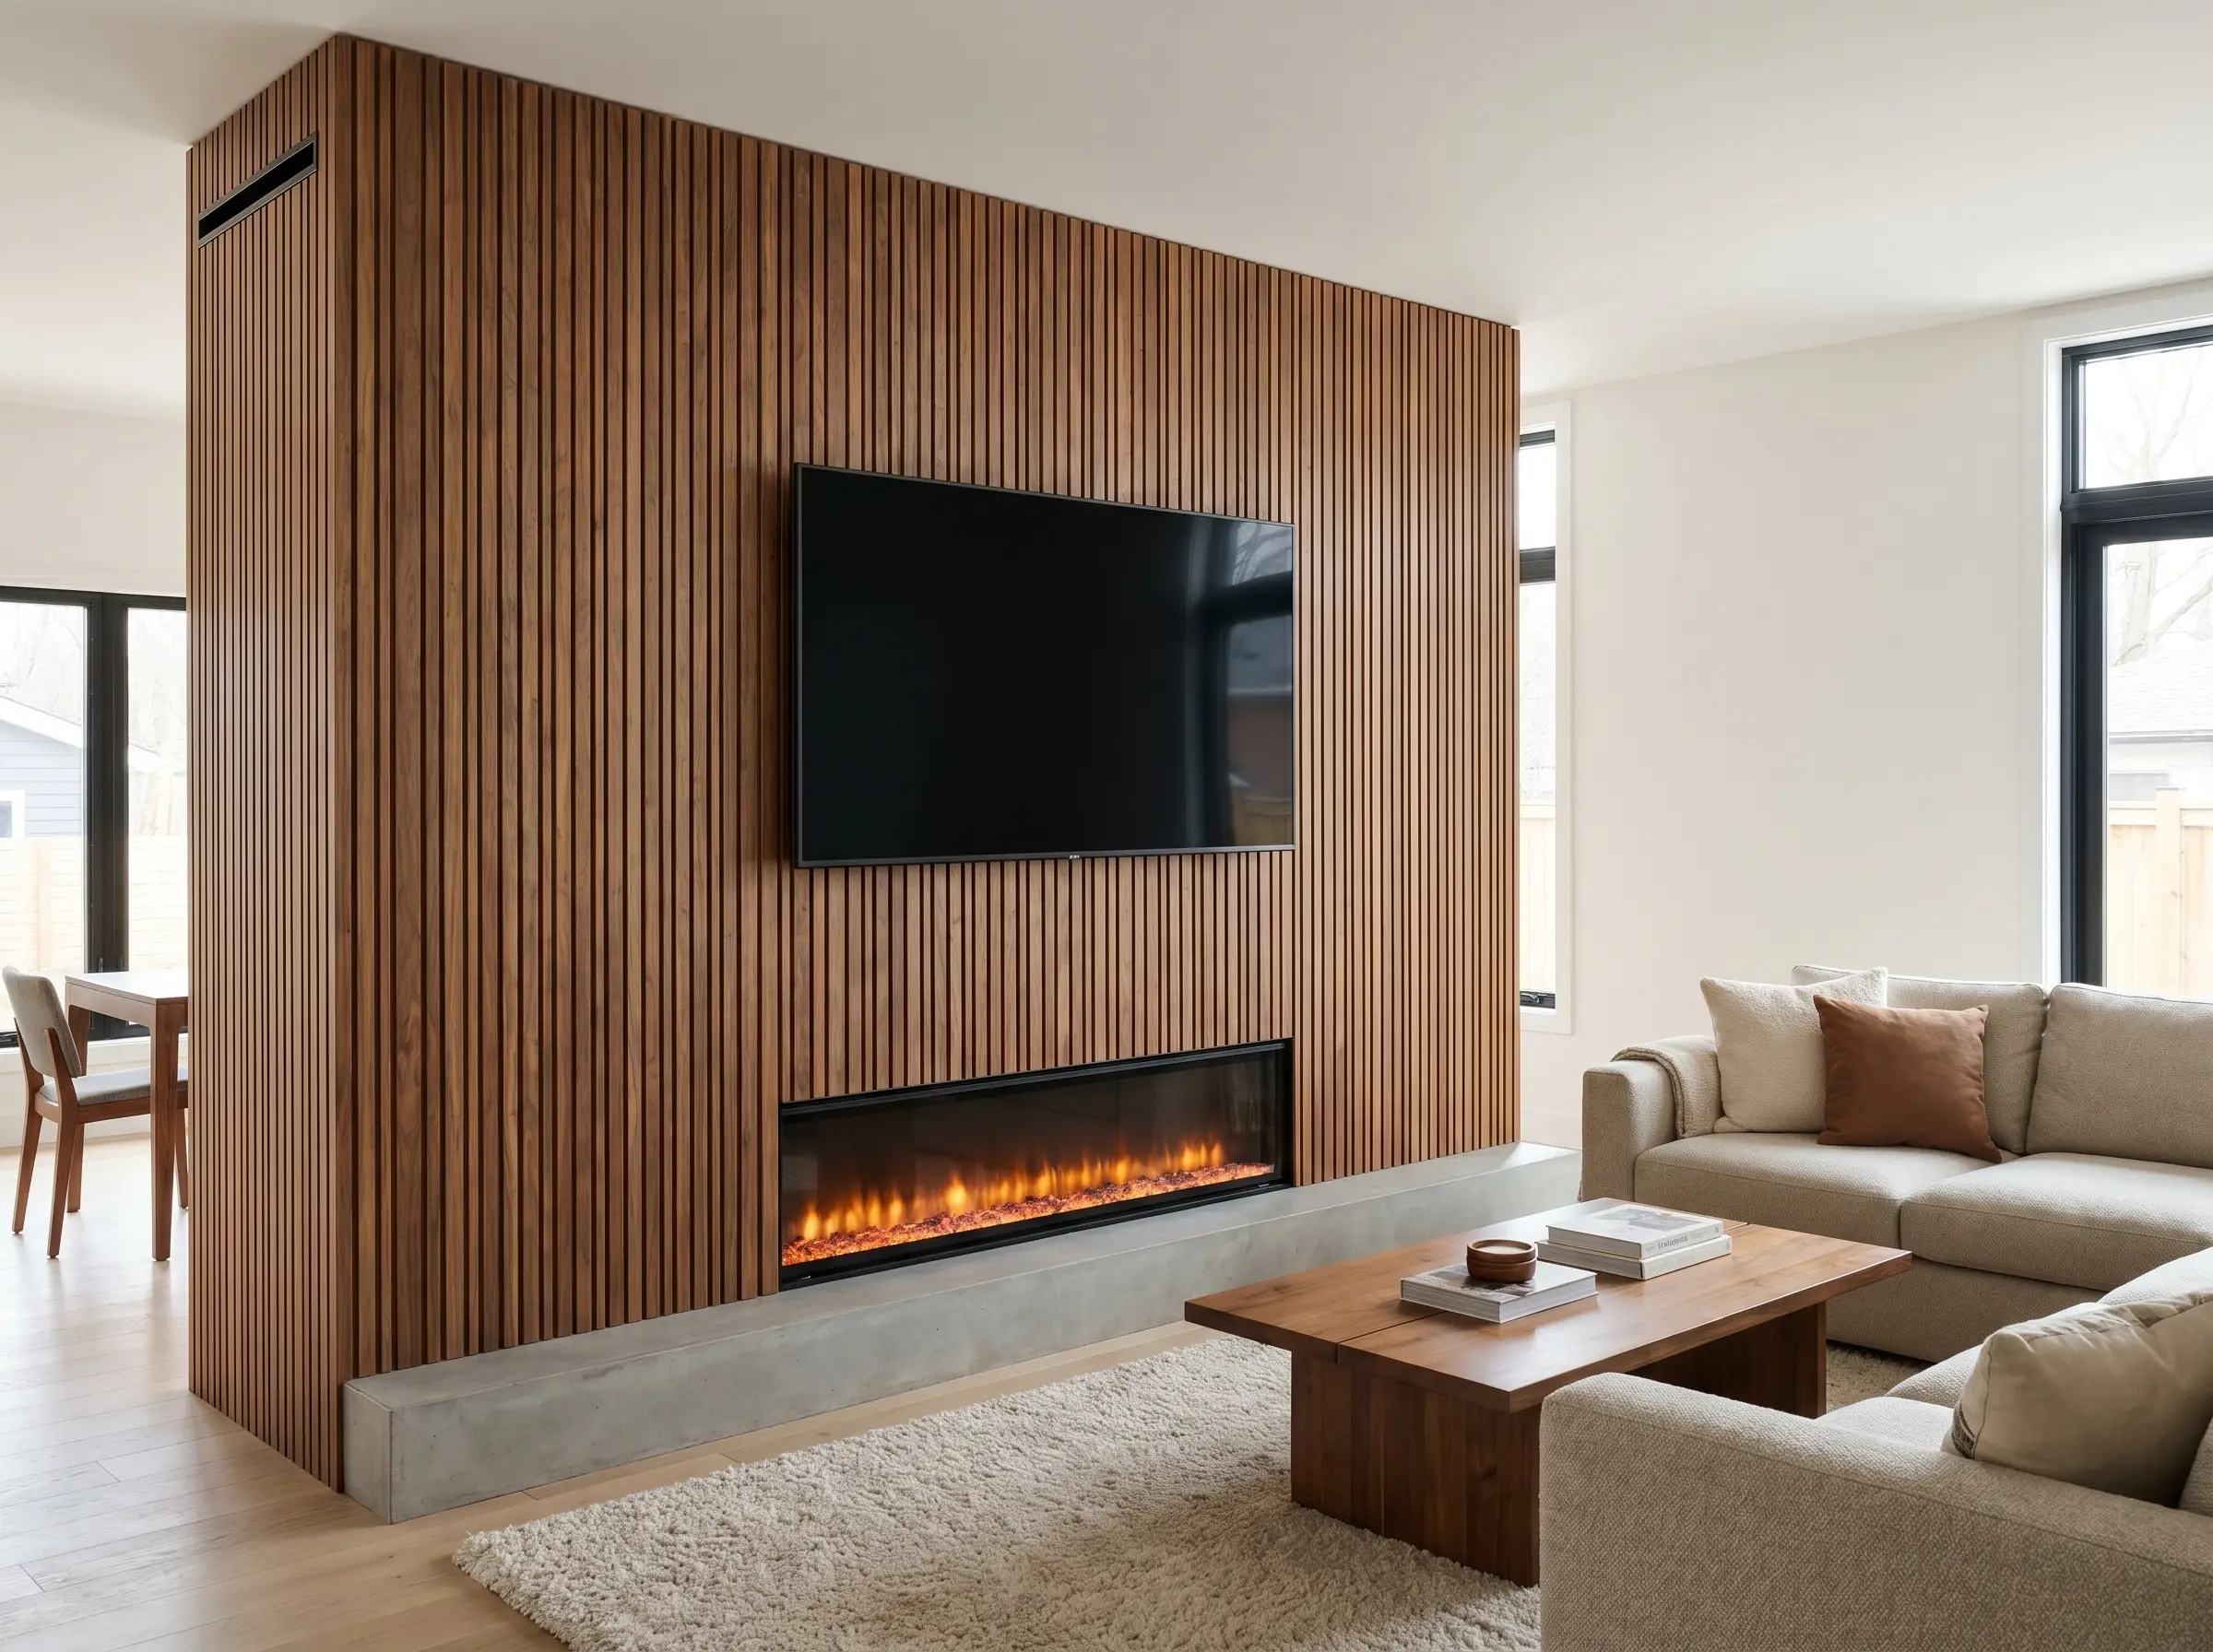
Building out a stud frame allows you to house a linear electric fireplace at the base and a television at the top, creating a modern hearth. Wrapping this entire protruding structure in vertical wood panels unifies the two focal points into one monolithic column.
- Goal: Integrated modern hearth.
- Material Check: Ensure your wood veneer panels are rated for the heat output of your specific electric fireplace model.
- Tech Spec: Frame the bump-out with 2x4s and maintain a minimum 12-inch clearance between the top of the electric fireplace heat vent and the bottom of the television.
Furniture & Styling Pairings
The slats are merely the backdrop; the furniture, hardware, and decorative objects bring the living room to life. You must balance the rigid, mathematical geometry of the wood with contrasting shapes and textures.
Anchor the Wall with a Floating Fluted Console
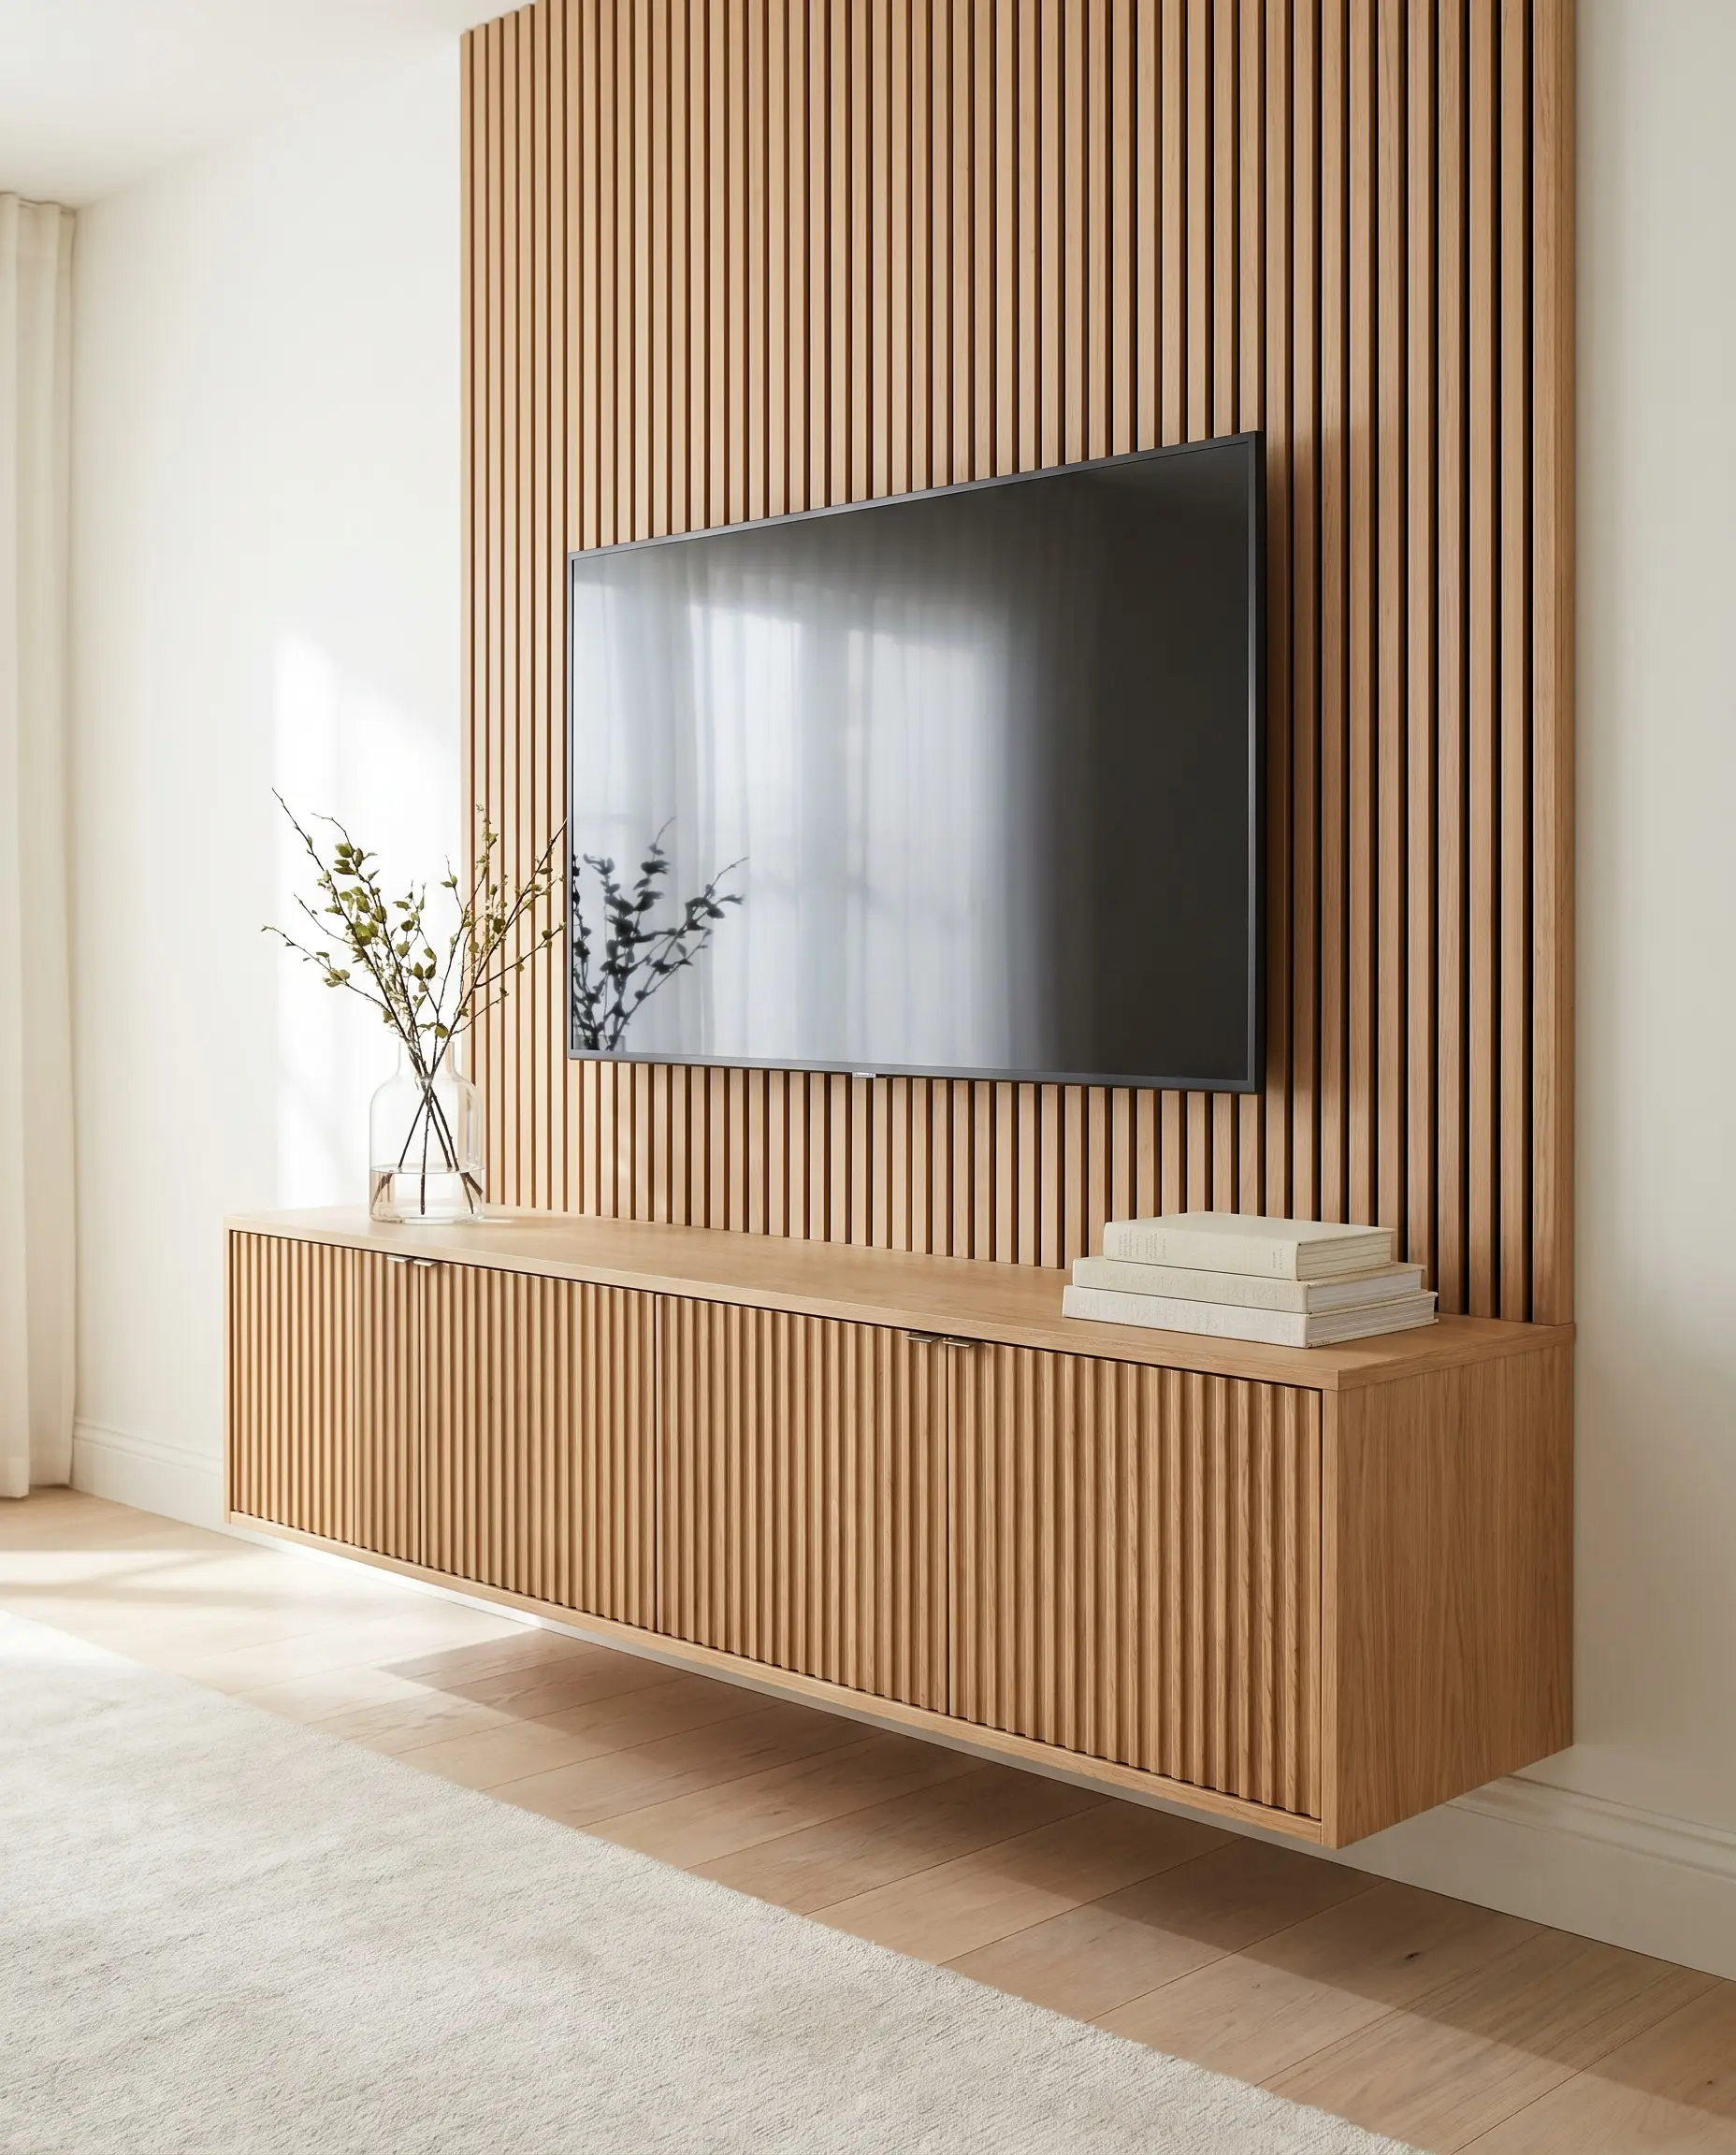
Keeping the floor space entirely clear beneath the television maintains a light, airy modern aesthetic. A floating media console featuring fluted details mirrors the verticality of the wall, creating a highly cohesive, custom-built look.
- Styling Goal: Weightless, integrated storage.
- Mounting Pro-Tip: Secure the floating console directly to the wall studs, never just to the acoustic paneling.
- Texture Match: Pair flat-faced wall slats with a deeply fluted or ribbed console door for subtle textural variance.
Pair Natural Slats with Raw Industrial Concrete Accents
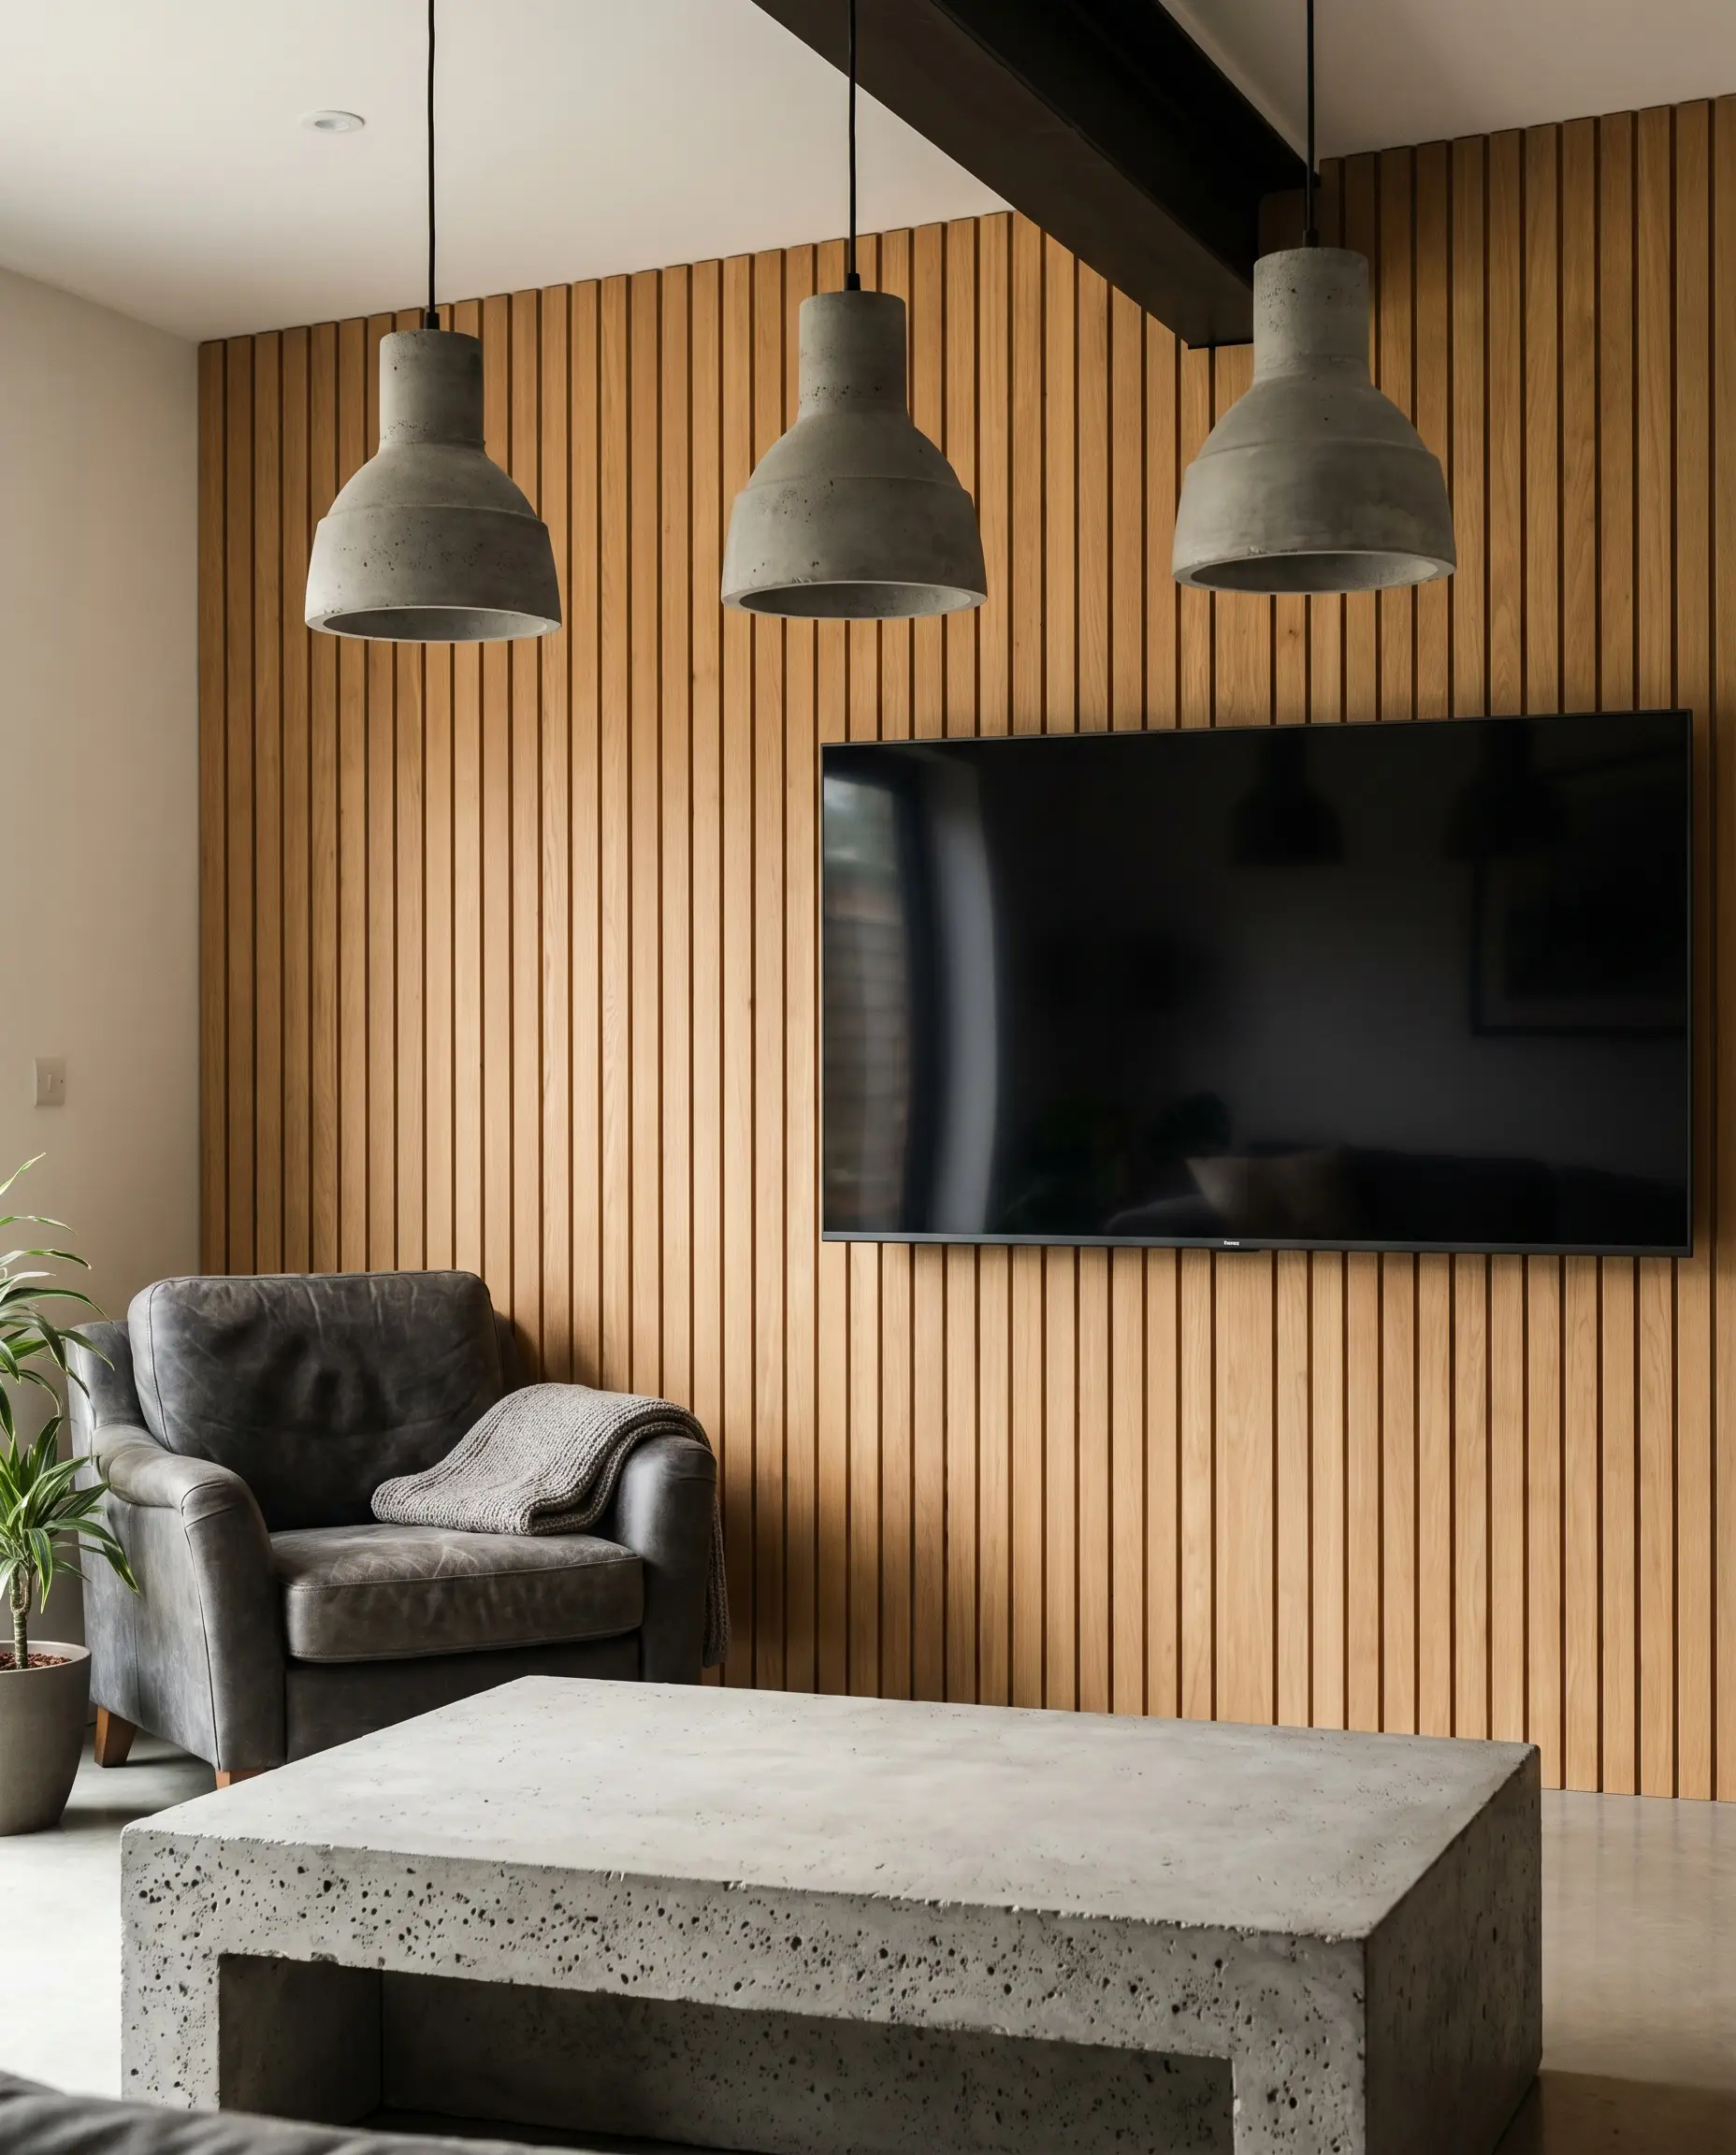
The organic, inviting warmth of natural wood can sometimes feel too soft if left unchecked. Introducing harsh, industrial materials into the immediate vicinity establishes a sophisticated, high-tension design balance.
- Styling Goal: Brutalist-inspired contrast.
- Vibe: Industrial Modern.
- Texture Match: Contrast smooth white oak slats with a raw, porous concrete coffee table or heavy concrete pendant lights.
Add Matte Black Hardware to Contrast Warm Woods
If you are utilizing rich oak or walnut, leaning heavily into matte black for all visible metal hardware grounds the design and prevents the wood from looking dated. This creates a sharp, graphic outline against the natural grain.
- Styling Goal: Graphic, contemporary grounding.
- Consistency: Ensure your television bezel and soundbar match this matte black profile.
- Texture Match: Pair warm wood tones with matte black shelving brackets, console pulls, and architectural sconces.
Style Asymmetrical Floating Shelves into the Slats

Breaking up the relentless vertical lines of the wall prevents the space from looking like a commercial boardroom. Drilling custom floating shelves directly through the acoustic panels allows you to display curated decor and introduce horizontal movement.
- Styling Goal: Curated, asymmetrical display.
- Installation: Use heavy-duty toggle bolts through the MDF core if you miss a stud.
- Texture Match: Use powder-coated steel shelves for a razor-thin, minimalist profile against the thick wood.
Soften the Geometry with Organic Shaped Decor
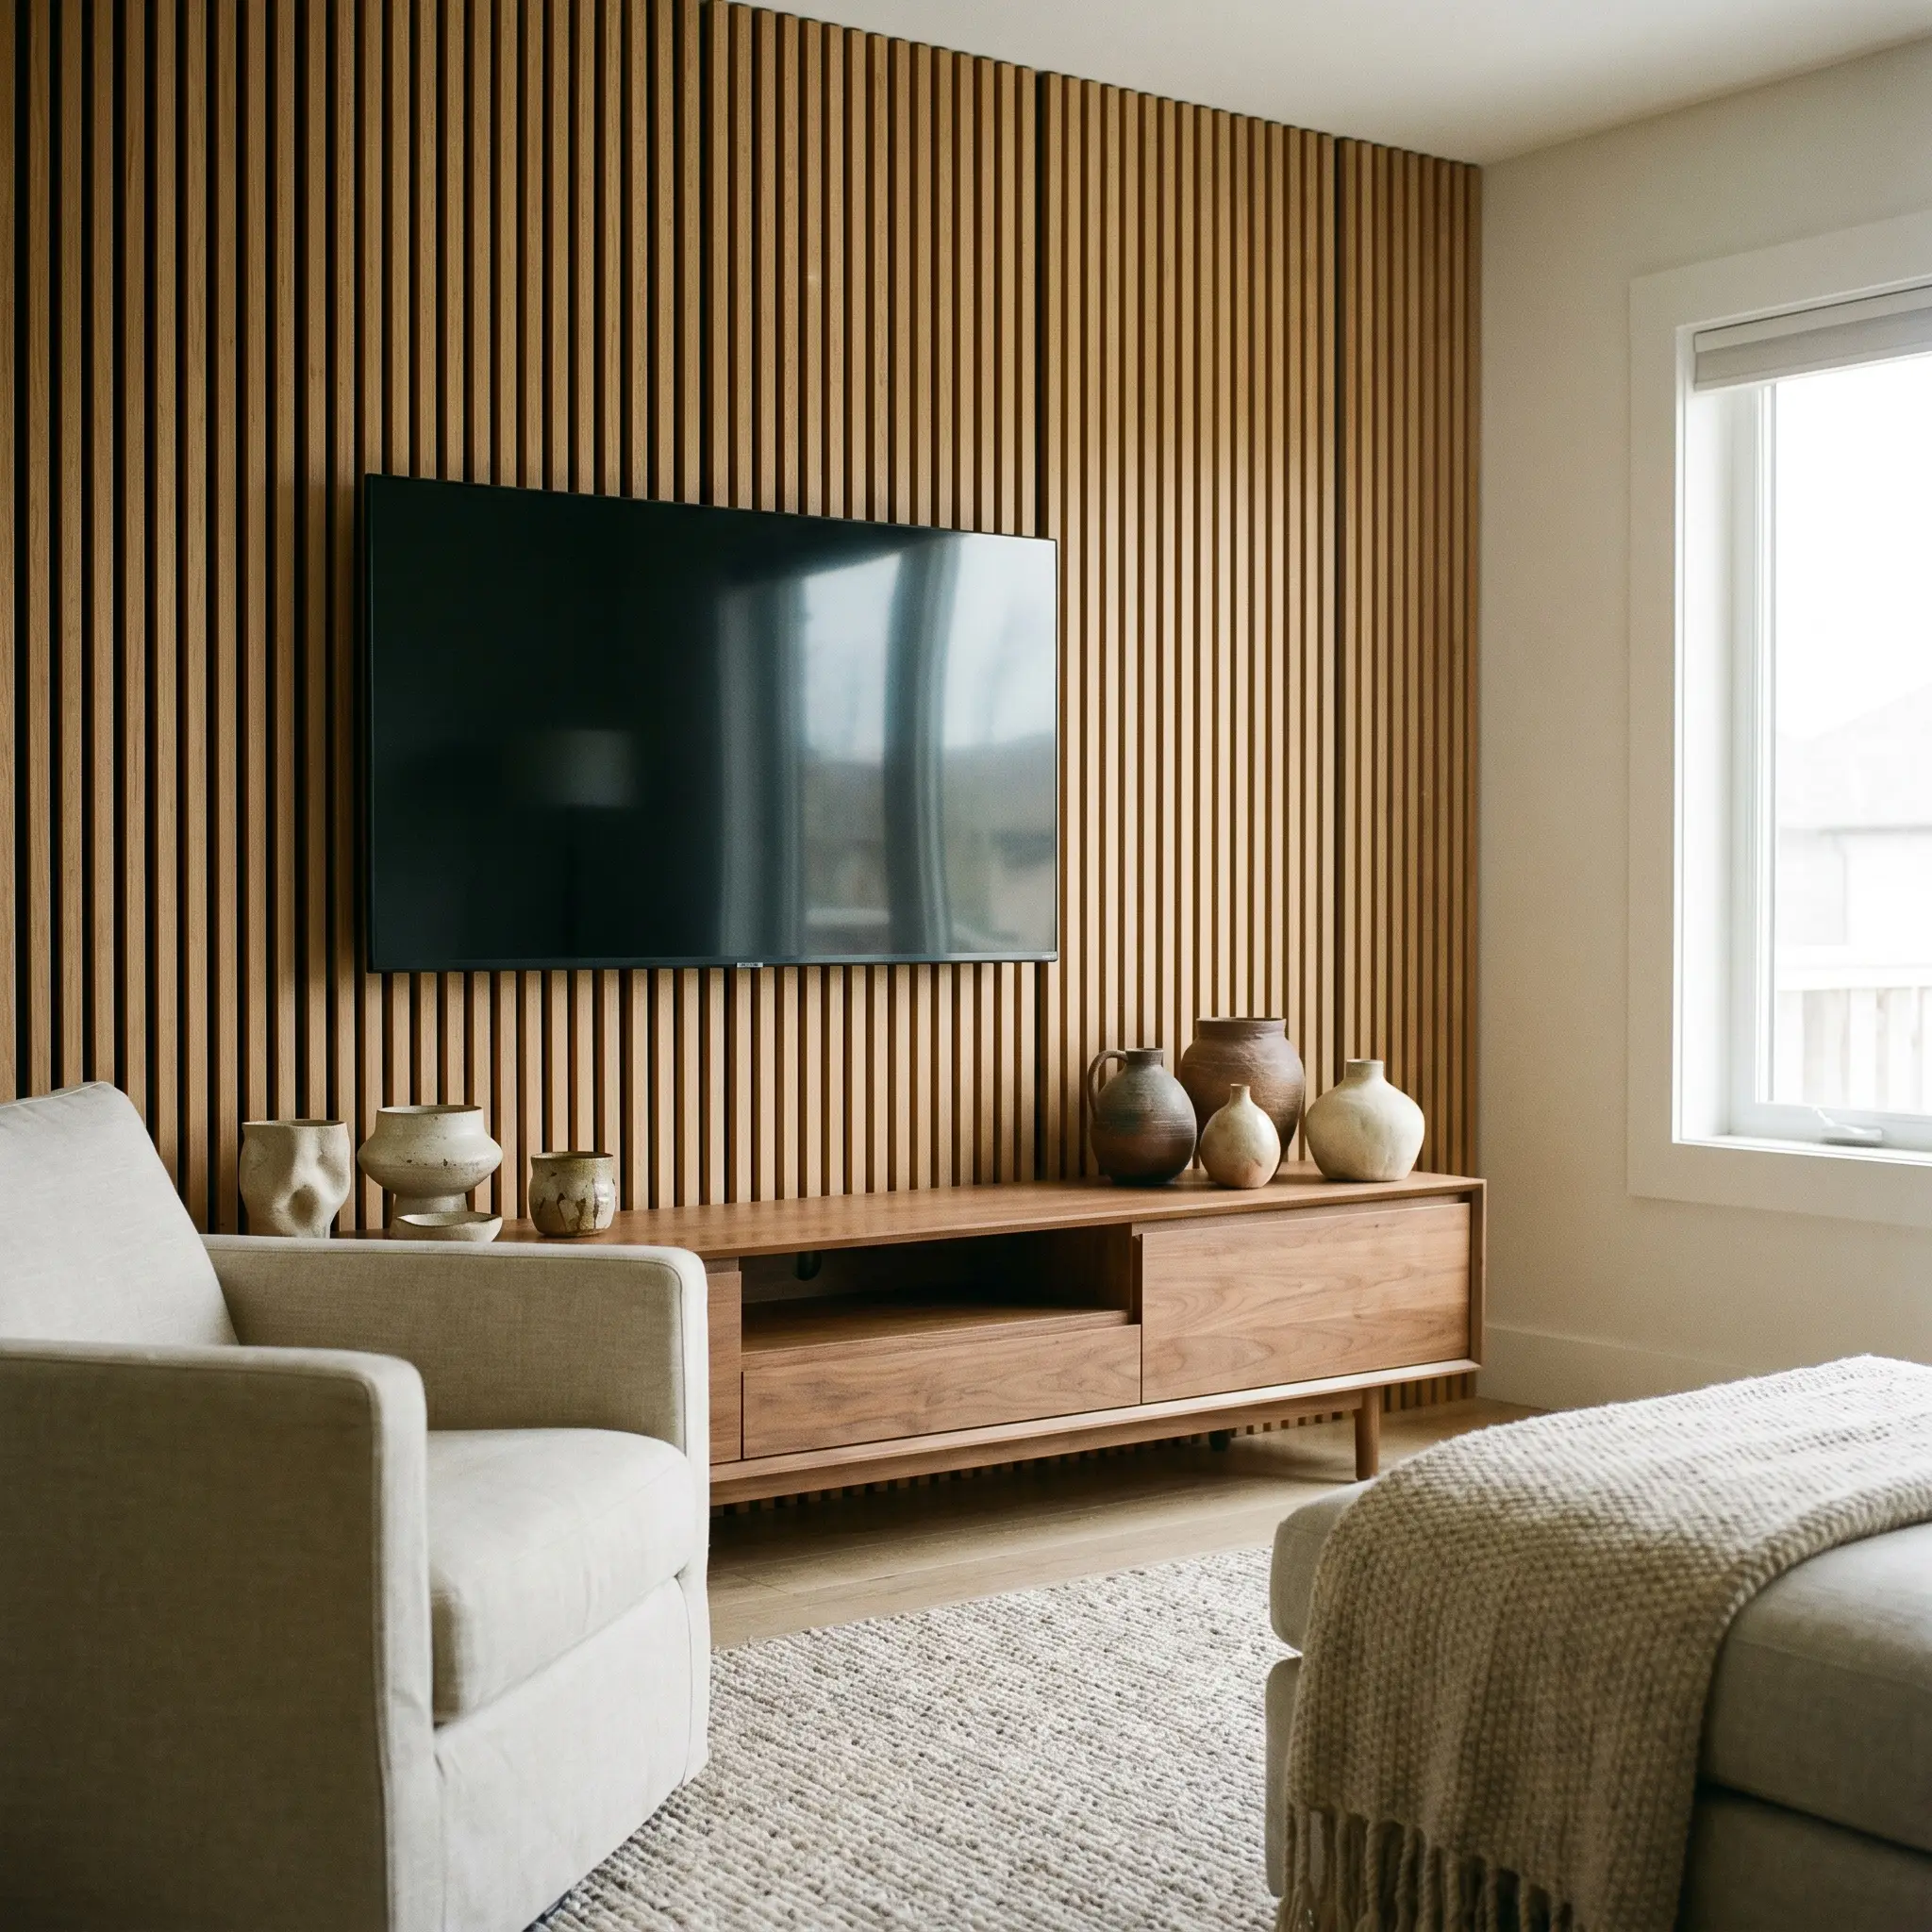
Wood slats present a highly rigid, linear visual field. To prevent the media zone from feeling too severe or mathematical, you must intentionally disrupt the grid by placing curved, imperfect objects on the console beneath the screen.
- Styling Goal: Visual softening and wabi-sabi balance.
- Placement: Cluster items in odd numbers off-center to maintain an organic flow.
- Texture Match: Contrast the straight lines with wabi-sabi ceramics, hand-thrown clay vessels, or round, sculptural vases.
Integrate Biophilic Design with Trailing Indoor Plants
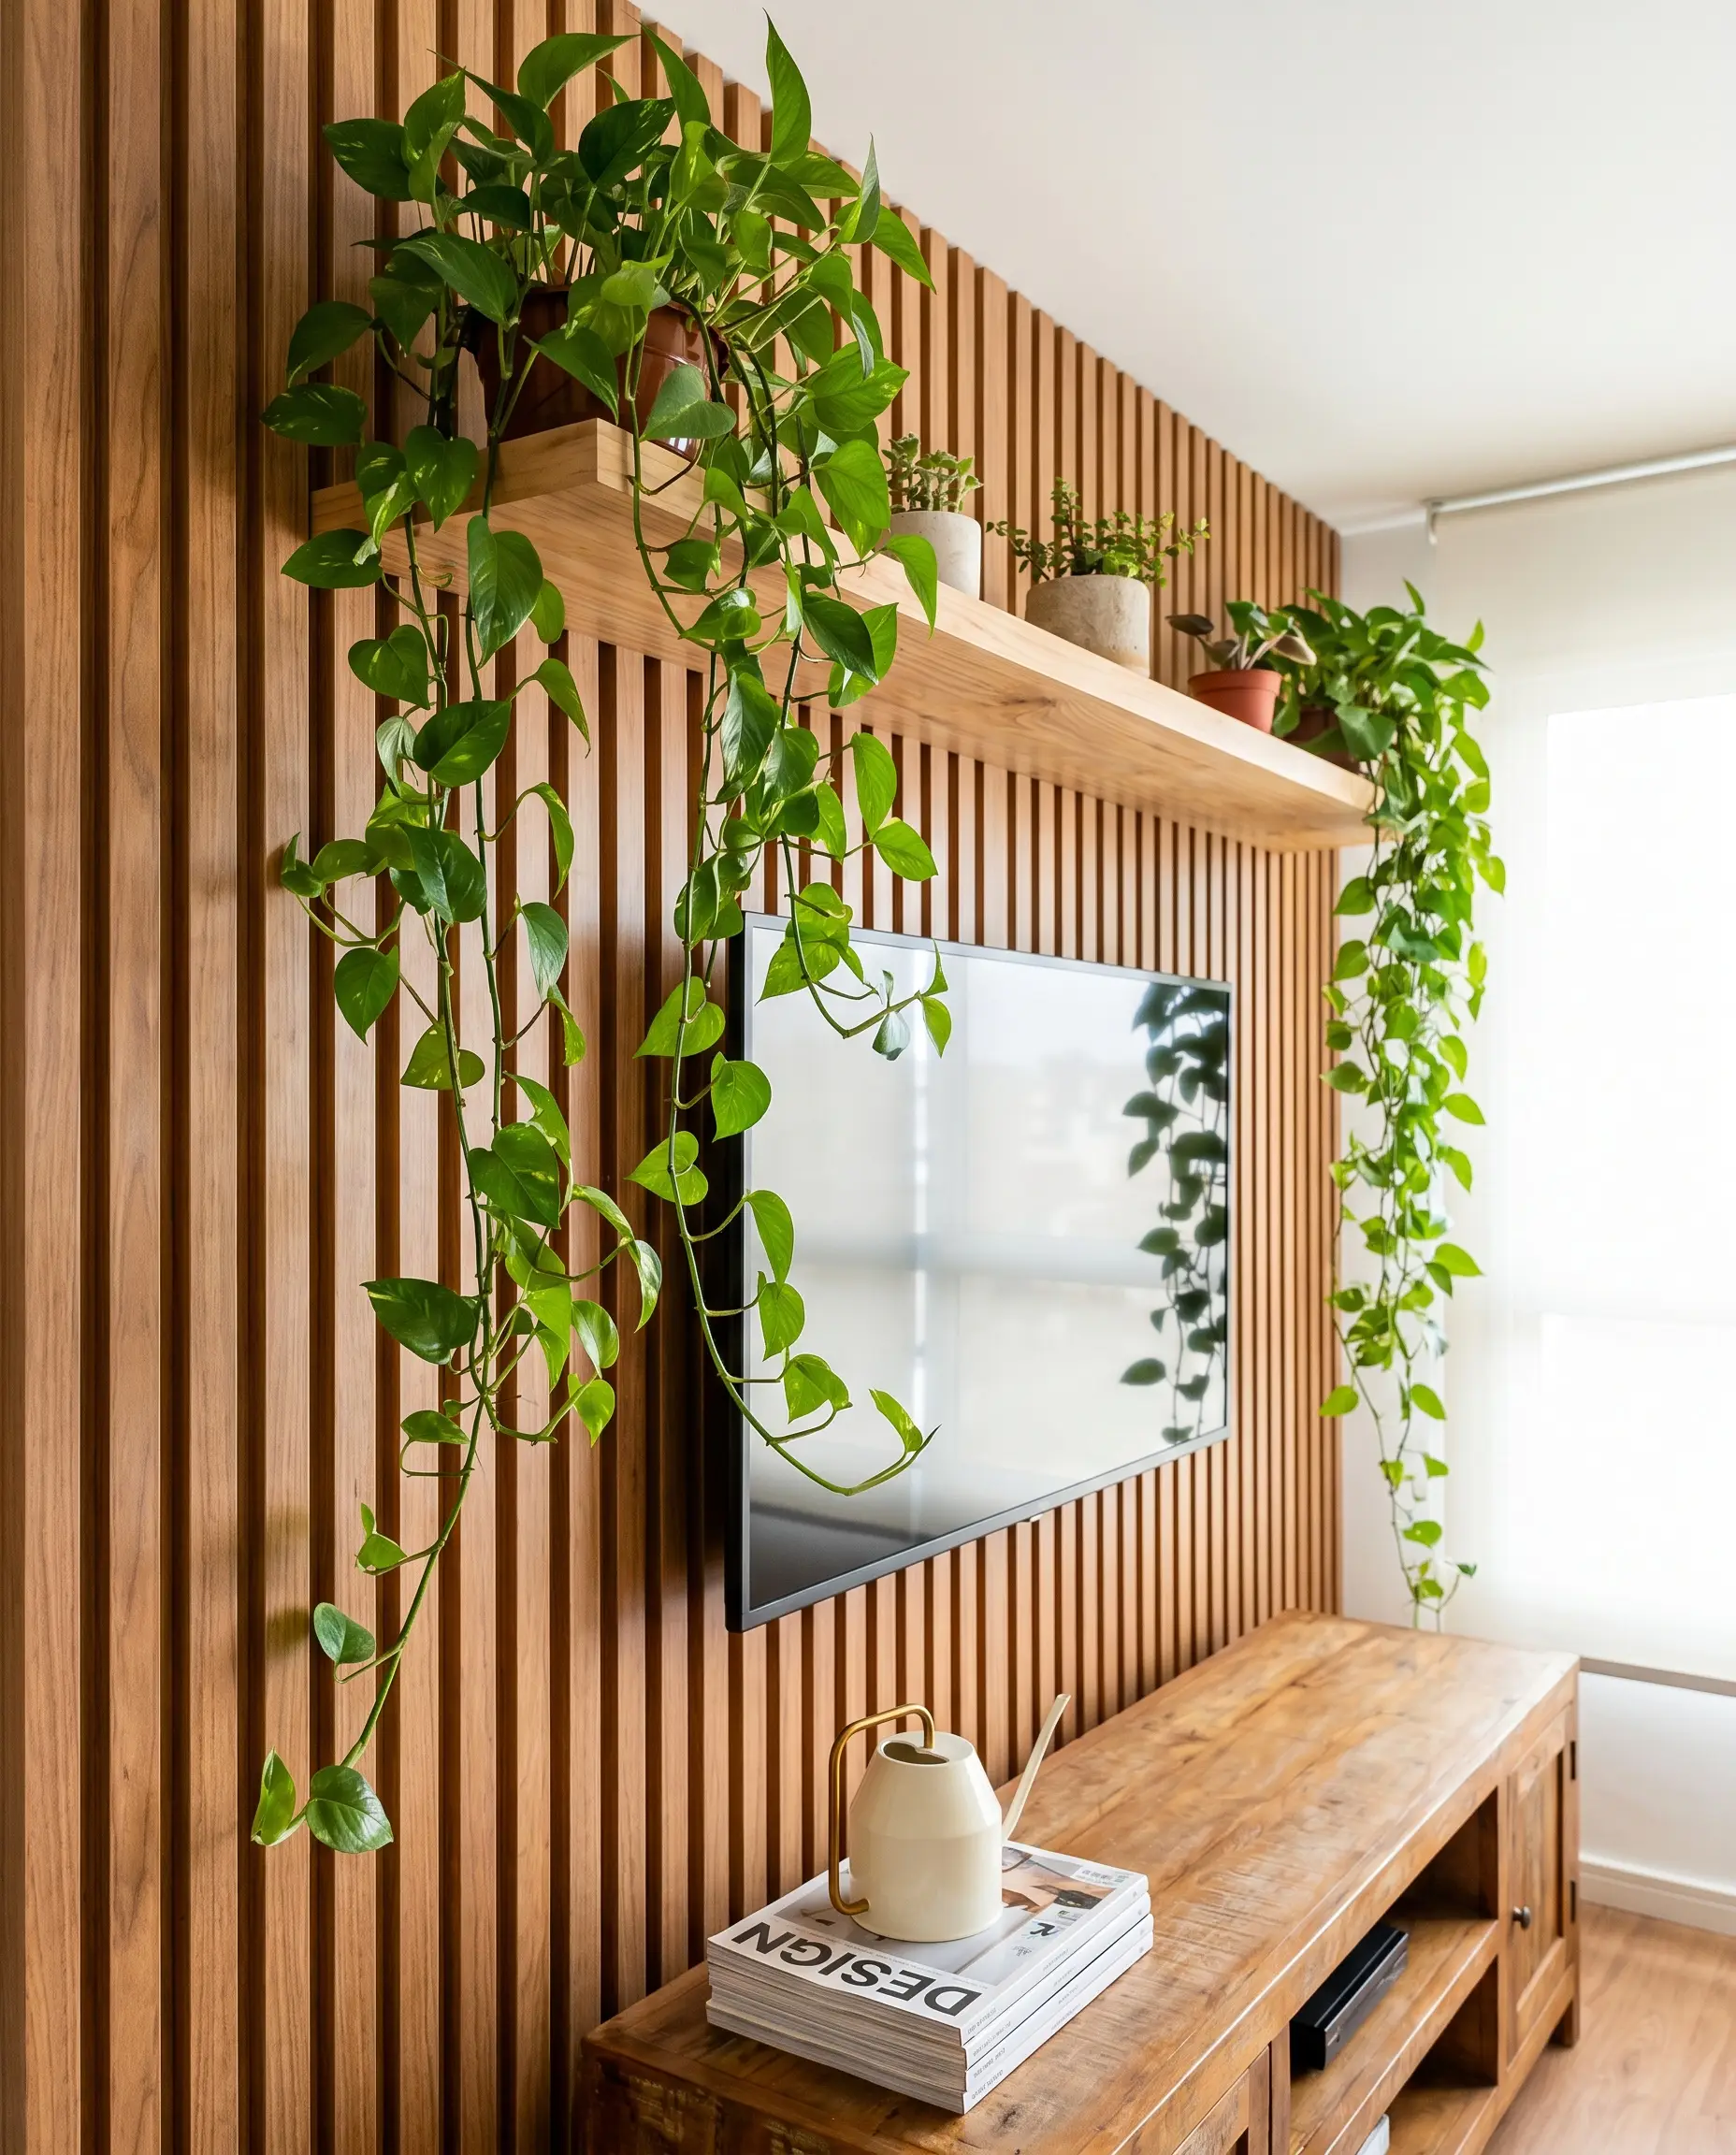
A core tenet of modern Biophilic design is the seamless integration of living nature with architectural elements. The vibrant green foliage popping against the natural wood grain instantly breathes life into the tech-heavy zone.
- Styling Goal: Organic vibrancy.
- Lighting Need: Ensure your media wall receives adequate indirect sunlight, or utilize high-quality artificial botanicals.
- Texture Match: Drape the soft, trailing leaves of a Pothos or String-of-Pearls over the rigid edges of an upper floating shelf.
Match Slat Tones to Your Living Room Flooring Core
Clashing wood undertones will instantly downgrade the luxury feel of your space. You must evaluate the color temperature of your existing floors before committing to a wall veneer to ensure the vertical and horizontal planes communicate perfectly.
- Styling Goal: Cohesive undertone mapping.
- Testing: Always order physical veneer samples and view them against your floor in both natural daylight and evening ambient light.
- Texture Match: If your luxury vinyl plank (LVP) flooring has cool grey undertones, pair it with Smoked Larch or Ash slats, never warm Walnut.
The Buyer’s & DIY Guide: Sourcing the Best Wood Slats
Achieving this architectural finish requires understanding exactly what materials you are buying. You have two distinct paths: investing in engineered, pre-made panels or sourcing raw lumber to fabricate the wall yourself.
| Option | Average Cost per Panel | Installation Difficulty | Acoustic Benefits | Best For |
|---|---|---|---|---|
| Pre-Made Acoustic Panels | $100 – $250 | Low (Screws & Adhesive) | High (Class A sound absorption) | Prosumer DIYers, rapid weekend installs, home theaters. |
| DIY Raw Wood Slats | $40 – $80 (Lumber equivalent) | High (Cutting, sanding, spacing) | Low (Hard surface reflection) | Advanced carpenters, ultra-custom bespoke finishes. |
Pre-made acoustic panels—featuring a stable MDF core, a real wood veneer face, and a recycled felt backing—offer the most reliable execution for the modern homeowner. Sticking raw 1×2 pine boards directly to your drywall looks cheap, warps over time, and offers zero sound dampening. The engineered felt backing of pre-made panels provides true Class A sound absorption, tightening the acoustics of your room while giving you a perfect 13mm gap every single time.
Master the Modern Media Wall
Your television wall should never be an architectural dead zone; it should dictate the entire energy of the space. By strategically deploying the right wood widths, hiding your cables through the acoustic felt, and dialing in your LED channels, you can elevate your living room into a masterclass of modern design.
Grab your tape measure, evaluate your wall dimensions, and order a few wood veneer samples to test against your flooring. We want to hear about your build strategy—are you leaning toward the serene minimalism of Rift-Sawn White Oak, the mid-century warmth of Walnut, or the cinematic drama of Matte Black? Drop your plans in the comments, and be sure to review our linked guide on hiding TV wires before you make your first cut.
The Hackrea Style Desk treats interior decoration as an exact visual science. Rather than focusing on demolition or floor plans, this desk masters the art of color theory, undertone matching, material pairings, and spatial proportion. From balancing the visual weight of mixed metals to finding the perfect bridging tone between disparate wood species, this desk provides the rigorous aesthetic rules needed to achieve high-end, editorial-quality harmony in any space.