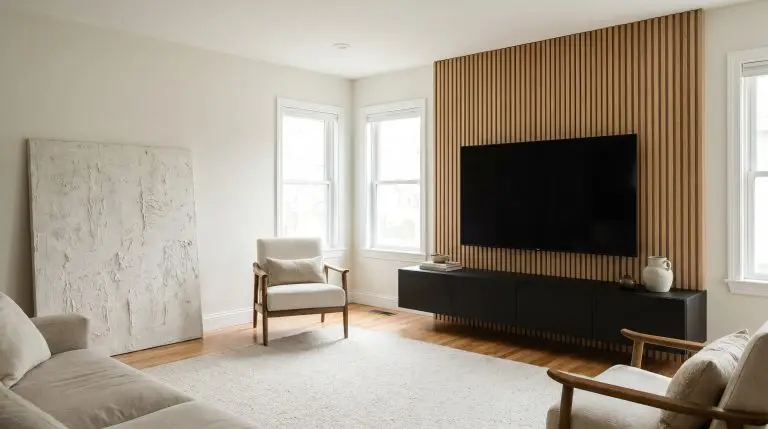
A massive, glossy black television screen dominating a living room is a design failure we see far too often. You want a calm, uncluttered aesthetic, but you also need practical solutions to hide cables, mount soundbars, and integrate your media equipment without turning the space into a generic corporate lobby. The solution lies in mastering Japandi style wood slat TV walls, a highly architectural approach that absorbs harsh technology into natural, tactile materials.
However, slapping pre-fabricated wood strips edge-to-edge across a drywall surface will only leave your room feeling like a 1970s basement. Achieving true visual silence requires rigorous attention to spatial geometry, specific wood species, and the deliberate styling of negative space. This guide breaks down the exact material science, structural layouts, and carpentry details needed to execute a flawlessly integrated media wall.
Architectural Layouts and Slat Zoning
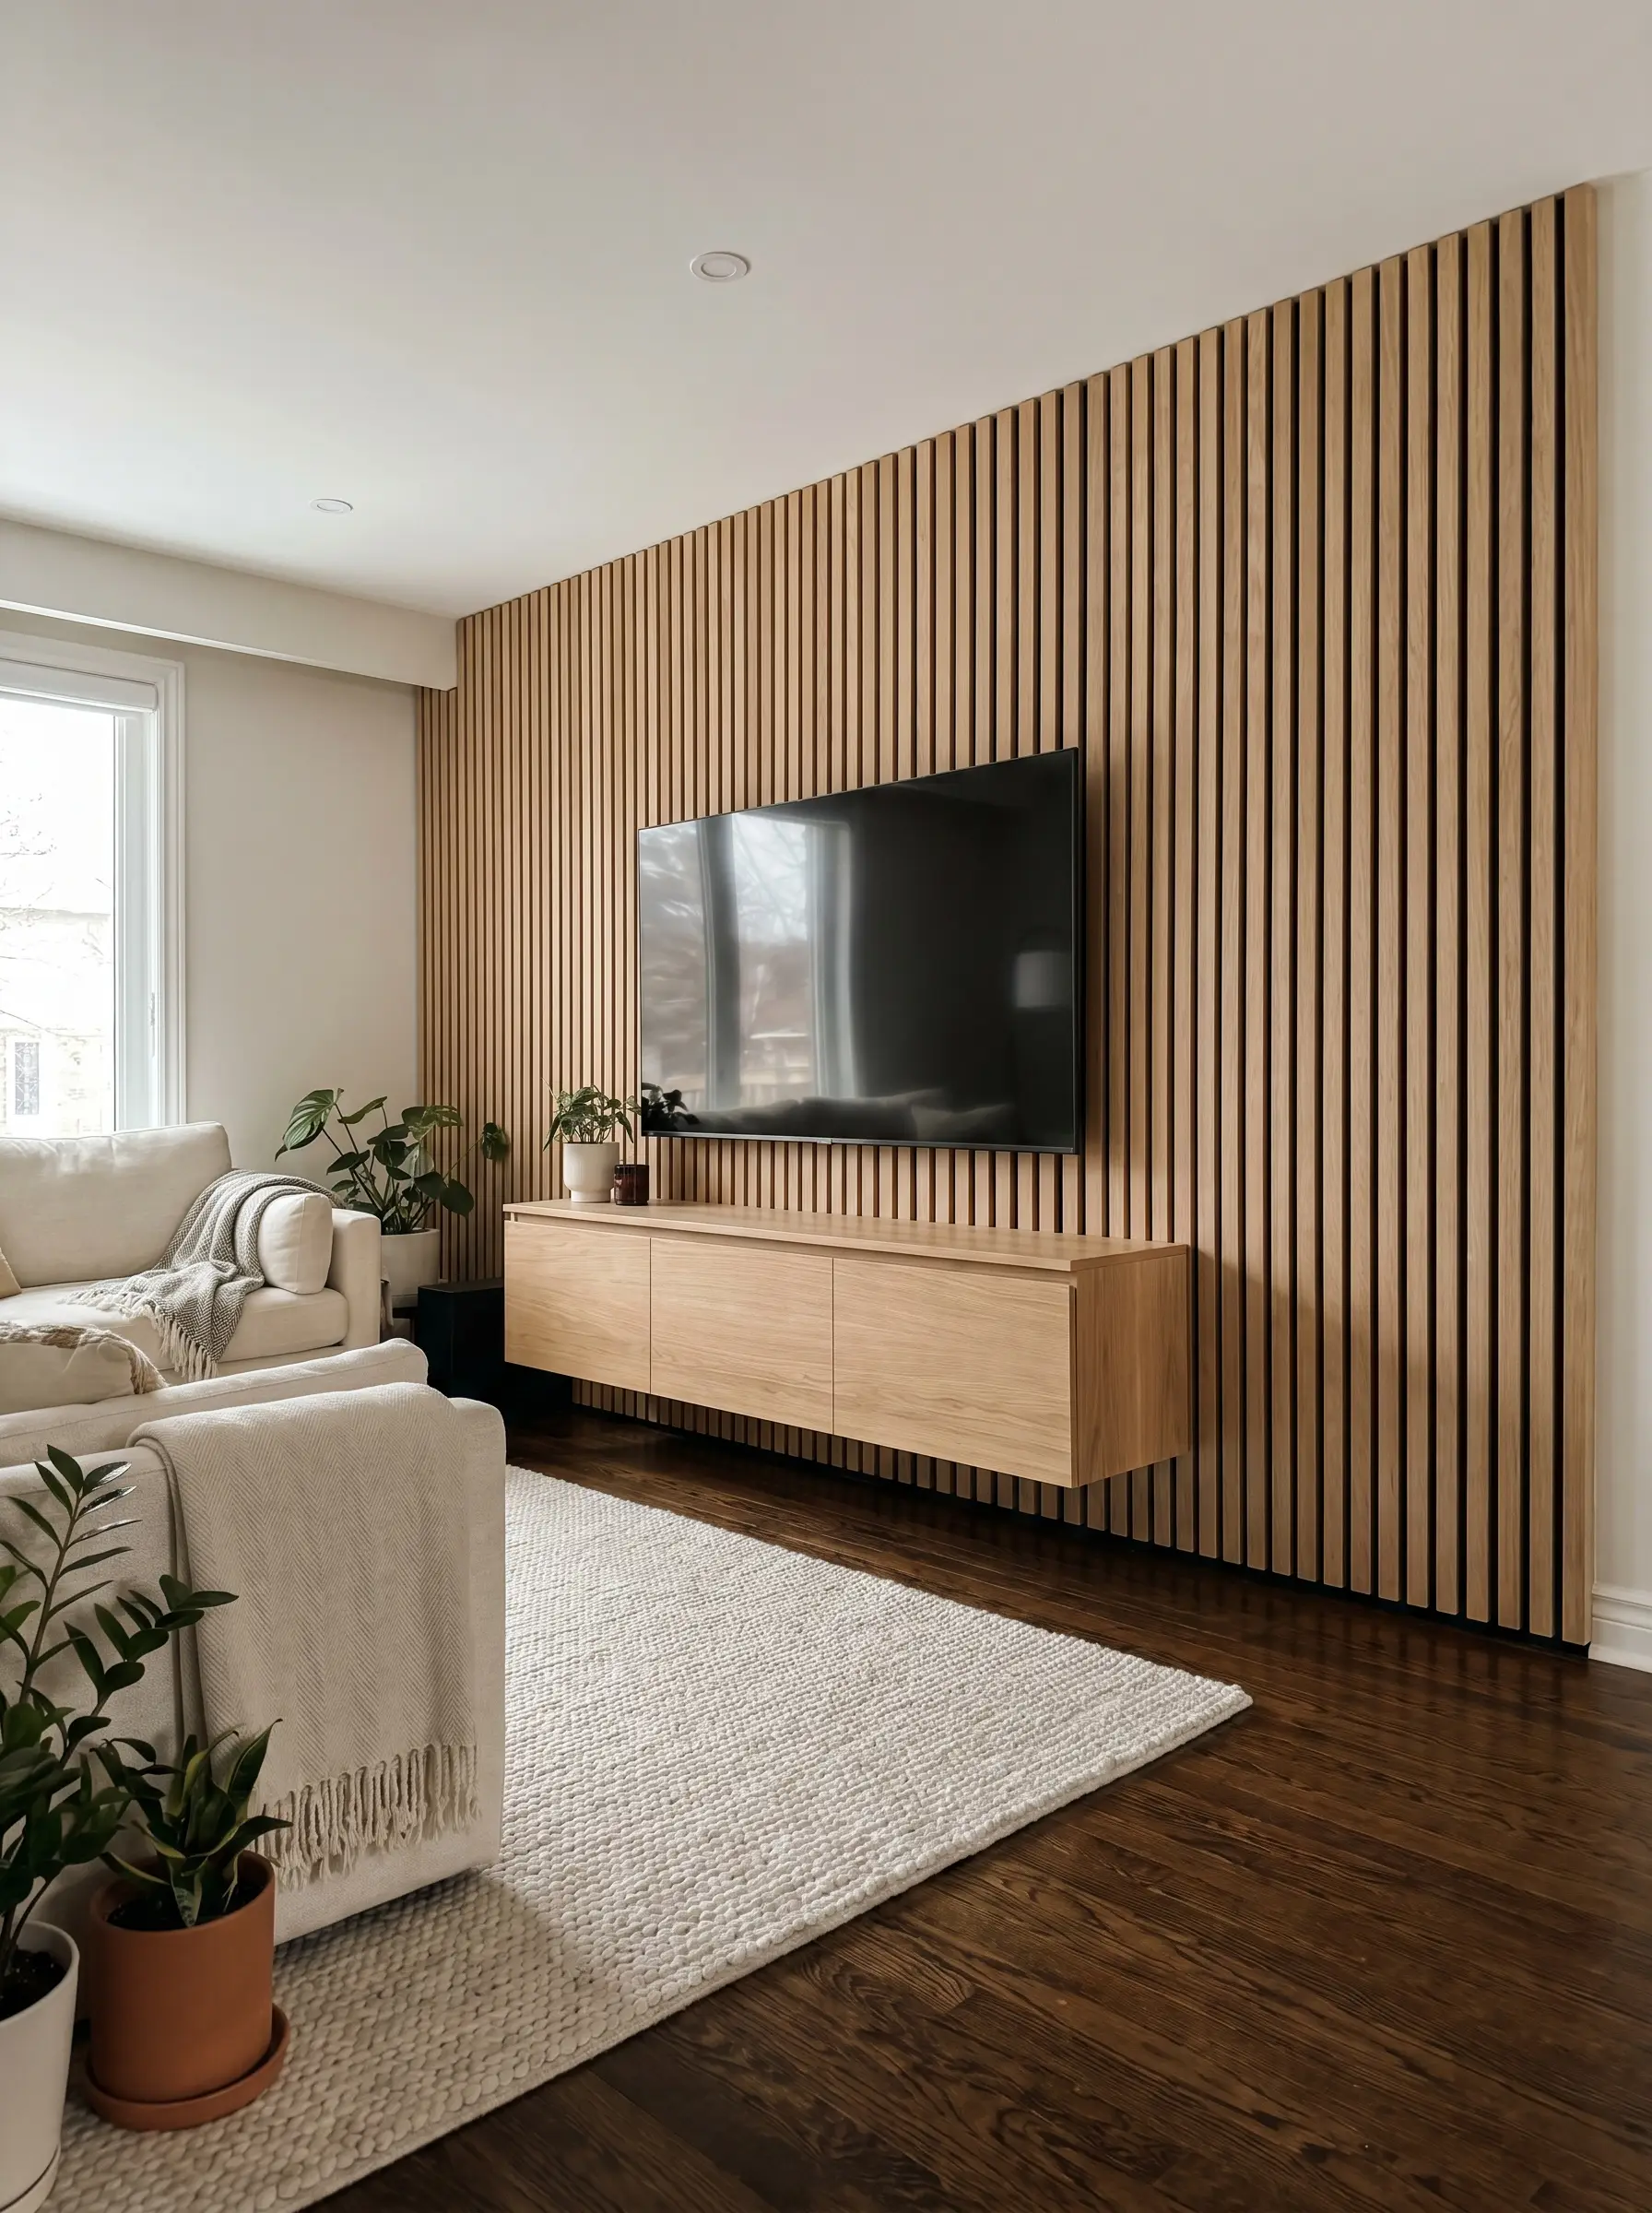
Running wood slats from edge to edge across a standard living room wall instantly overwhelms the space, choking out any sense of architectural breathability. The secret is “zoning”—using slats strictly to define the media center’s geometry while leaving the remaining wall bare to create intentional, wabi-sabi-inspired tension.
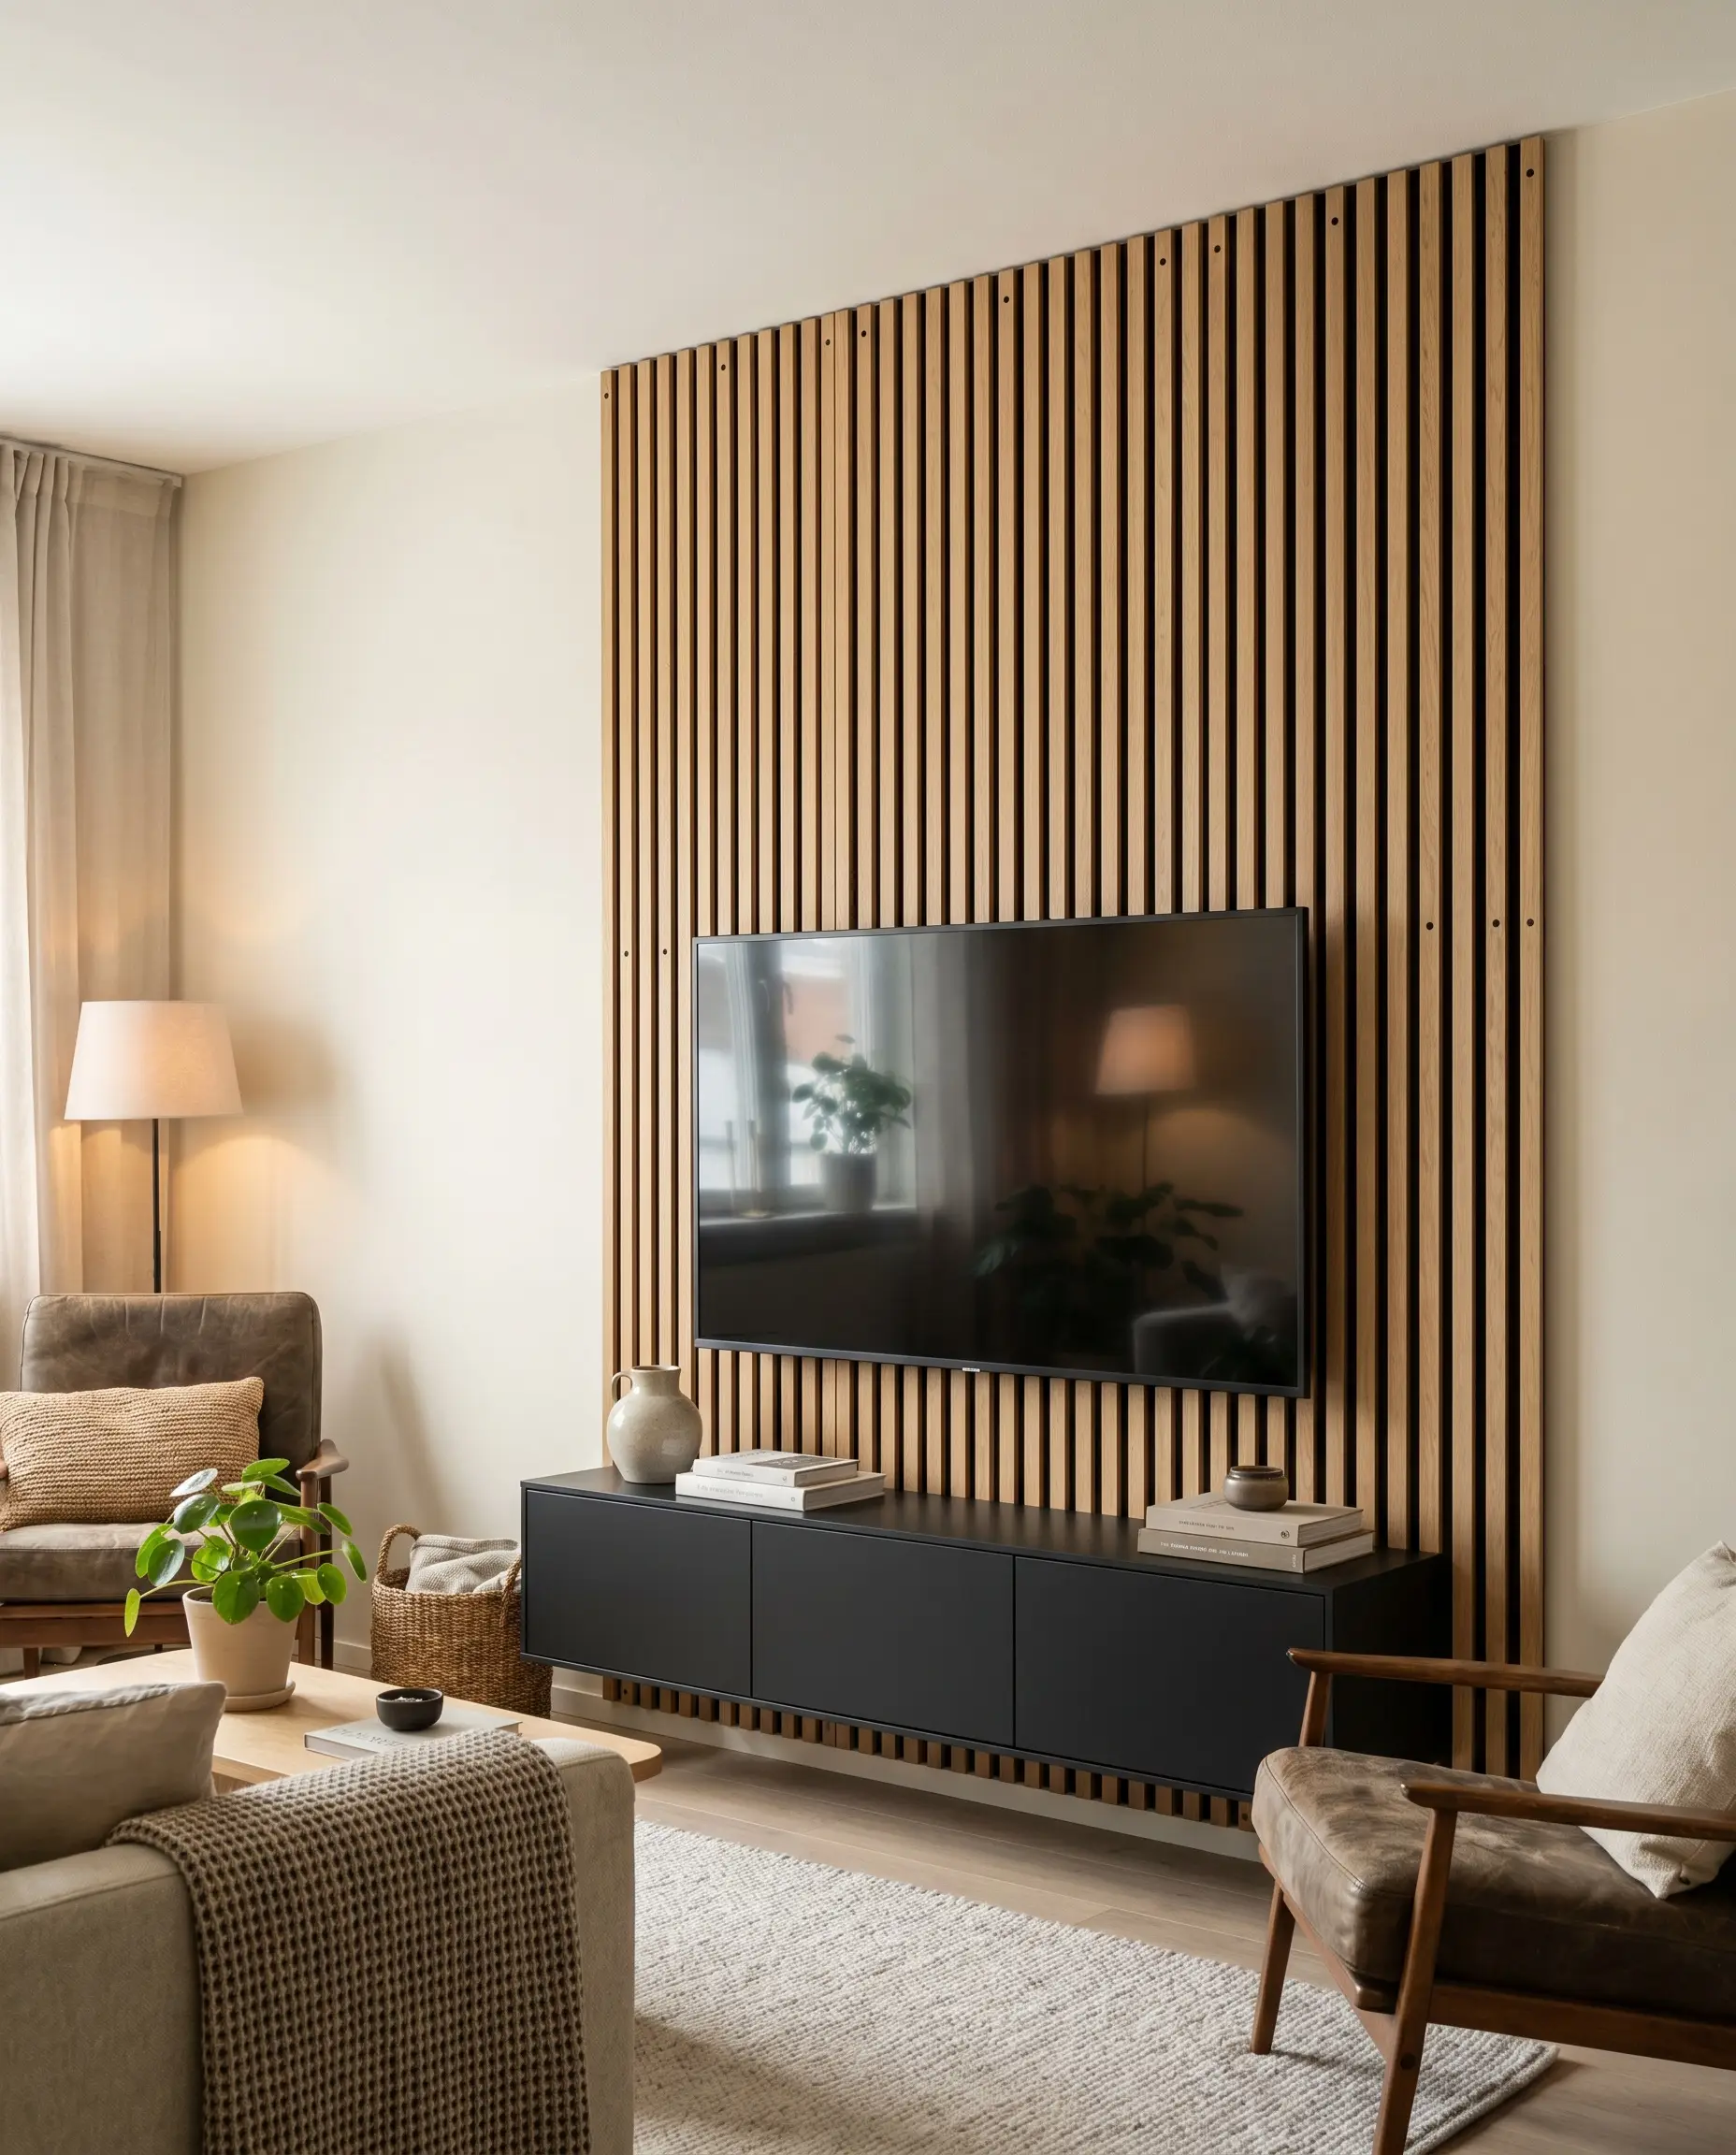
The Asymmetrical Off-Center Layout
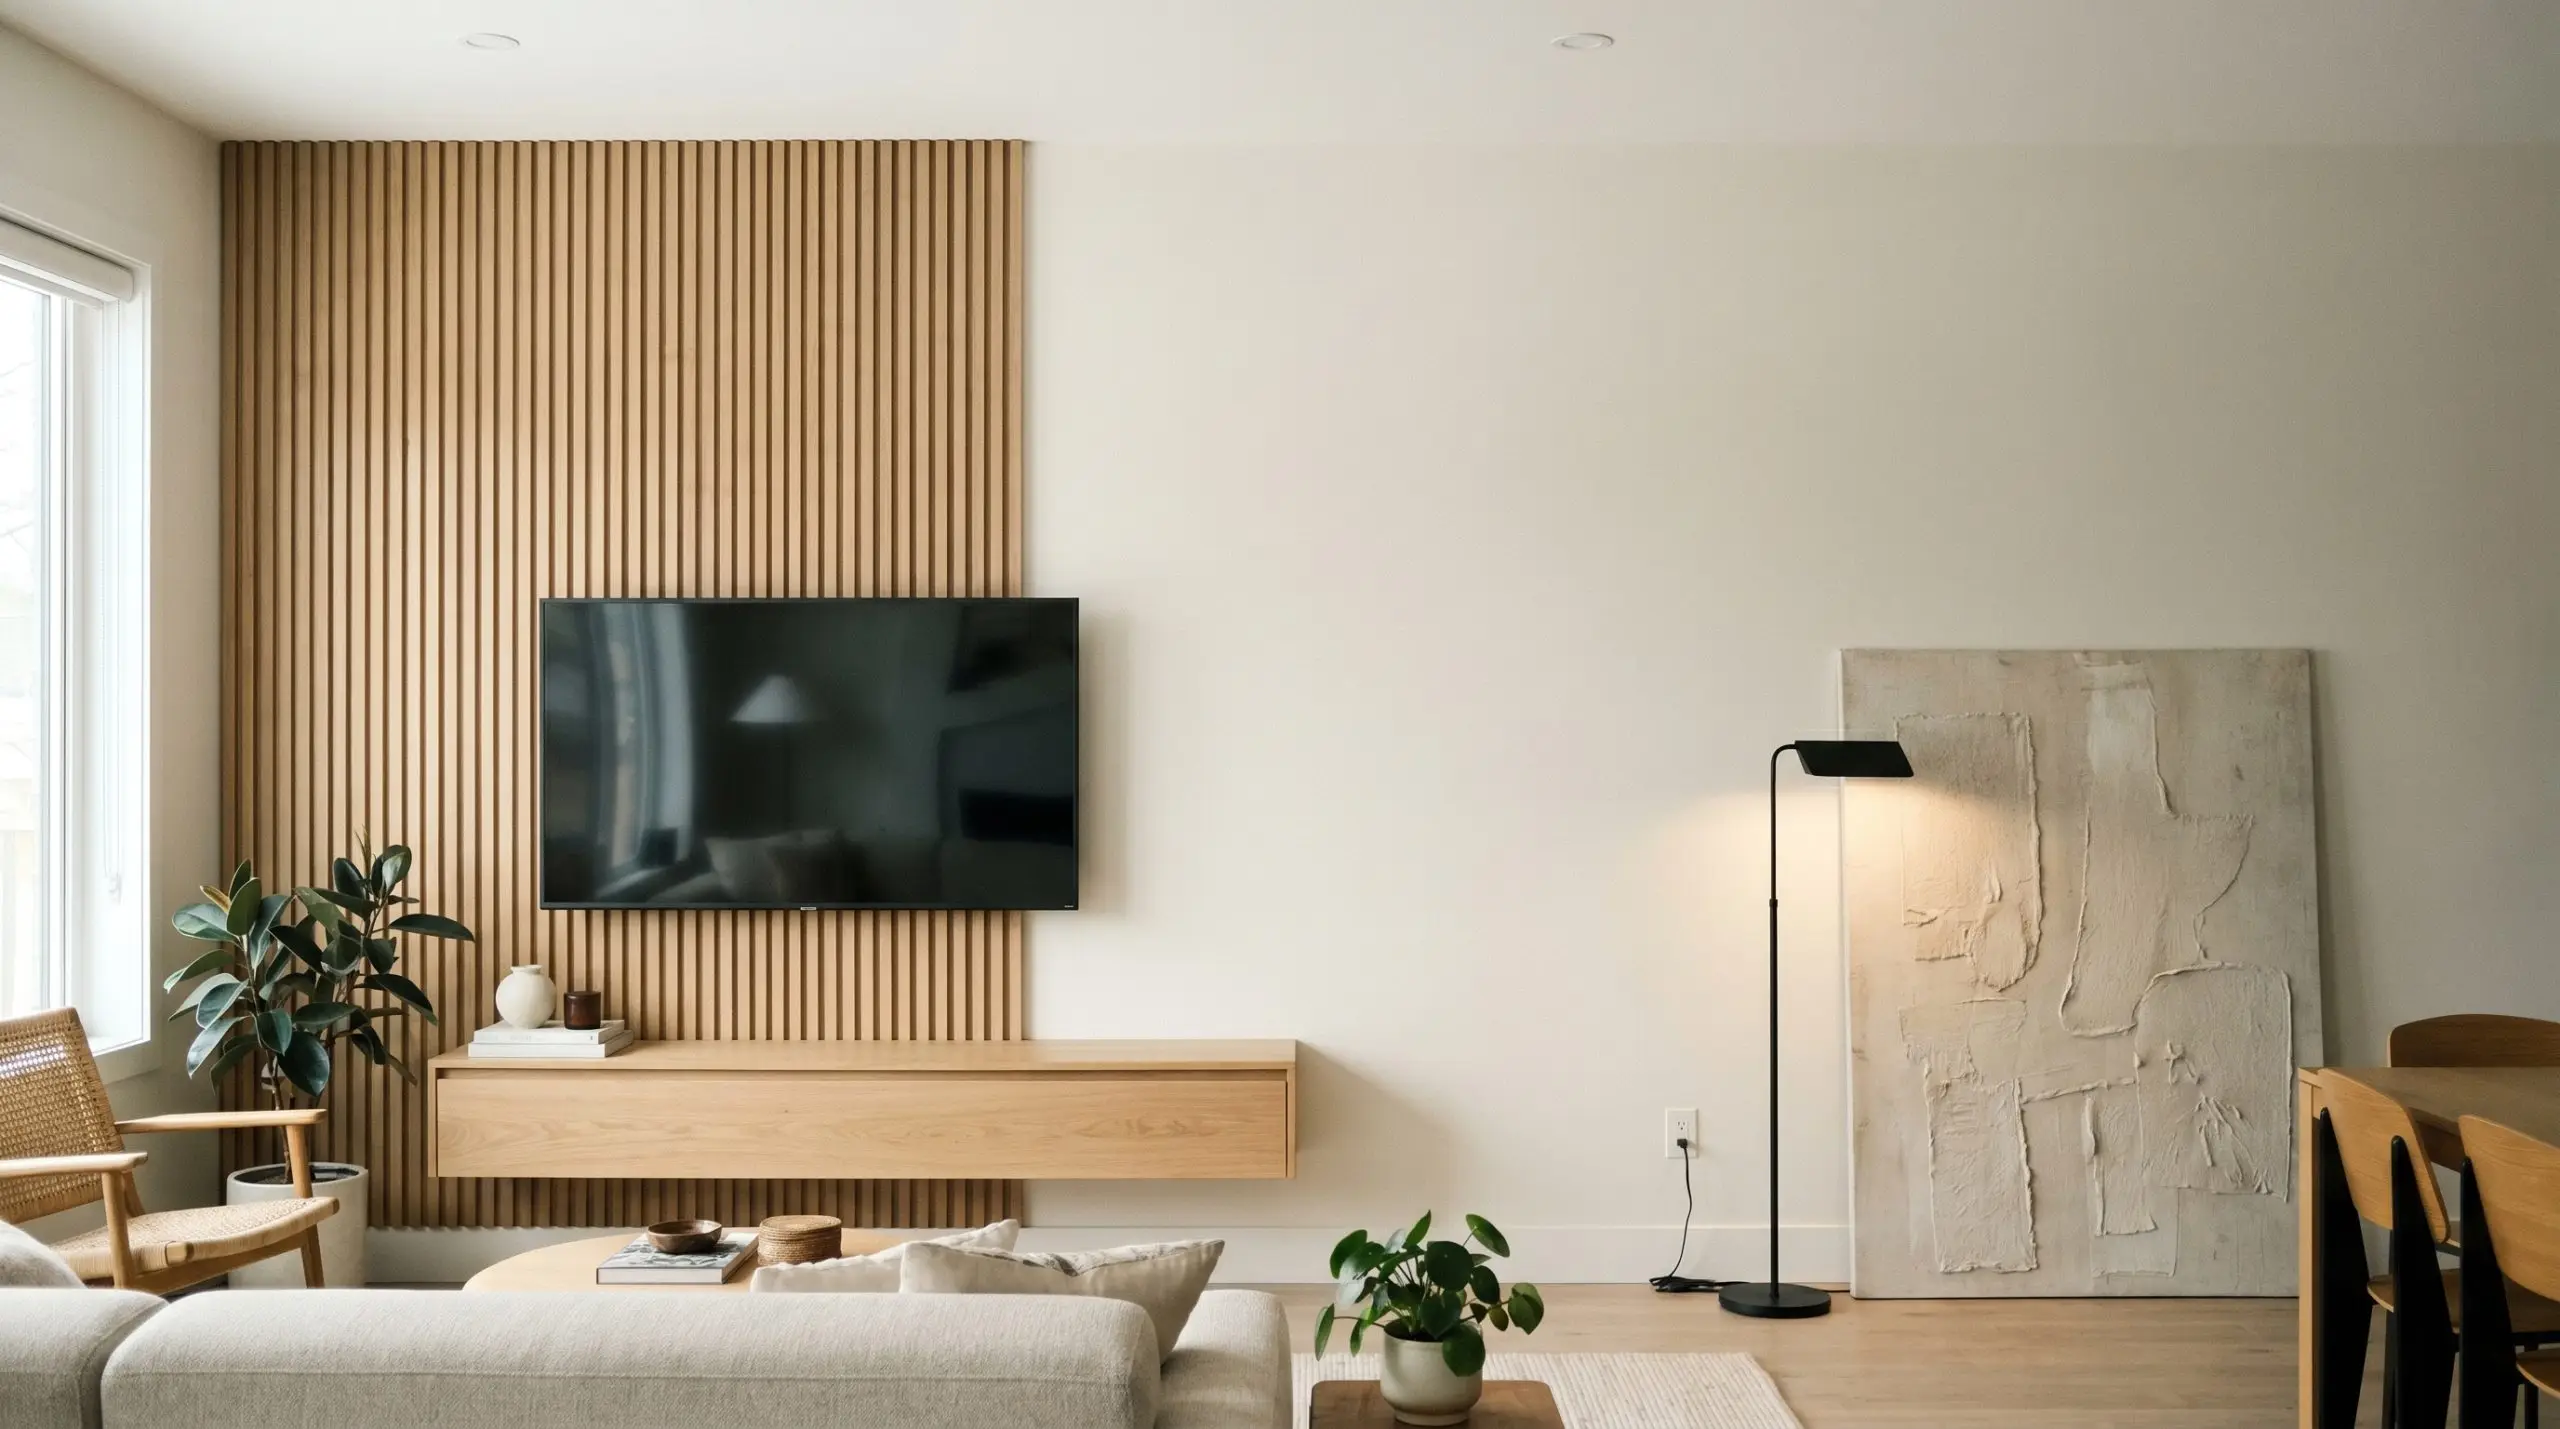
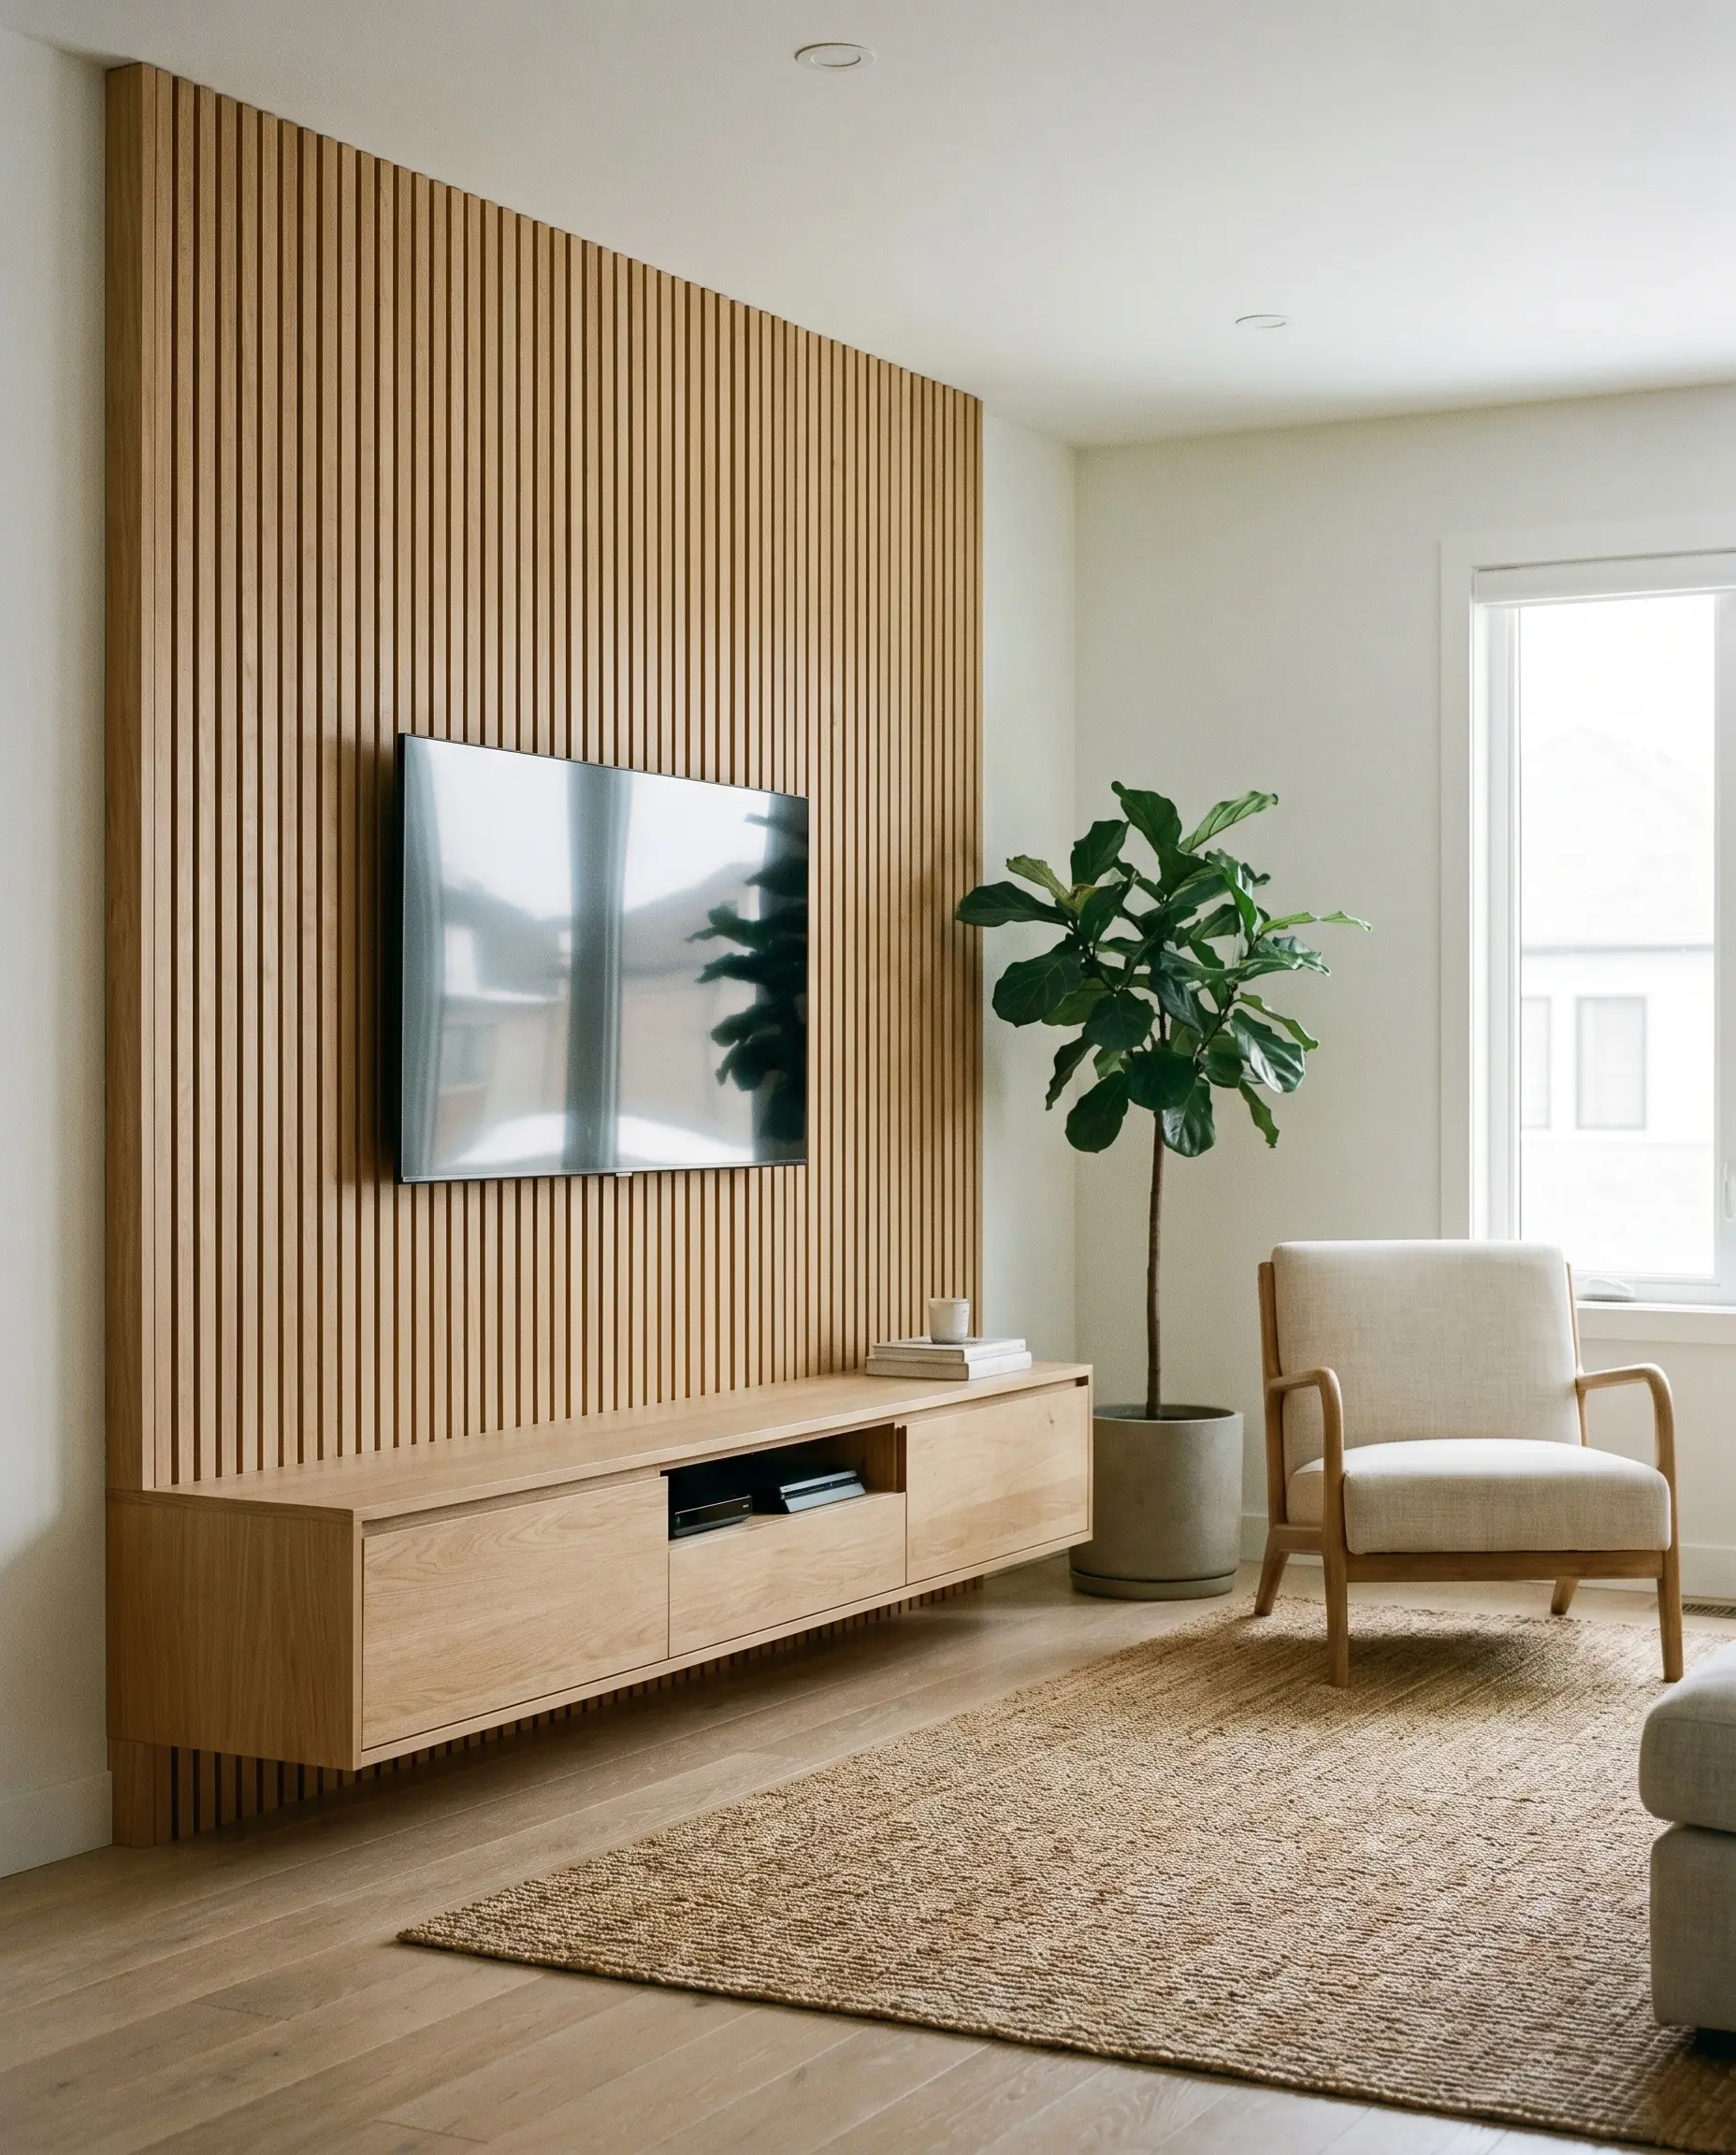
Placing your TV and millwork flush to one side of the wall while leaving the opposite side entirely blank creates a highly sophisticated, architectural tension. This layout forces the eye to appreciate the deliberate negative space, making the room feel wider and intensely intentional.
- Vibe: Sophisticated, gallery-like, deliberately unbalanced.
- Spatial Rule: Dedicate no more than 40% of the total wall width to the slatted millwork zone.
- Key Material: Custom white oak fluted detailing.
- Styling Pro-Tip: Anchor the negative space with a single, low-profile floor lamp or a large-scale, heavily textured canvas.
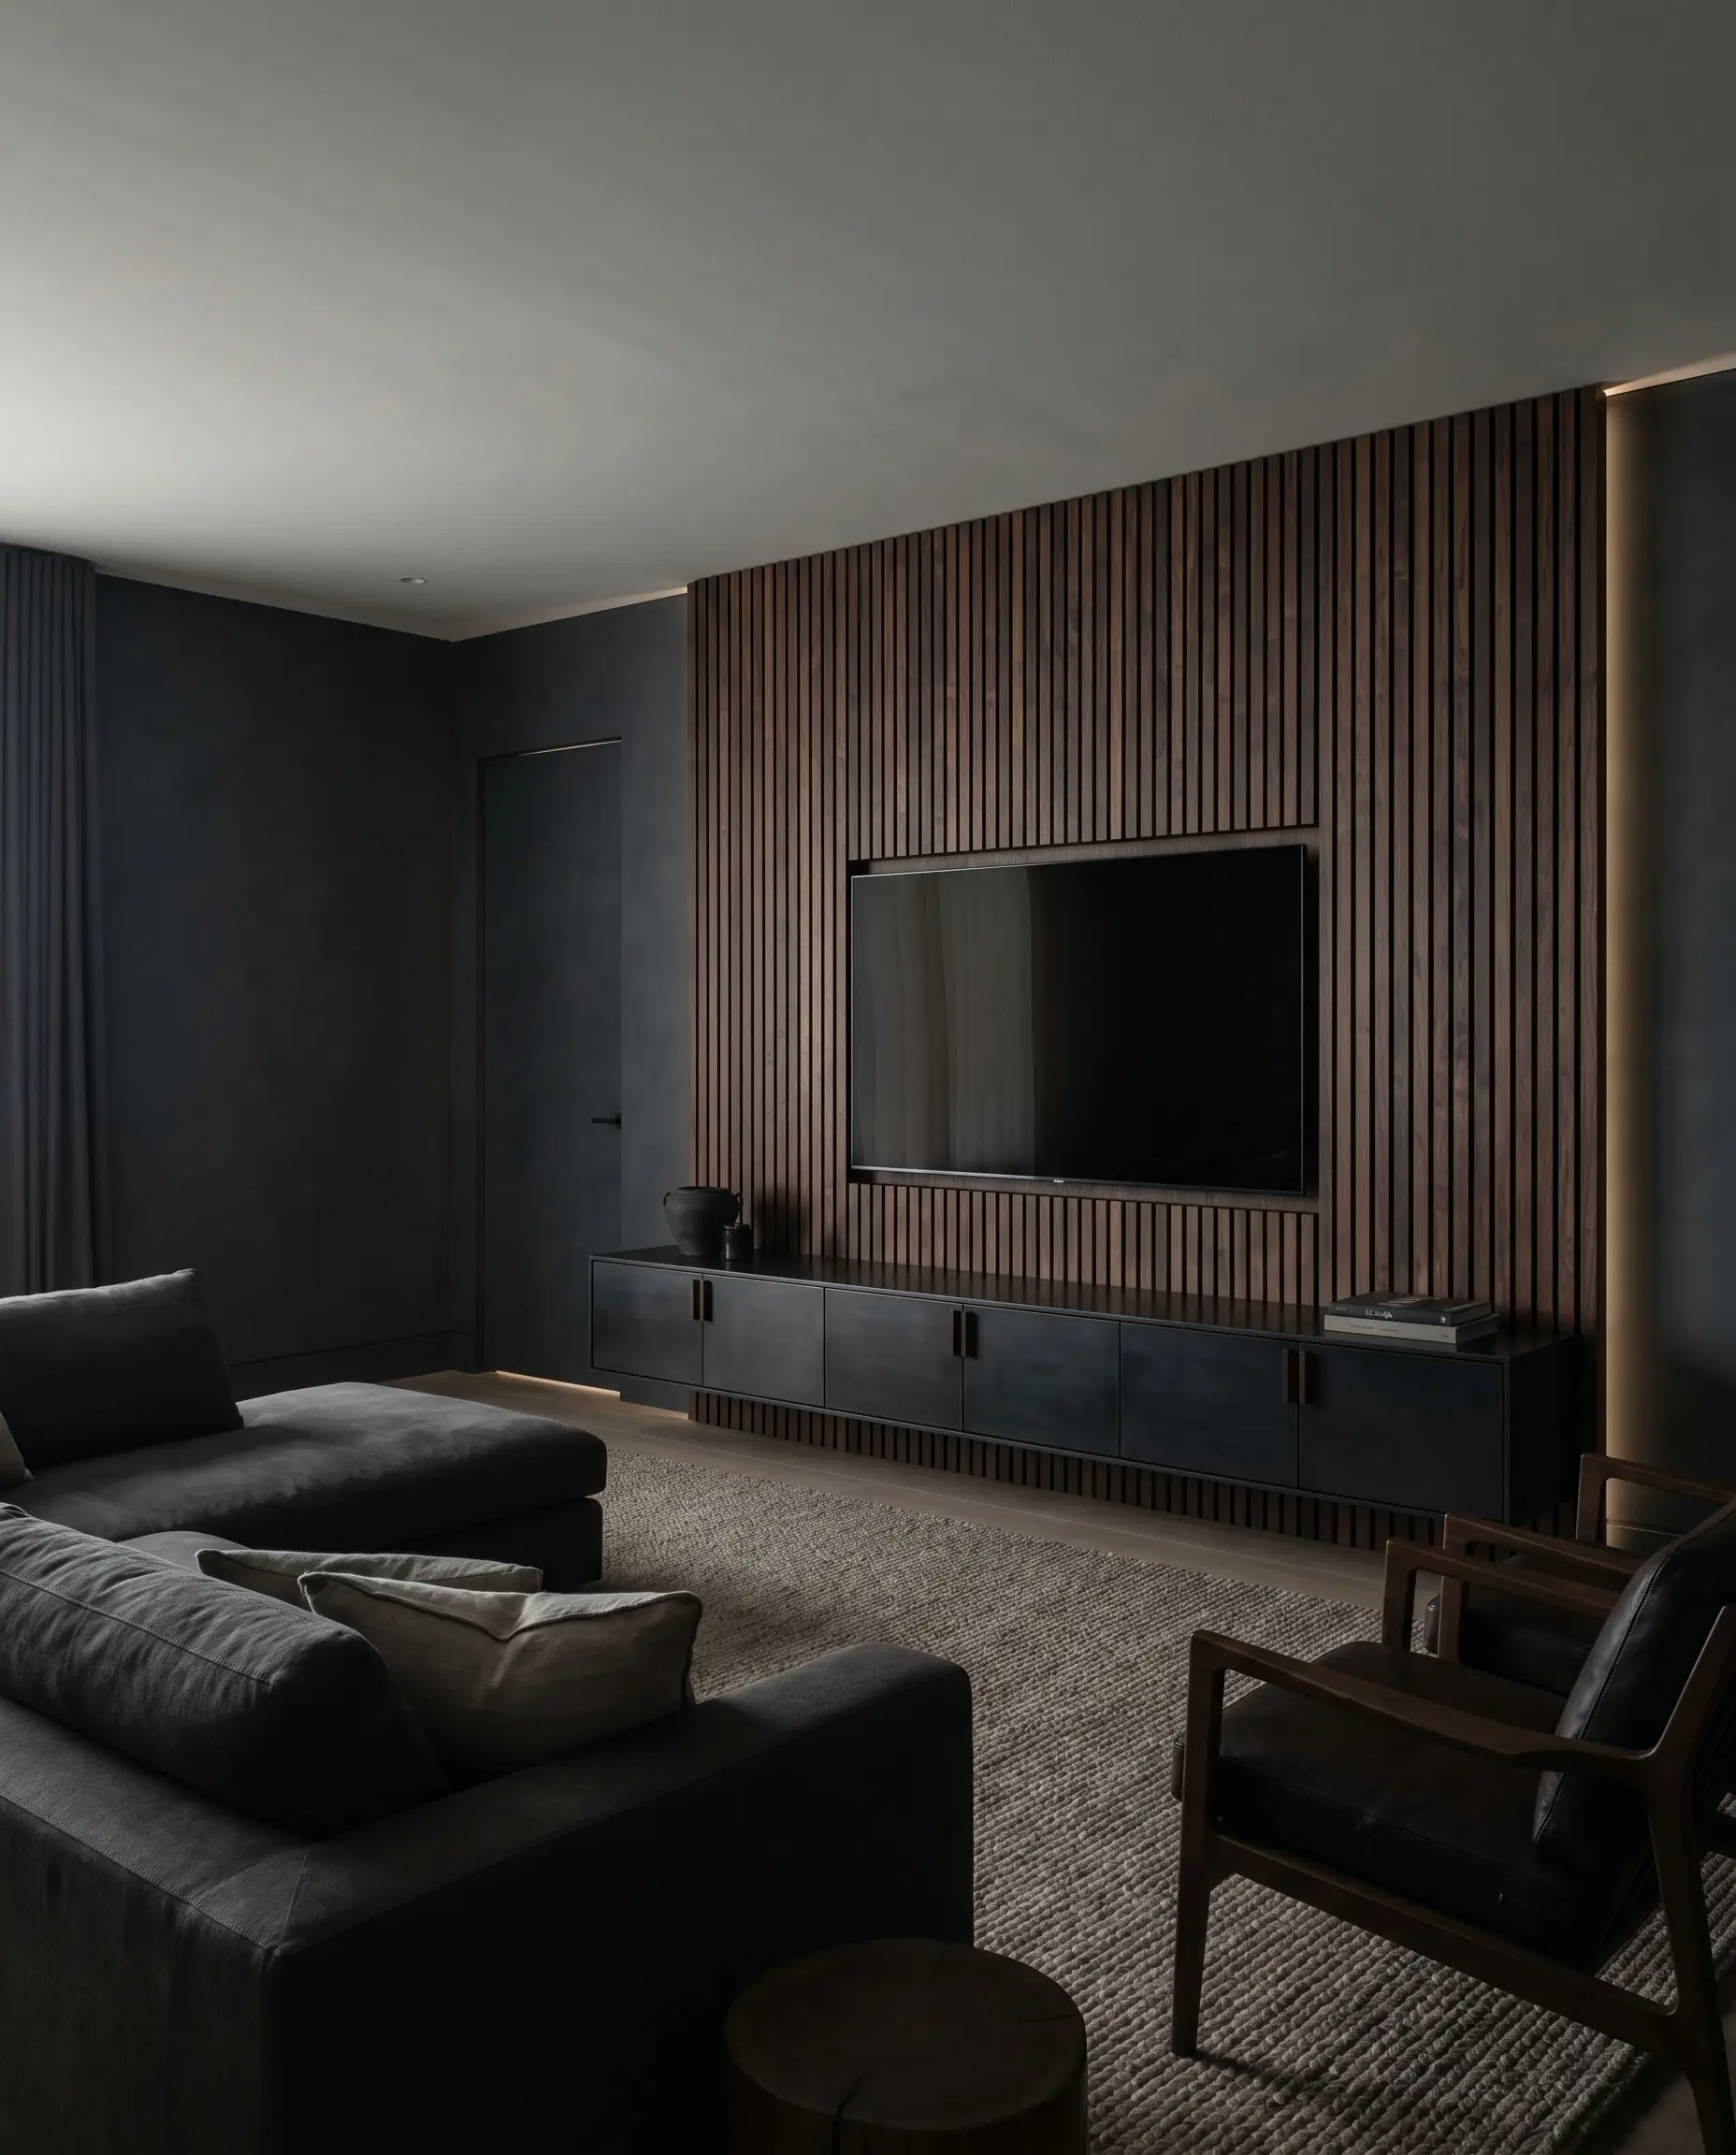
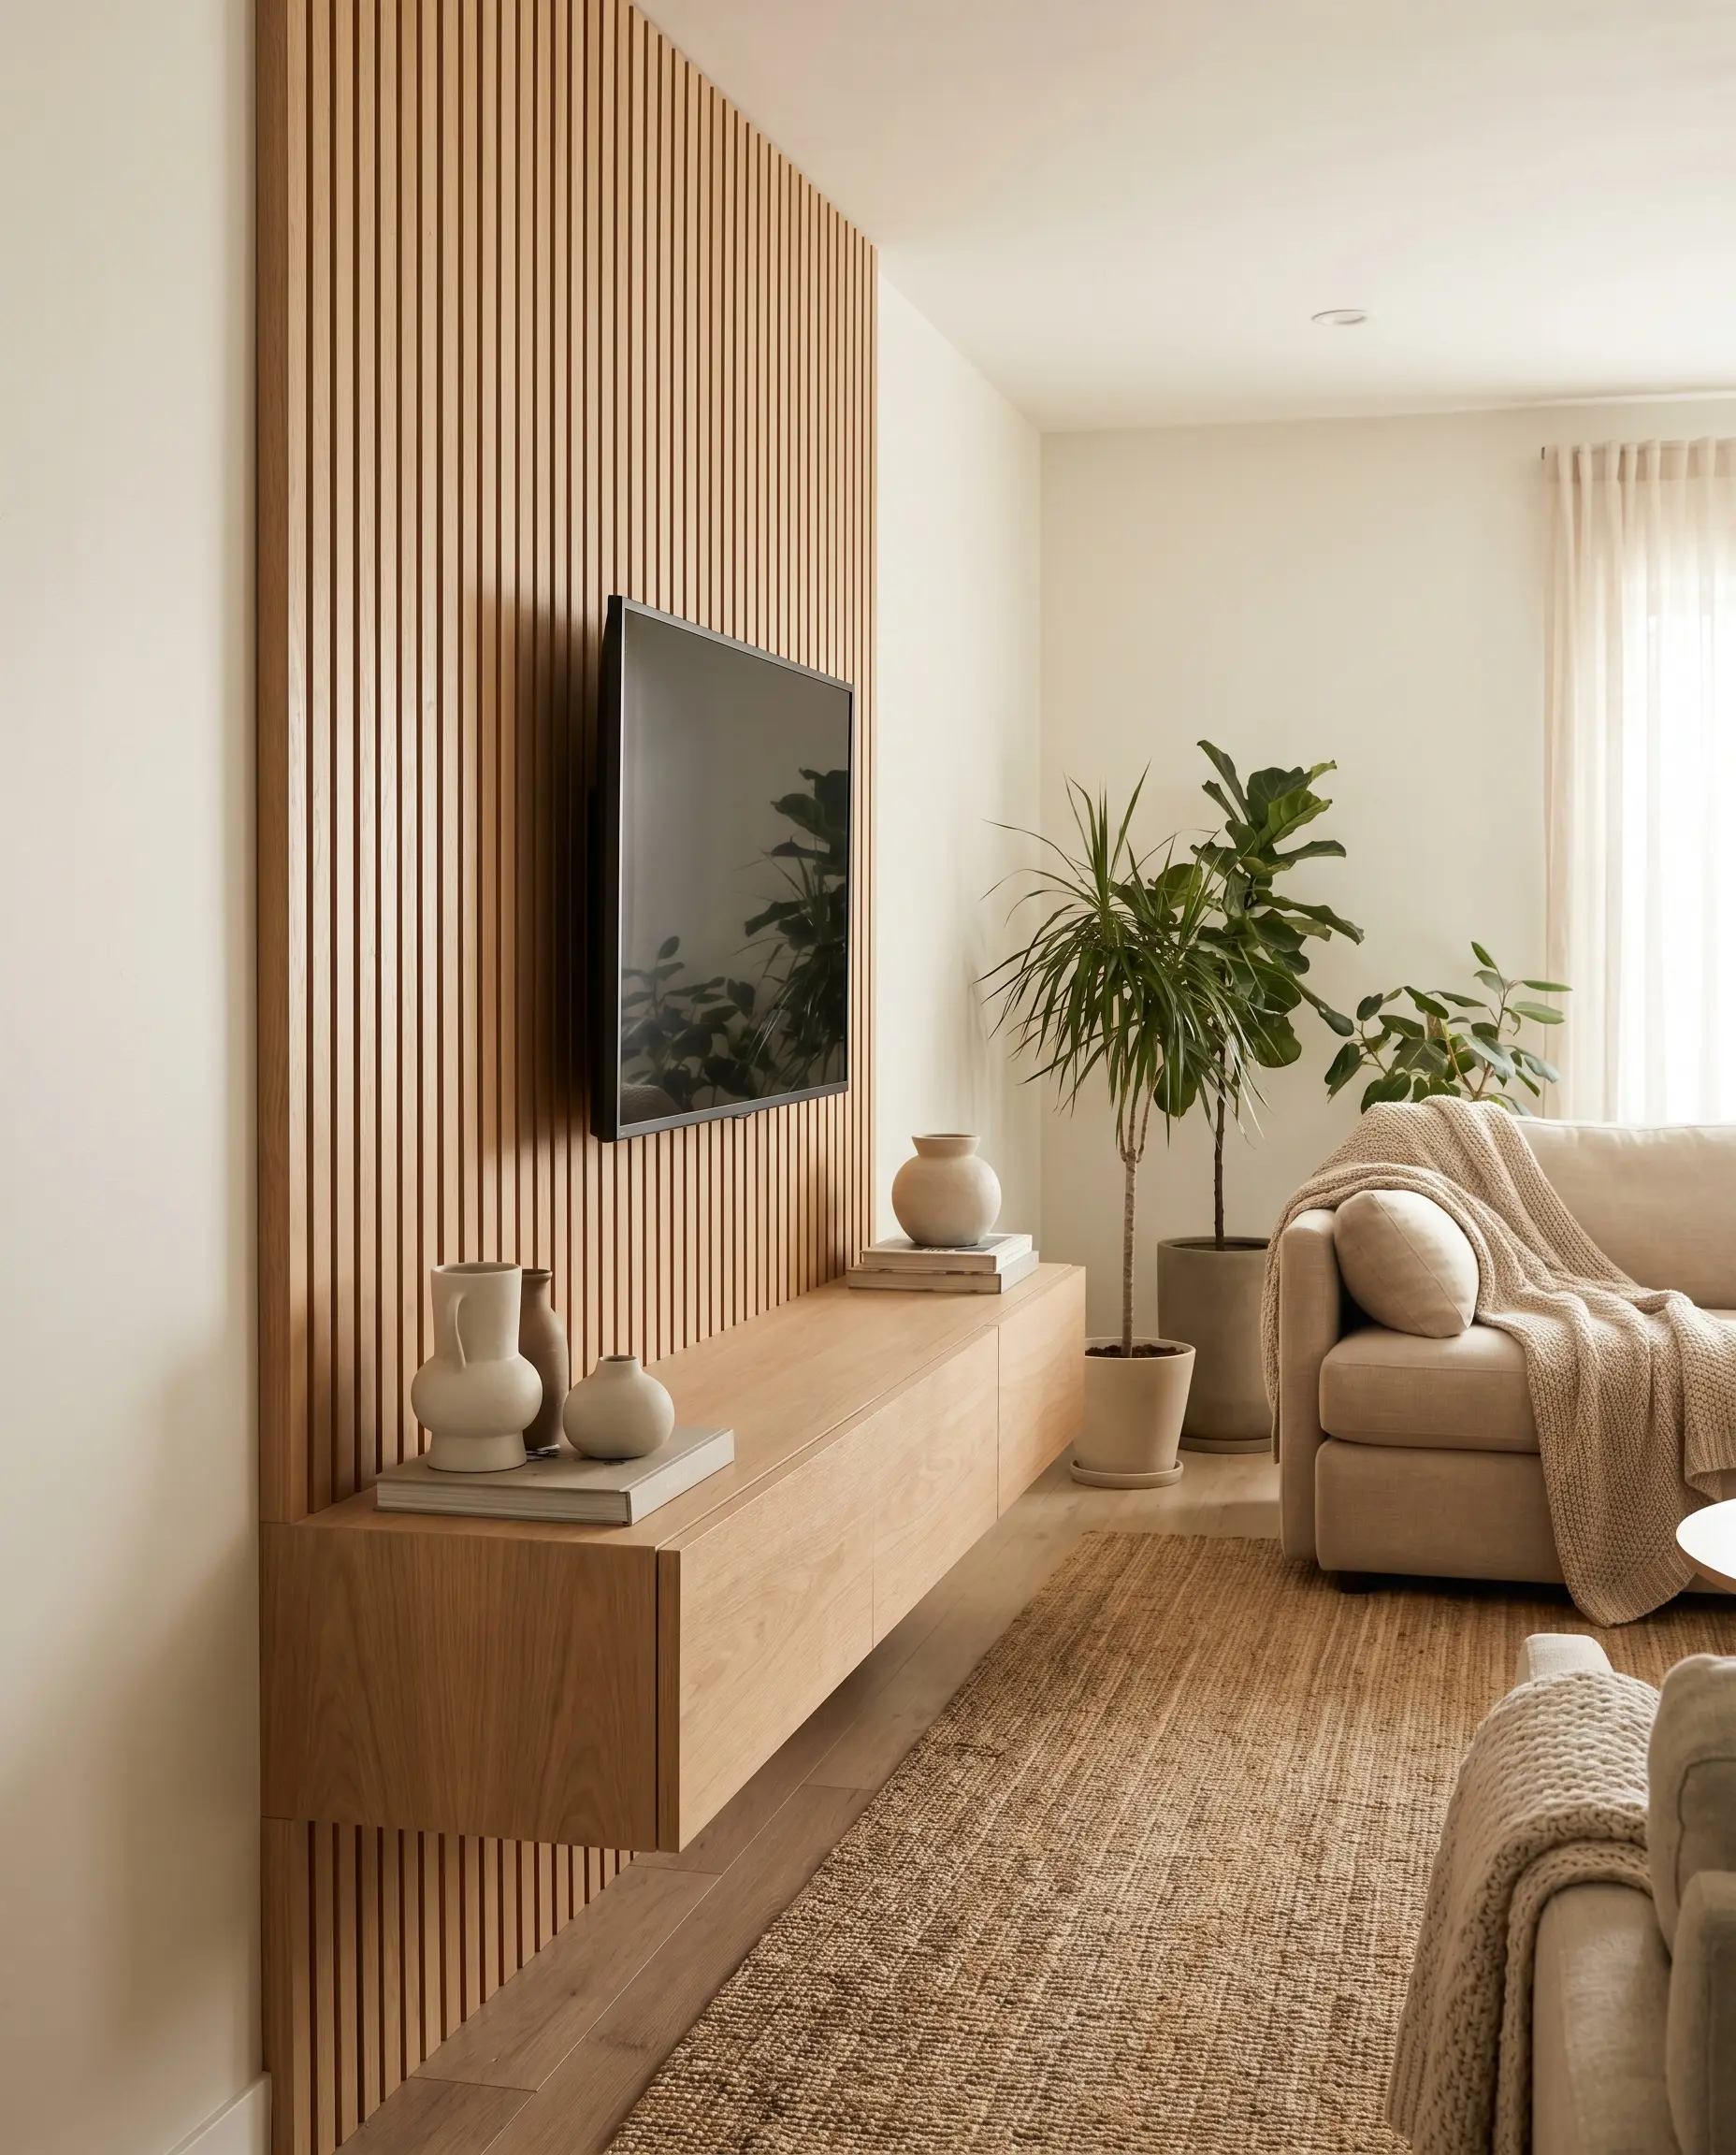
The Floor-to-Ceiling Vertical Anchor
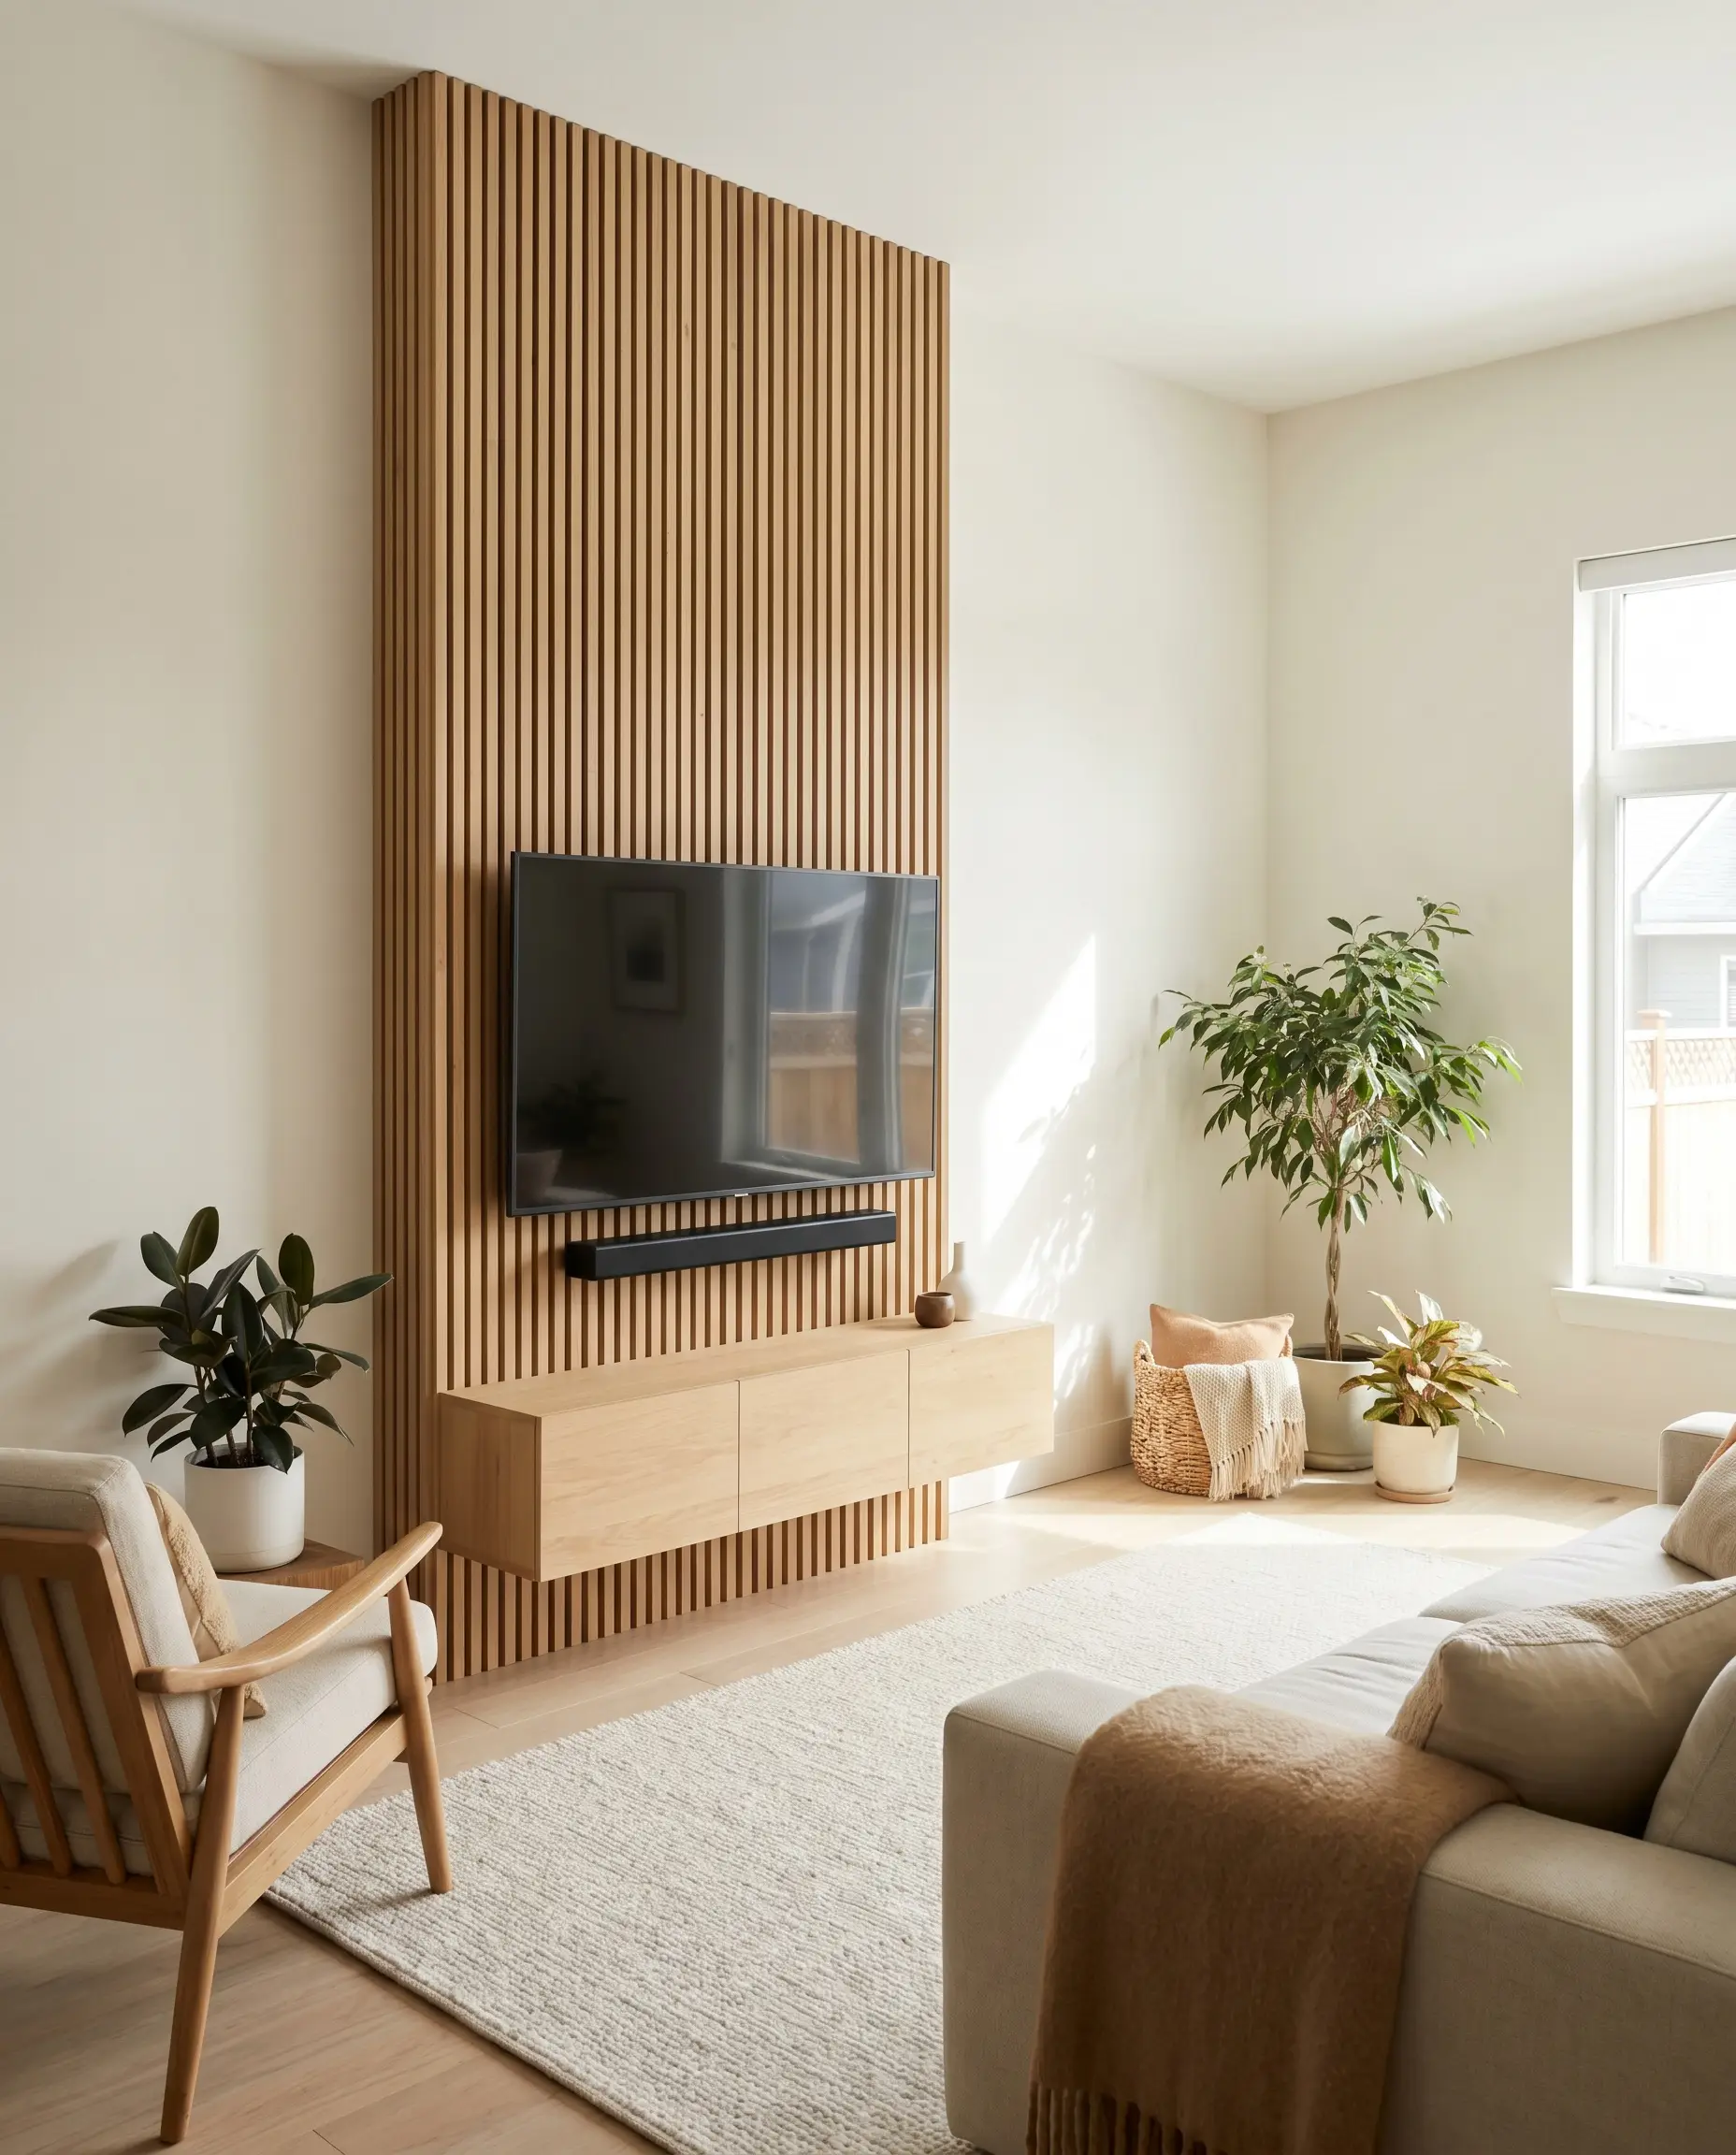
To manipulate the room’s proportions and increase perceived ceiling height, run the slats in a narrow, vertical column directly behind the screen. This column should drop down flawlessly to meet a low-profile floating media console, drawing the eye upward in a continuous, unbroken line.
- Vibe: Towering, linear, structurally grounded.
- Key Materials: 9-foot continuous acoustic wood panels.
- Spatial Rule: The slat column should be exactly the width of the media console below it.
- Styling Pro-Tip: Use a matte black soundbar mounted perfectly flush beneath the screen to maintain the vertical column’s sharp integrity.
The Wrap-Around Corner Technique

Wrapping the slatted texture from the main TV wall around an adjacent outside corner or into an alcove transforms a flat applique into a cohesive, monolithic architectural block. This requires precision carpentry to execute a flawless 45-degree mitered edge where the two planes meet.
- Vibe: Bespoke, structural, heavy millwork.
- Builder’s Note: Never use corner trim to hide the seam; demand a true mitered return for a seamless wood grain wrap.
- Key Material: Custom rift-sawn veneer.
- Styling Pro-Tip: Keep the wrapped corner completely free of artwork or sconces to let the carpentry speak for itself.
Combining Slats with Limewash Plaster
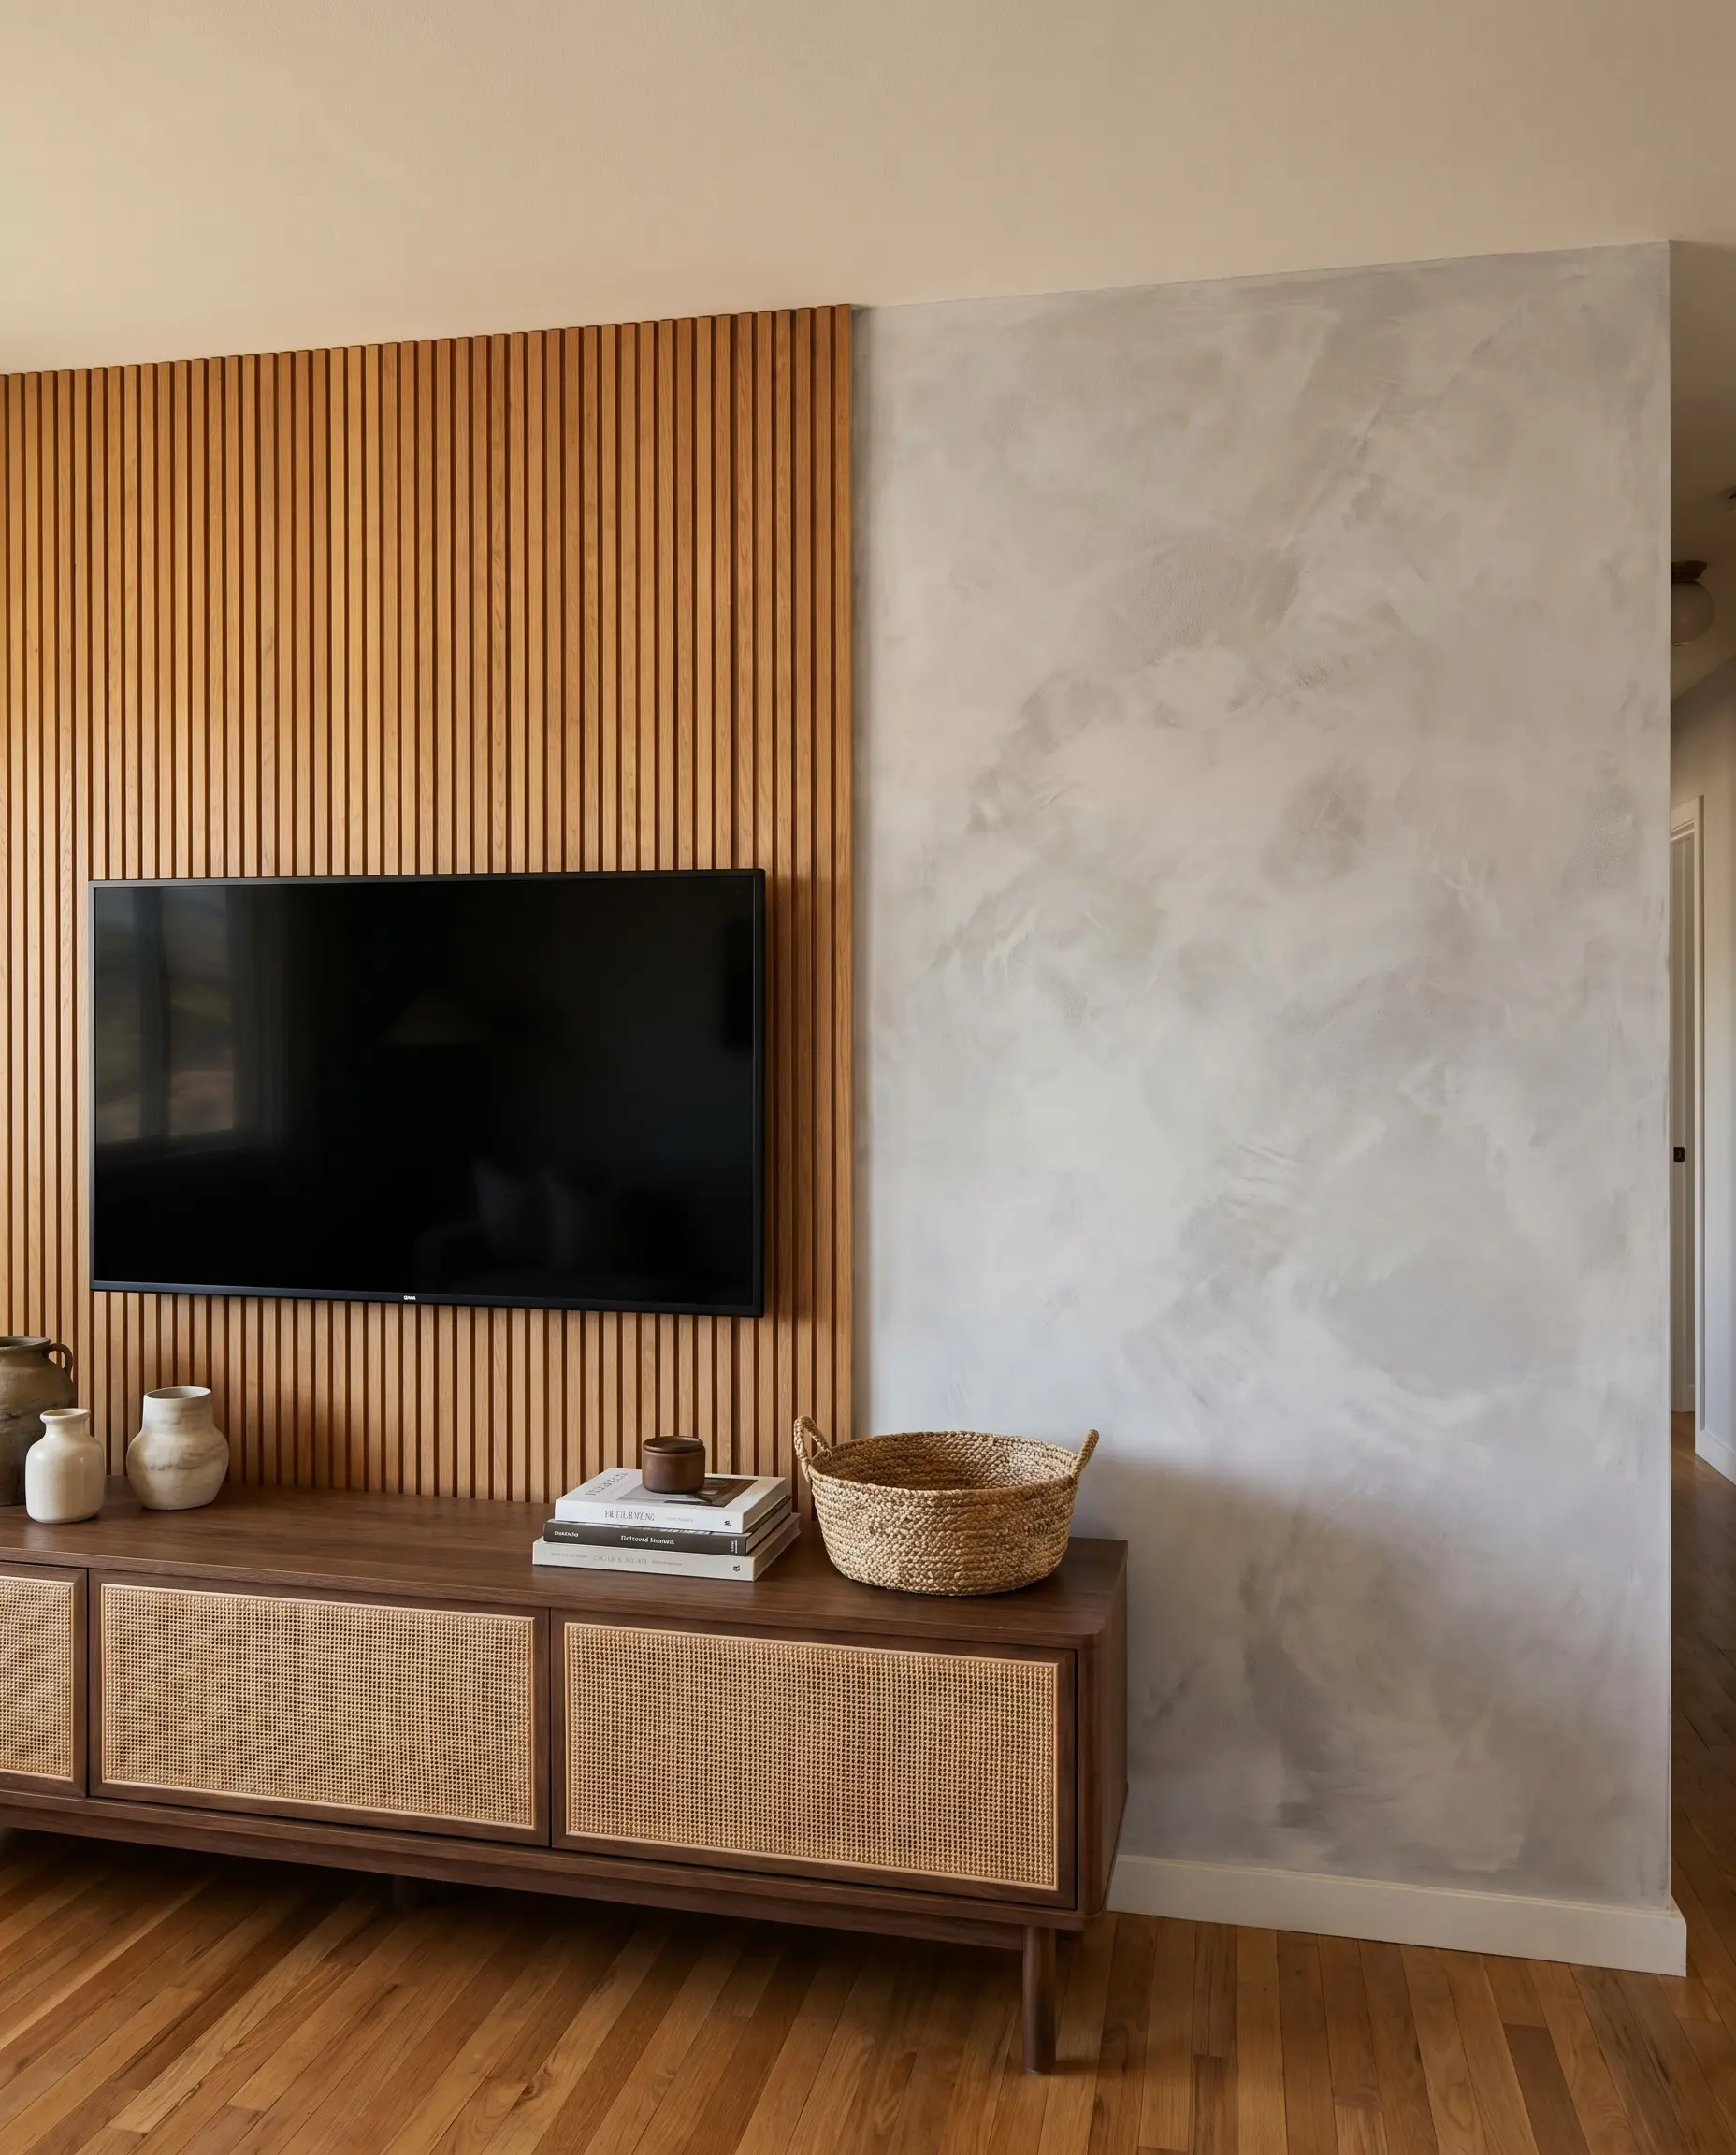
Contrasting the rigid, linear geometry of the wood slats with a deeply organic, cloud-like limewash on the adjacent drywall nails the essential aesthetic friction of this design. The raw, chalky texture of the plaster absorbs light beautifully, preventing the room from feeling overly clinical.
- Vibe: Earthy, highly tactile, wabi-sabi.
- Key Paint Recommendation: Portola Paints Limewash in “El Mirage.”
- Material Match: Pair cool-toned limewash with warm-toned oak to balance the thermal visual weight.
- Styling Pro-Tip: Use a wide, natural bristle brush to apply the limewash in loose, overlapping X-strokes for maximum movement.
Limewash Plaster vs. Standard Matte Paint (Behind Slats)
Limewash Plaster:
- Pros: Deeply organic texture, absorbs light beautifully, creates immense wabi-sabi friction against rigid wood.
- Cons: Labor-intensive application, difficult to touch up, higher cost per square foot.
Standard Matte Paint:
- Pros: Fast application, easy to color-match to existing walls, simple to clean and touch up.
- Cons: Lacks tactile depth, can look flat and uninspired next to rich millwork.
You can apply wallpapers, paints, etc. on walls and see how they look in various interiors.
Selecting the Exact Wood Tones and Materials
The fastest way to ruin a minimal aesthetic is by choosing glossy finishes, heavy red oaks, or overly rustic, knotty pines. This style demands clean, muted, and dead-flat matte wood profiles that whisper rather than shout.
Rift-Sawn White Oak Profiles

Rift-sawn white oak is the absolute gold standard for this application because the milling process produces a wildly straight, quiet grain pattern. When sealed with a dead-flat matte clear coat, it provides a highly tactile, raw wood feel without any distracting yellow or red undertones.
- Vibe: Bright, Scandinavian-leaning, impeccably clean.
- Material Spec: 1-inch rift-sawn white oak sealed with Bona Traffic HD Extra Matte.
- Color Match: Sherwin-Williams “Alabaster” for the surrounding drywall.
- Styling Pro-Tip: Ensure your flooring doesn’t violently clash with the oak; if you have dark floors, use a large, light-toned wool rug to buffer the transition.
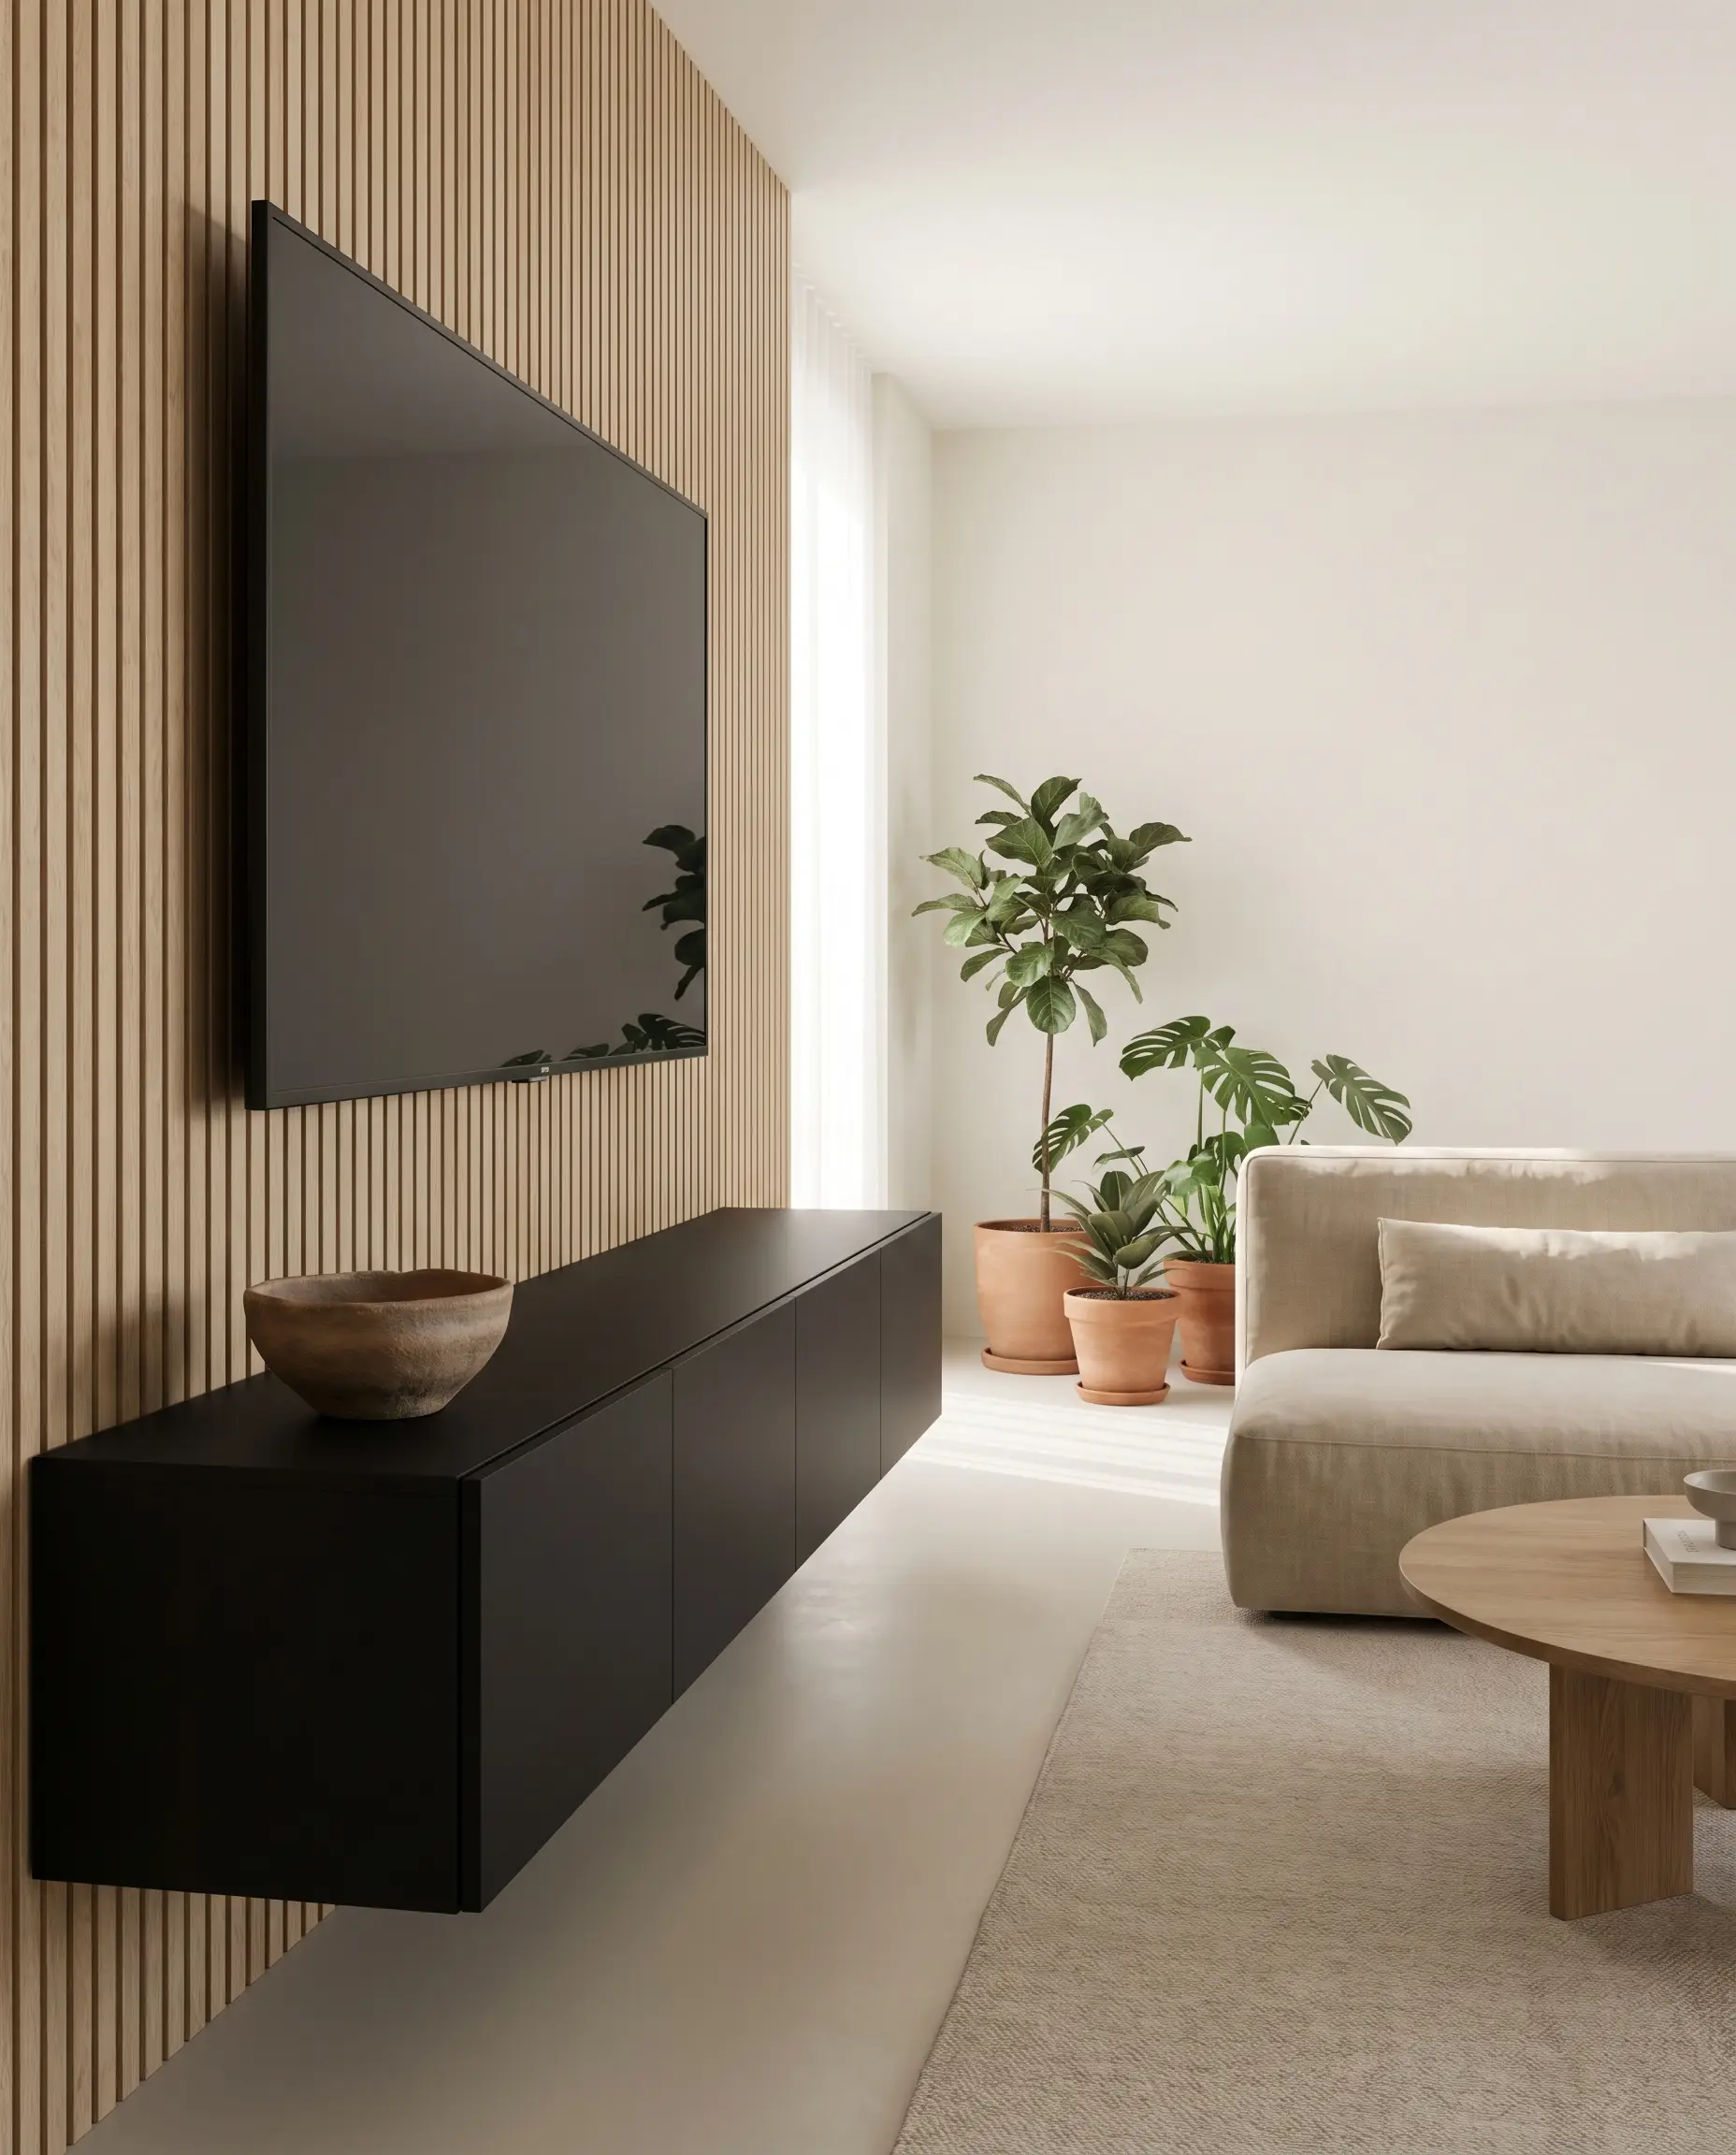
Smoked Walnut for Moody Japandi
For darker media rooms or spaces requiring immense visual weight, smoked walnut offers a richer, almost mid-century crossover appeal. It maintains the necessary minimalism but grounds the space with deep chocolate hues and subtle charcoal graining.
- Vibe: Intimate, heavy, cinematic.
- Key Material: Flat-cut or quarter-sawn smoked walnut veneer.
- Material Match: Pair heavily with blackened steel hardware or dark bronze accents.
- Styling Pro-Tip: Use deep, saturated limewash (like a dark slate) on the adjacent walls to absorb excess screen glare.
Pre-Fabricated Acoustic Felt Panels
For an accessible DIY route that refuses to compromise on finish, pre-fabricated acoustic wood panels are incredibly effective. Beyond looking high-end, their recycled black or gray felt backing drastically improves room acoustics by absorbing harsh soundbar bounce.
- Vibe: Functional, modern, accessible luxury.
- Key Material: WoodUpp Akupanel in Natural Oak.
- Builder’s Note: Use black drywall screws driven directly through the felt backing into the structural studs for a completely invisible installation.
- Styling Pro-Tip: Vacuum the felt backing with a brush attachment monthly to keep dust from dulling the deep black contrast.
Bamboo Slat Alternatives
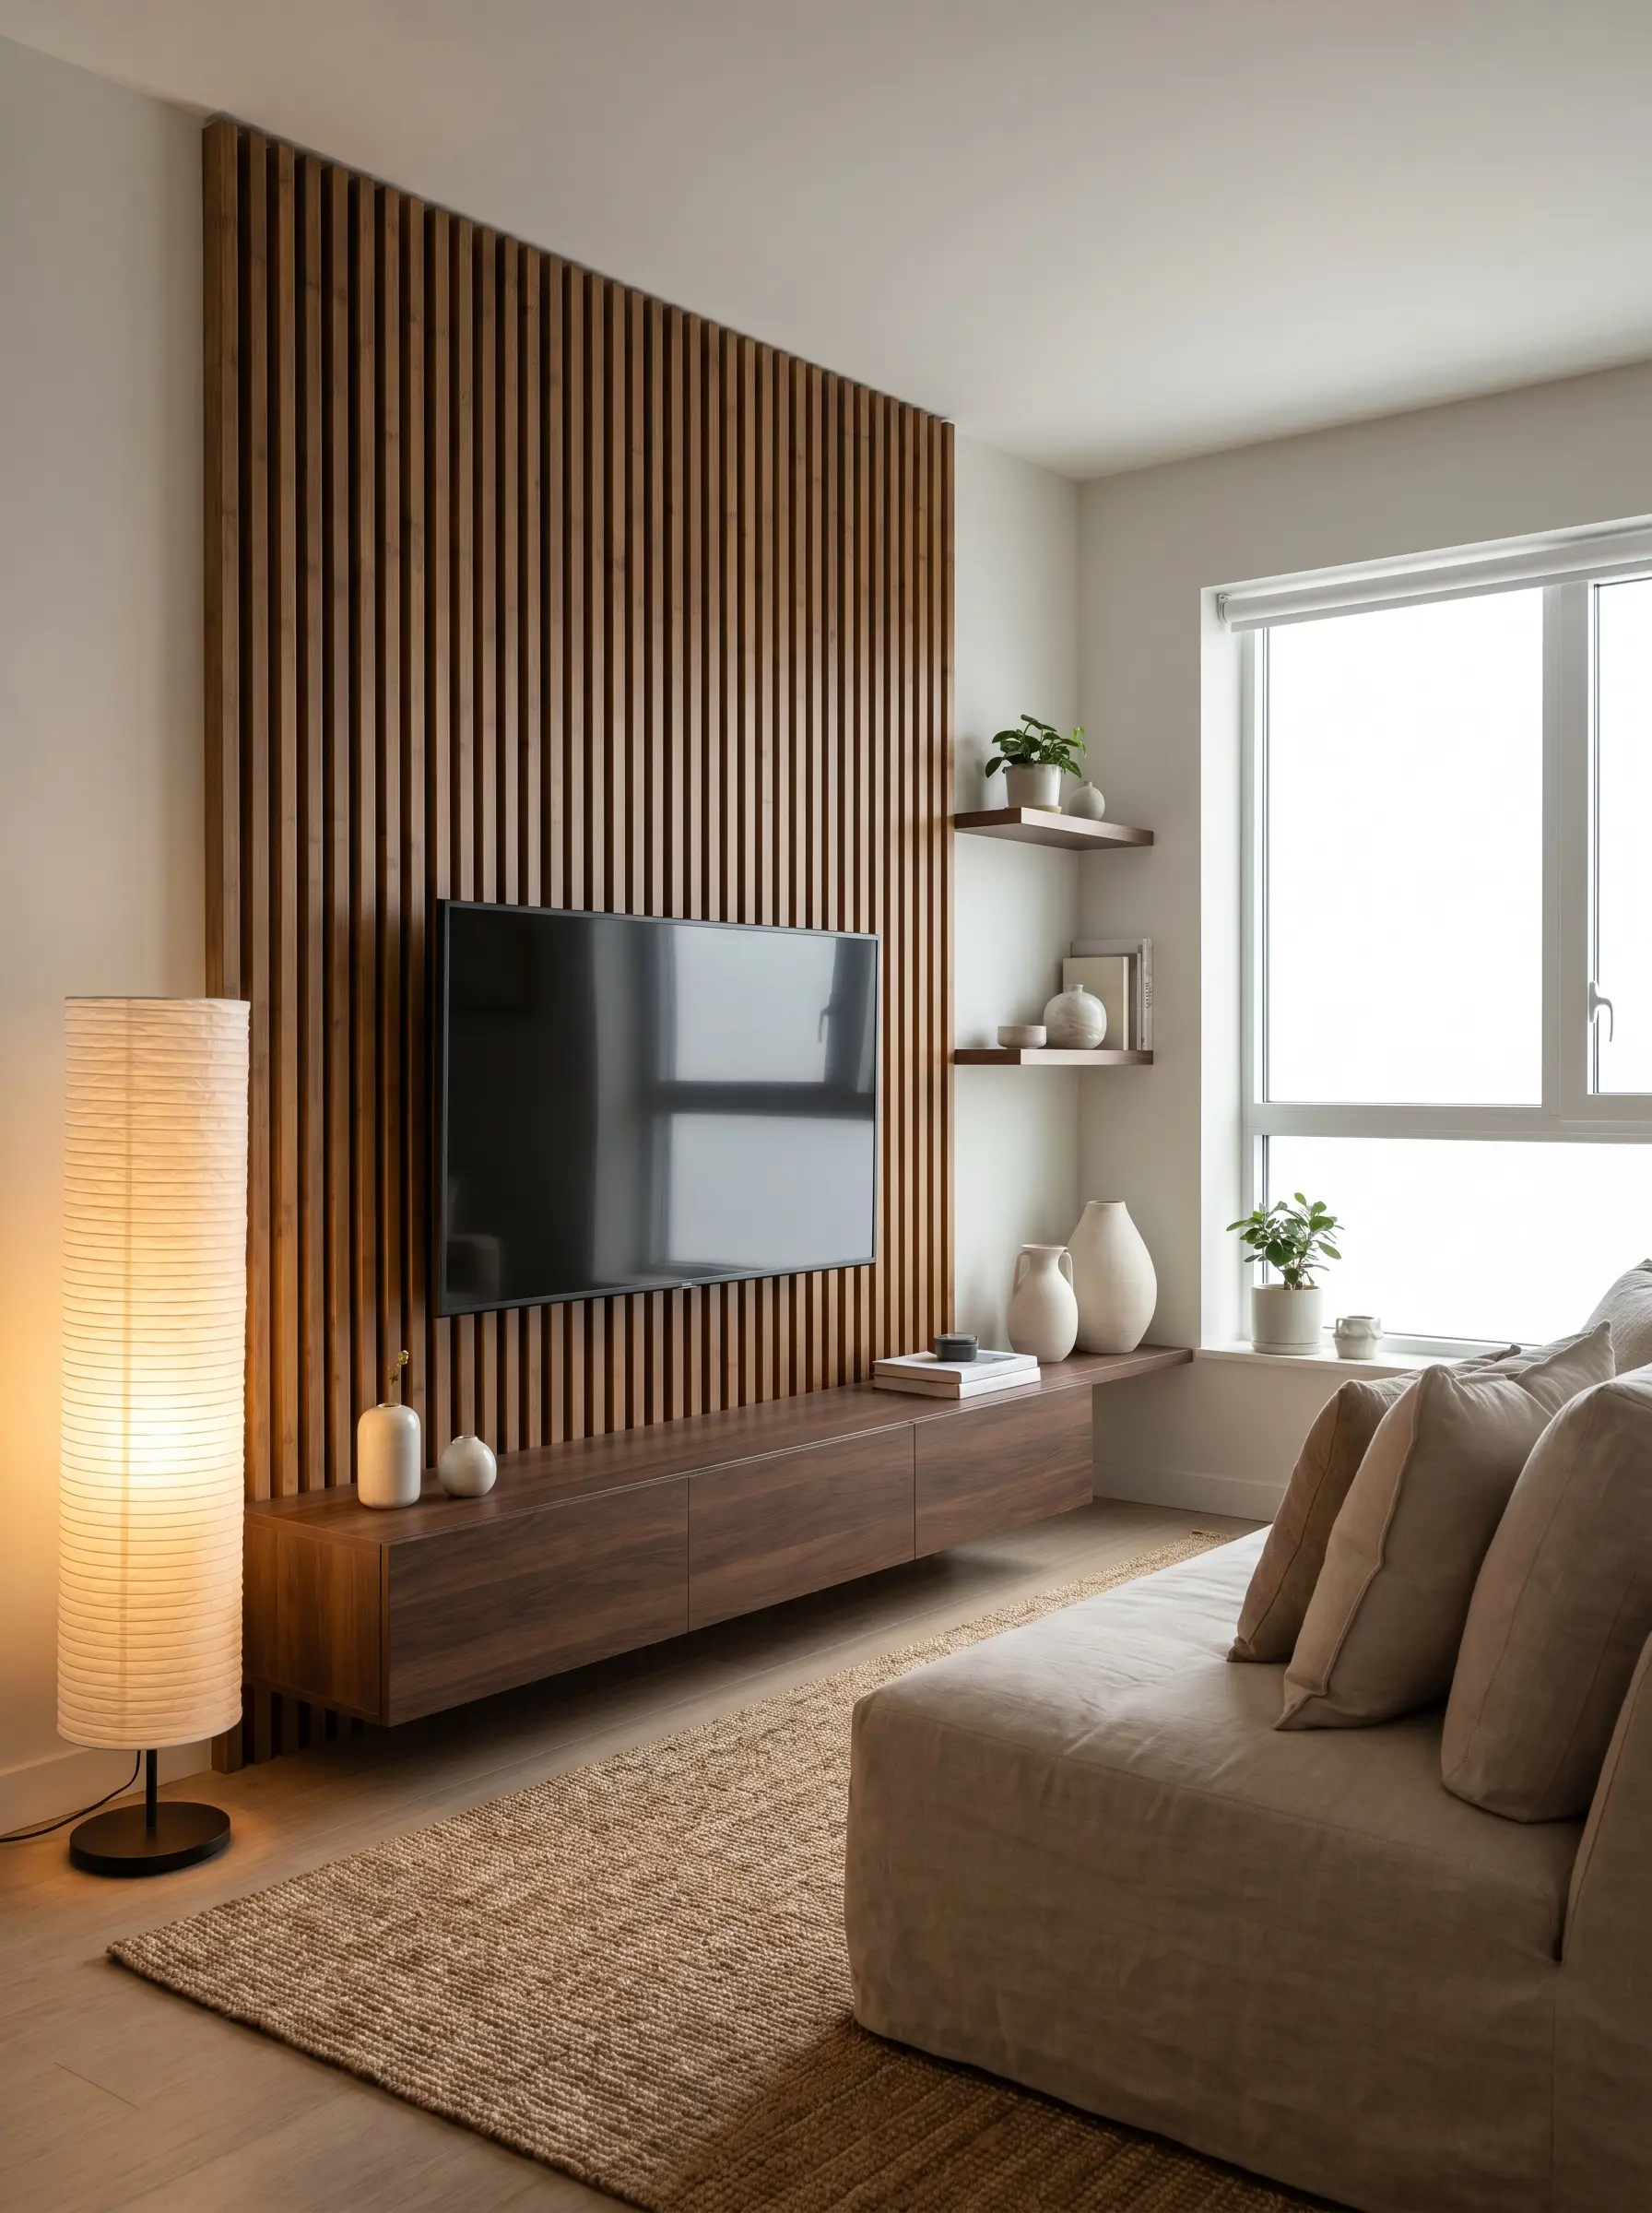
Bamboo is a highly sustainable, ultra-smooth alternative that leans heavily into the Japanese influence of the aesthetic. Its rapid growth cycle makes it an eco-conscious choice, while its completely knot-free surface provides a pristine, uniform texture.
- Vibe: Zen, uniform, environmentally conscious.
- Key Material: Solid architectural carbonized bamboo slats.
- Material Match: Pair with rice paper lighting fixtures for a cohesive material story.
- Styling Pro-Tip: Bamboo takes stain differently than traditional hardwoods; always test a matte sealer on a scrap piece to ensure it doesn’t pull orange.
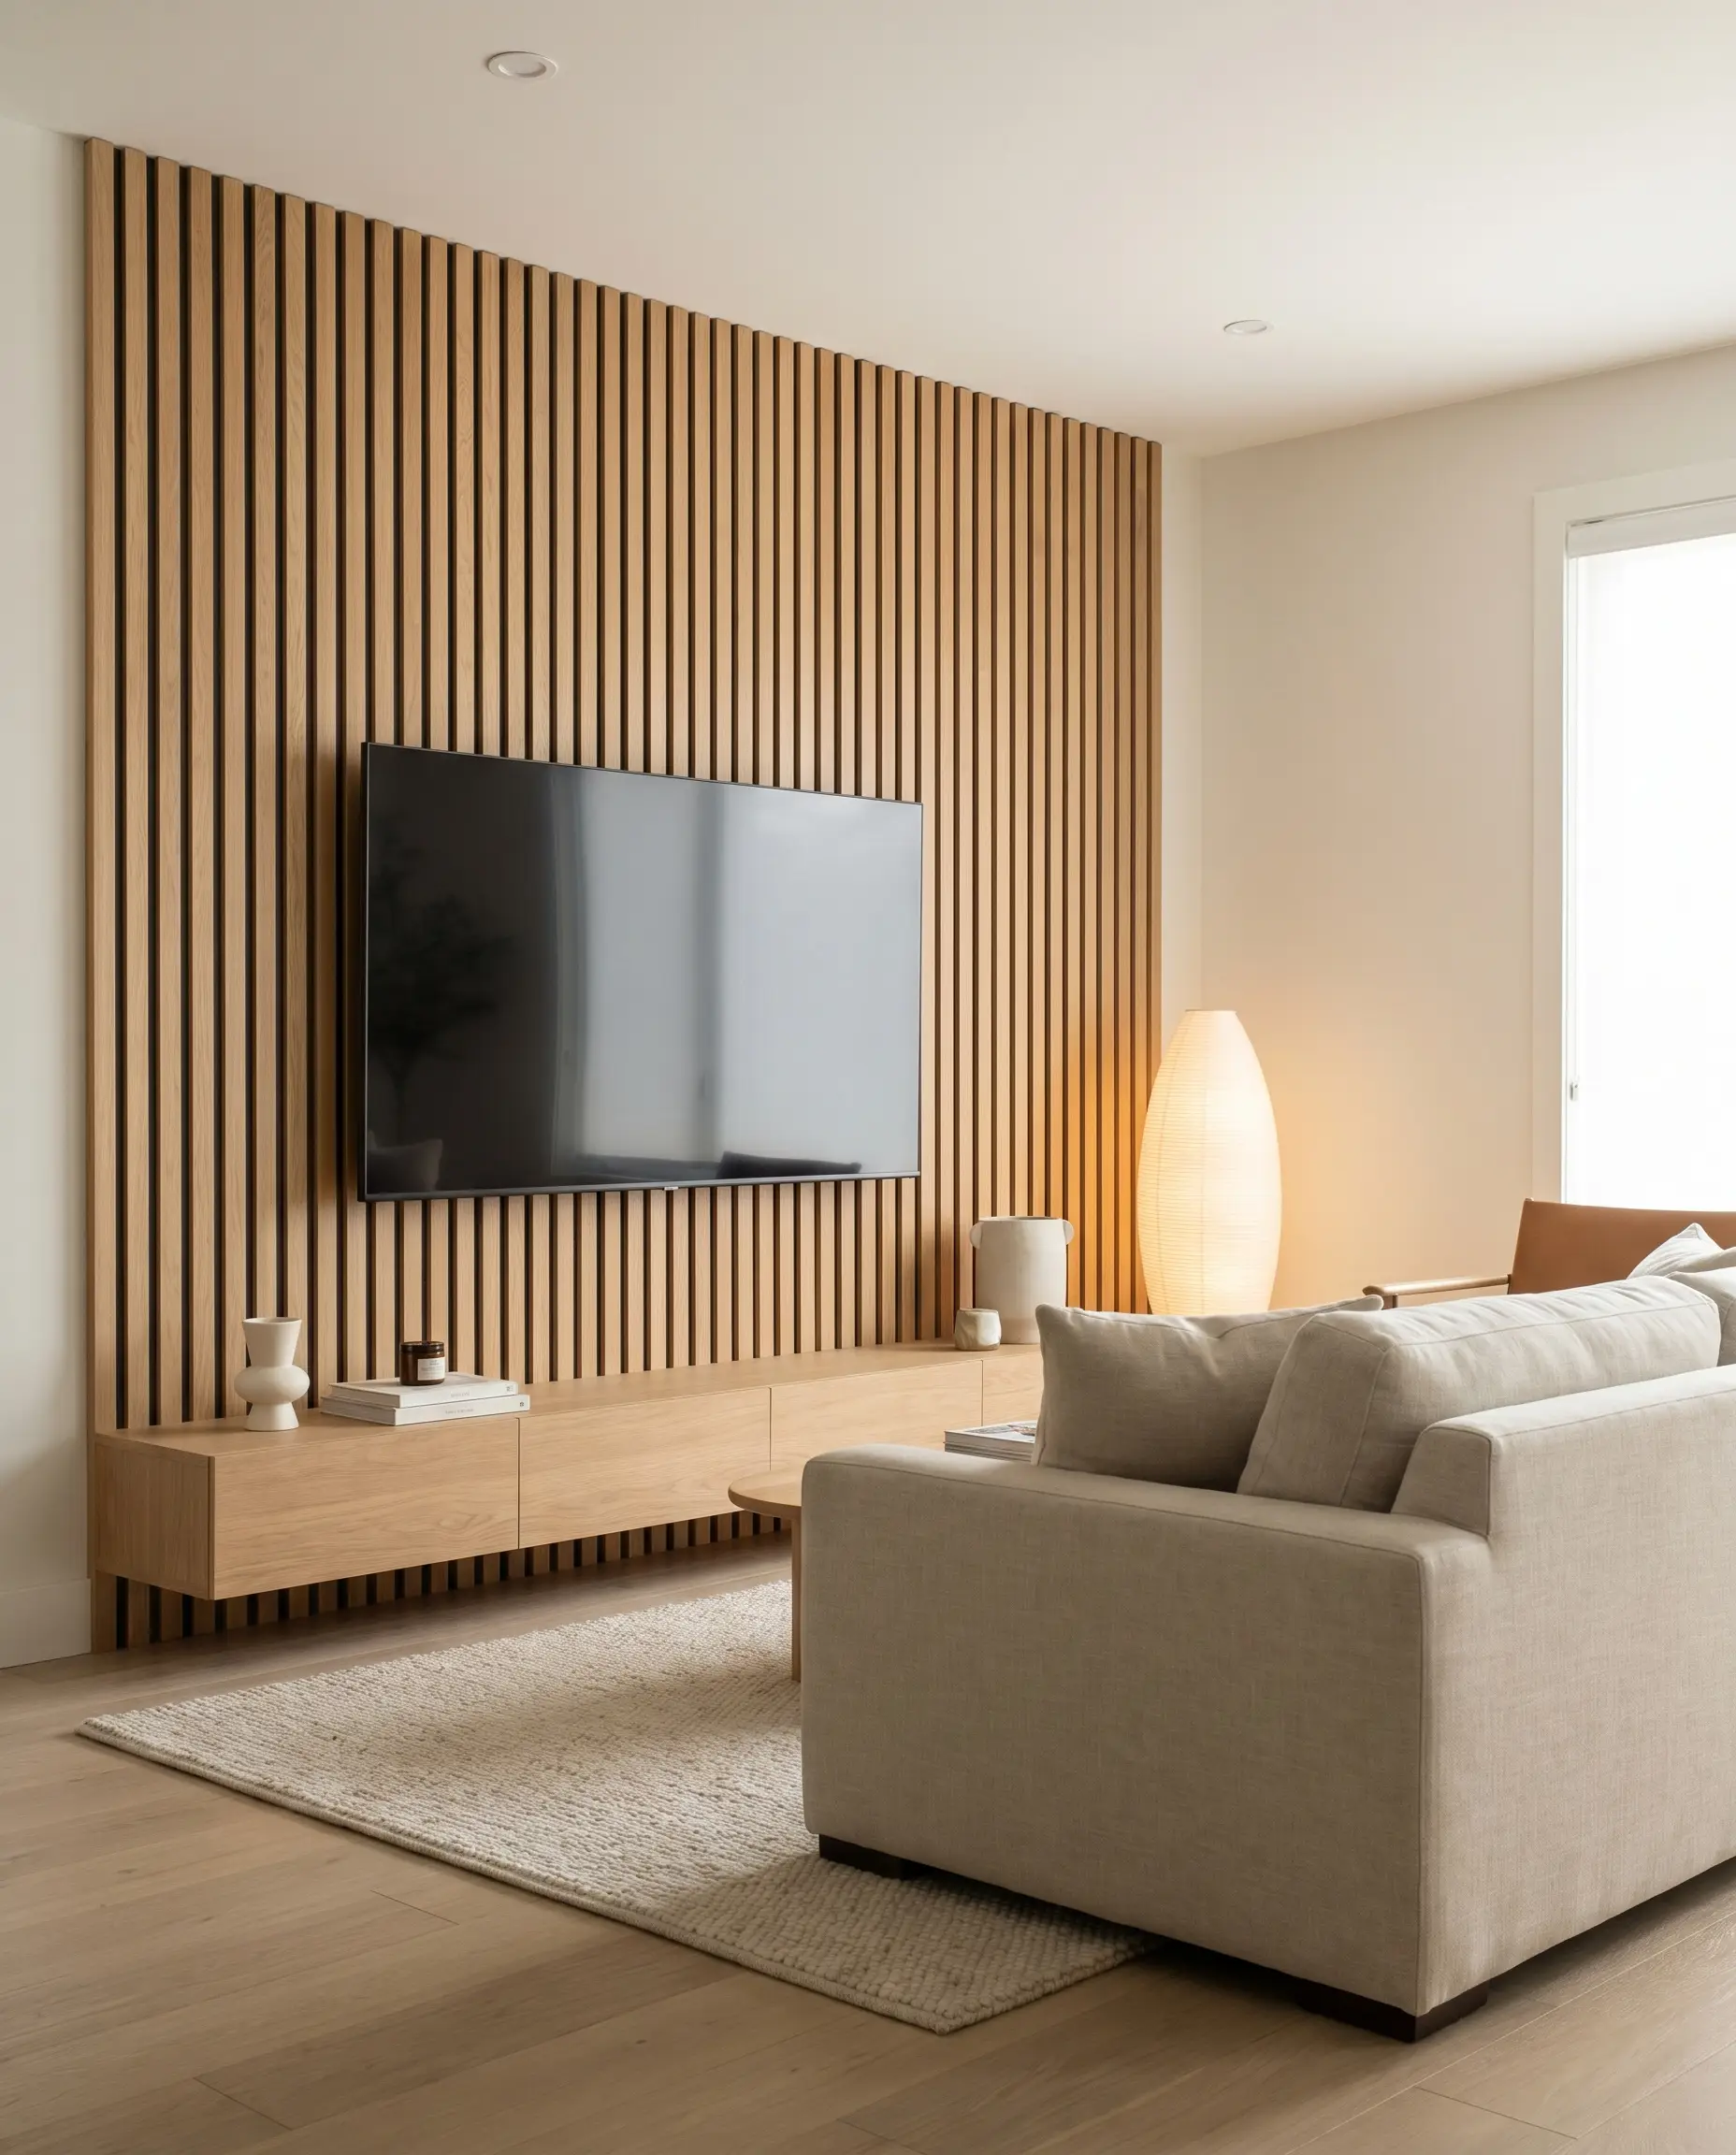
Integrating Lighting and Technology Hiding Tech
A flawlessly executed millwork wall is instantly destroyed by a single dangling HDMI cable or a glaringly cool-toned smart bulb. True spatial calm requires treating your technology and lighting as integrated architectural elements rather than afterthoughts.
Diffused LED Cove Backlighting
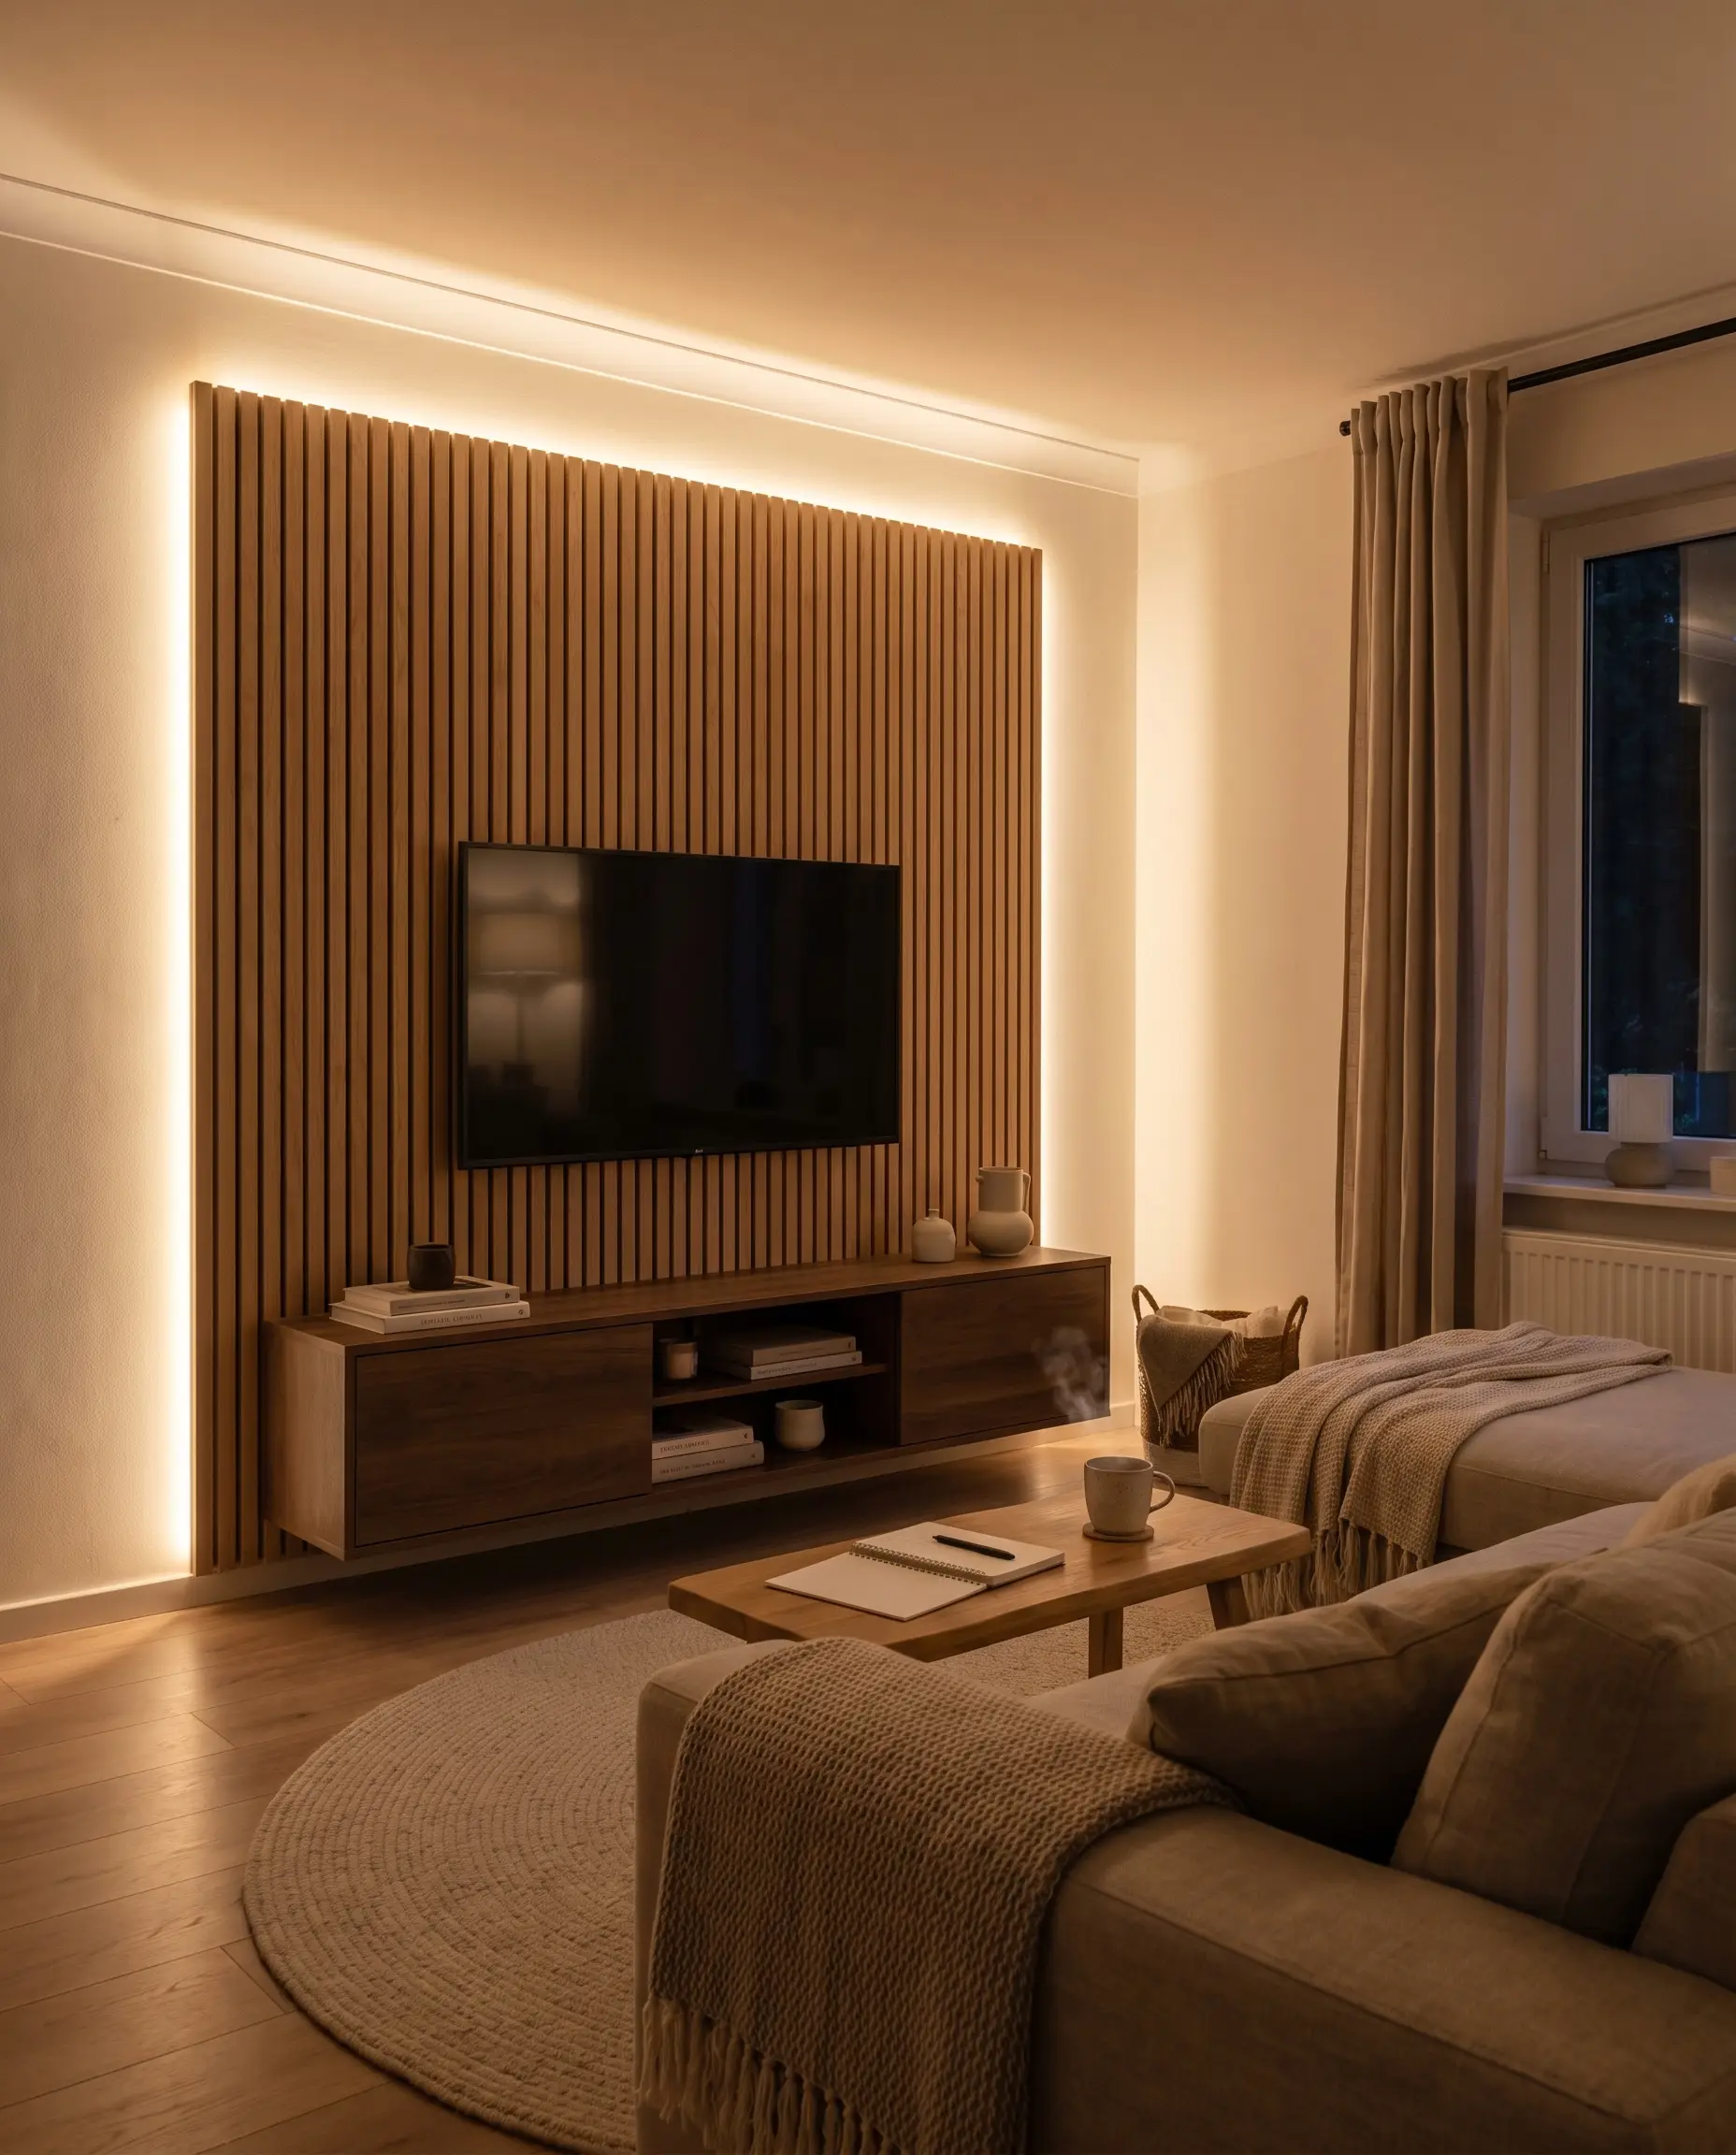
Installing LED strip lighting behind the outer edge of your slat panels creates a soft, glowing halo effect that doubles as functional bias lighting for your television. This wash of light highlights the wood’s texture while drastically reducing eye strain during nighttime viewing.
- Vibe: Cinematic, glowing, integrated.
- Material Spec: COB LED strips rated strictly between 2700K and 3000K color temperature.
- Builder’s Note: Mount the LEDs inside a recessed aluminum channel with a frosted diffuser to eliminate harsh light dots reflecting off the adjacent wall.
- Styling Pro-Tip: Wire the LEDs to a smart dimmer switch so you can drop the output to 10% for casual listening sessions.
Hackrea Micro-Guide: Rapid-Fire Cable Concealment
- Cut a designated opening directly behind the TV mount location.
- Cut a corresponding opening dead-center behind where the floating media console will sit.
- Drop a flexible, fire-rated smurf tube (conduit) between the two holes inside the wall cavity.
- Fish your power extension and HDMI cables through the conduit before mounting the slat panels over the drywall.
In-Wall Cable Management Channels
You must route all power and AV cords through the drywall completely out of sight before mounting a single piece of wood. A flush, wire-free finish is non-negotiable for this aesthetic.
- Vibe: Invisible, pristine, distraction-free.
- Key Material: Recessed in-wall power and cable management channels.
- Builder’s Note: Ensure you pull at least two extra HDMI cables and a Cat6 ethernet cable before sealing the wall to future-proof your setup.
- Styling Pro-Tip: Bundle excess cords inside the media console using velcro ties so the interior remains as clean as the exterior.
The Flush-Mount Frame TV Pairing
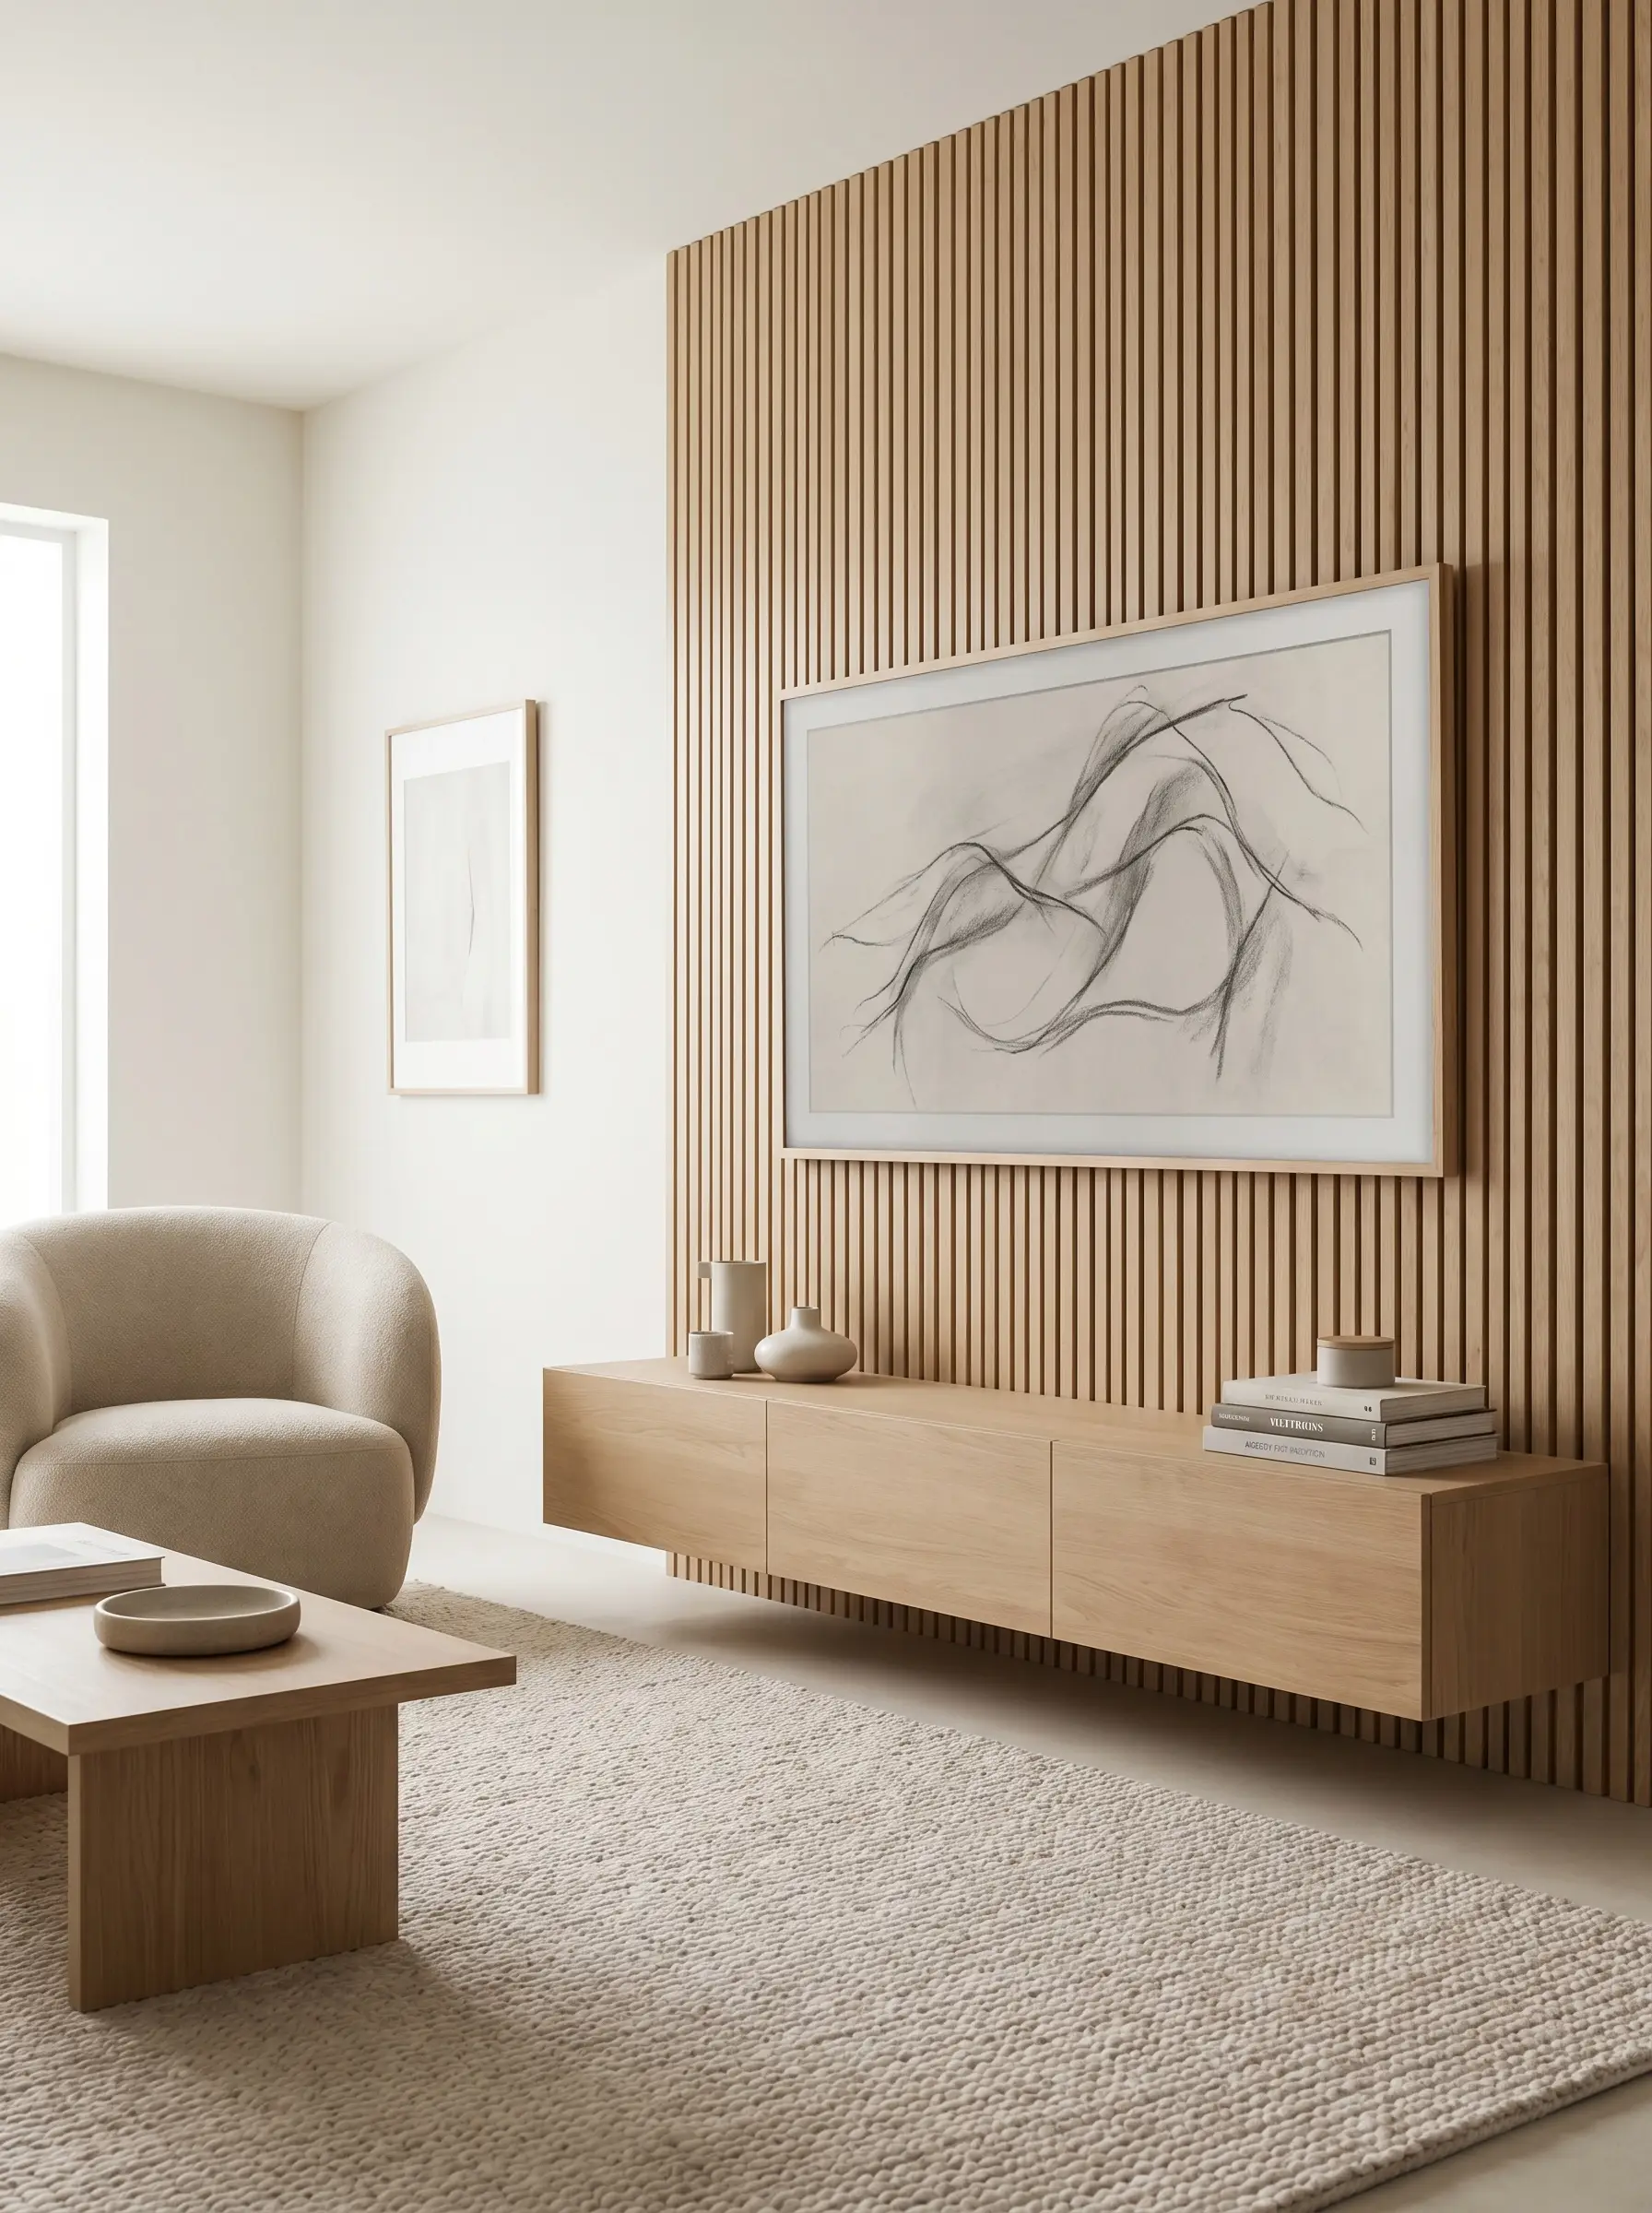
A Samsung Frame TV (or a comparable art-display model) equipped with a matching wood bezel is critical, allowing the aggressive black rectangle to masquerade as curated artwork when powered down. Mounting it perfectly flush against the slats maintains the monolithic integrity of the wall.
- Vibe: Curated, deceptive, gallery-inspired.
- Key Material: Samsung Frame TV with a custom teak or oak bezel.
- Spatial Rule: Recess the TV mount bracket slightly into the drywall behind the slats so the screen sits perfectly flush with the face of the wood.
- Styling Pro-Tip: Upload high-resolution, muted wabi-sabi plaster textures or subtle charcoal sketches to the TV’s art mode.
Accommodating the Ultra-Short-Throw Projector
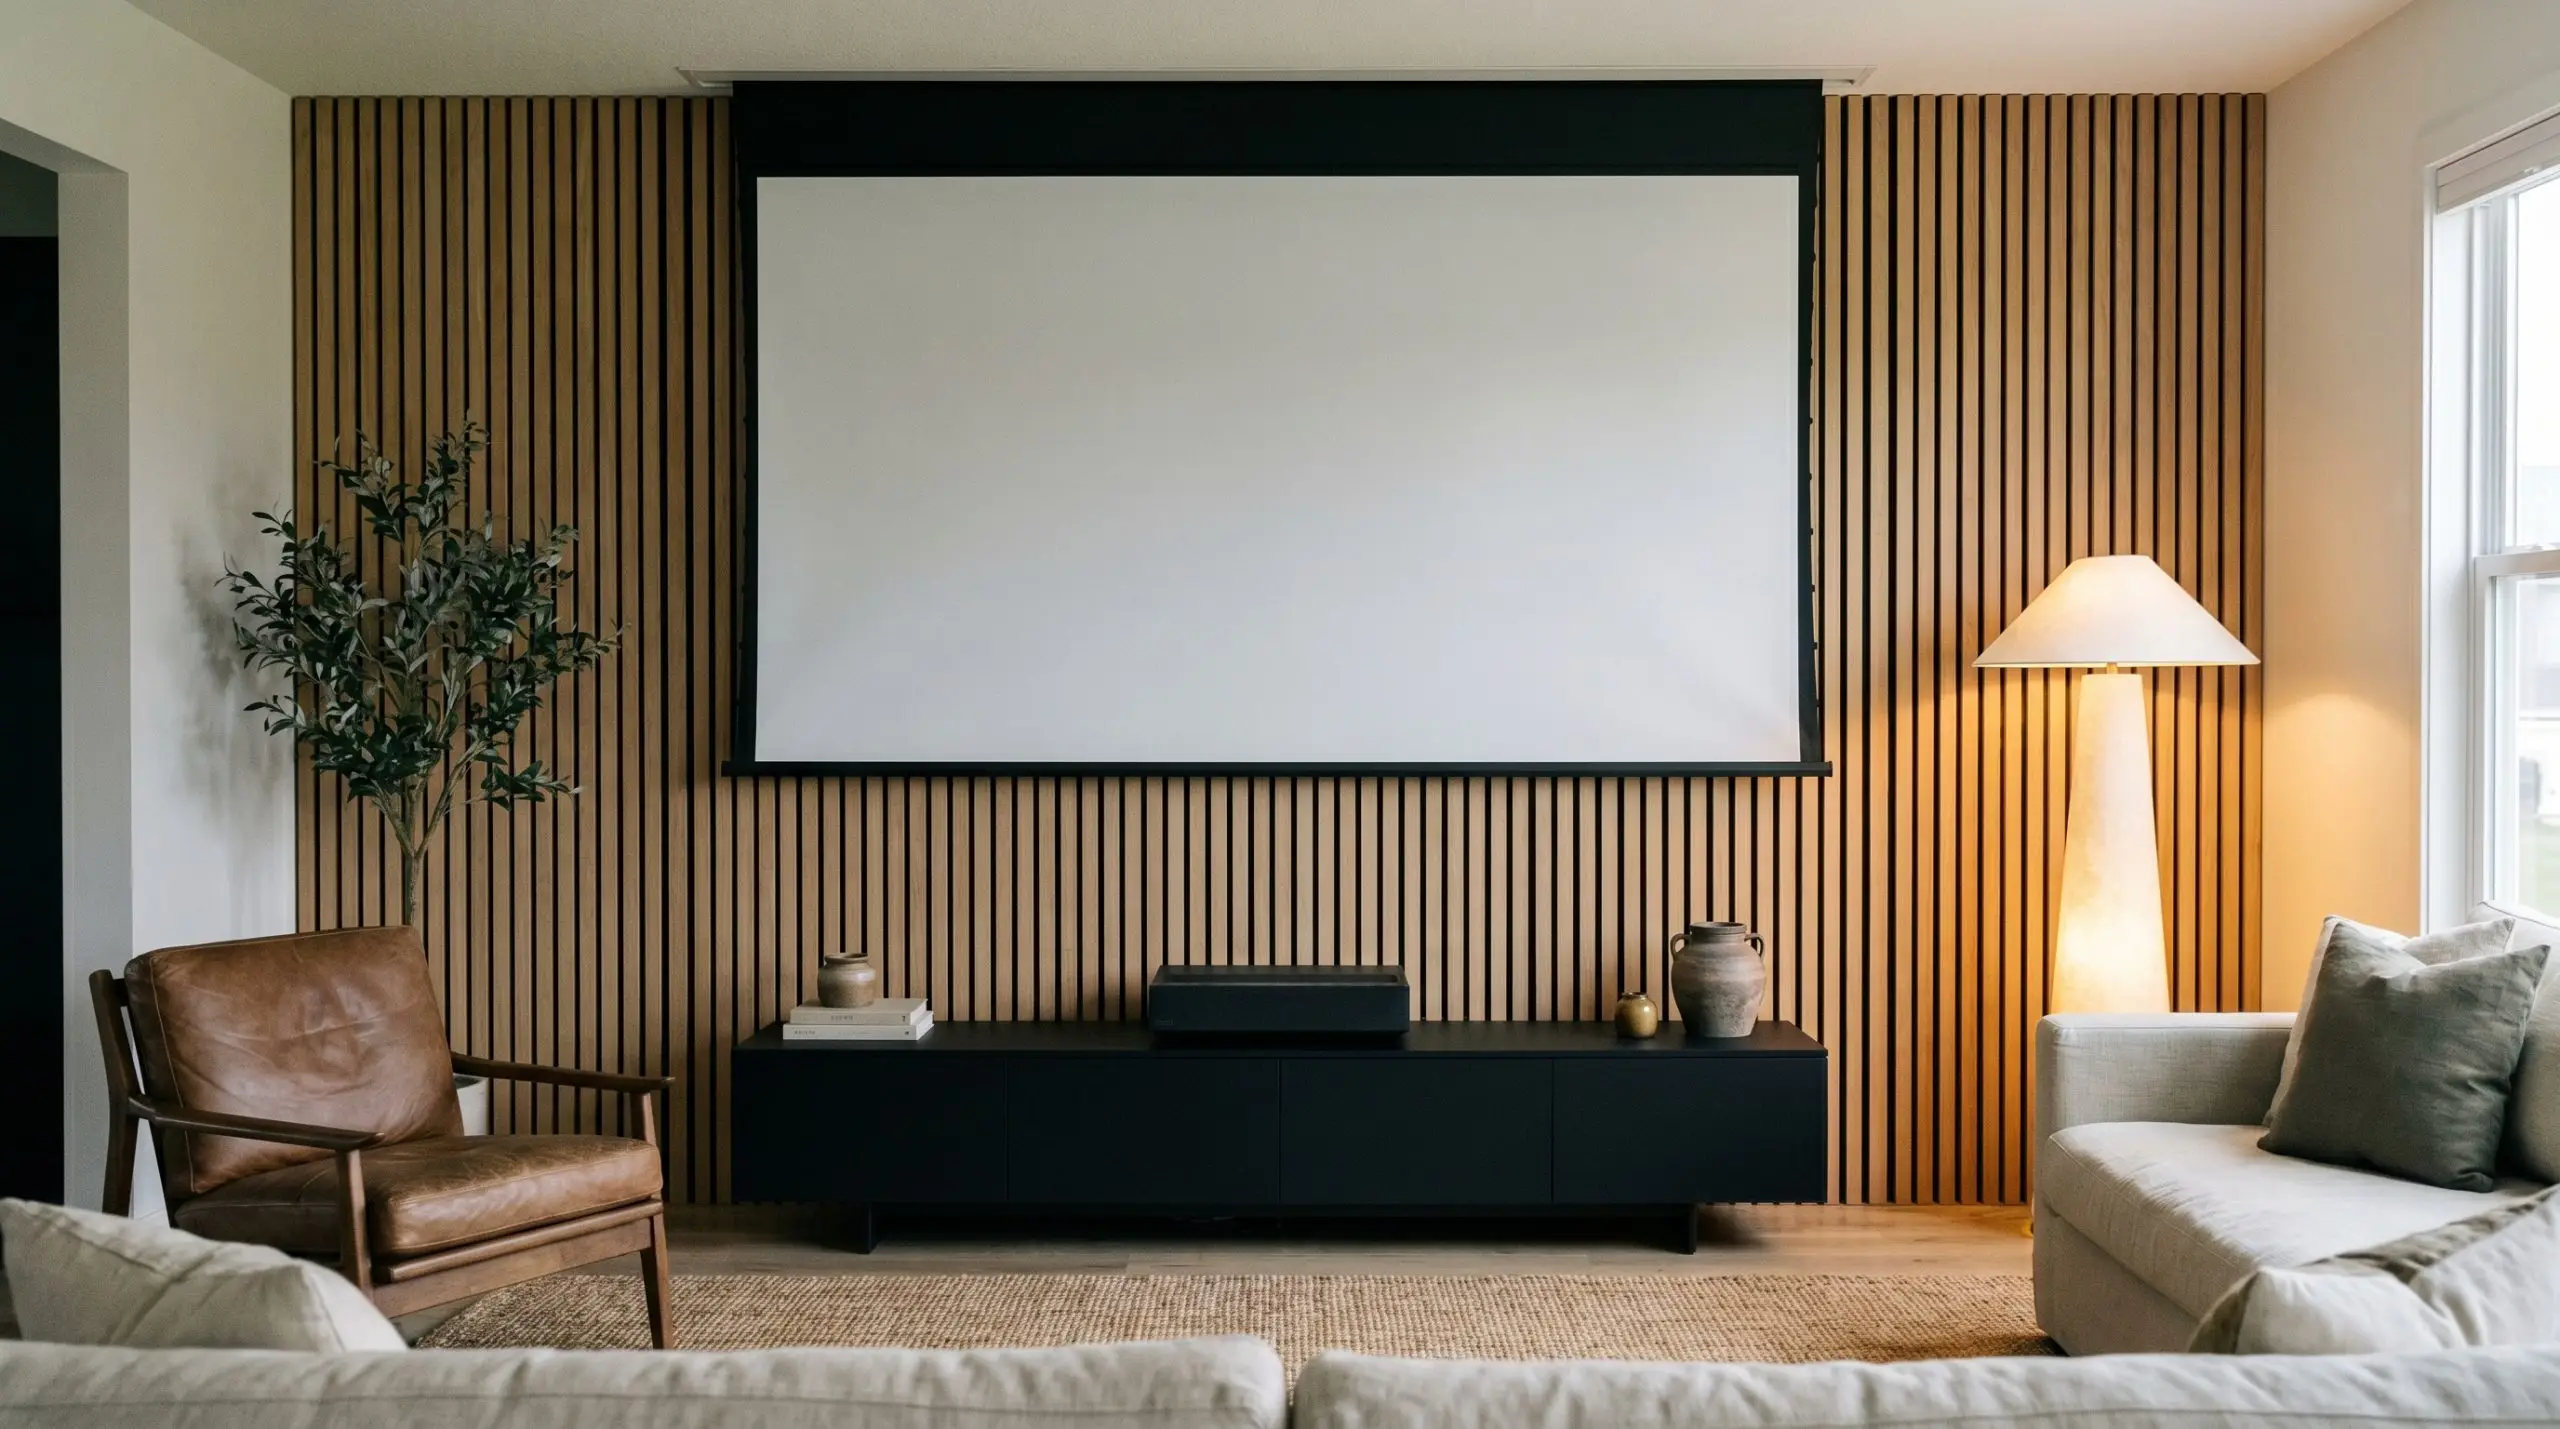
For an elite-level, bespoke alternative to a traditional television, utilize the slat wall purely as a textural backdrop for a low-profile console housing an ultra-short-throw (UST) projector. This leaves the upper wall entirely clean for a tensioned, motorized drop-down screen that disappears completely when not in use.
- Vibe: High-end, stealthy, uncompromisingly minimal.
- Key Material: Motorized ambient light rejecting (ALR) projector screen.
- Builder’s Note: The console depth must be mathematically calculated to accommodate the specific throw ratio of your chosen UST projector.
- Styling Pro-Tip: Style the expansive empty slatted wall above the projector with a single, dramatic piece of asymmetrical lighting.
Executing the Joinery, Baseboards, and Millwork Details
The chasm between a cheap weekend project and a professional architectural installation lies entirely in the transitions. How the wood meets the floor, how it interacts with the ceiling, and how it frames the console dictates the entire success of the room.
Optimal Slat Width to Gap Ratios
Randomly spacing wood strips results in a chaotic, dizzying barcode effect that exhausts the eye. You must adhere to strict mathematical proportions to create a rhythmic, calming visual frequency.
- Vibe: Rhythmic, exact, mathematically sound.
- Spatial Rule: Use a 1-inch to 1.5-inch slat width paired exactly with a 0.5-inch negative gap.
- Key Material: Pre-milled solid oak batten strips.
- Styling Pro-Tip: Paint the drywall or backing behind the gap a flat, light-absorbing black or dark charcoal to create infinite depth.
Navigating Baseboards and Crown Molding
Never install vertical slats over the face of existing, curvy baseboards. You must remove the baseboard entirely and either run the slats flush to the flooring or engineer a custom shadow gap at the bottom for a true architectural finish.
- Vibe: Clean, structural, uncompromising.
- Builder’s Note: Stop the slats exactly 0.5 inches above the finished floor to create a floating shadow line that hides slight floor unevenness.
- Key Material: Oscillating multi-tool (for cutting existing trim cleanly).
- Styling Pro-Tip: Carry this shadow-gap detail to the ceiling line as well to make the wood paneling appear completely detached and floating.
Integrating Flush-Mount Floating Shelves
If your layout requires shelving, slot the floating shelves seamlessly between the slats rather than haphazardly screwing them onto the face of the wood. This technique creates a monolithic structure where the shelves appear extruded directly from the wall itself.
- Vibe: Monolithic, custom-fabricated, integrated.
- Builder’s Note: Cut the vertical slats to perfectly frame the horizontal shelf, leaving zero visible gaps at the intersection.
- Key Material: Blind shelf supports mortised into the shelf back.
- Styling Pro-Tip: Match the shelf veneer exactly to the slat veneer; introducing a third wood tone will ruin the cohesion.
Never trust toggle bolts or drywall anchors for a floating media console. The combined weight of the MDF cabinet, heavy receivers, and styling objects will inevitably rip through the wall. Always bridge your mounting cleats across at least two structural wall studs.
Hackrea Caution Callout
Load-Bearing Mounts for Floating Consoles
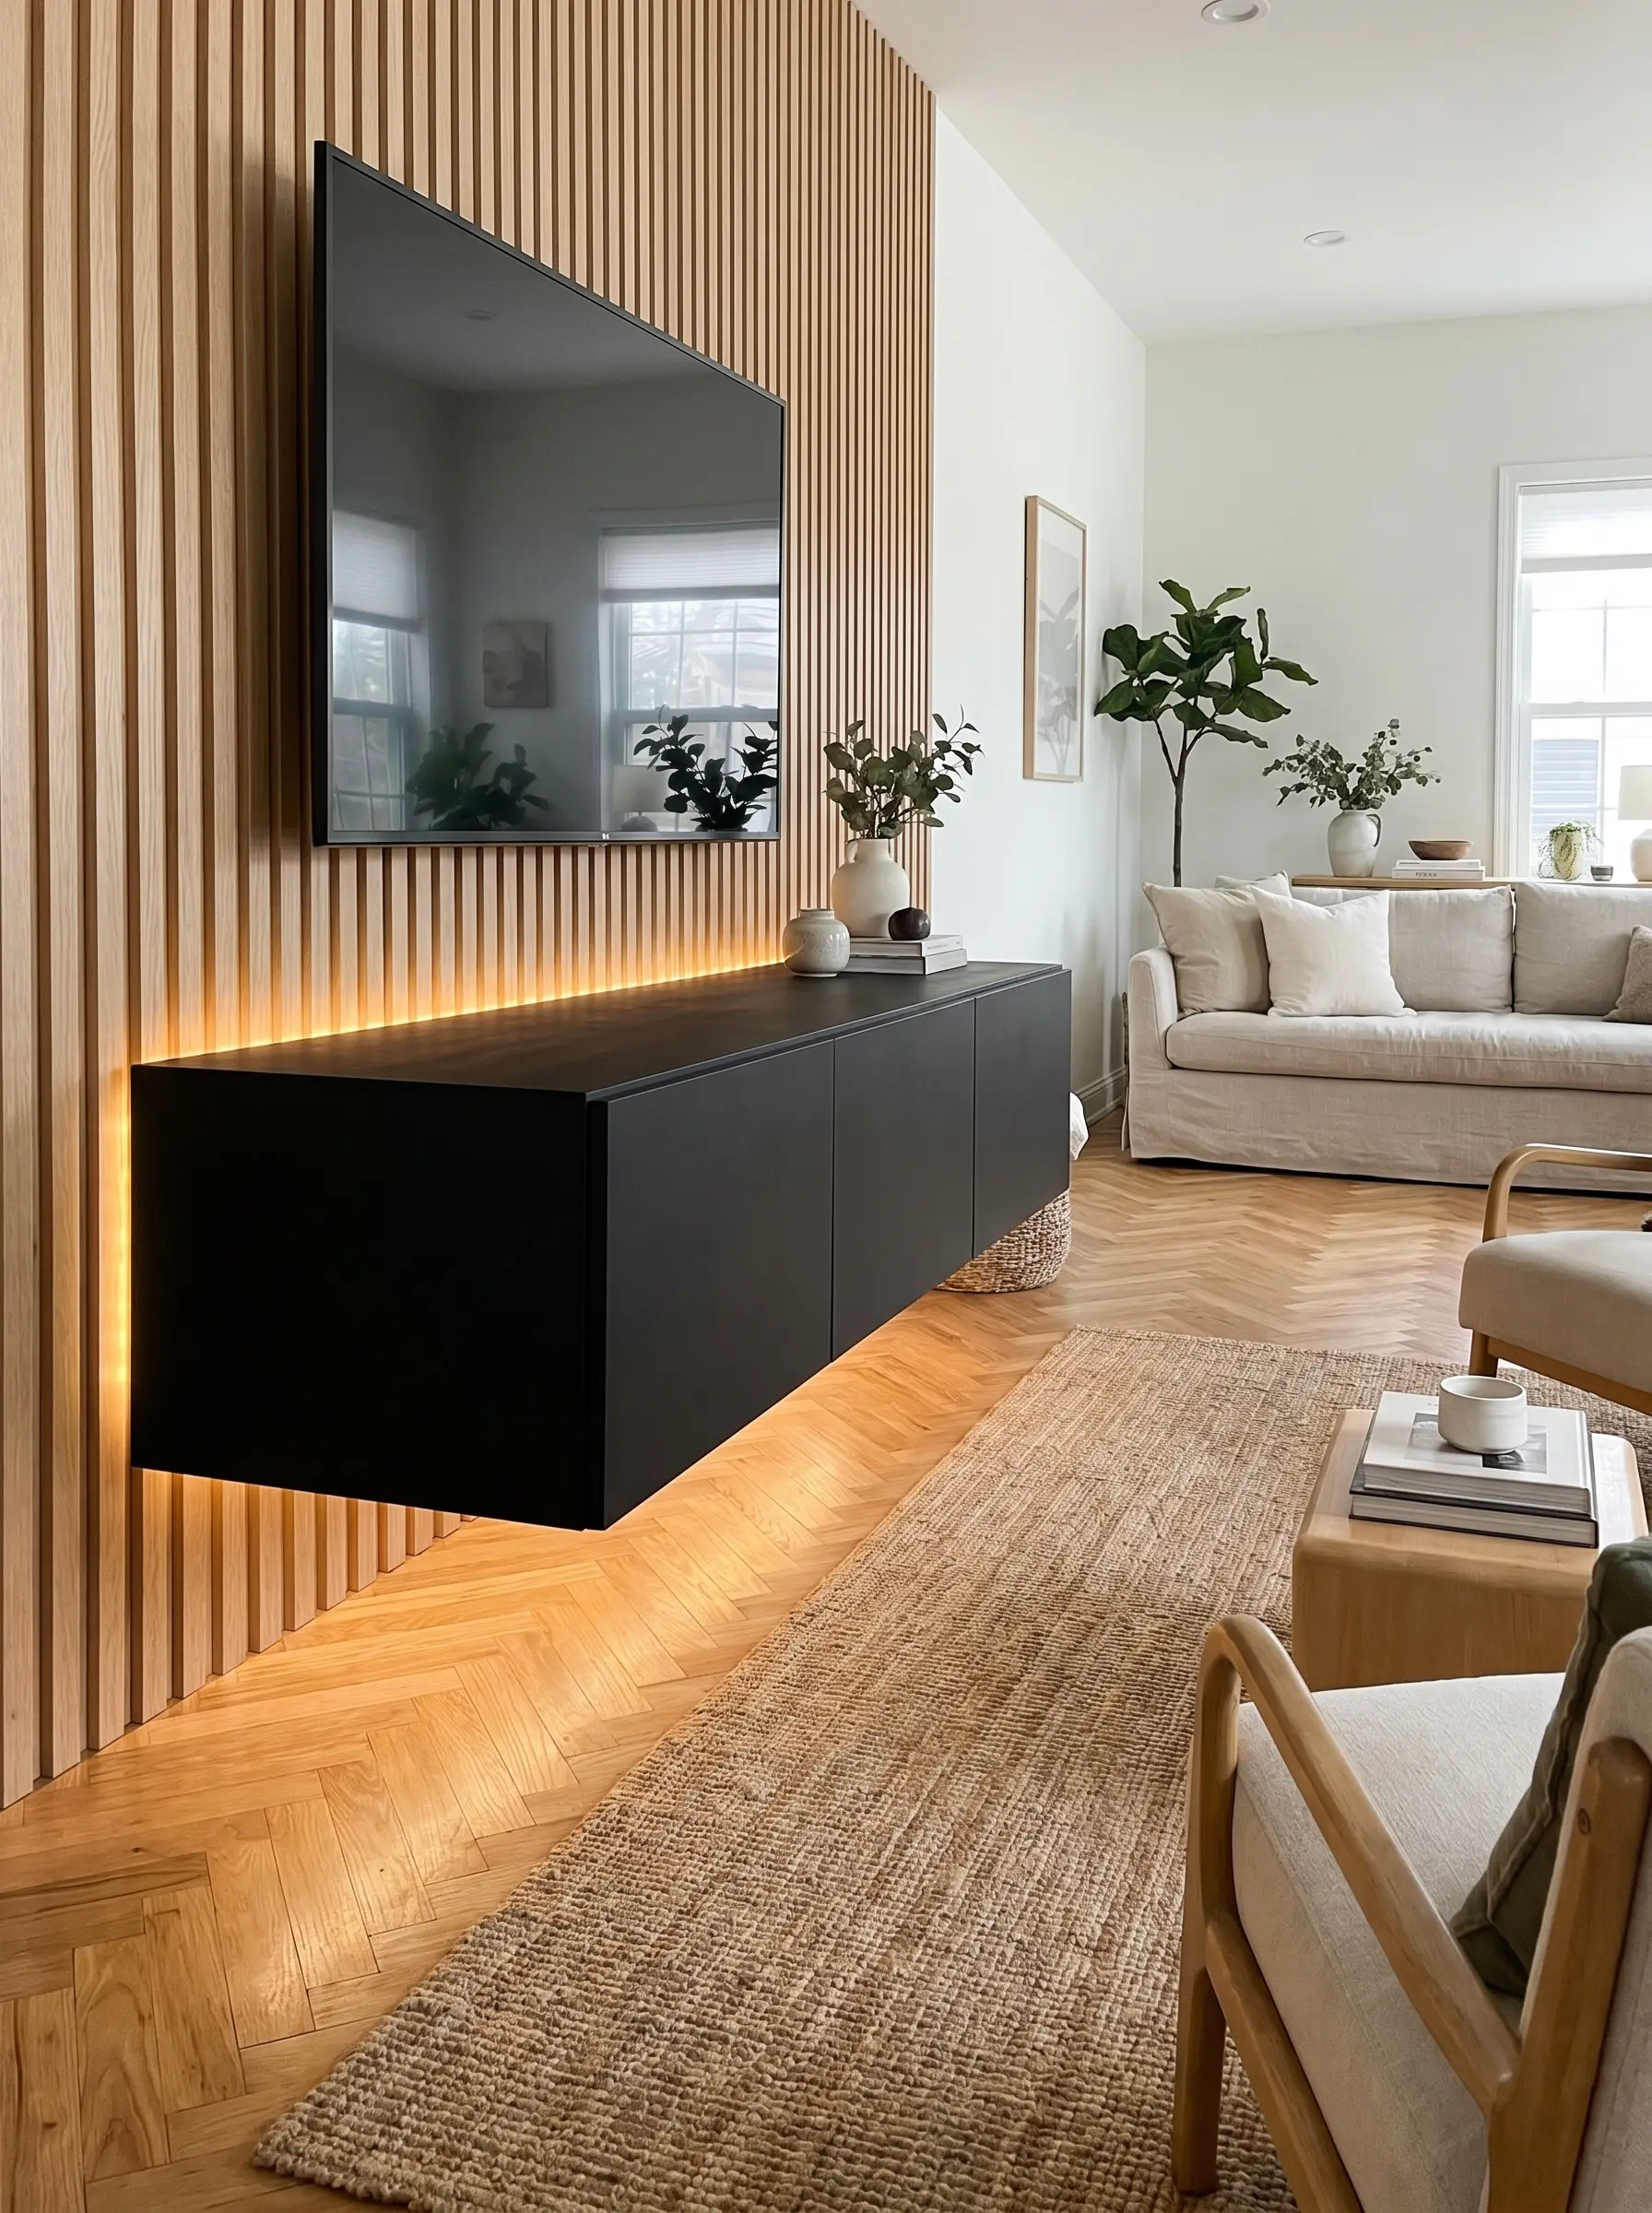
Floating a heavy media console directly off the floor reinforces the airy, minimalist aesthetic, but it requires serious structural integrity. You cannot anchor a heavy cabinet directly into acoustic felt panels or standard drywall.
- Vibe: Weightless, secure, heavy-duty.
- Key Material: 3-inch structural lag screws.
- Builder’s Note: You must locate and secure the console bracket directly into the wooden wall studs behind the slats and drywall.
- Styling Pro-Tip: Run an LED strip under the floating console to mirror the cove lighting behind the slats.
Styling the Japandi Media Console
Once the heavy carpentry is finished, the styling layer breathes life into the rigid geometry. The wood slats provide the tactile backdrop, but the careful curation of objects resting on the console provides the room’s soul.
Wabi-Sabi Ceramic Pairings
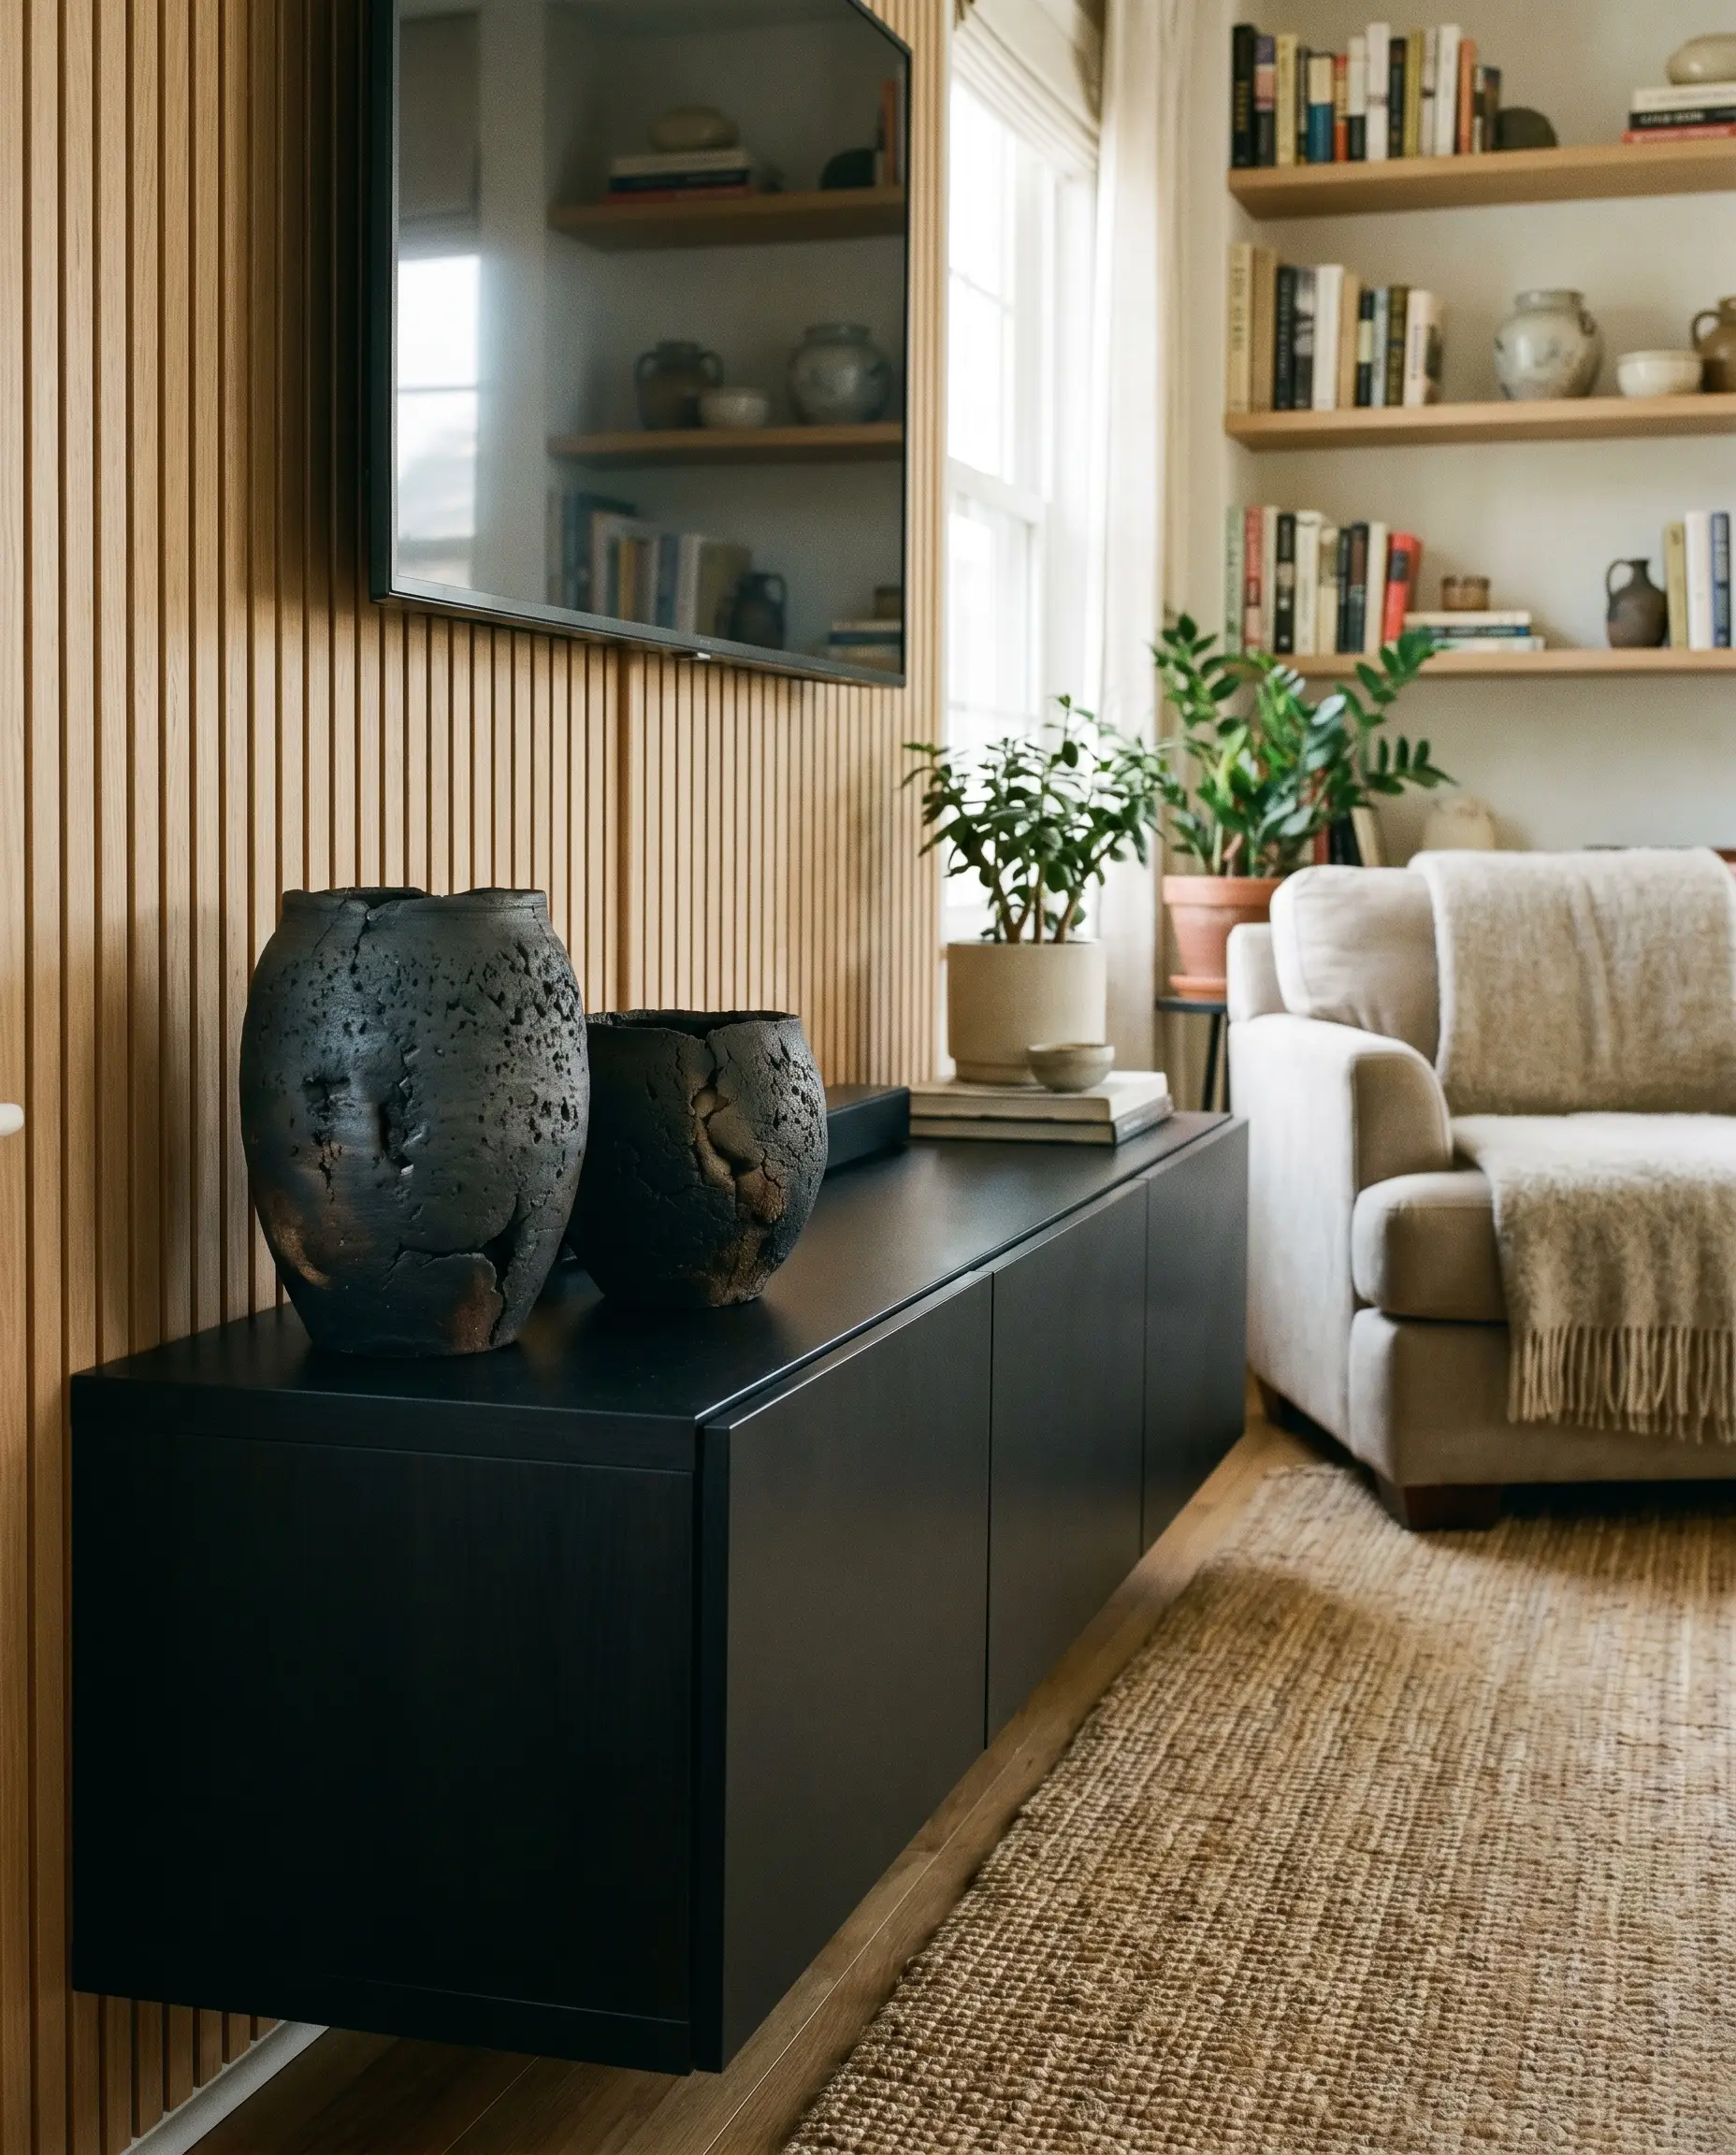
Anchor the console with one or two handmade, beautifully imperfect clay vessels. Avoid perfectly symmetrical, high-gloss, mass-produced decor; instead, opt for pitted, raw textures that celebrate the beauty of natural irregularity.
- Vibe: Earthy, grounded, imperfectly beautiful.
- Key Material: Unglazed raku fired pottery or grogged clay.
- Material Match: Pair a dark charcoal ceramic against light oak slats for sharp visual contrast.
- Styling Pro-Tip: Group vessels in odd numbers (pairs of different heights or a single statement piece) rather than flanking the TV symmetrically.
Ikebana Branch Arrangements
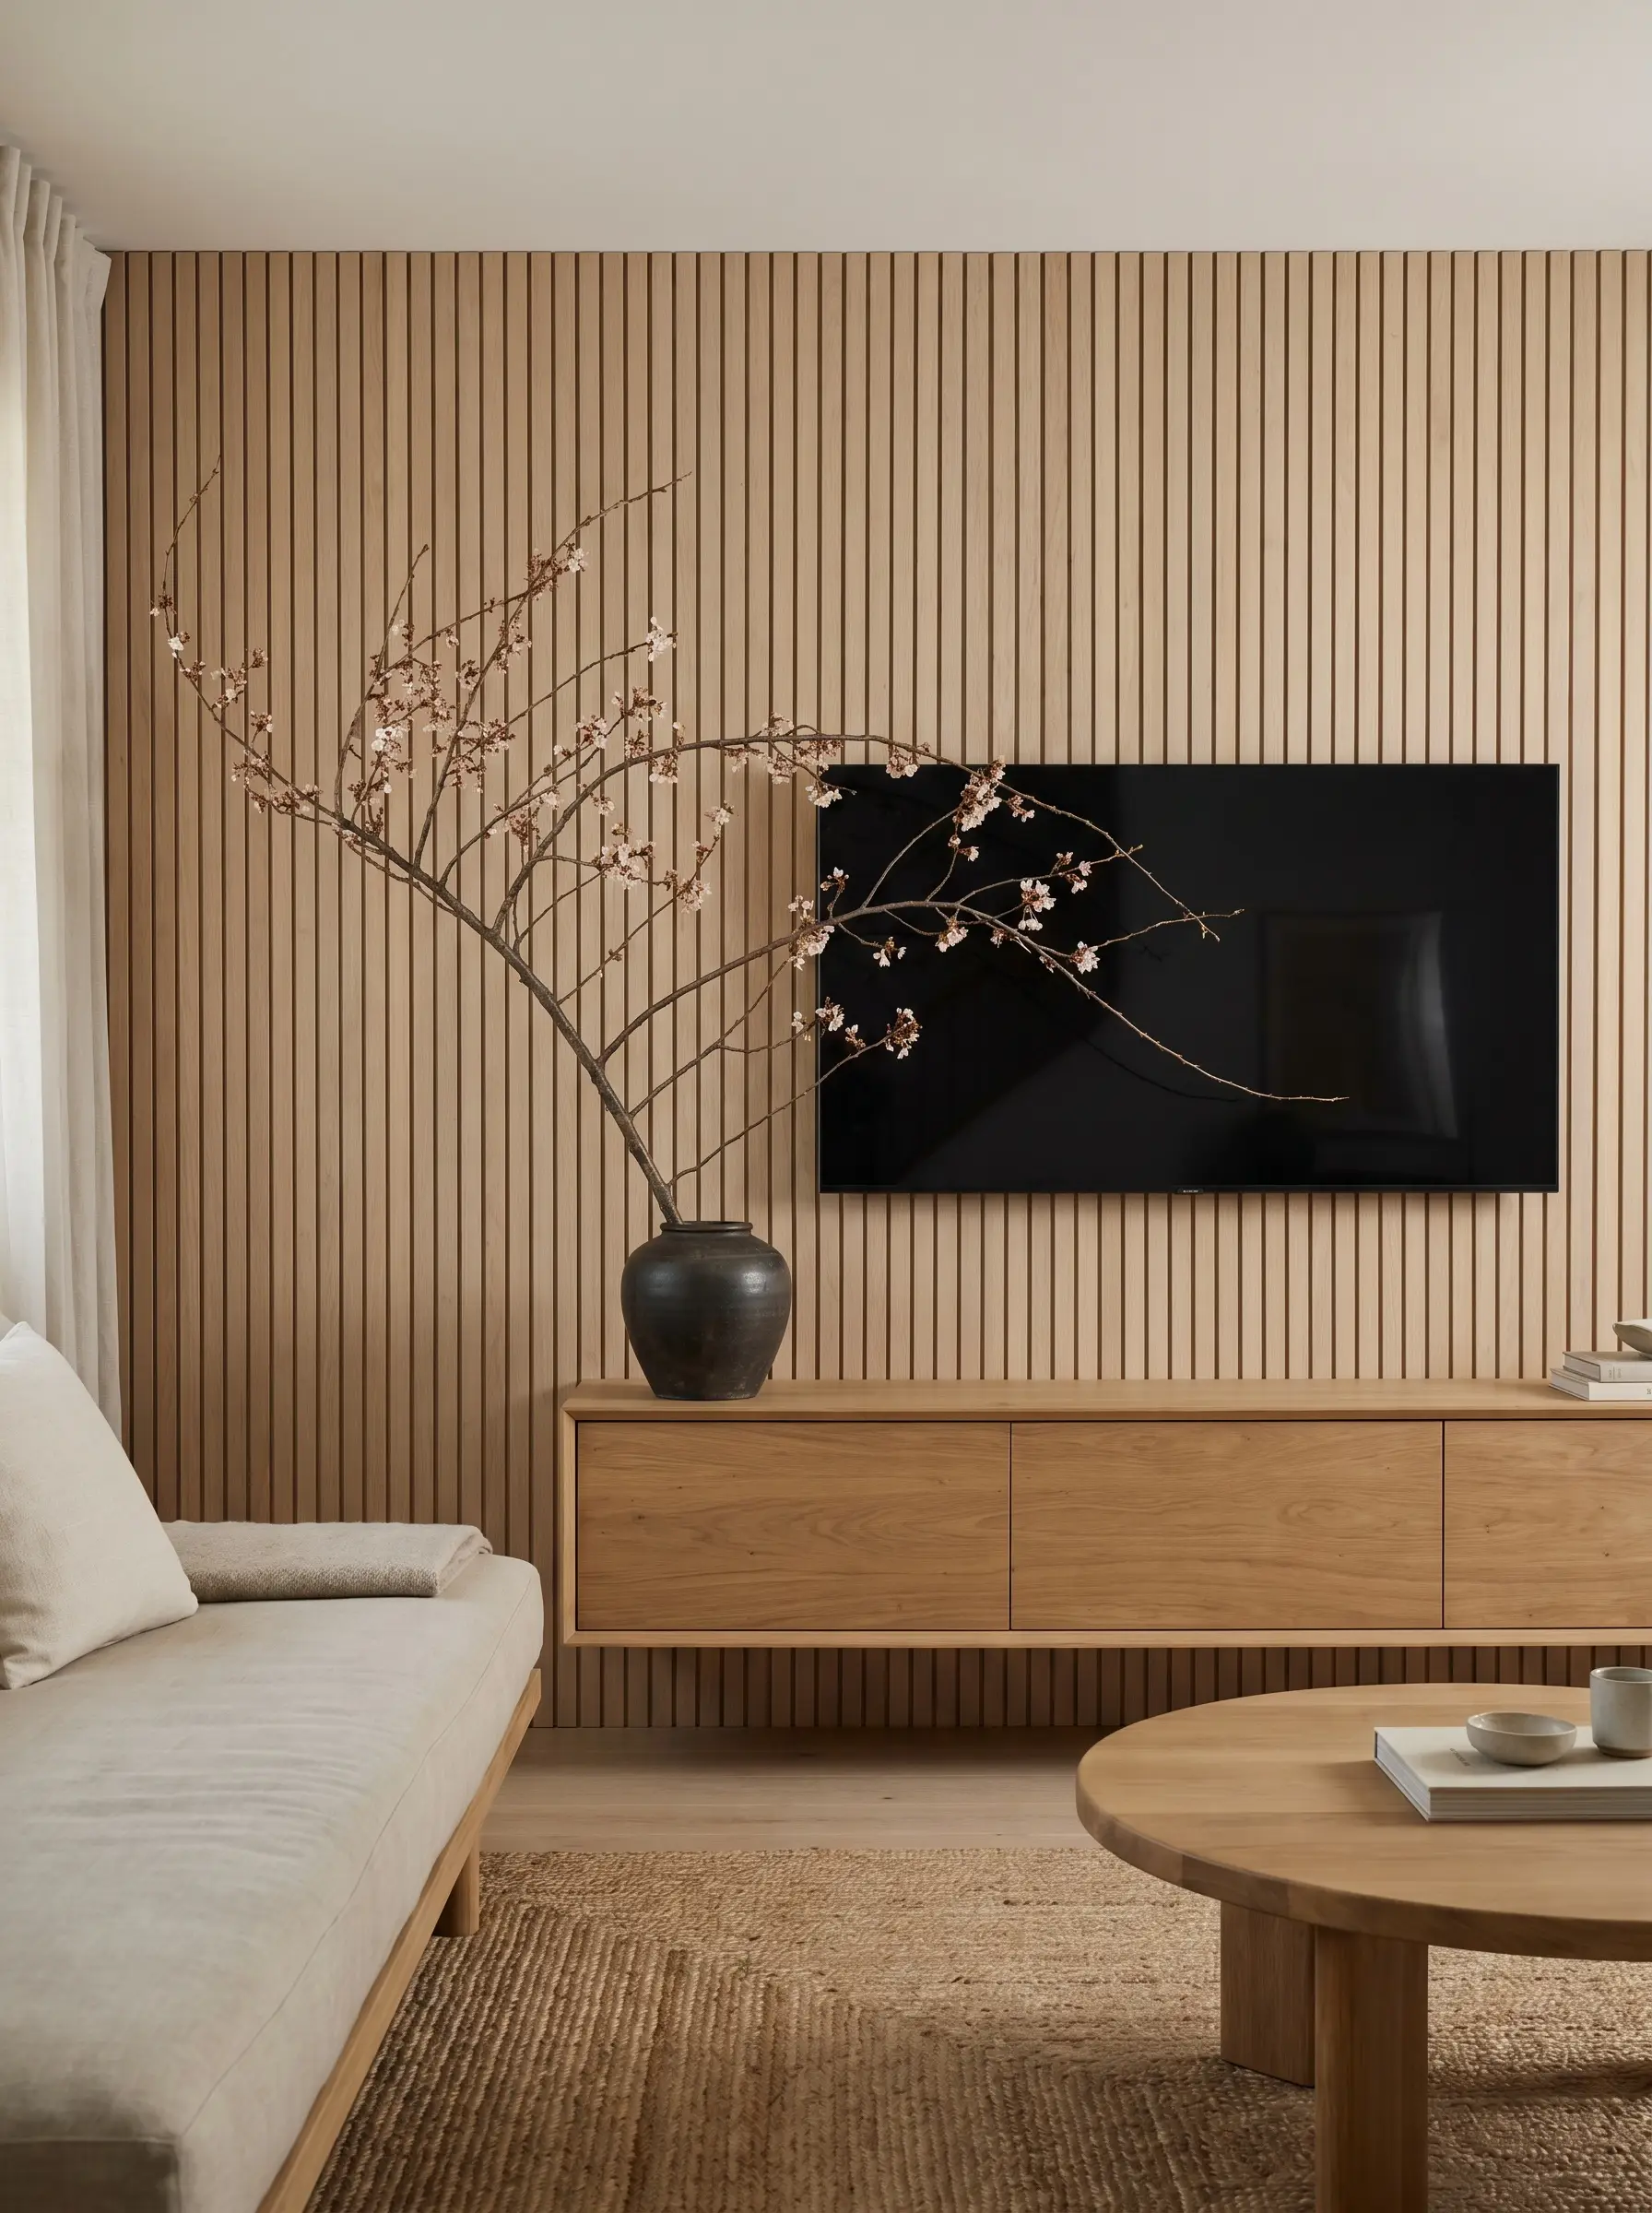
Instead of cluttering the surface with a bushy, generic houseplant, utilize a single, architectural branch placed in a low, heavy vase. This introduces sculptural minimalism, using organic, sweeping lines to break up the strict vertical rigidity of the wood slats.
- Vibe: Sculptural, organic, restrained.
- Key Material: Dried willow, cherry blossom branches, or preserved manzanita.
- Spatial Rule: Allow the branch to reach up and slightly overlap the negative space next to the television.
- Styling Pro-Tip: Use a hidden floral frog (kenzan) inside the vase to pin the branch at a precise, dramatic angle.
Travertine and Stone Accents

Introducing a contrasting natural material prevents the media zone from feeling like a monolithic wood box. A small, heavily veined travertine catch-all tray or solid stone bookends creates necessary visual friction against the warm timber.
- Vibe: Heavy, ancient, textural.
- Key Material: Unfilled, honed travertine or raw soapstone.
- Material Match: Pair porous travertine with sleek matte black remote controls to hide practical tech gracefully.
- Styling Pro-Tip: Keep stone accessories low to the console surface to avoid competing with the height of your Ikebana arrangement.
The Discipline of Negative Space
The hardest part of styling a minimalist console is possessing the restraint to know exactly when to stop. Empty space is not a void waiting to be filled; it is an active design element that allows the eye to rest and the materials to breathe.
- Vibe: Silent, expansive, intensely curated.
- Spatial Rule: Leave at least 60% of your media console surface entirely bare.
- Key Concept: Ma (the Japanese concept of negative space).
- Styling Pro-Tip: If an object does not serve a daily function or bring immense textural joy, remove it from the media zone immediately.
Achieving Visual Silence in the Living Room
A successfully executed Japandi wood slat TV wall is not merely about hiding wires or adding an arbitrary layer of texture. It is a calculated architectural strategy to transform the most chaotic, tech-heavy zone of your house into a space of profound visual silence and calm. By obsessing over exact dimensions, sourcing the right rift-sawn materials, and respecting the discipline of negative space, you strip away the visual pollution of modern living.
The result is a living room that feels deliberate, grounded, and intensely tactile. To finalize this architectural transformation and ensure your equipment is housed flawlessly, explore our comprehensive guide on minimalist floating media consoles to complete your design.
The Aesthetics Desk curates the visual direction for Hackrea. Specializing in design history, global architectural movements, and interior styling, this desk focuses on the psychology of space and how to translate high-end, magazine-quality aesthetics into approachable residential design without falling into fleeting micro-trends.