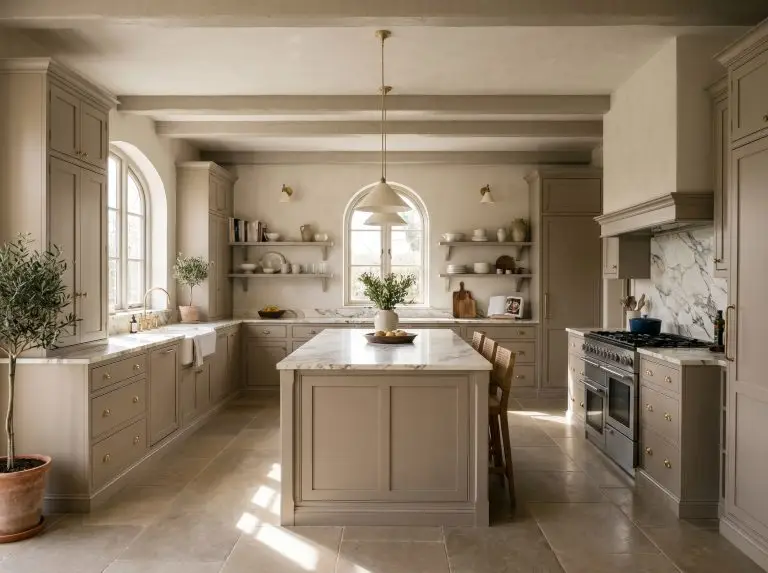
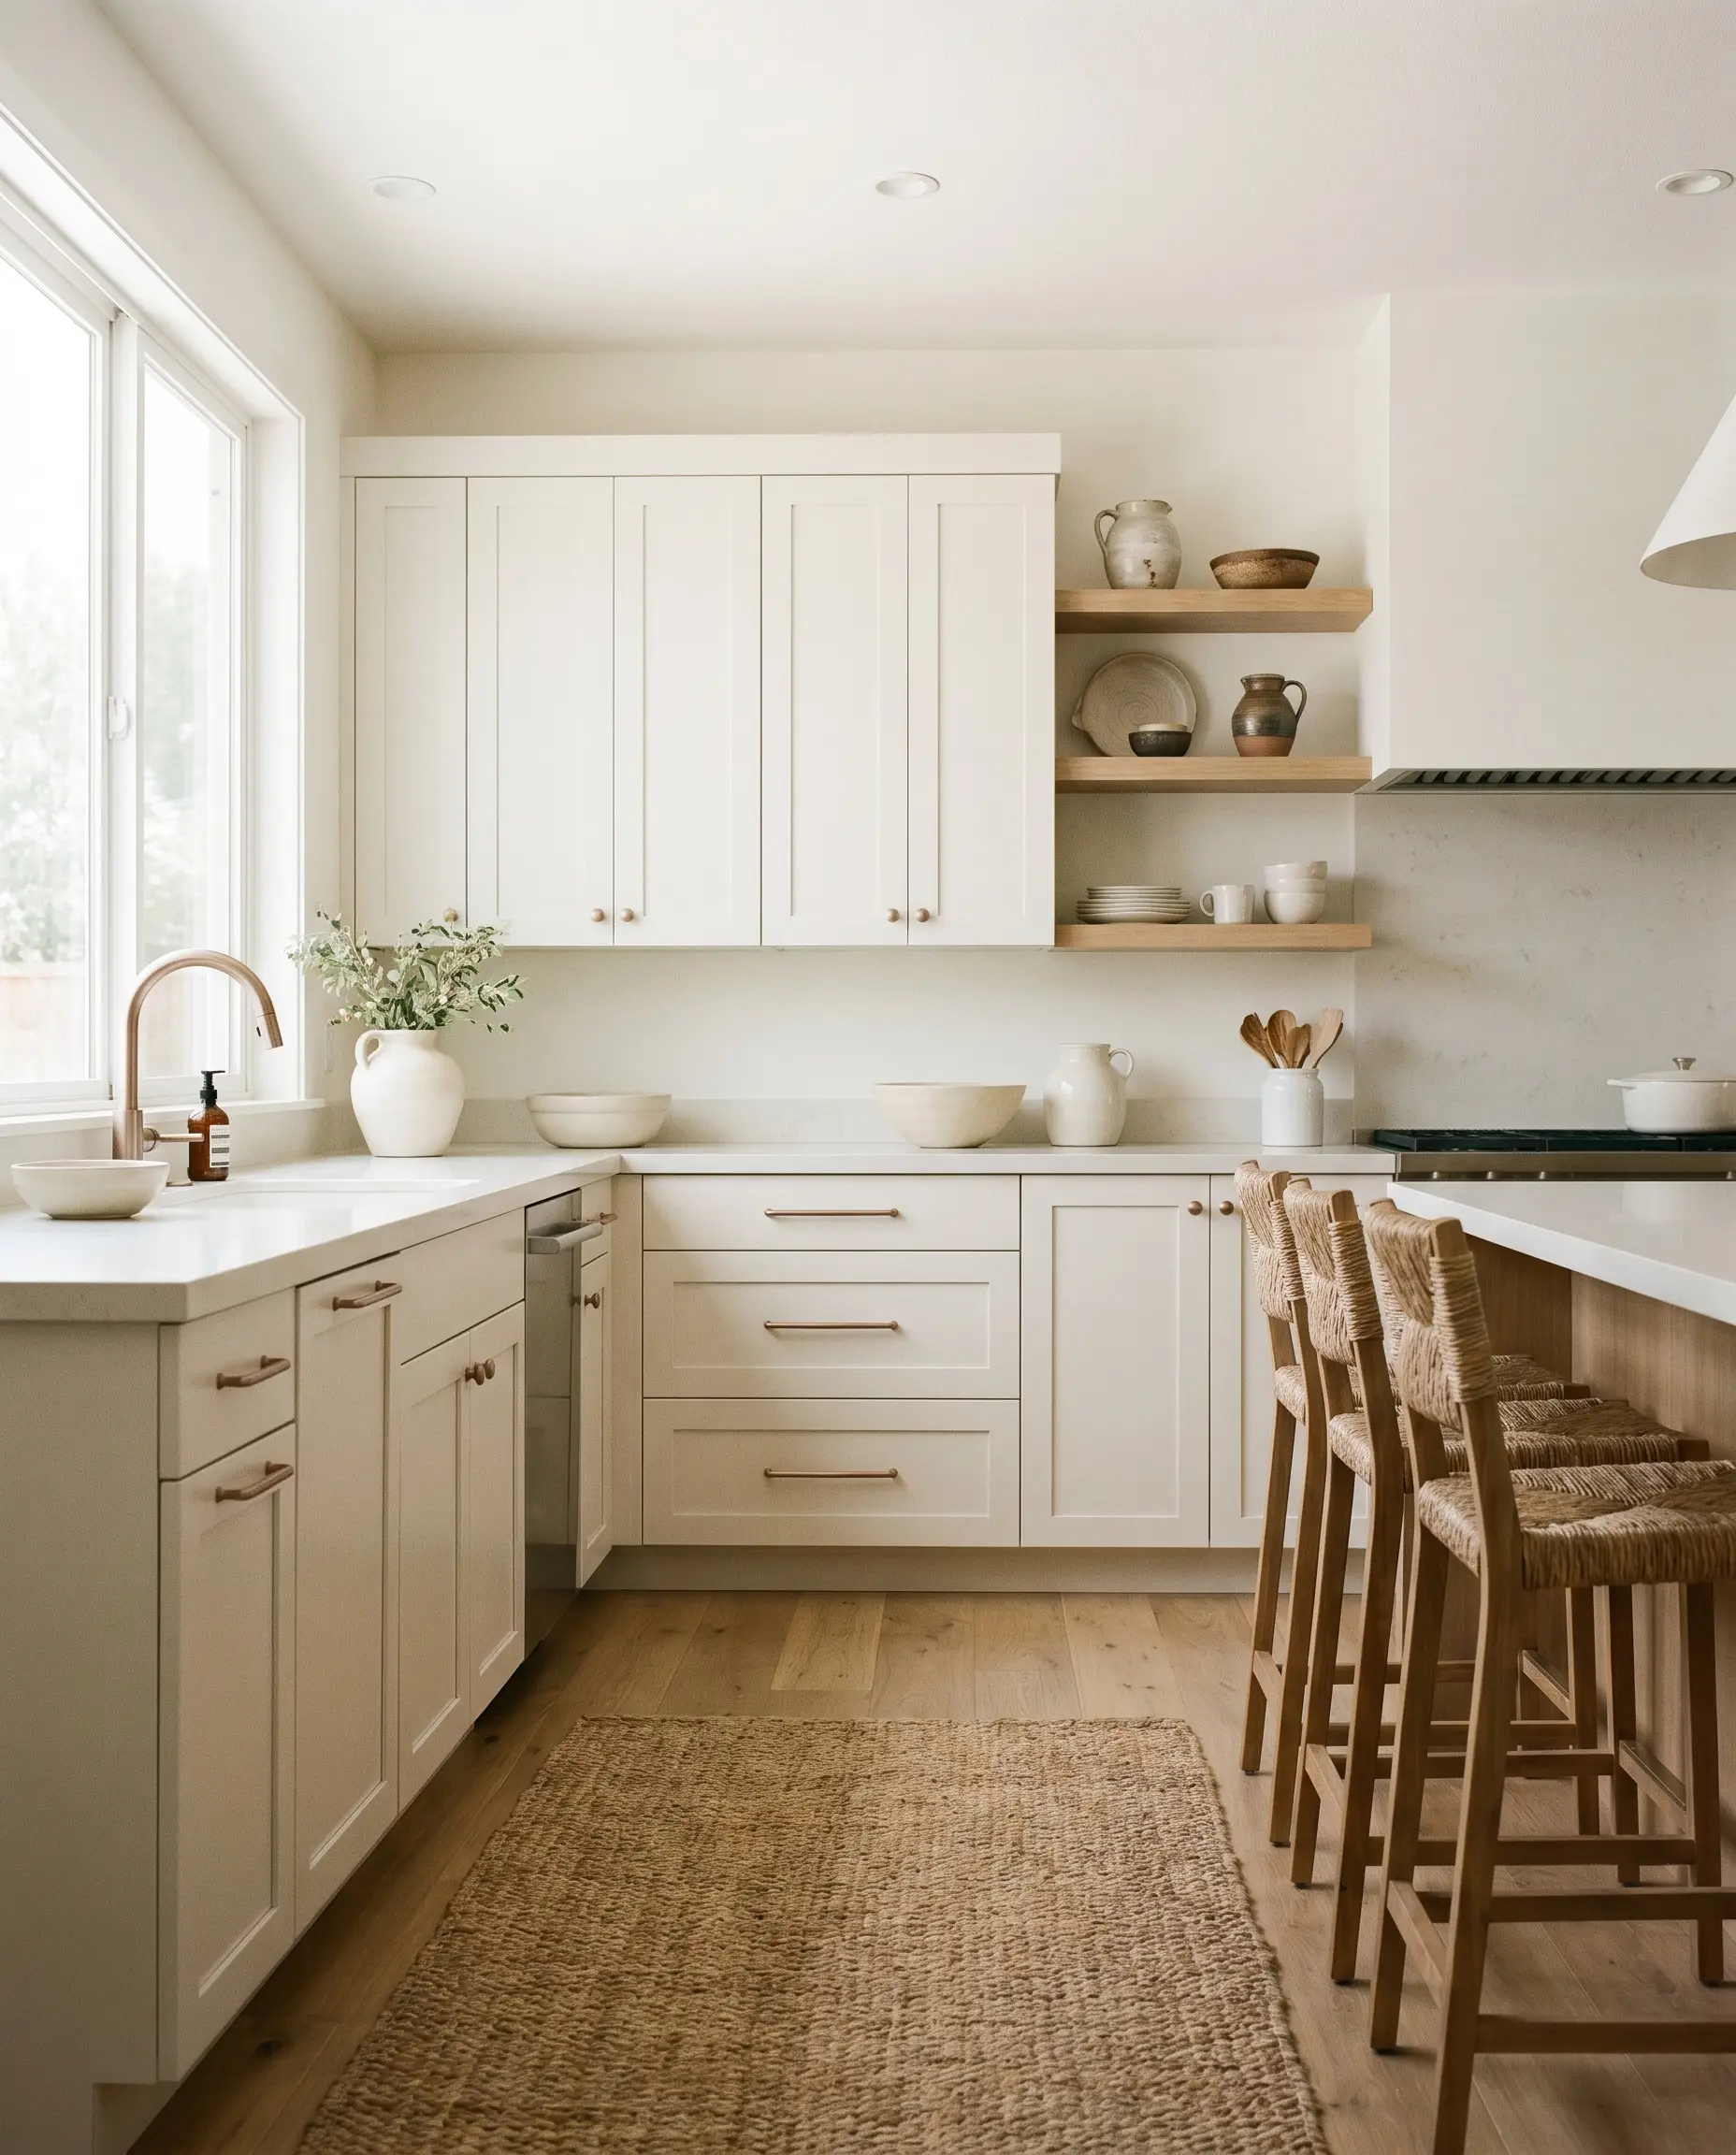
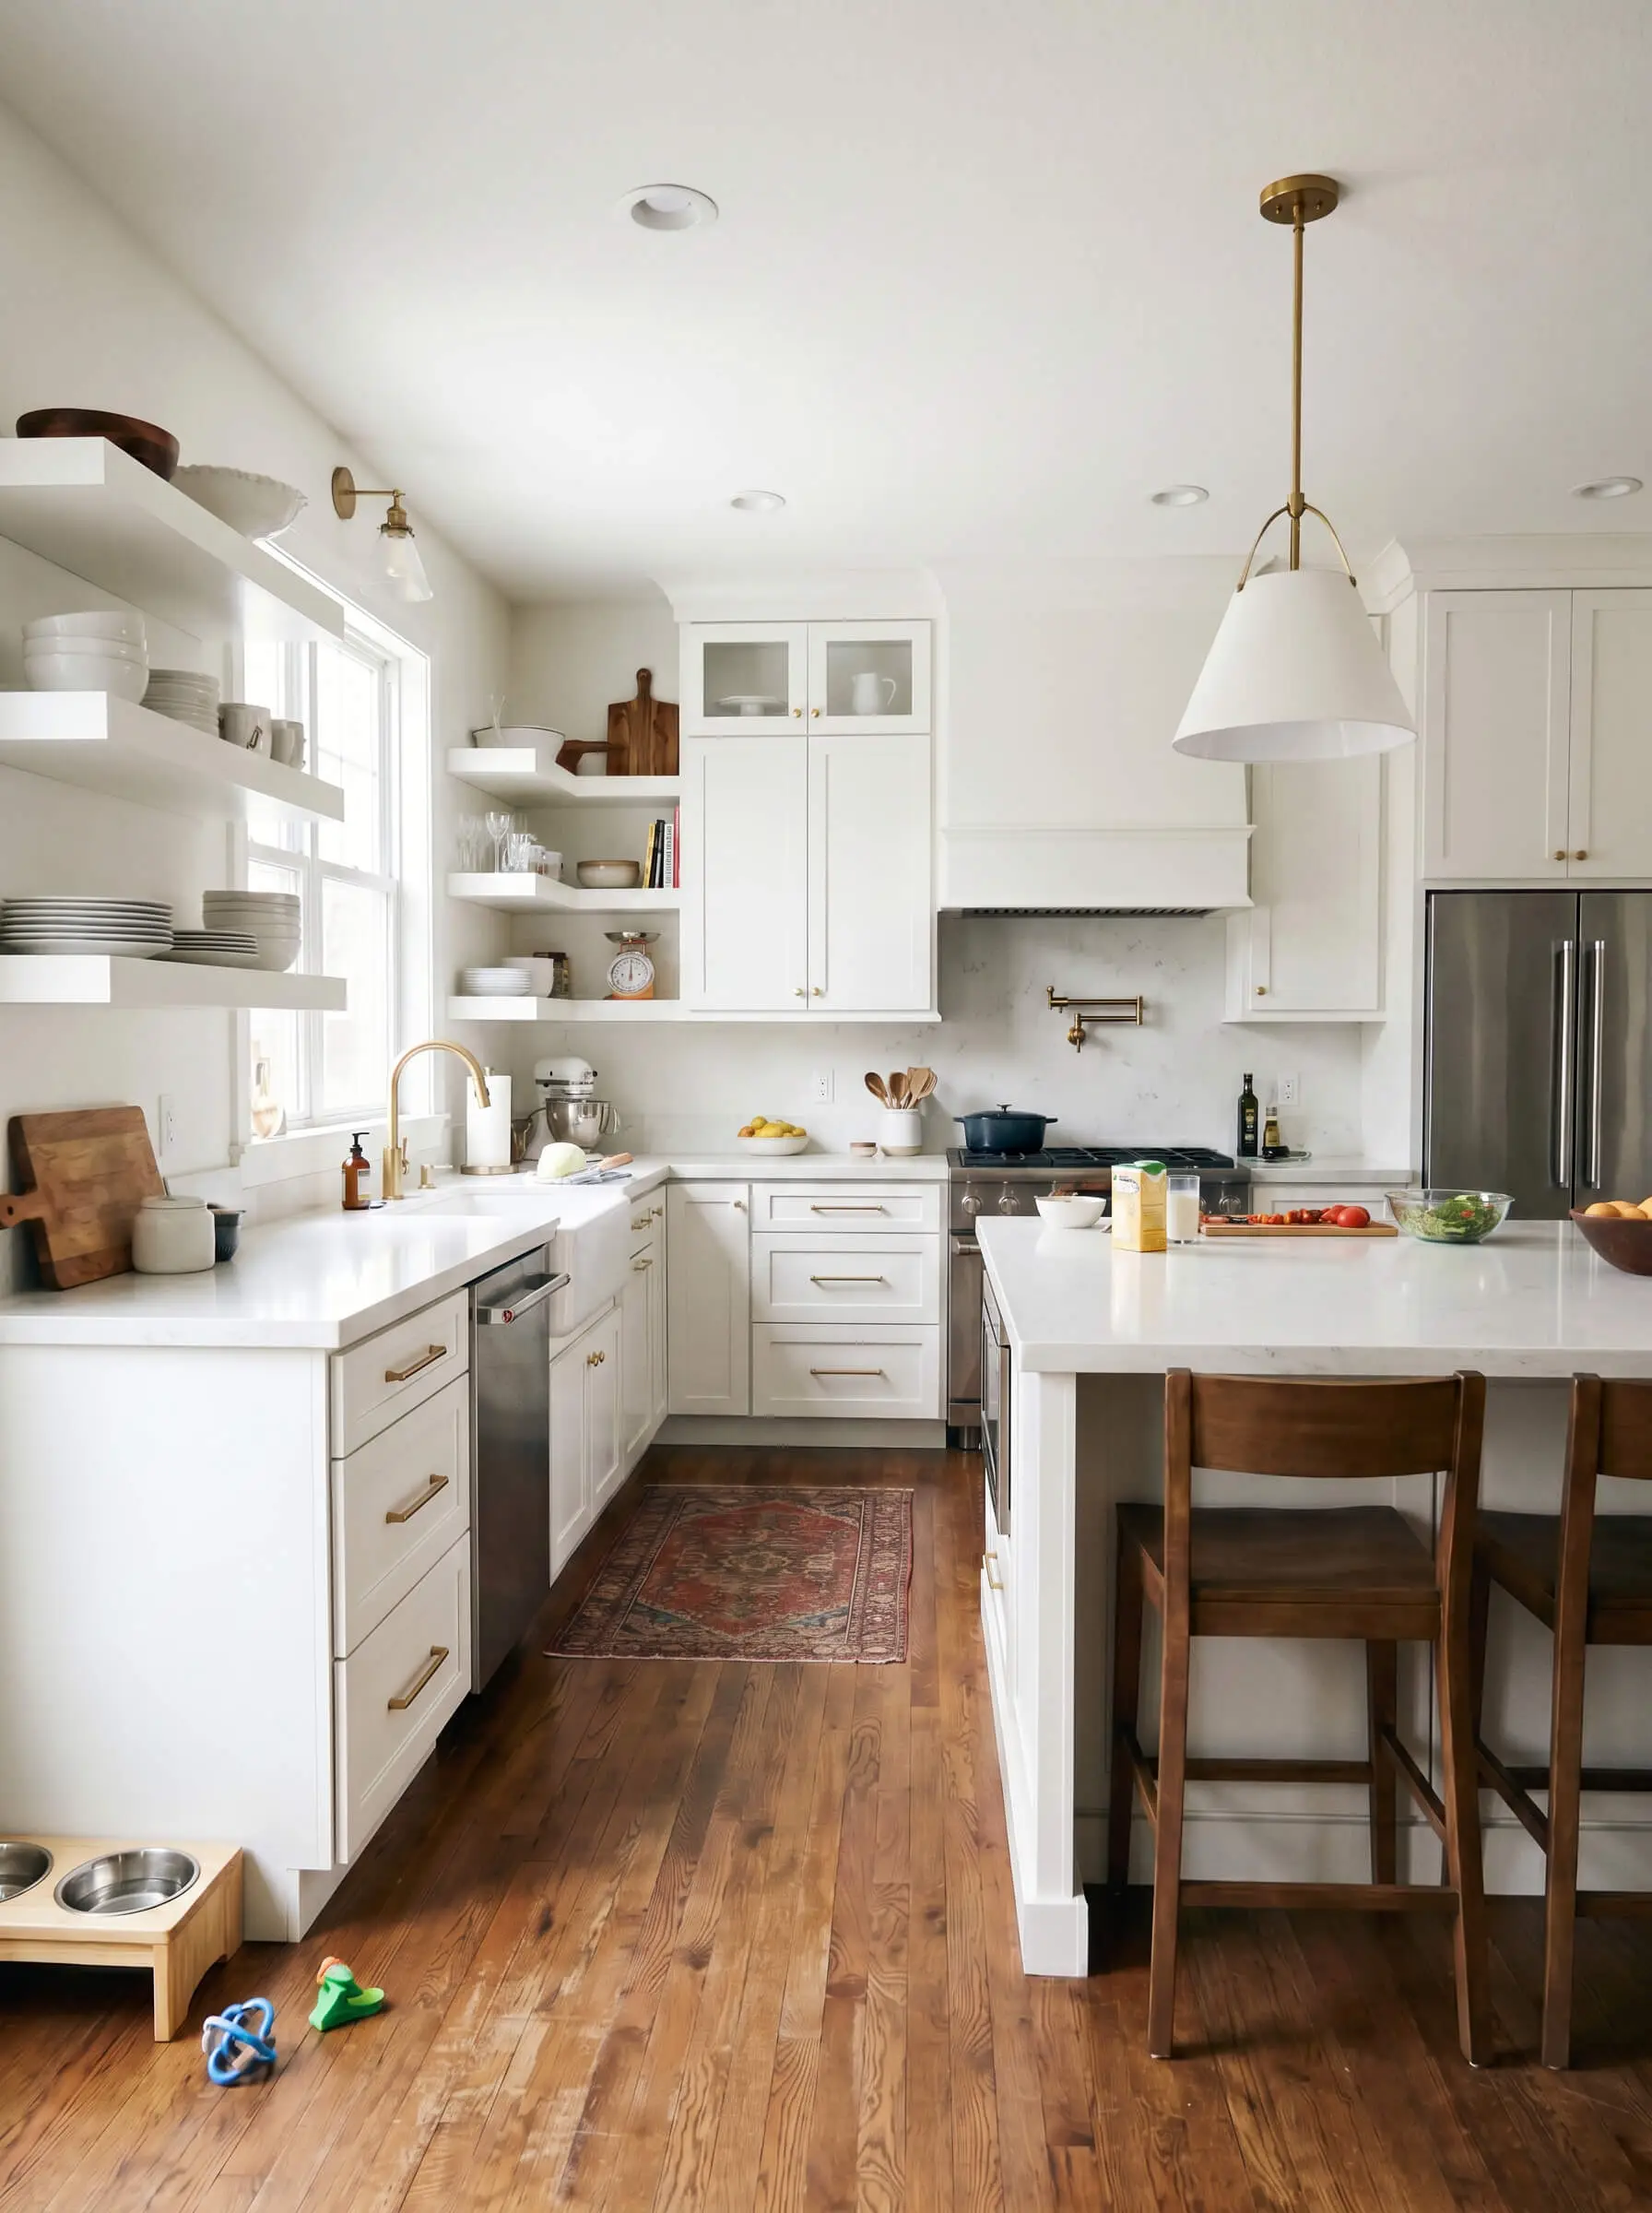
White shaker cabinets are the most versatile architectural canvas in the world, but this ubiquity presents a distinct challenge. The difference between a standard builder-grade kitchen and a heavily curated, bespoke space lies entirely in the hardware you select. If you find yourself paralyzed by the fear of choosing a cheap, yellow-toned metal that looks like a 1990s polished-brass time capsule, your instincts are exactly right.
Modern gold hardware for white shaker cabinets is not a single, flat color—it is a sophisticated spectrum of tactile finishes, living patinas, and precise architectural proportions.
By mastering the exact finish, scale, and shape of your hardware, you completely redefine the classic shaker door into a statement of modern luxury.
Curating the Perfect Gold Finish for White Cabinetry
The specific tone of your gold hardware dictates the entire stylistic direction of your kitchen. Because white paint carries distinct warm or cool undertones, your metal must complement that base. Here are the three reigning modern gold finishes for high-end spaces.
| Finish | Pros | Cons |
|---|---|---|
| Unlacquered Brass | Develops a rich, organic patina; feels historic and bespoke. | Requires an appreciation for uneven aging and water spots. |
| Champagne Bronze | Muted, warm undertone hides fingerprints; incredibly versatile. | Can lean slightly brown depending on the kitchen’s natural lighting. |
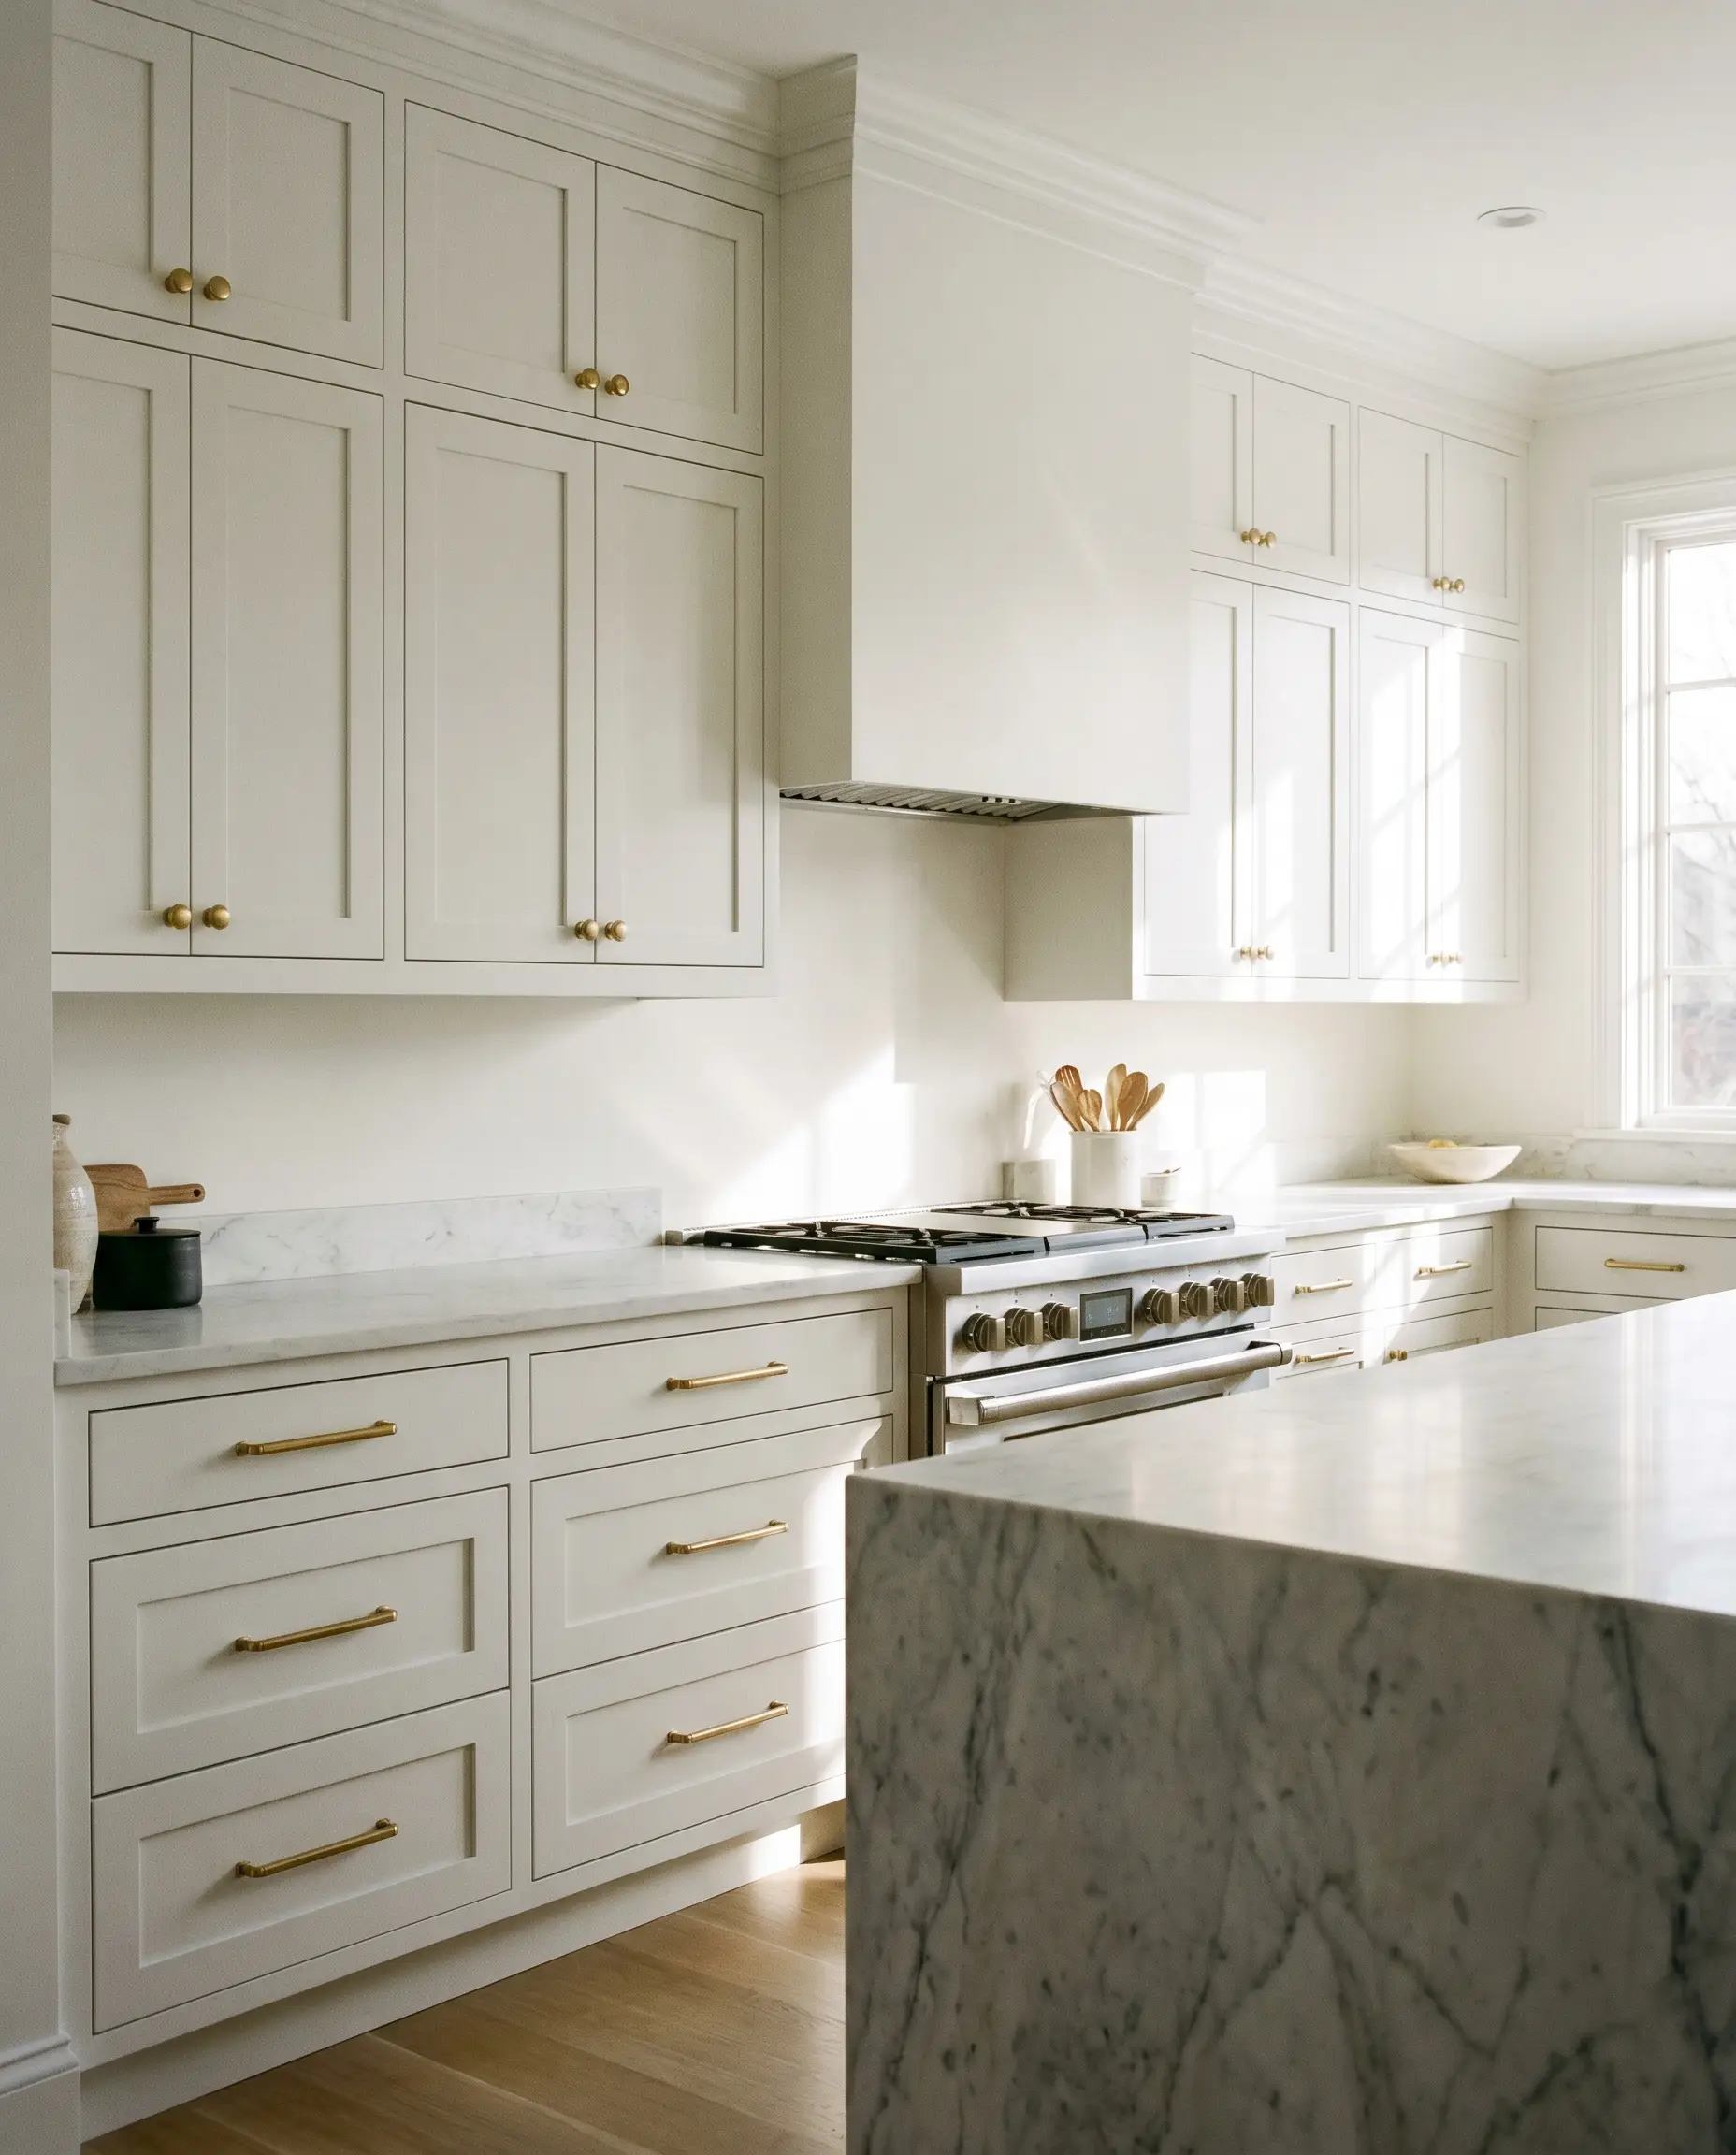
| Satin Brass | Bright, consistent color; heavy cast feel with high durability. | Lacks the organic, “living” character of unlacquered options. |
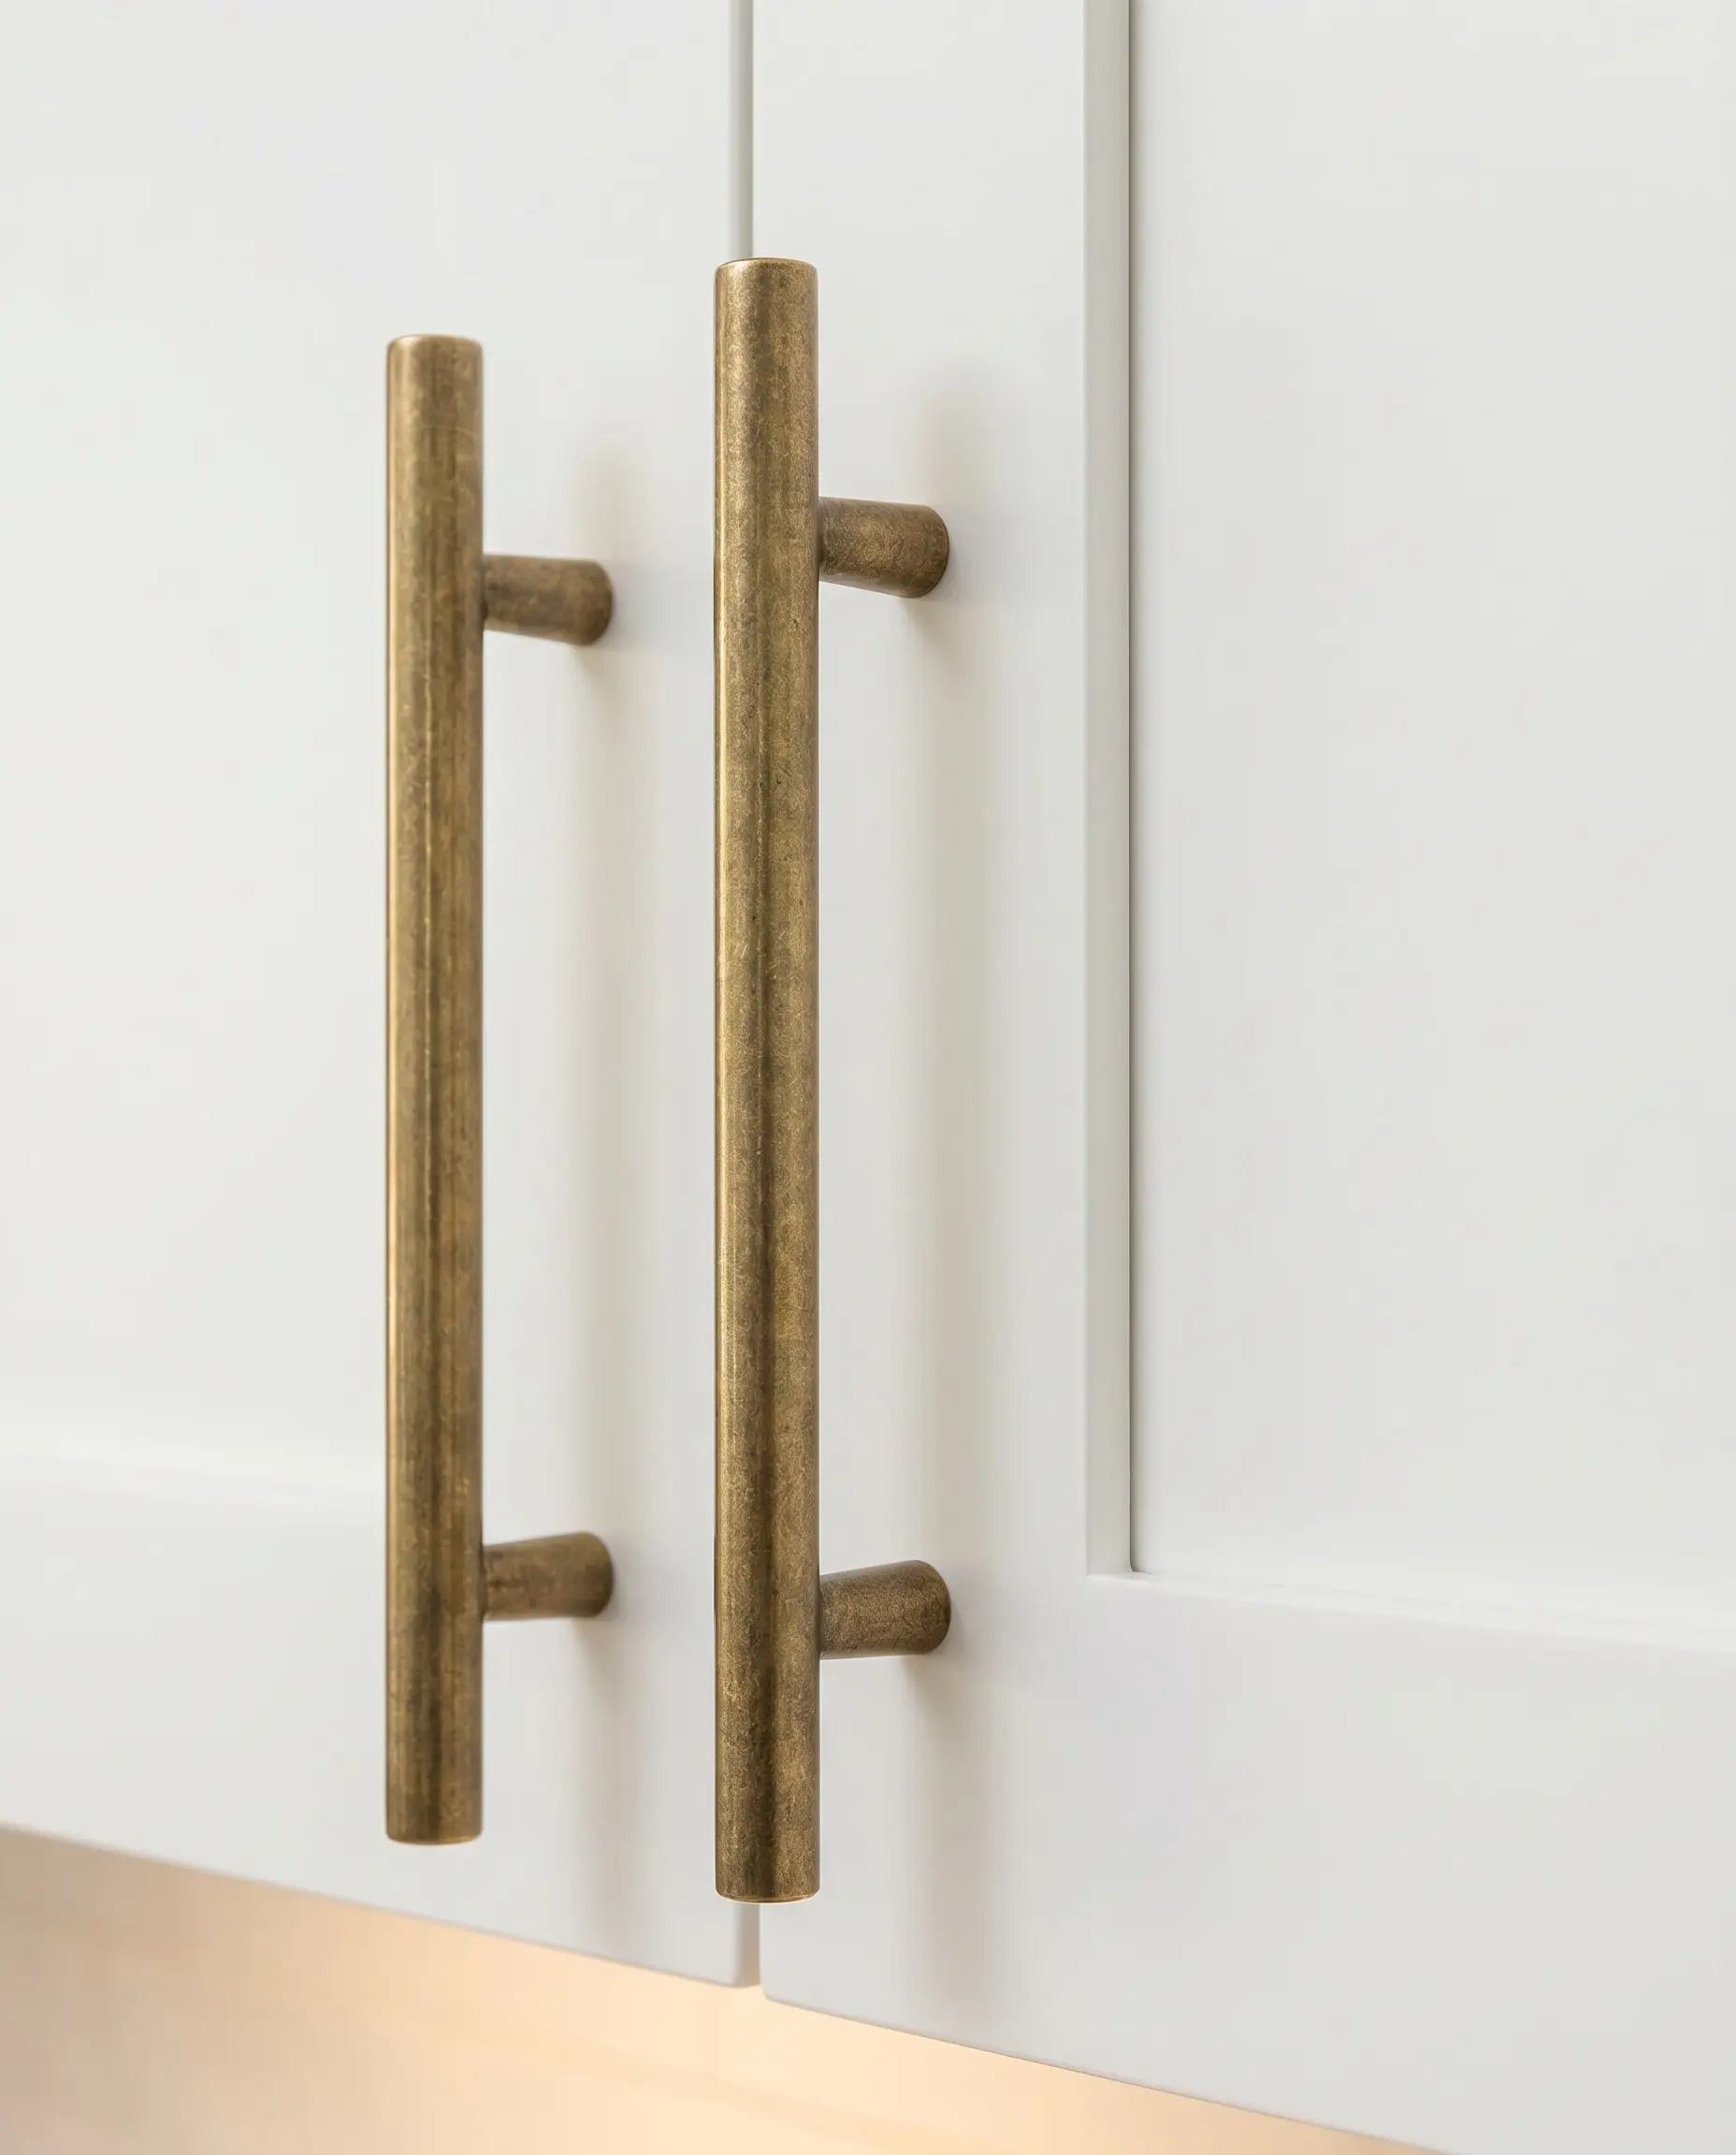
1. Embrace the Patina of Unlacquered Brass
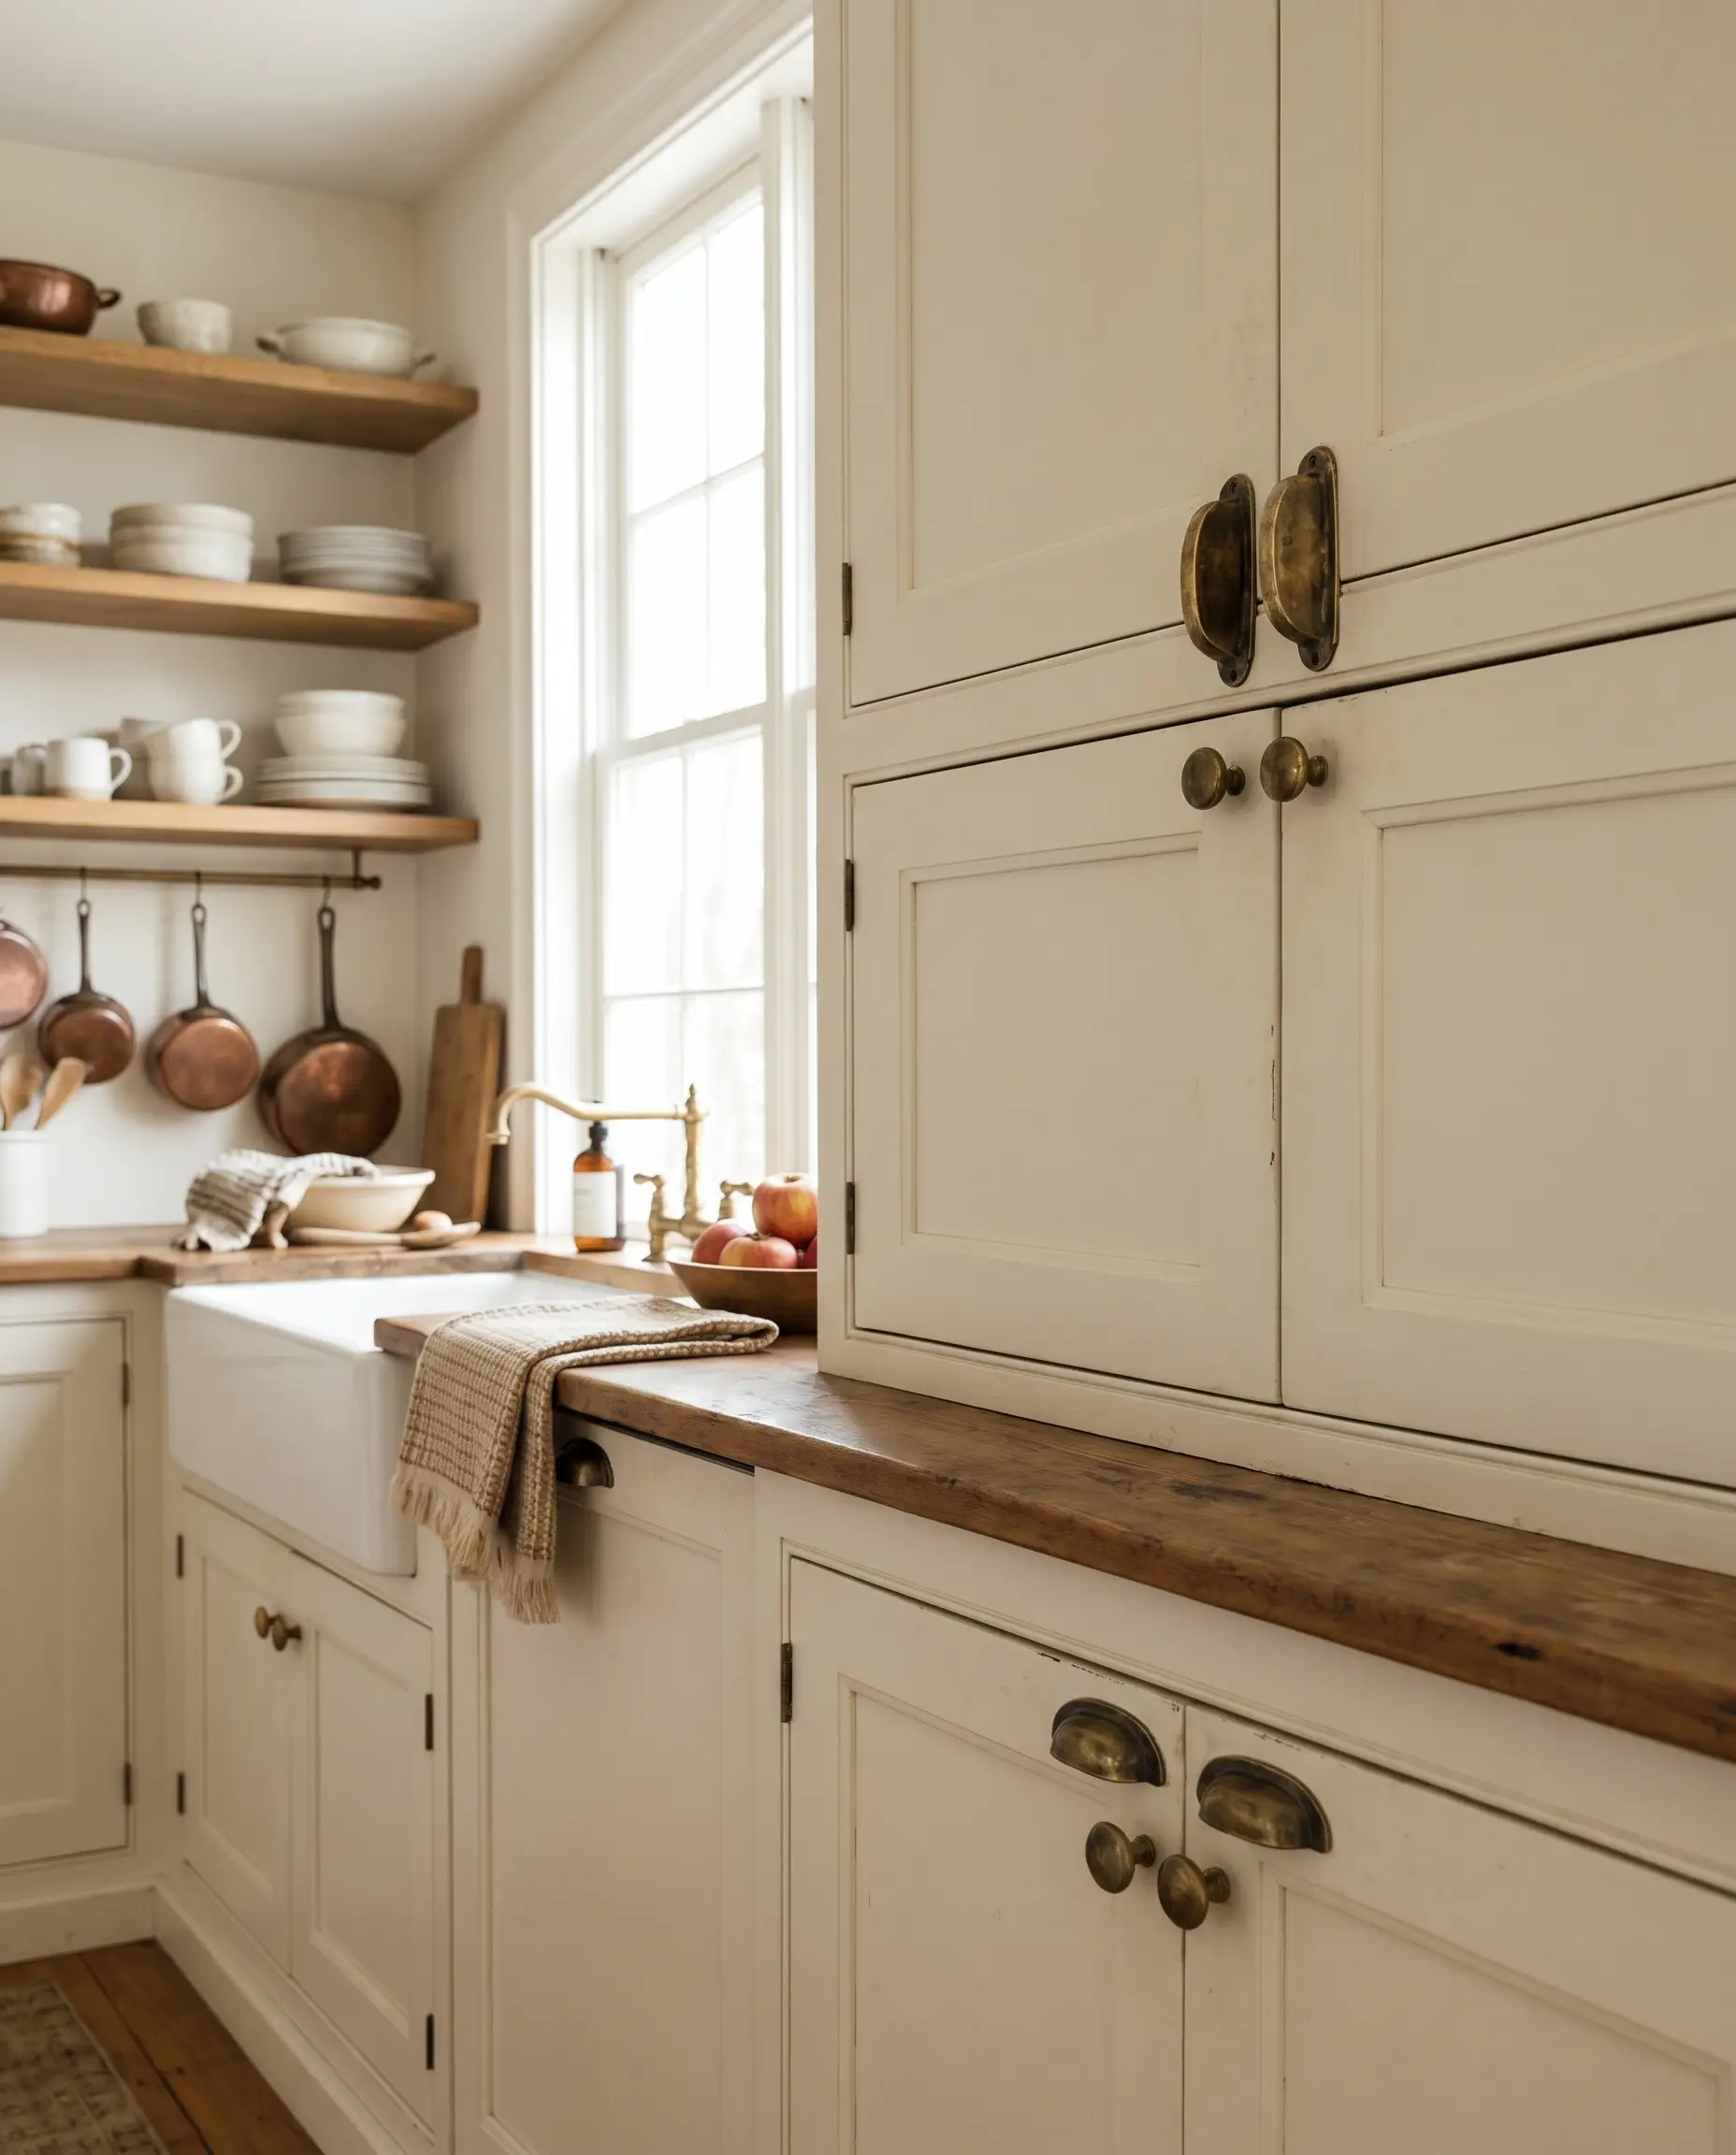
Unlacquered brass is a “living finish” that intentionally reacts with the oils in your hands and the air in your kitchen, darkening and spotting beautifully over time. This organic aging process introduces immense warmth and historical character, breaking up the crisp, pristine nature of white cabinets with a finish that feels genuinely bespoke.
- Vibe: Modern Organic, Historic Luxury
- Key Material: Raw, solid unlacquered brass (e.g., Armac Martin, Rejuvenation)
- Paint Recommendation: Benjamin Moore White Dove
Never polish a living finish; the beauty of unlacquered brass is its natural, uneven aging.
Design Rule
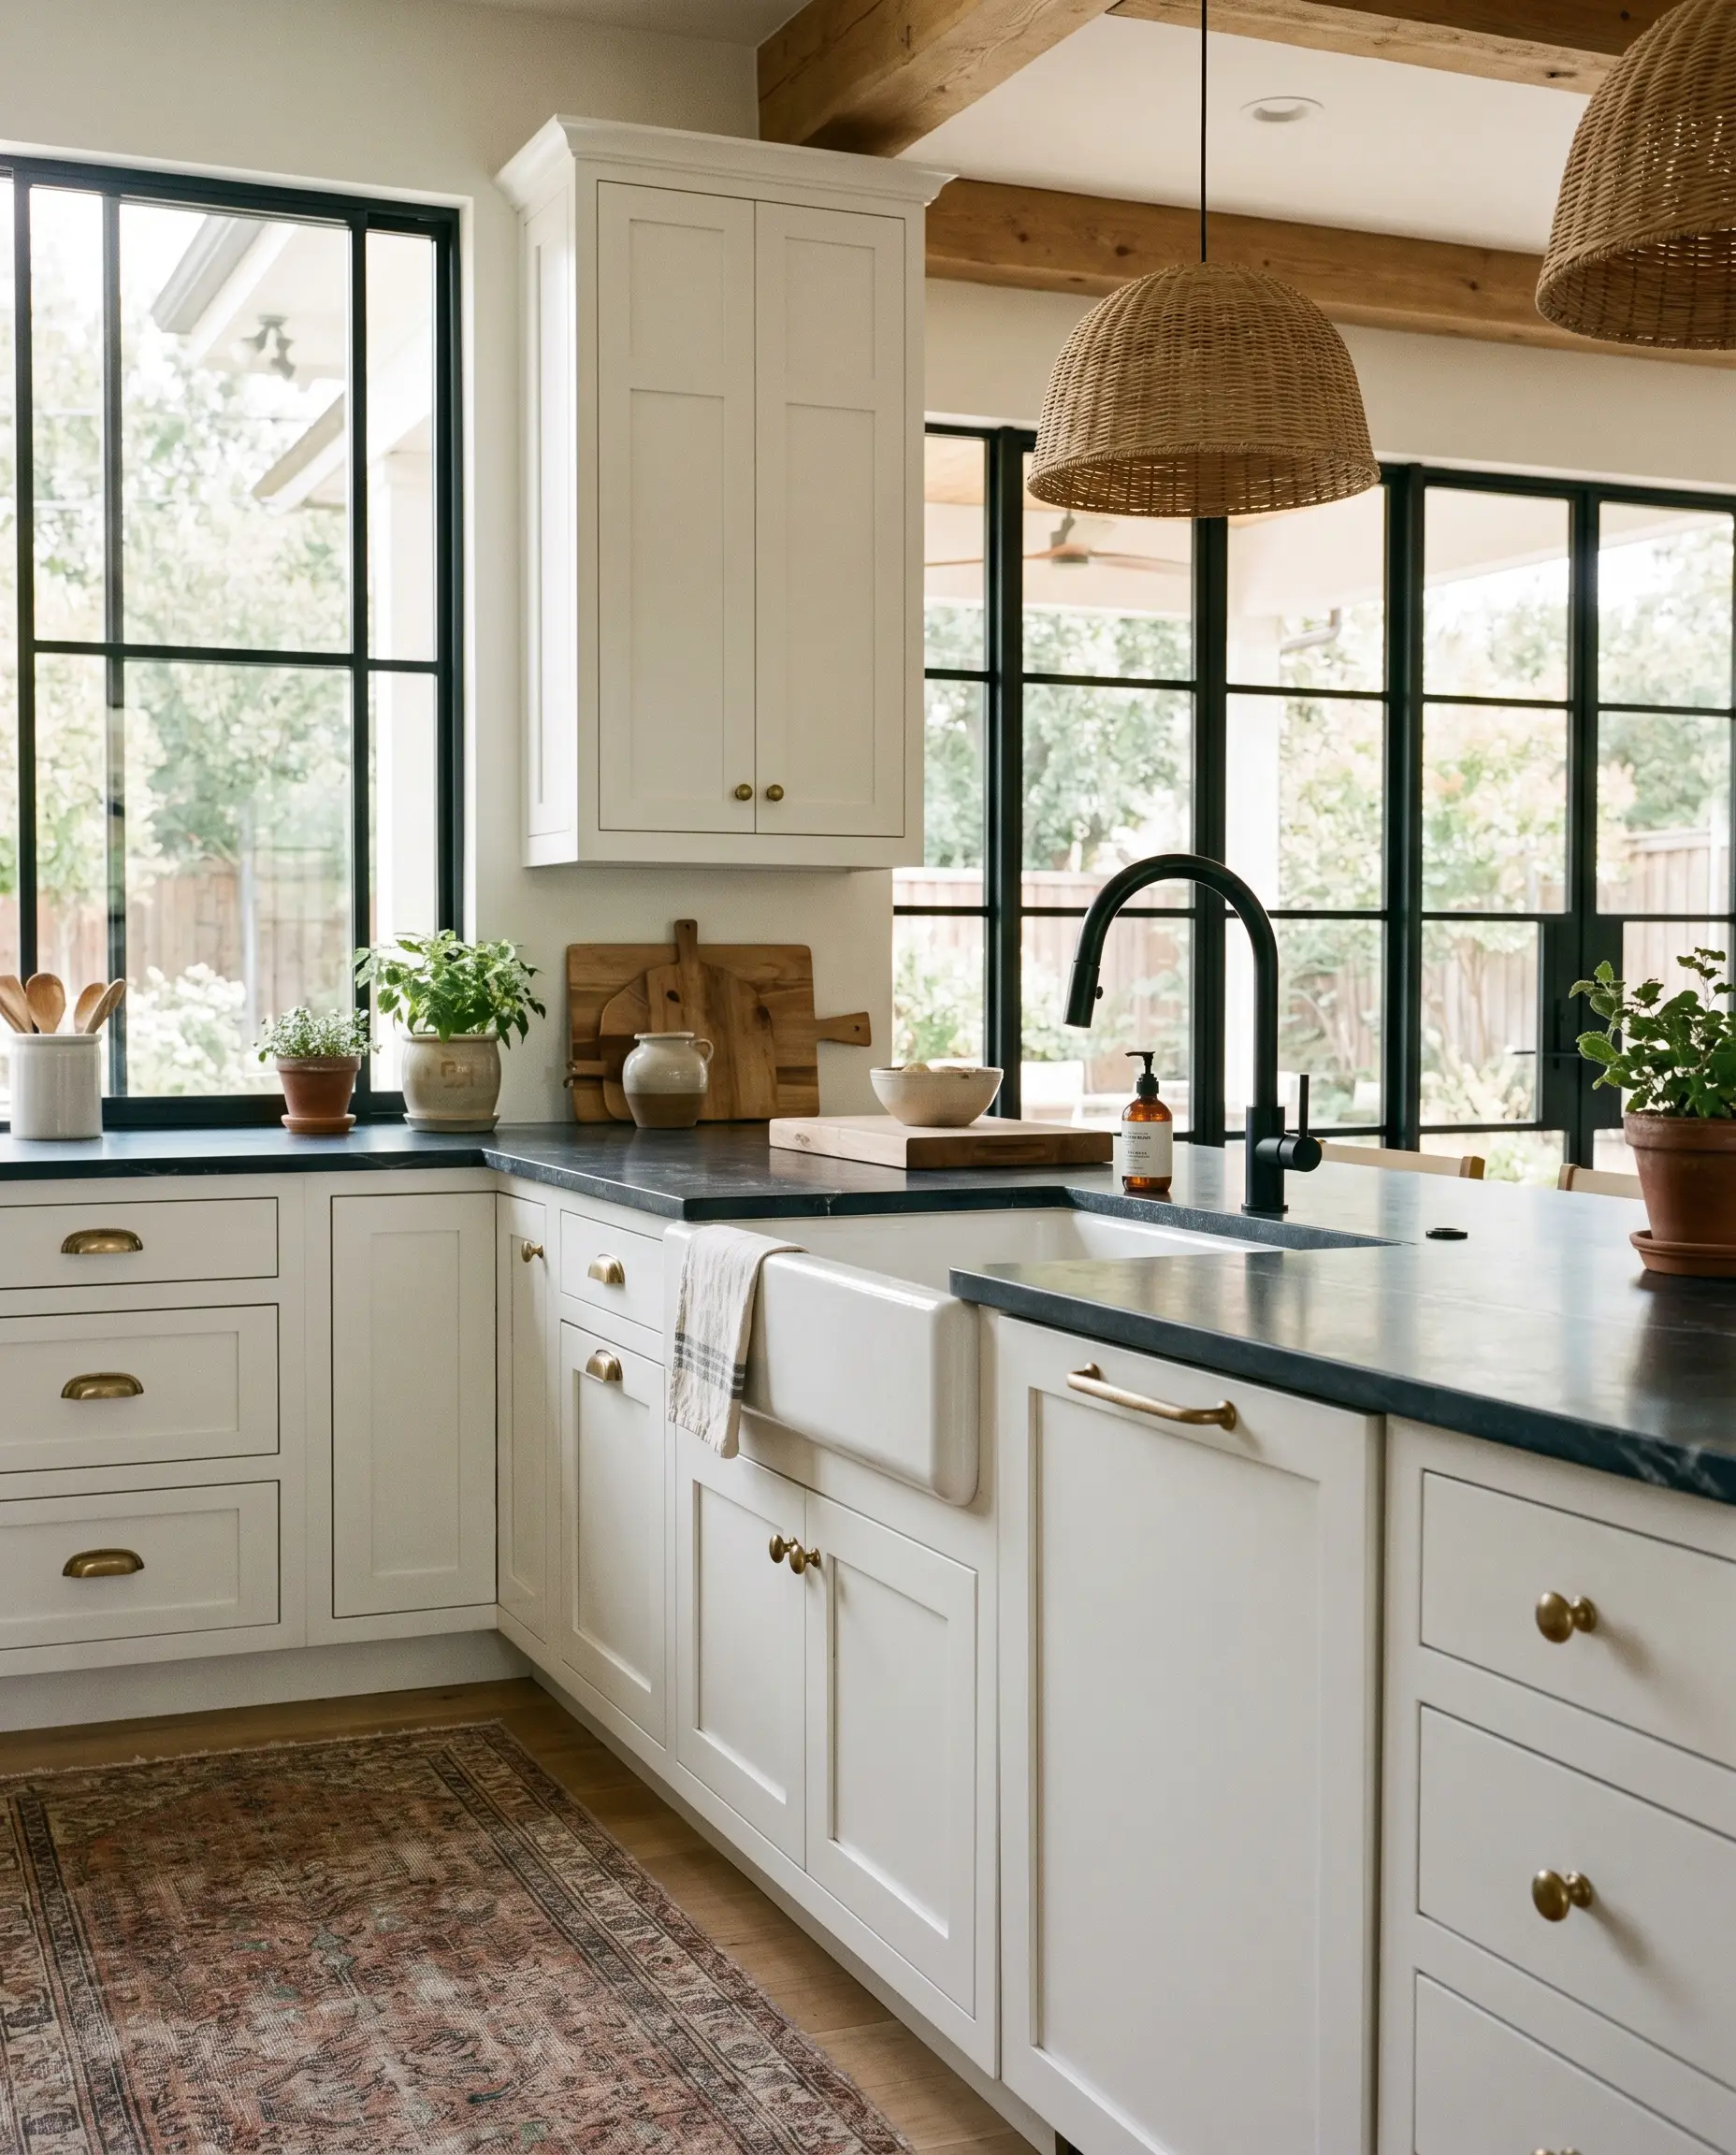
2. Soften the Contrast with Champagne Bronze
If you fear bright yellow tones, champagne bronze is the safest, most sophisticated modern gold available today. It carries a muted, almost pink-brown undertone that reads as soft and grounded, making it an exceptional choice for California Casual or Transitional kitchens where subtle warmth is the goal.
- Vibe: California Casual, Transitional
- Key Material: Champagne bronze with a brushed finish
- Paint Recommendation: Sherwin-Williams Alabaster
- Styling Pro-Tip: This specific finish is highly forgiving and hides daily fingerprints better than any other gold option.
Pair champagne bronze with creamy, warm-toned white cabinets rather than stark, cool whites to avoid a muddy visual clash.
Design Rule
3. Anchor the Room with Heavy Cast Satin Brass
For those who desire a consistent, bright pop of gold that will never age or tarnish, heavy cast satin brass protected by a clear PVD coating is the definitive choice. The sheer physical weight of cast brass makes the hardware feel expensive to the touch, grounding the light, airy look of a white kitchen with substantial architectural presence.
- Vibe: Crisp Transitional, Tailored Classic
- Key Material: Solid cast brass with PVD coating
- Durability Factor: Ideal for high-traffic family kitchens requiring daily wipe-downs.
Ensure your satin brass has a brushed or matte topcoat to prevent the finish from looking like inexpensive, highly reflective polished brass.
Design Rule
You can apply wallpapers, paints, etc. on walls and see how they look in various interiors.
Hardware Silhouettes and Textures for Shaker Fronts
Moving beyond color, we must address the physical shape of the hardware. Shaker cabinets are defined by the straight, 90-degree lines of their stile and rail construction; your hardware must either echo those linear boundaries or intentionally disrupt them with rich, tactile contrast.
4. Contrast Flat Panels with Knurled Bar Pulls
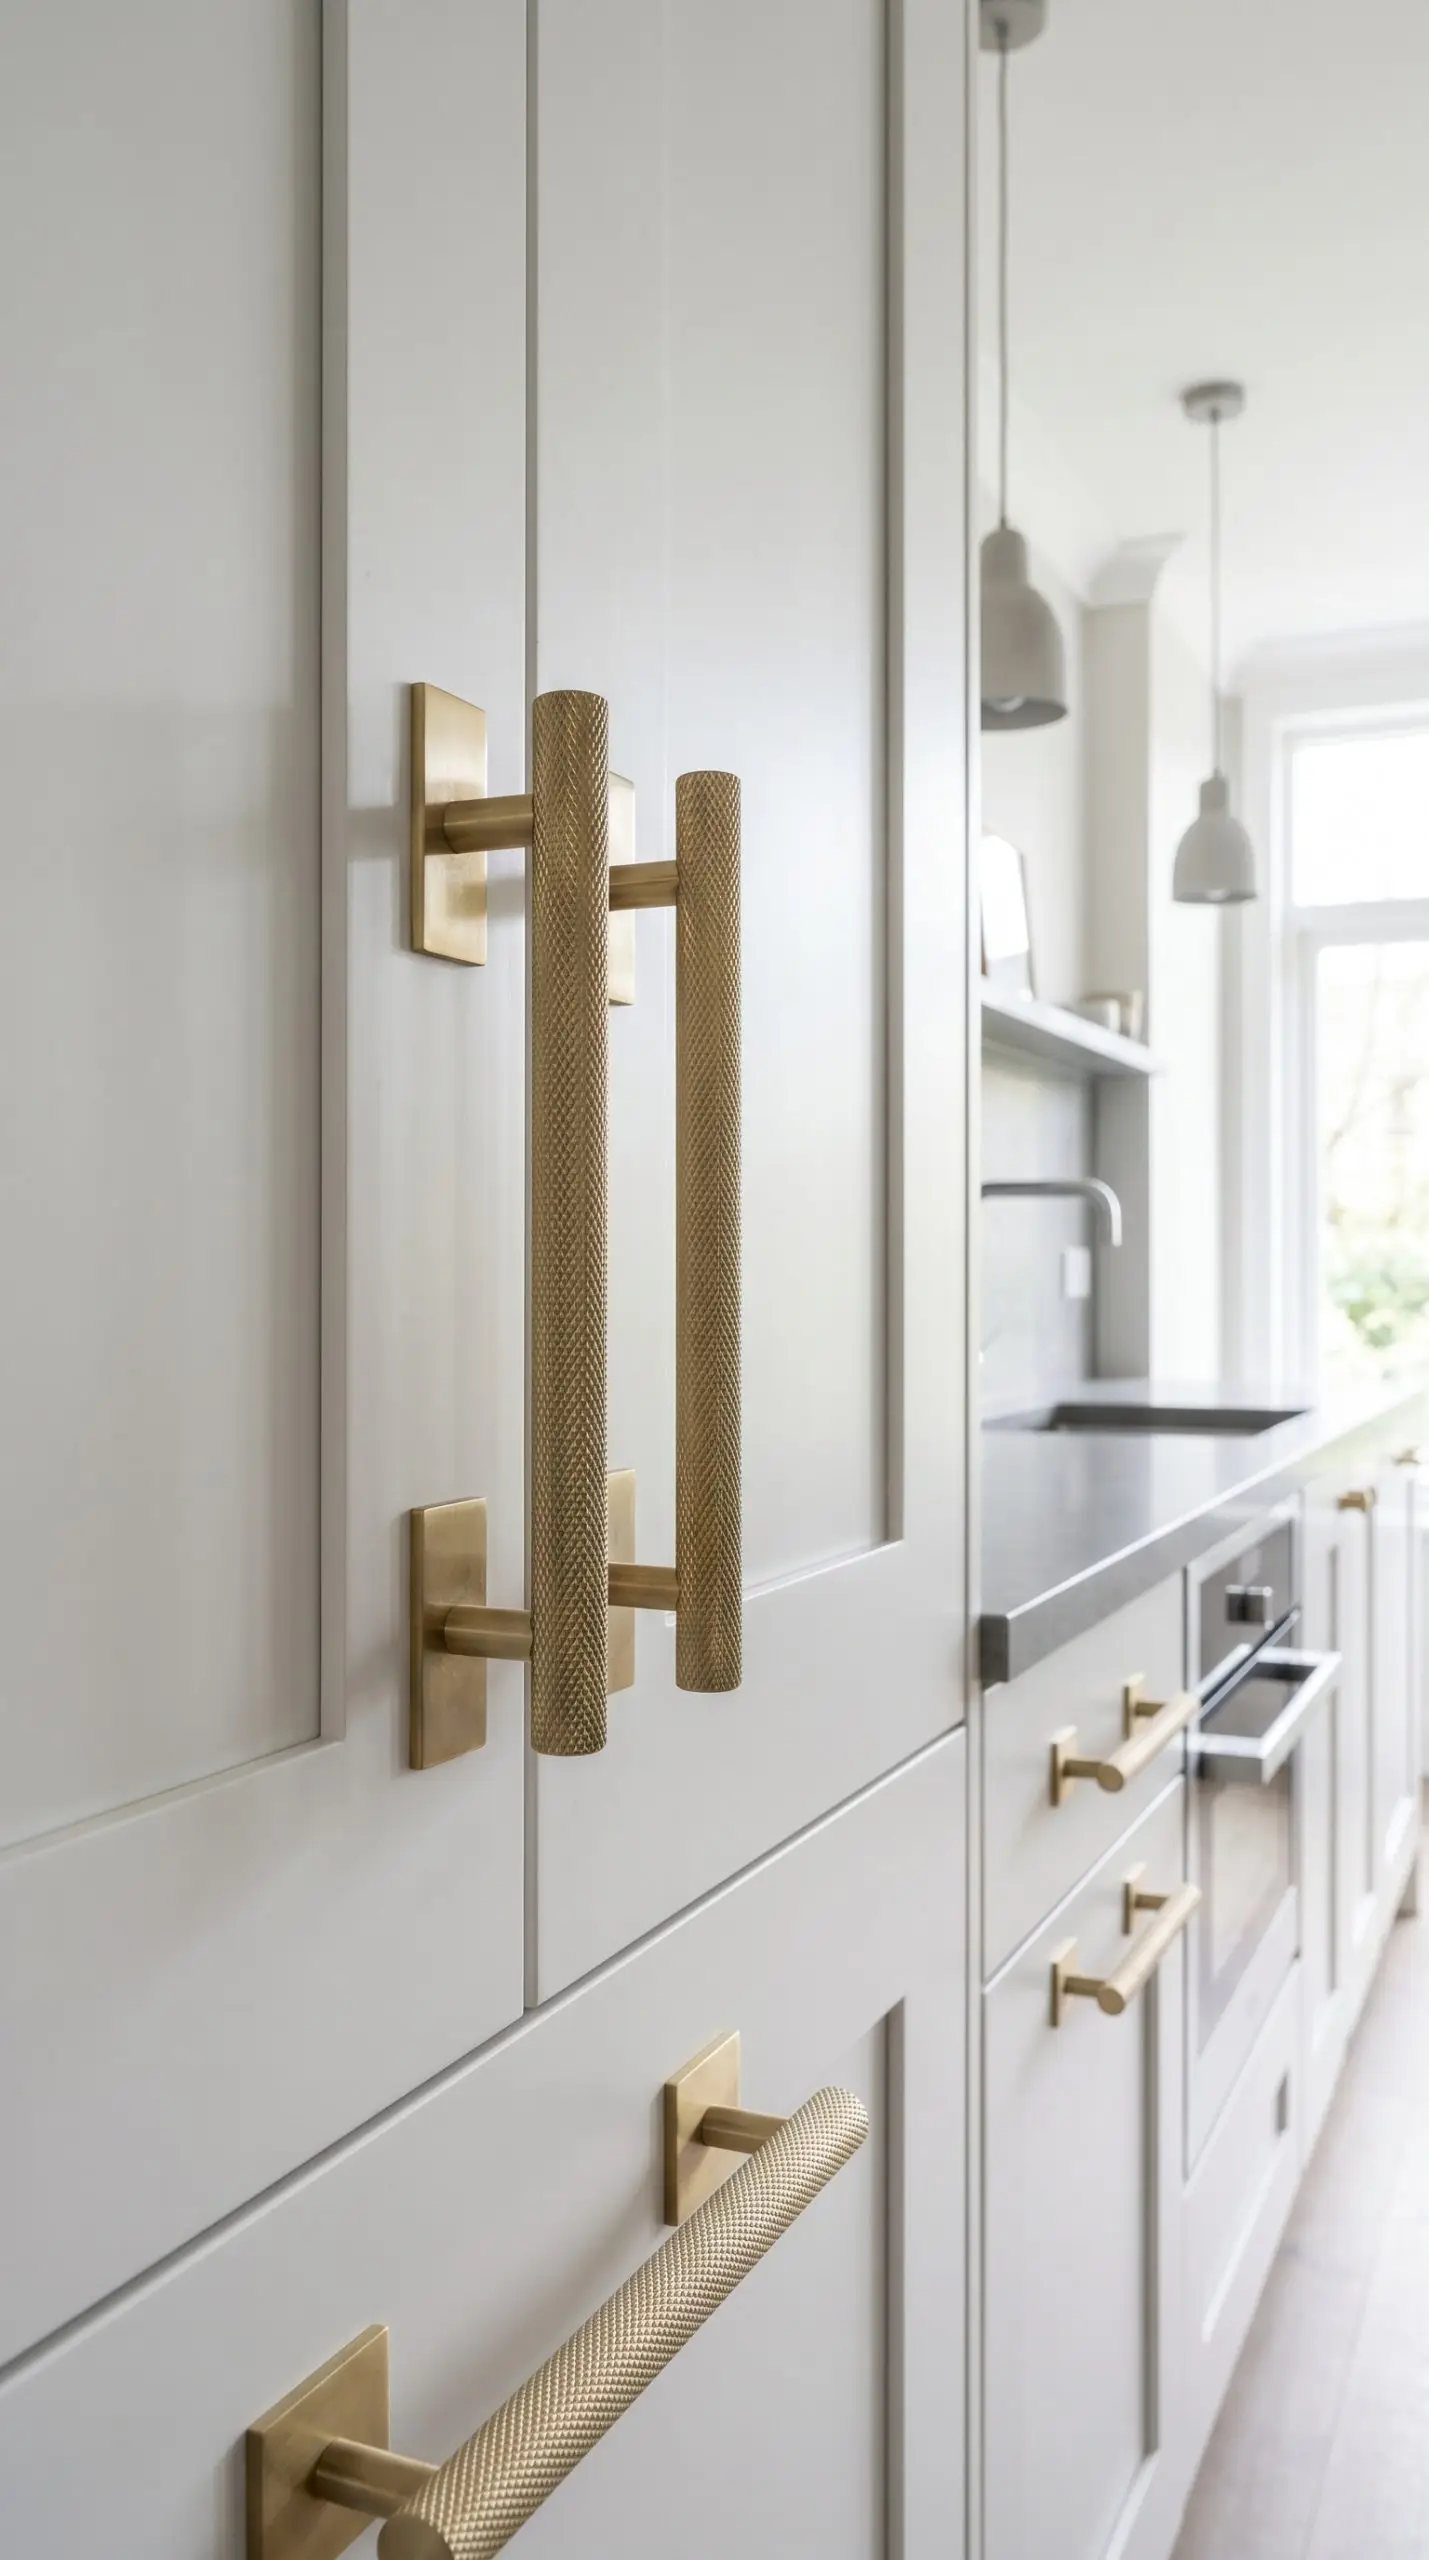
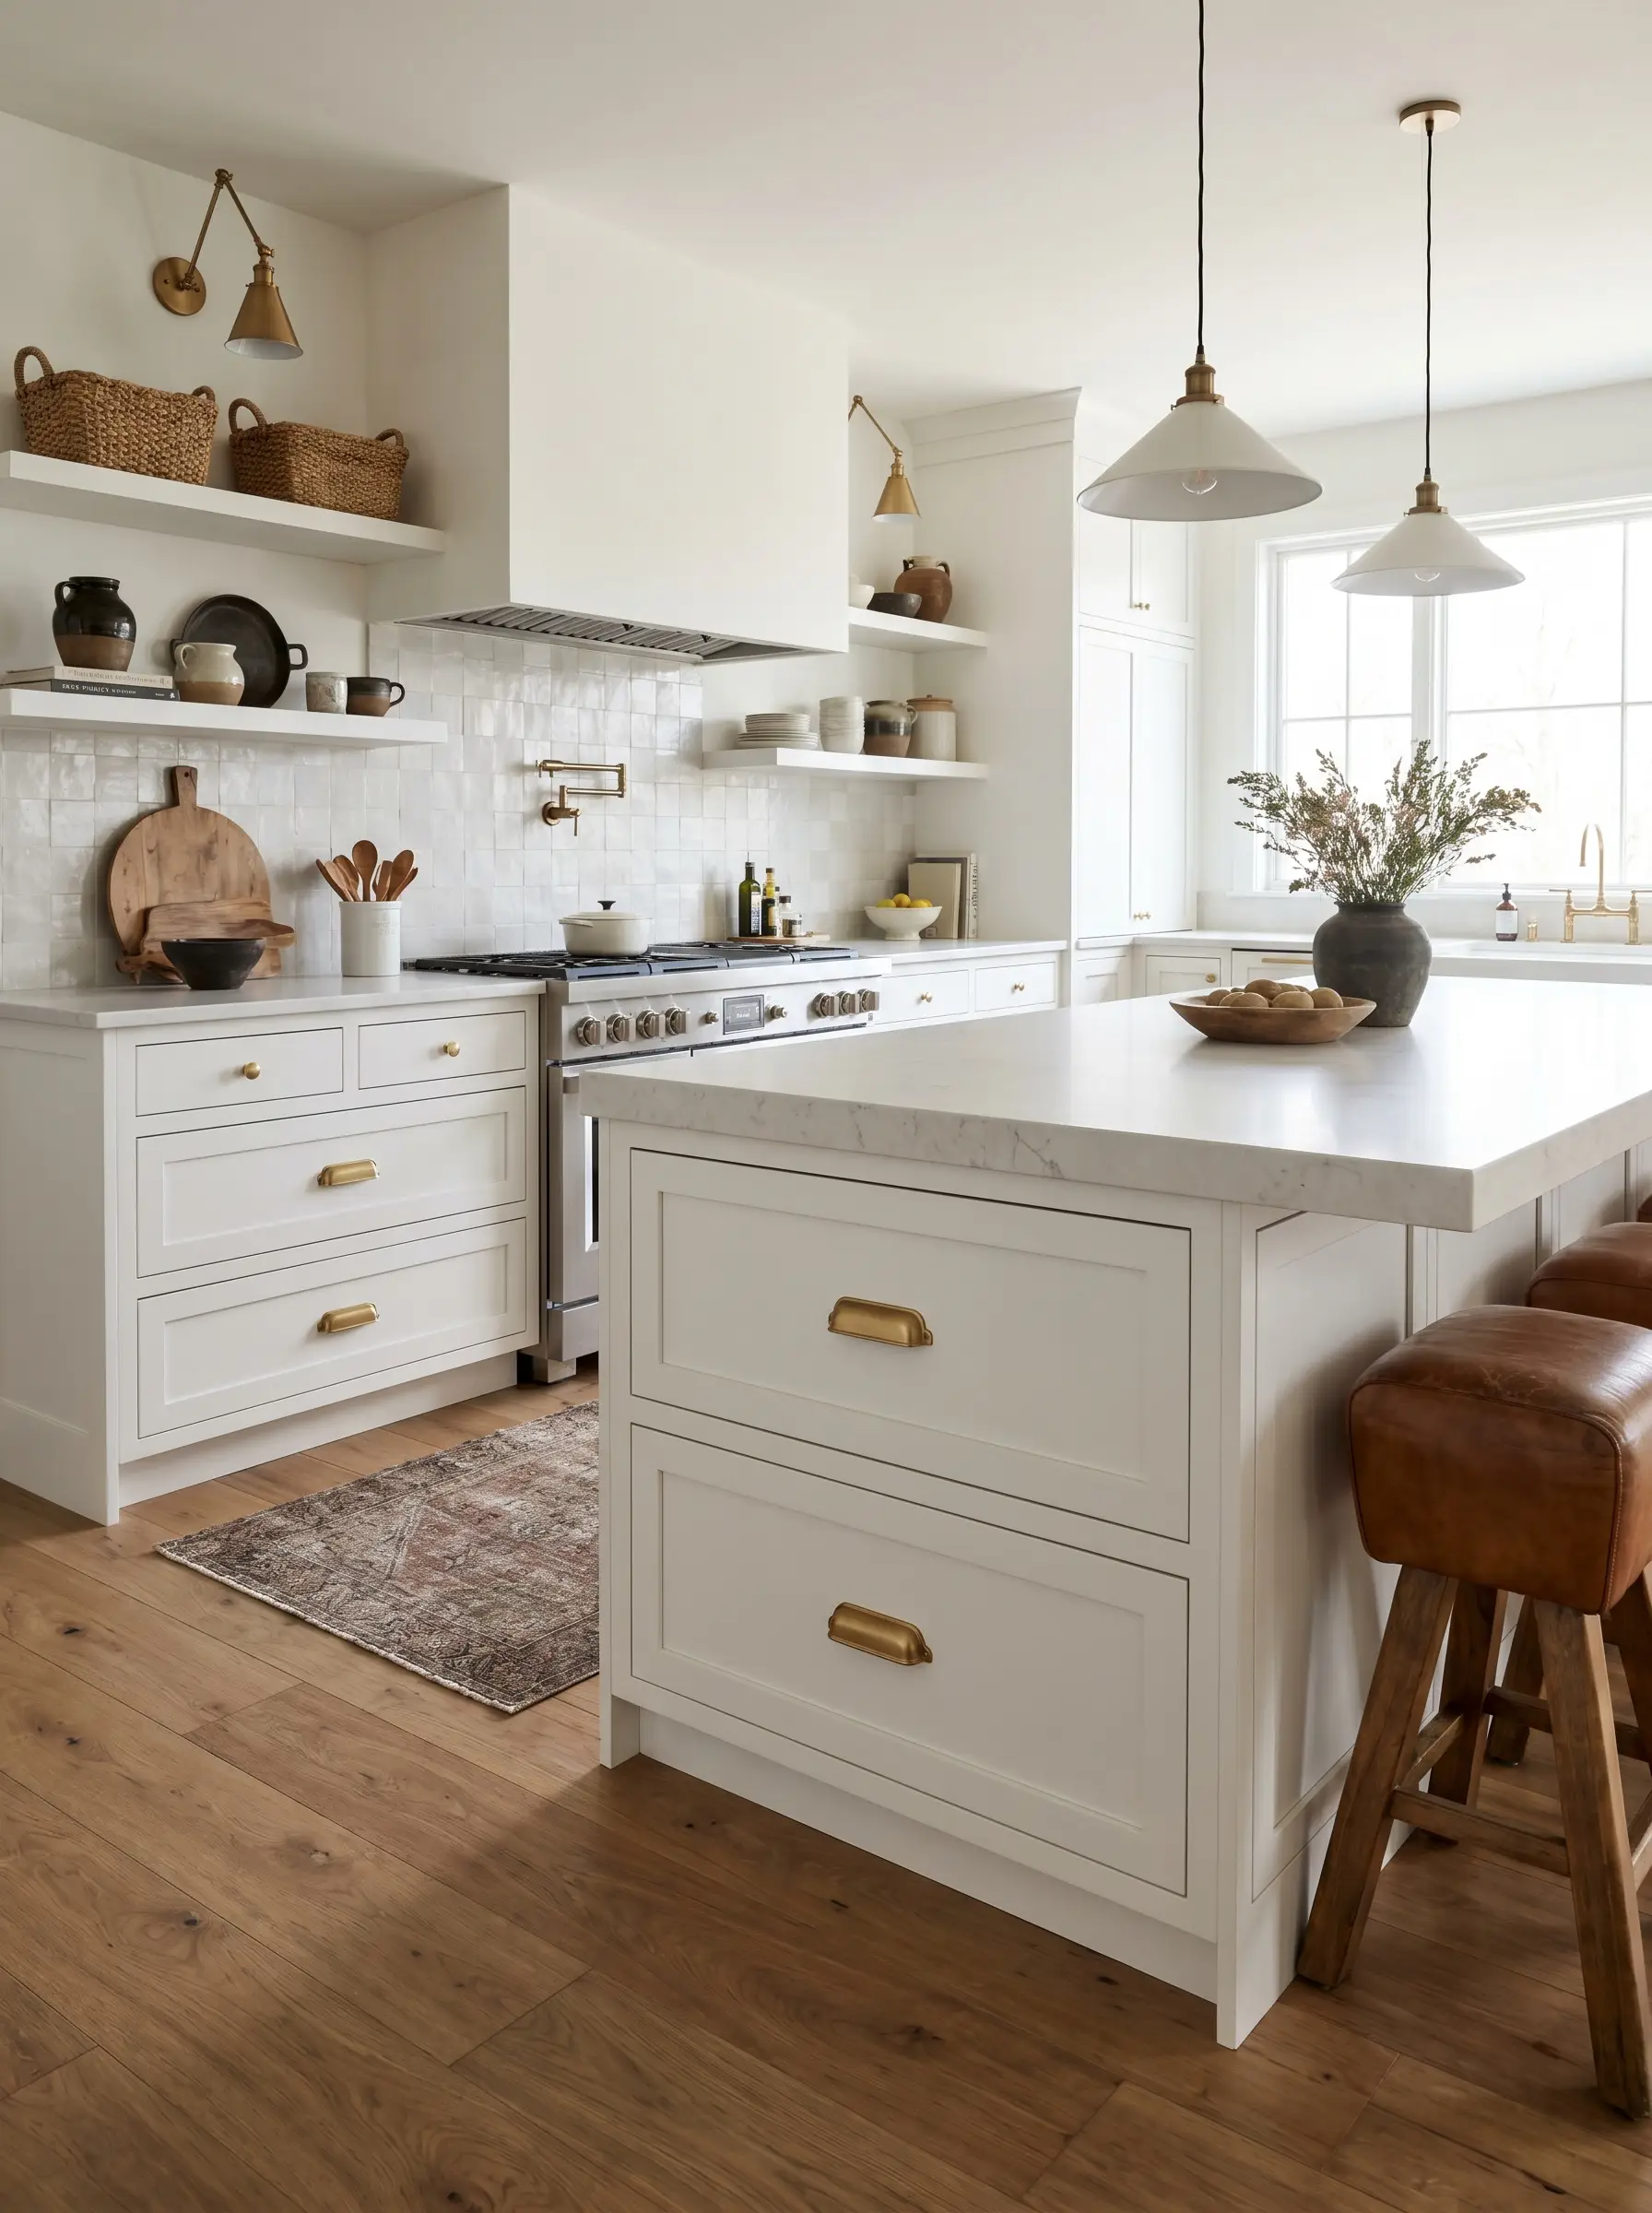
Knurling—the diamond-cut texture traditionally used on high-end industrial tools—adds massive tactile interest when set against the smooth, flat recessed panel of a white shaker door. It screams modern luxury by turning a standard pull into a highly sensory touchpoint.
- Vibe: Industrial Chic, Modern Luxury
- Key Material: Knurled solid brass bar pulls
- Styling Pro-Tip: Keep the backplates clean and unadorned to let the knurled texture remain the focal point.
Use knurled hardware to introduce a masculine, architectural edge to otherwise soft, transitional spaces.
Design Rule
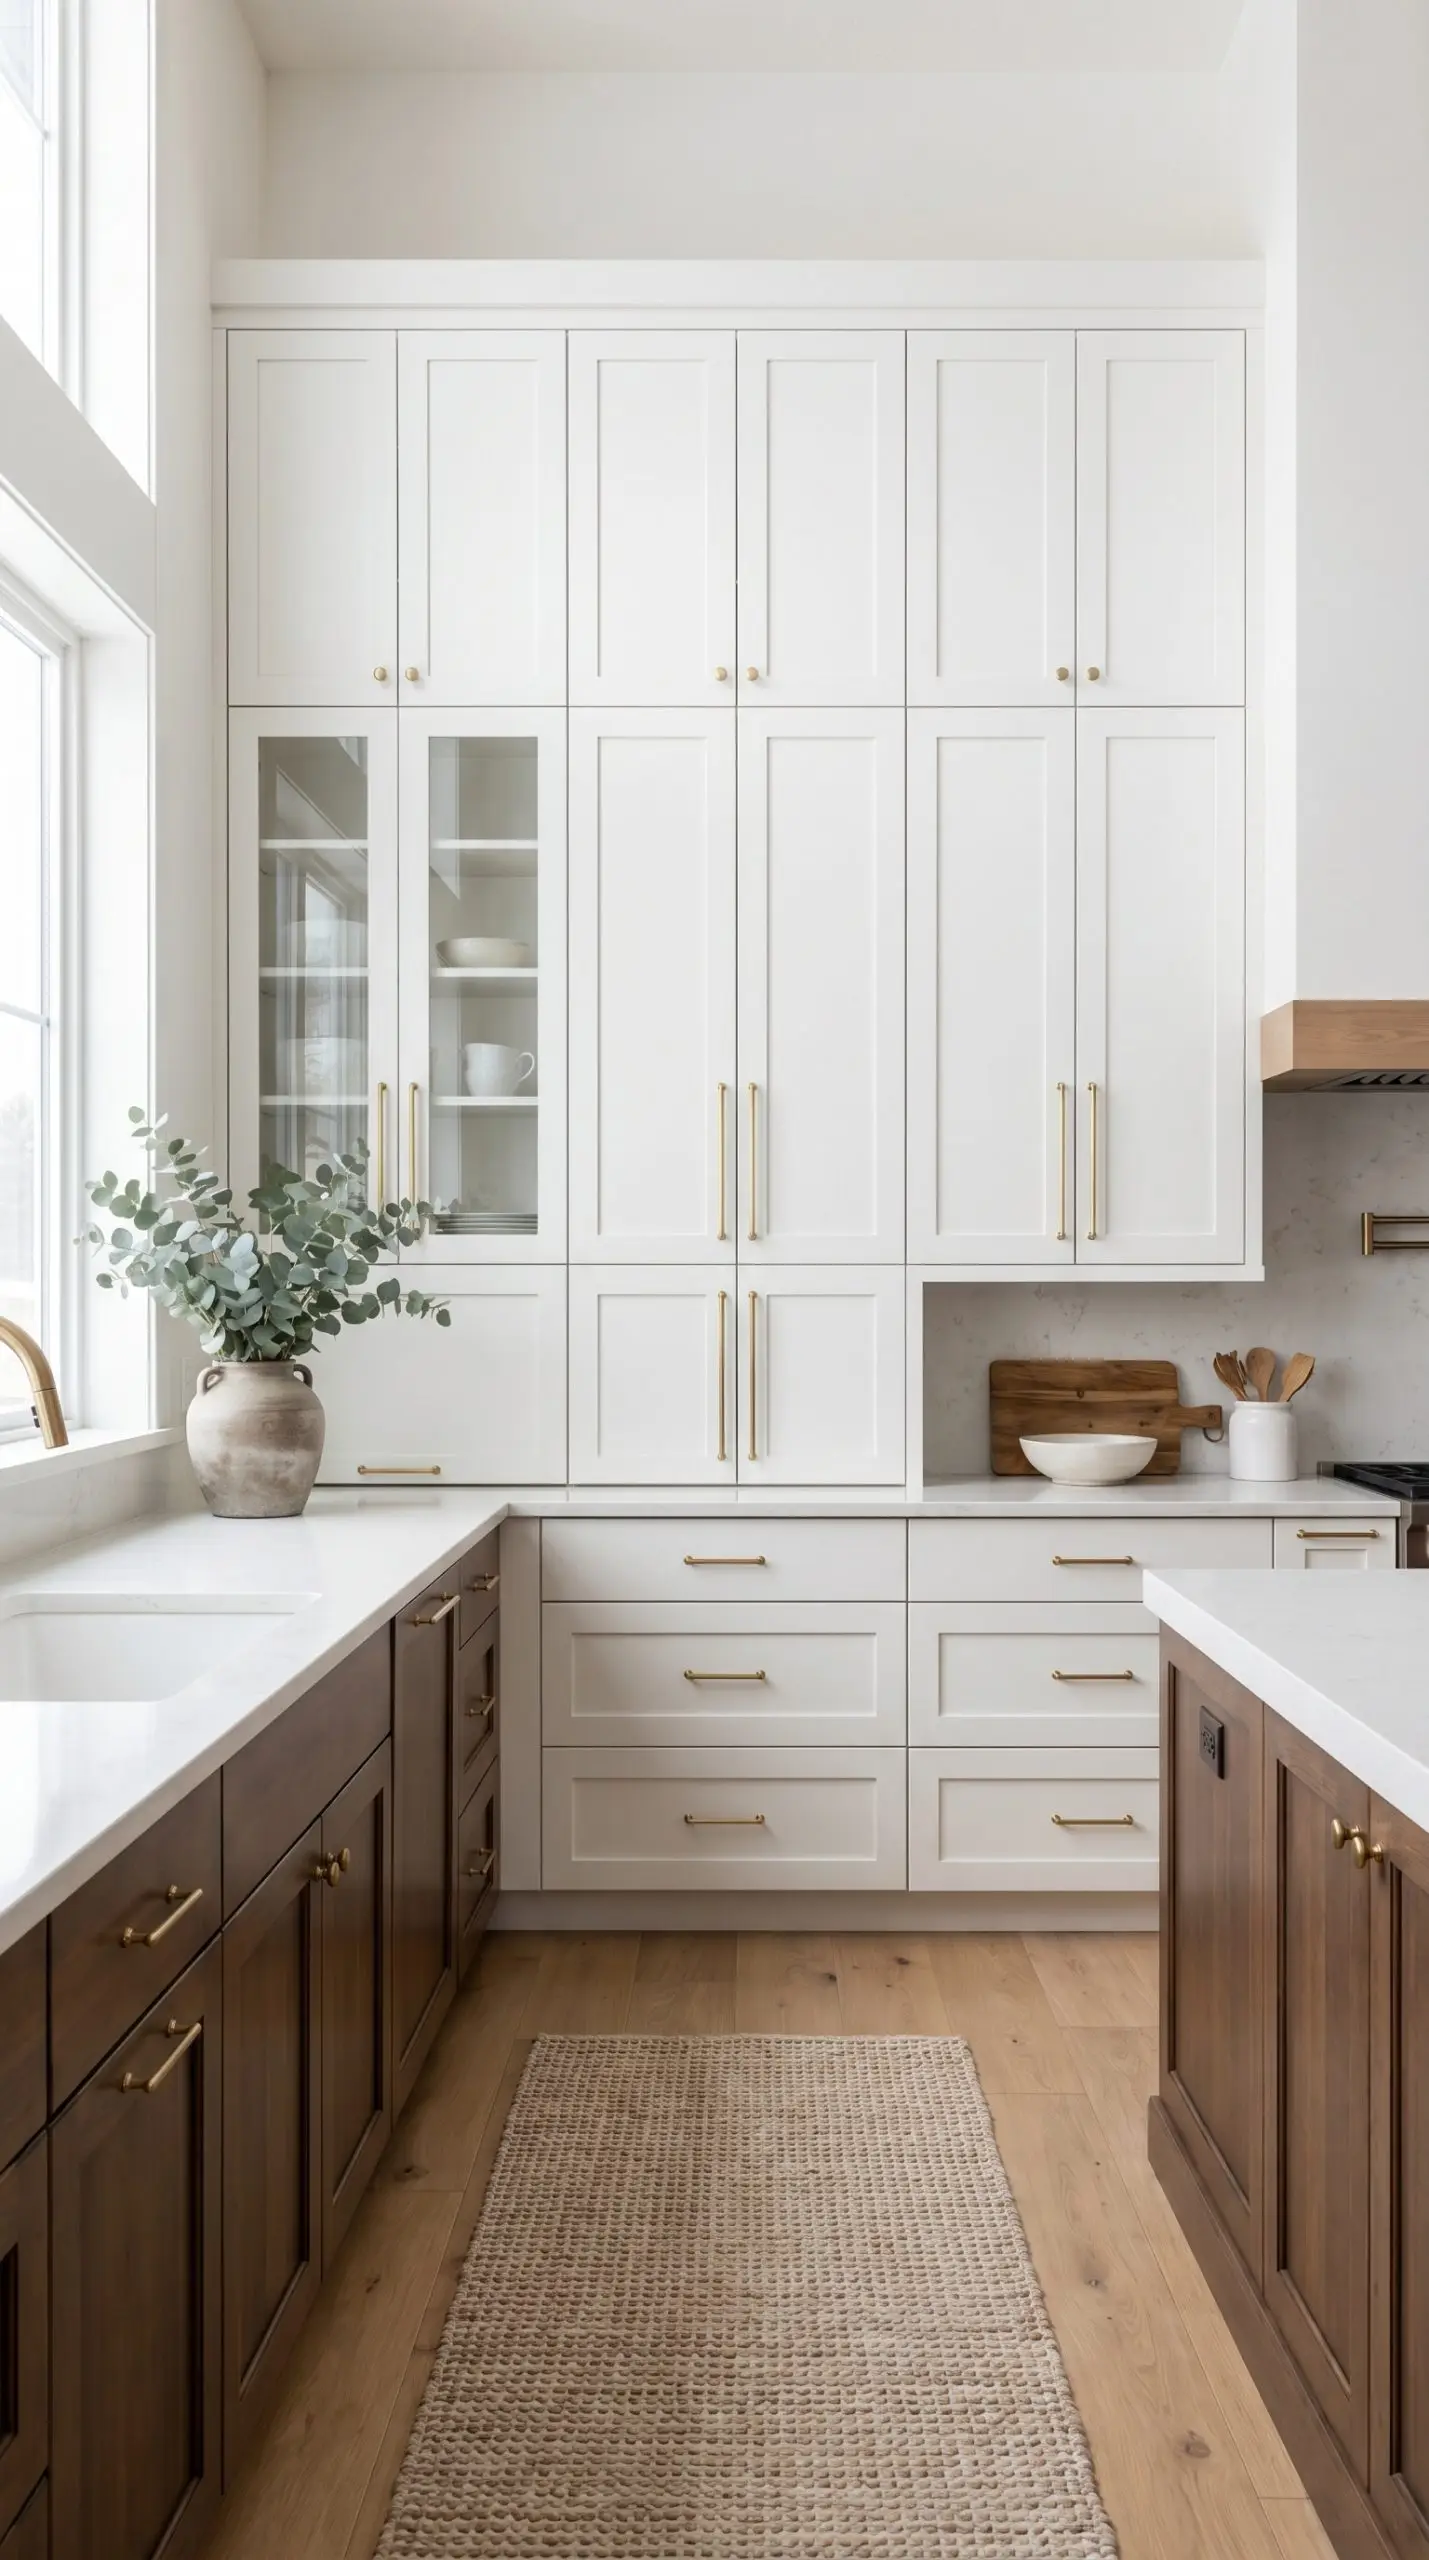
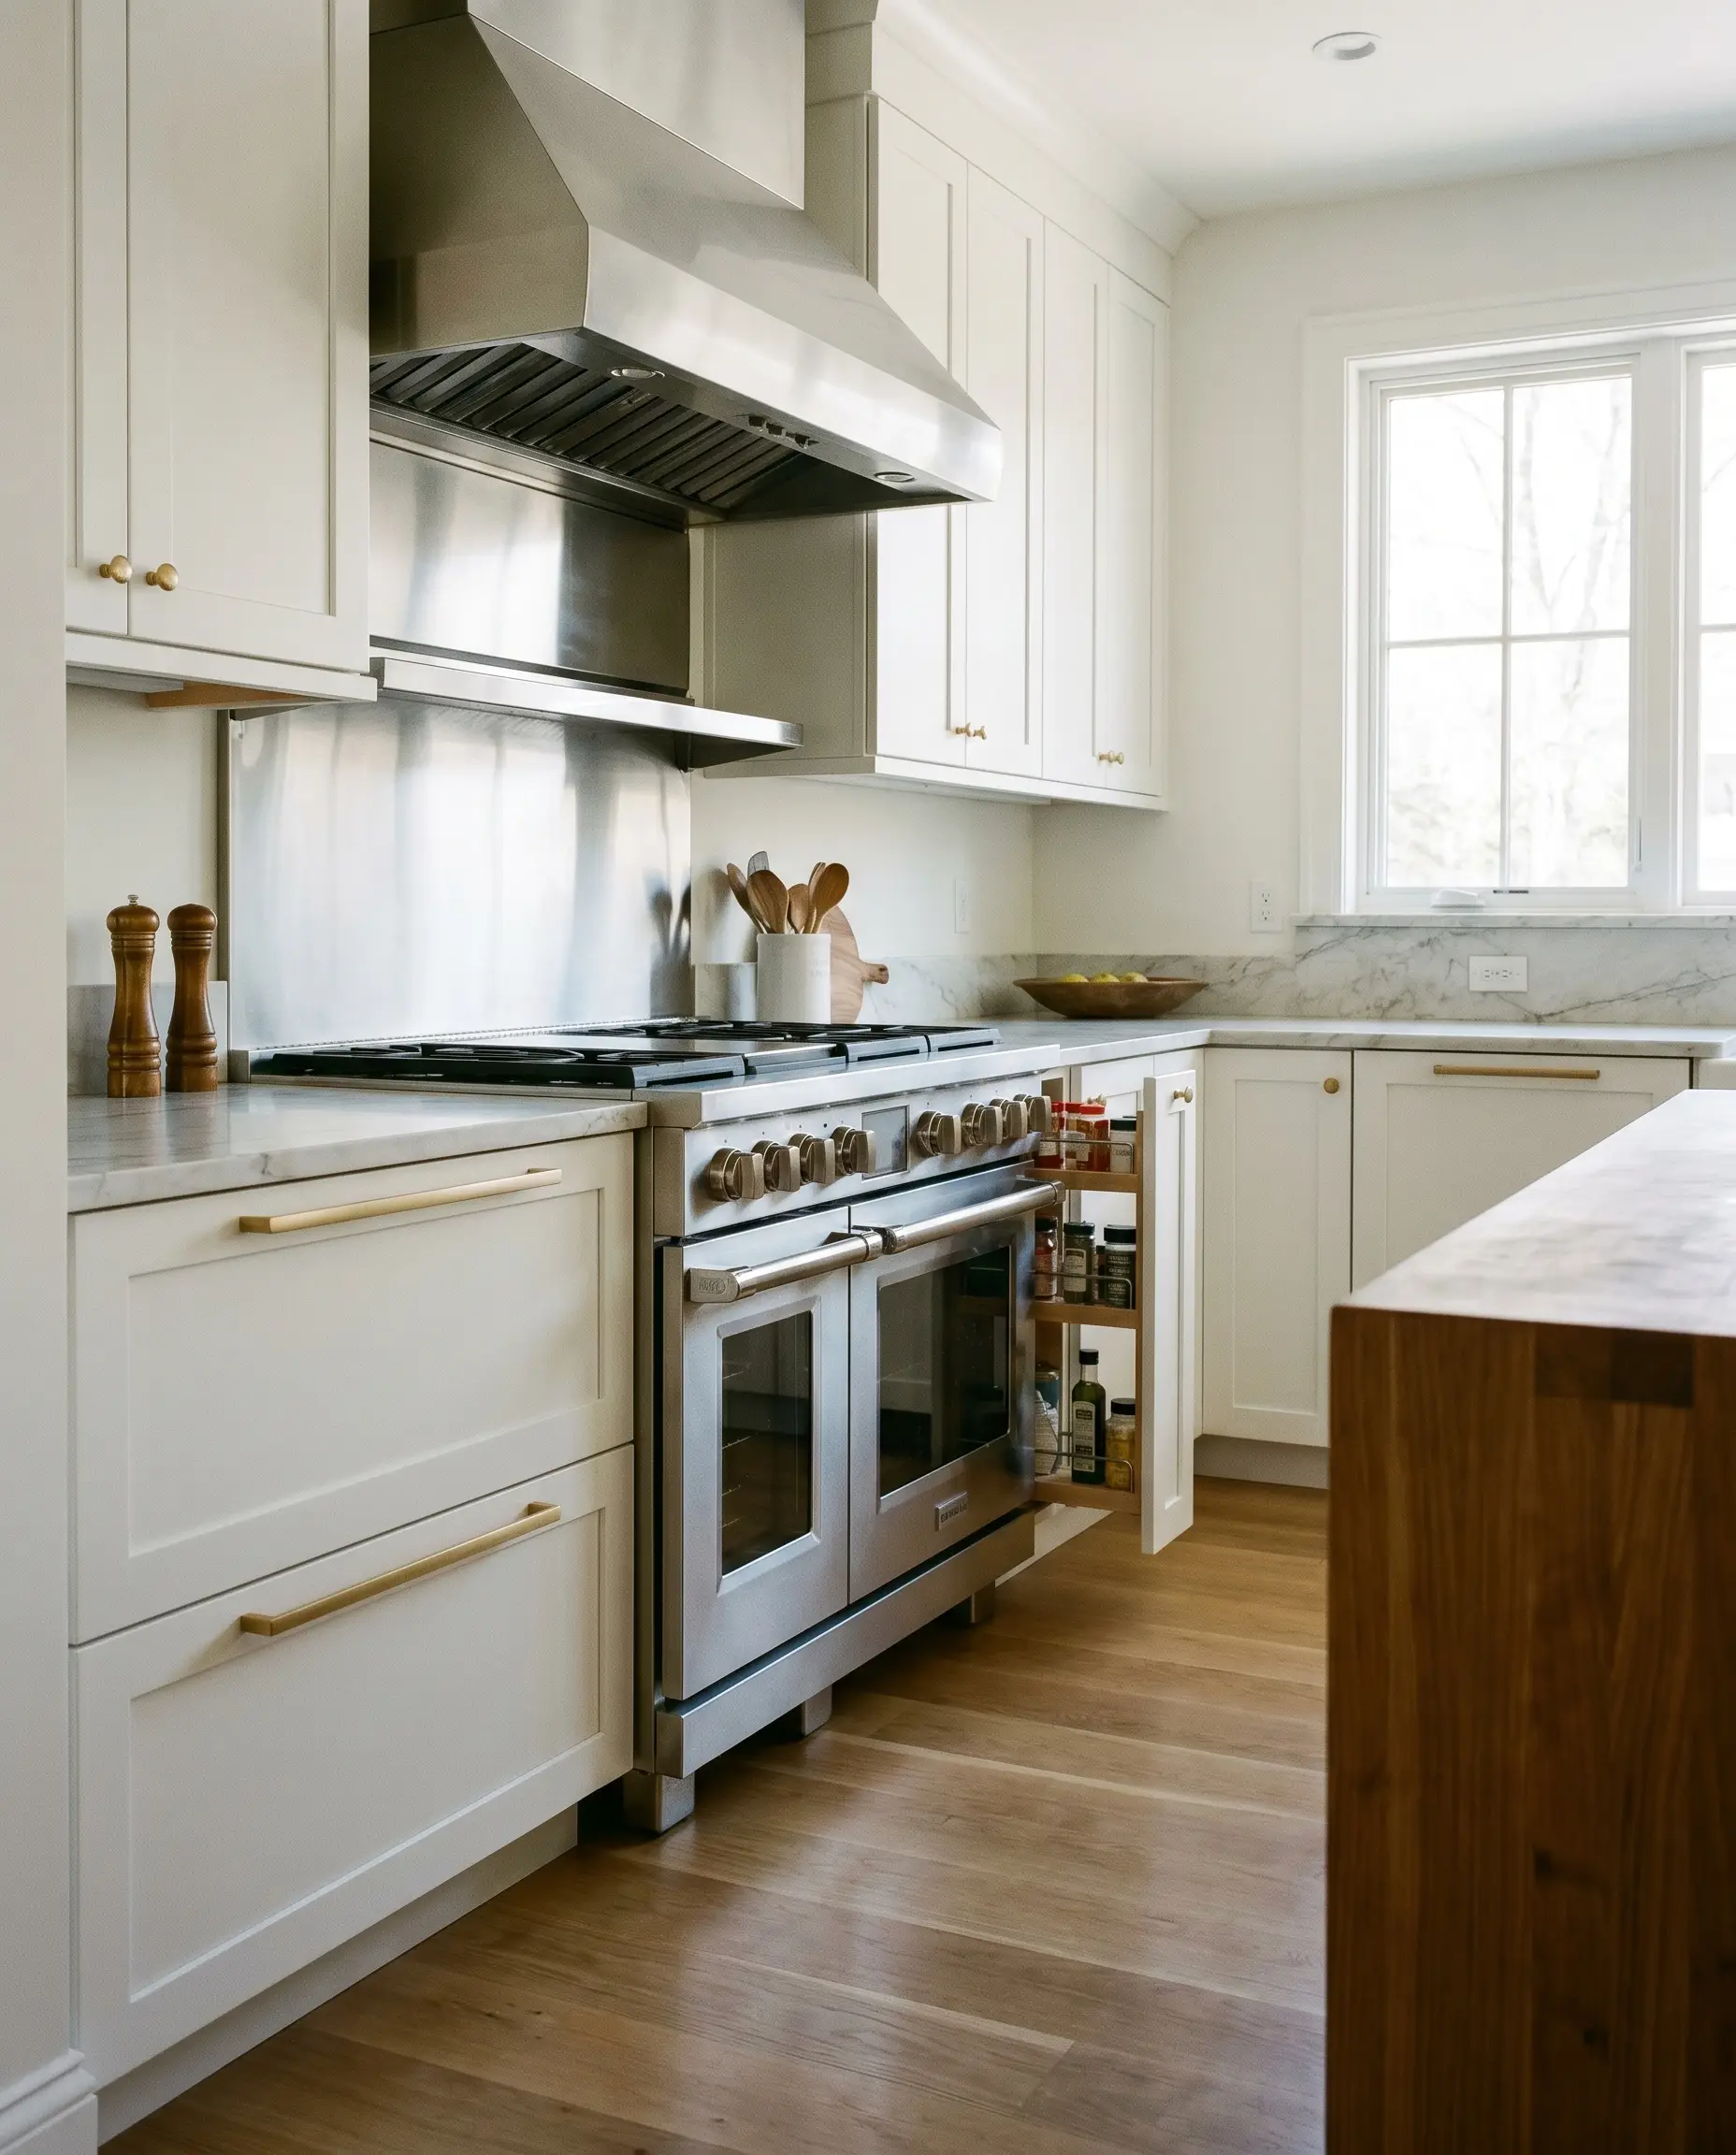
5. Add Architectural Weight with Brass Backplates
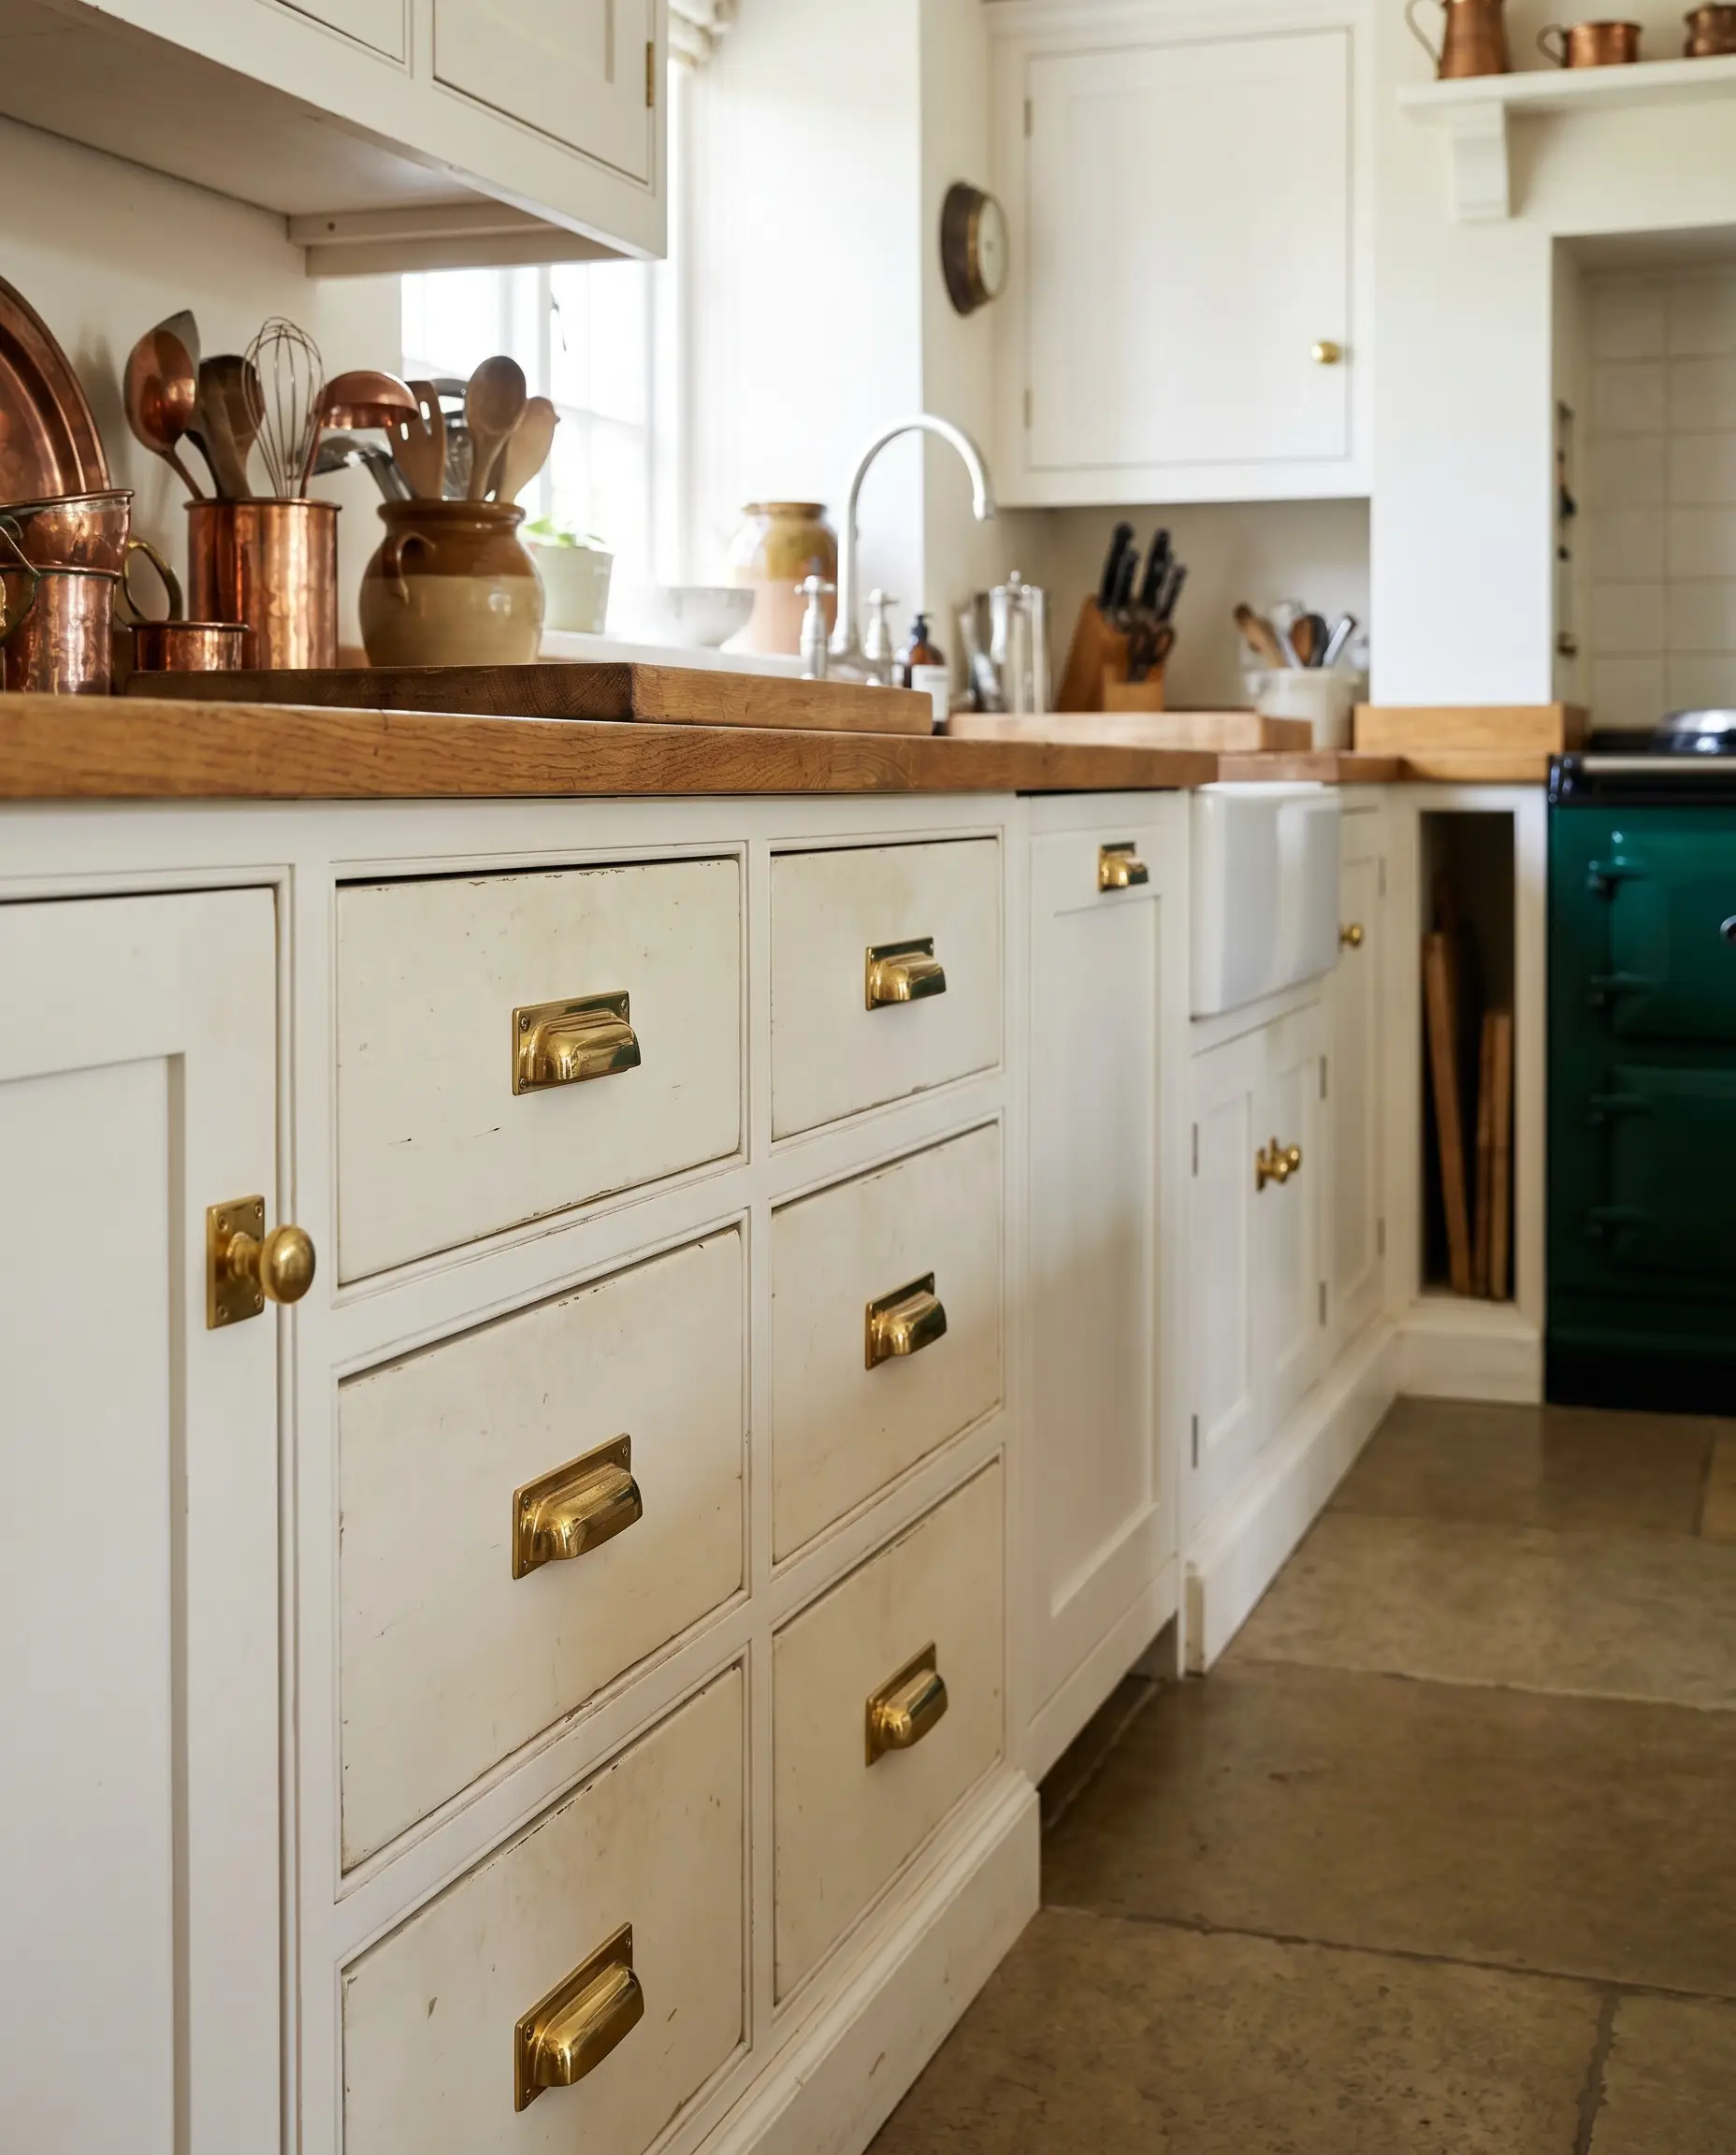
Installing a rectangular brass backplate behind a knob or pull serves a brilliant dual purpose: it protects your pristine white paint from daily fingernail scratches while adding immense visual weight. This combination creates a heavy, traditional-meets-modern aesthetic that instantly makes standard cabinetry look custom-built.
- Vibe: Bespoke Heritage, English Kitchen
- Key Material: Solid brass pulls with matching rectangular backplates
- Functional Benefit: Prevents wear and tear on the soft white paint around high-use drawer zones.
Match the width of the backplate proportionally to the width of the shaker stile so it does not visually overpower the wood framing.
Design Rule
6. Minimalist Intervention using Finger Edge Pulls
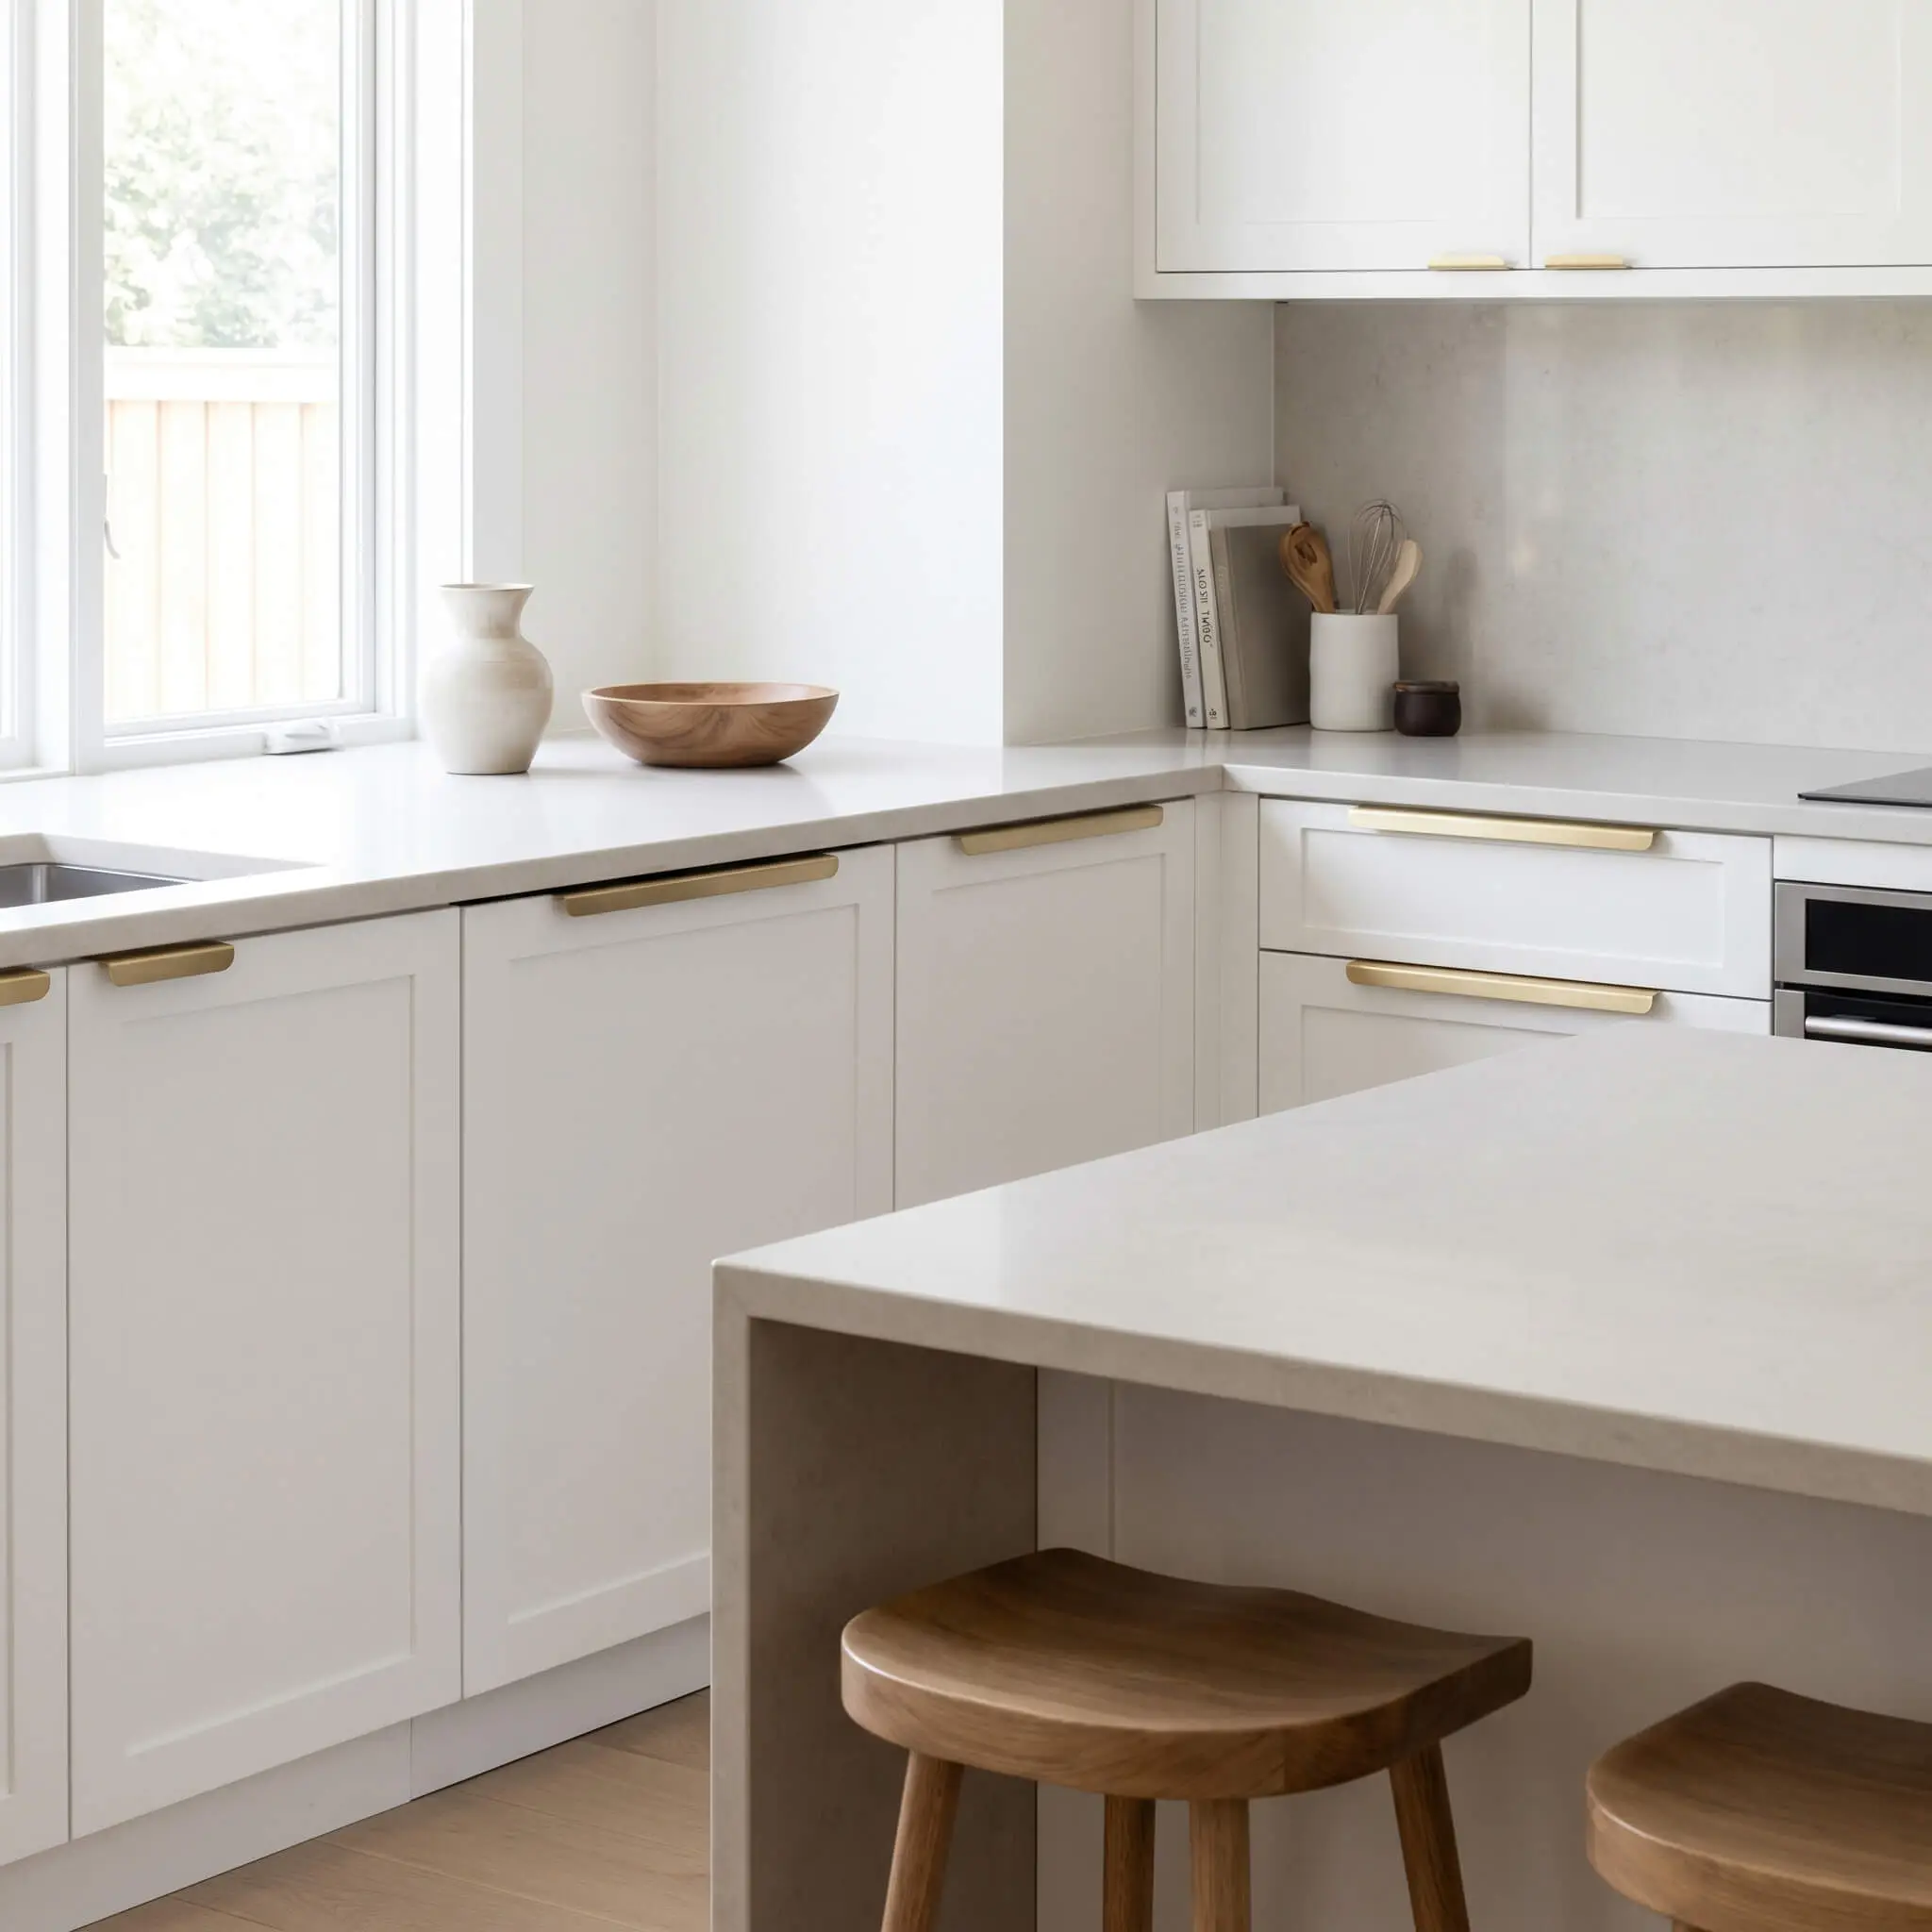
For a Soft Minimalism approach, top-mounted edge pulls offer a sleek sliver of gold without interrupting the flat face of the cabinetry. These low-profile pieces sit discreetly on the top rail of lower shaker cabinets, providing functional grip while maintaining an incredibly clean, uncluttered sightline.
- Vibe: Soft Minimalism, Contemporary
- Key Material: Extruded brass edge pulls
- Styling Pro-Tip: Opt for a brushed finish to minimize the visibility of smudges on the flat metallic surface.
Restrict edge pulls strictly to lower drawers and base cabinets; they look awkward and functionally fail on upper swinging doors.
Design Rule
7. Swap Basic Knobs for Heavy T-Bars
Instead of defaulting to round mushroom knobs on your upper cabinets, introduce horizontal or vertical T-bar knobs to mimic the linear nature of the shaker frame. This subtle geometric shift feels distinctly modern while maintaining a highly tailored, symmetrical look across your cabinet faces.
- Vibe: Tailored Modern, Geometric
- Key Material: Heavy cast brass T-bars
- Installation Method: Align T-bars vertically on upper cabinet doors and horizontally on small upper drawers.
Ensure the T-bar has a locking pin mechanism on the back to prevent the hardware from spinning out of alignment over time.
Design Rule
8. The Modern Cup Pull for Drawers
Reinvent the traditional farmhouse aesthetic by selecting a sleek, squared-off gold cup pull instead of the classic rounded bin pull. This sharp, structural silhouette bridges the gap between classic shaker heritage and crisp modern styling, offering a comfortable, hidden grip.
- Vibe: Modern Farmhouse, Transitional
- Key Material: Squared satin brass cup pulls
- Styling Pro-Tip: Center the cup pull perfectly within the recessed panel of the drawer for optimal visual balance.
Cup pulls must be strictly reserved for lower sliding drawers and never installed on upper swinging doors.
Design Rule
Proportional Scaling: The Secret to Modernizing Shaker Cabinets
The most common mistake homeowners make is selecting hardware that is fundamentally too small for their cabinet doors. Modern design demands longer, more substantial hardware, anchored by strict center-to-center measurement rules to ensure the hardware scales perfectly with the wood framing.
- Standard Drawers (12 to 18 inches): 4-inch to 5-inch pull.
- Medium Drawers (18 to 24 inches): 6-inch to 7-inch pull.
- Wide Drawers (24 to 30 inches): 8-inch to 9-inch pull.
- Extra-Wide Pot Drawers (30+ inches): 10-inch to 12-inch pull.
- Standard Upper Doors (30 to 36 inches): 5-inch to 7-inch pull.
- Tall Upper Doors (42+ inches): 8-inch to 12-inch vertical pull.
9. Elongate Upper Cabinets with Oversized Vertical Pulls
Installing 8-inch to 12-inch vertical bar pulls on standard 36-inch or 42-inch upper doors draws the eye forcefully upward. This visual trick of vertical elongation makes your ceilings feel significantly higher and gives the standard shaker design a dramatic, custom-grade presence.
- Vibe: High-End Bespoke, Vertical Drama
- Key Measurement: 8″ to 12″ center-to-center pulls
- Styling Pro-Tip: Keep the hardware thickness under 5/8 of an inch to ensure the long pull doesn’t look overly bulky.
Always position vertical pulls on the lower corner of the upper door, precisely aligned with the edge of the shaker stile.
Design Rule
10. The Rule of Thirds for Wide Pot Drawers
For wide lower drawers exceeding 30 inches, the modern rule dictates using one single, extra-long appliance pull that spans roughly one-third the width of the drawer face. A single long pull looks substantially cleaner than two small pulls and allows you to easily open heavy pot drawers with just one hand from the center.
- Vibe: Streamlined, Highly Functional
- Key Measurement: Hardware length equals 1/3 of the drawer width.
- Styling Pro-Tip: Verify the drawer box is built with heavy-duty glides to handle the single-point pull force.
Never use two small pulls on a wide drawer; it creates visual clutter and requires two hands to open, which is functionally frustrating while cooking.
Design Rule
11. Scale Up to Appliance Pulls on Pantry Doors
Tall, heavy shaker pantry doors look visually ridiculous and functionally weak when fitted with standard 6-inch pulls. You must match the massive scale of the wood by installing 18-inch to 24-inch heavy appliance pulls, giving the cabinetry the architectural respect it deserves.
- Vibe: Architectural Statement, Bespoke
- Key Measurement: 18″ to 24″ appliance pulls
- Hardware Match: Ensure the appliance pull is from the exact same manufacturer line as your standard pulls to guarantee the gold undertones match perfectly.
Secure heavy appliance pulls with through-bolts rather than standard wood screws to handle the weight of a fully loaded pantry door.
Design Rule
12. Mix Pulls and Knobs Systematically
To prevent visual clutter in a crisp white kitchen, you must deploy different hardware shapes systematically across the room. The definitive modern standard is to place knobs or T-bars exclusively on upper doors, while reserving horizontal pulls entirely for lower drawers and base cabinets.
- Vibe: Ordered, Symmetrical, Calm
- System Layout: Knobs on top, Pulls on the bottom.
- Styling Pro-Tip: Use the exact same finish and collection for both the knobs and the pulls to maintain precise cohesion.
Do not mix more than two hardware silhouettes in a single kitchen zone to maintain a highly curated, intentional aesthetic.
Design Rule
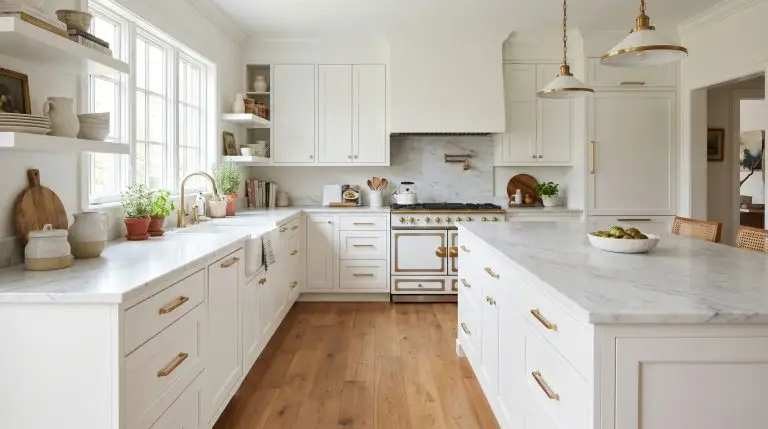
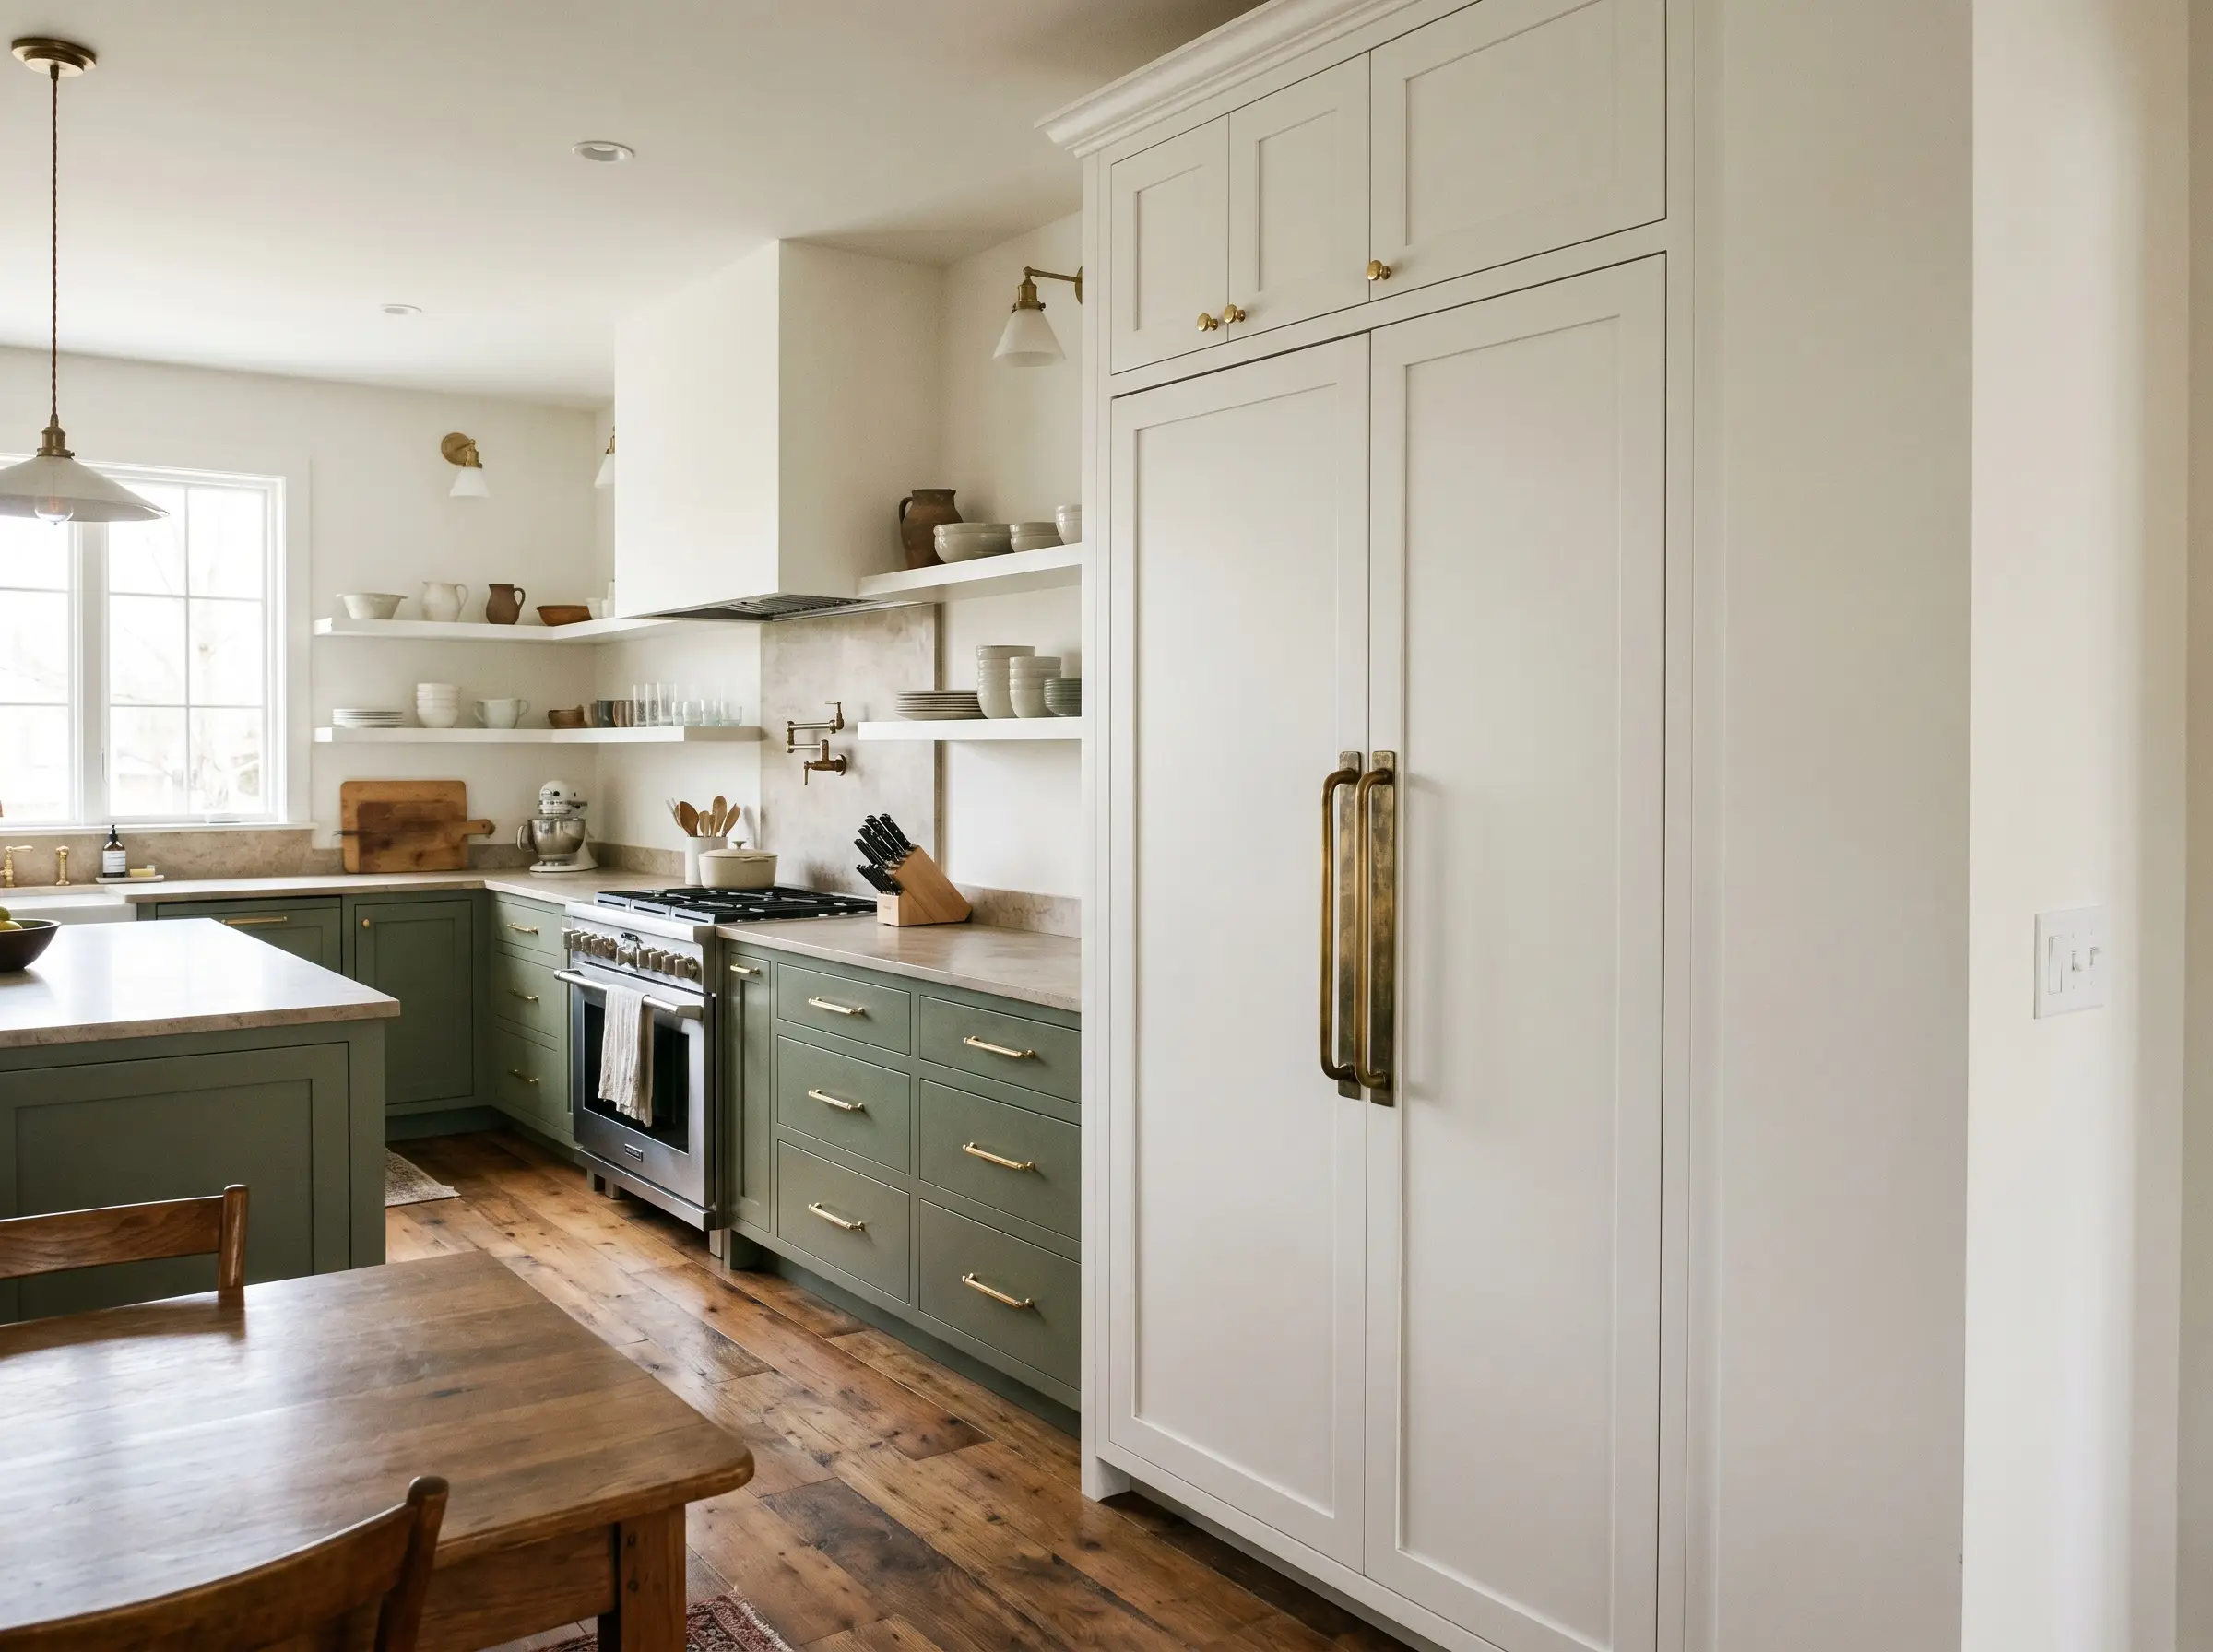
Masterful Metal Mixing with Gold and White
The anxiety of matching every metal in your kitchen perfectly to your gold hardware is entirely unnecessary. White shaker cabinets provide a pristine, neutral backdrop, making them the perfect canvas for a curated mixed-metal approach where gold does not have to stand alone.
13. Ground the Space with Matte Black Accents
Pairing rich gold cabinet hardware with a matte black kitchen faucet or black steel window frames grounds the room with striking contrast. The black accents absorb light and add a layer of industrial edge, preventing the gold hardware from feeling overly glamorous or overly feminine.
- Vibe: Modern Organic, High-Contrast
- Key Pairing: Unlacquered brass hardware with matte black plumbing fixtures.
- Styling Pro-Tip: Keep the black accents minimal—think faucets and cabinet hinges—so the gold remains the star.
Balance the visual weight by distributing matte black touches evenly across the room rather than clustering them all in one spot.
Design Rule
14. Blend Warm and Cool: Gold and Polished Nickel

For a true high-end Transitional look, purposefully mix warm champagne bronze hardware with the sophisticated, silvery sheen of polished nickel plumbing fixtures. Because polished nickel carries an inherent warm, slightly golden undertone, it bridges the gap beautifully between the white cabinets and the gold pulls without the harsh clash you get from standard chrome.
- Vibe: Classic Transitional, Layered Luxury
- Key Pairing: Champagne bronze hardware with polished nickel faucets.
- Styling Pro-Tip: Read our guide on Mixing Metals in the Kitchen: A Designer’s Guide to master this delicate balance.
Never mix warm gold hardware with blue-toned, highly reflective chrome; always insist on the warmer depth of polished nickel.
Design Rule
15. Integrate Seamlessly with Stainless Steel Appliances
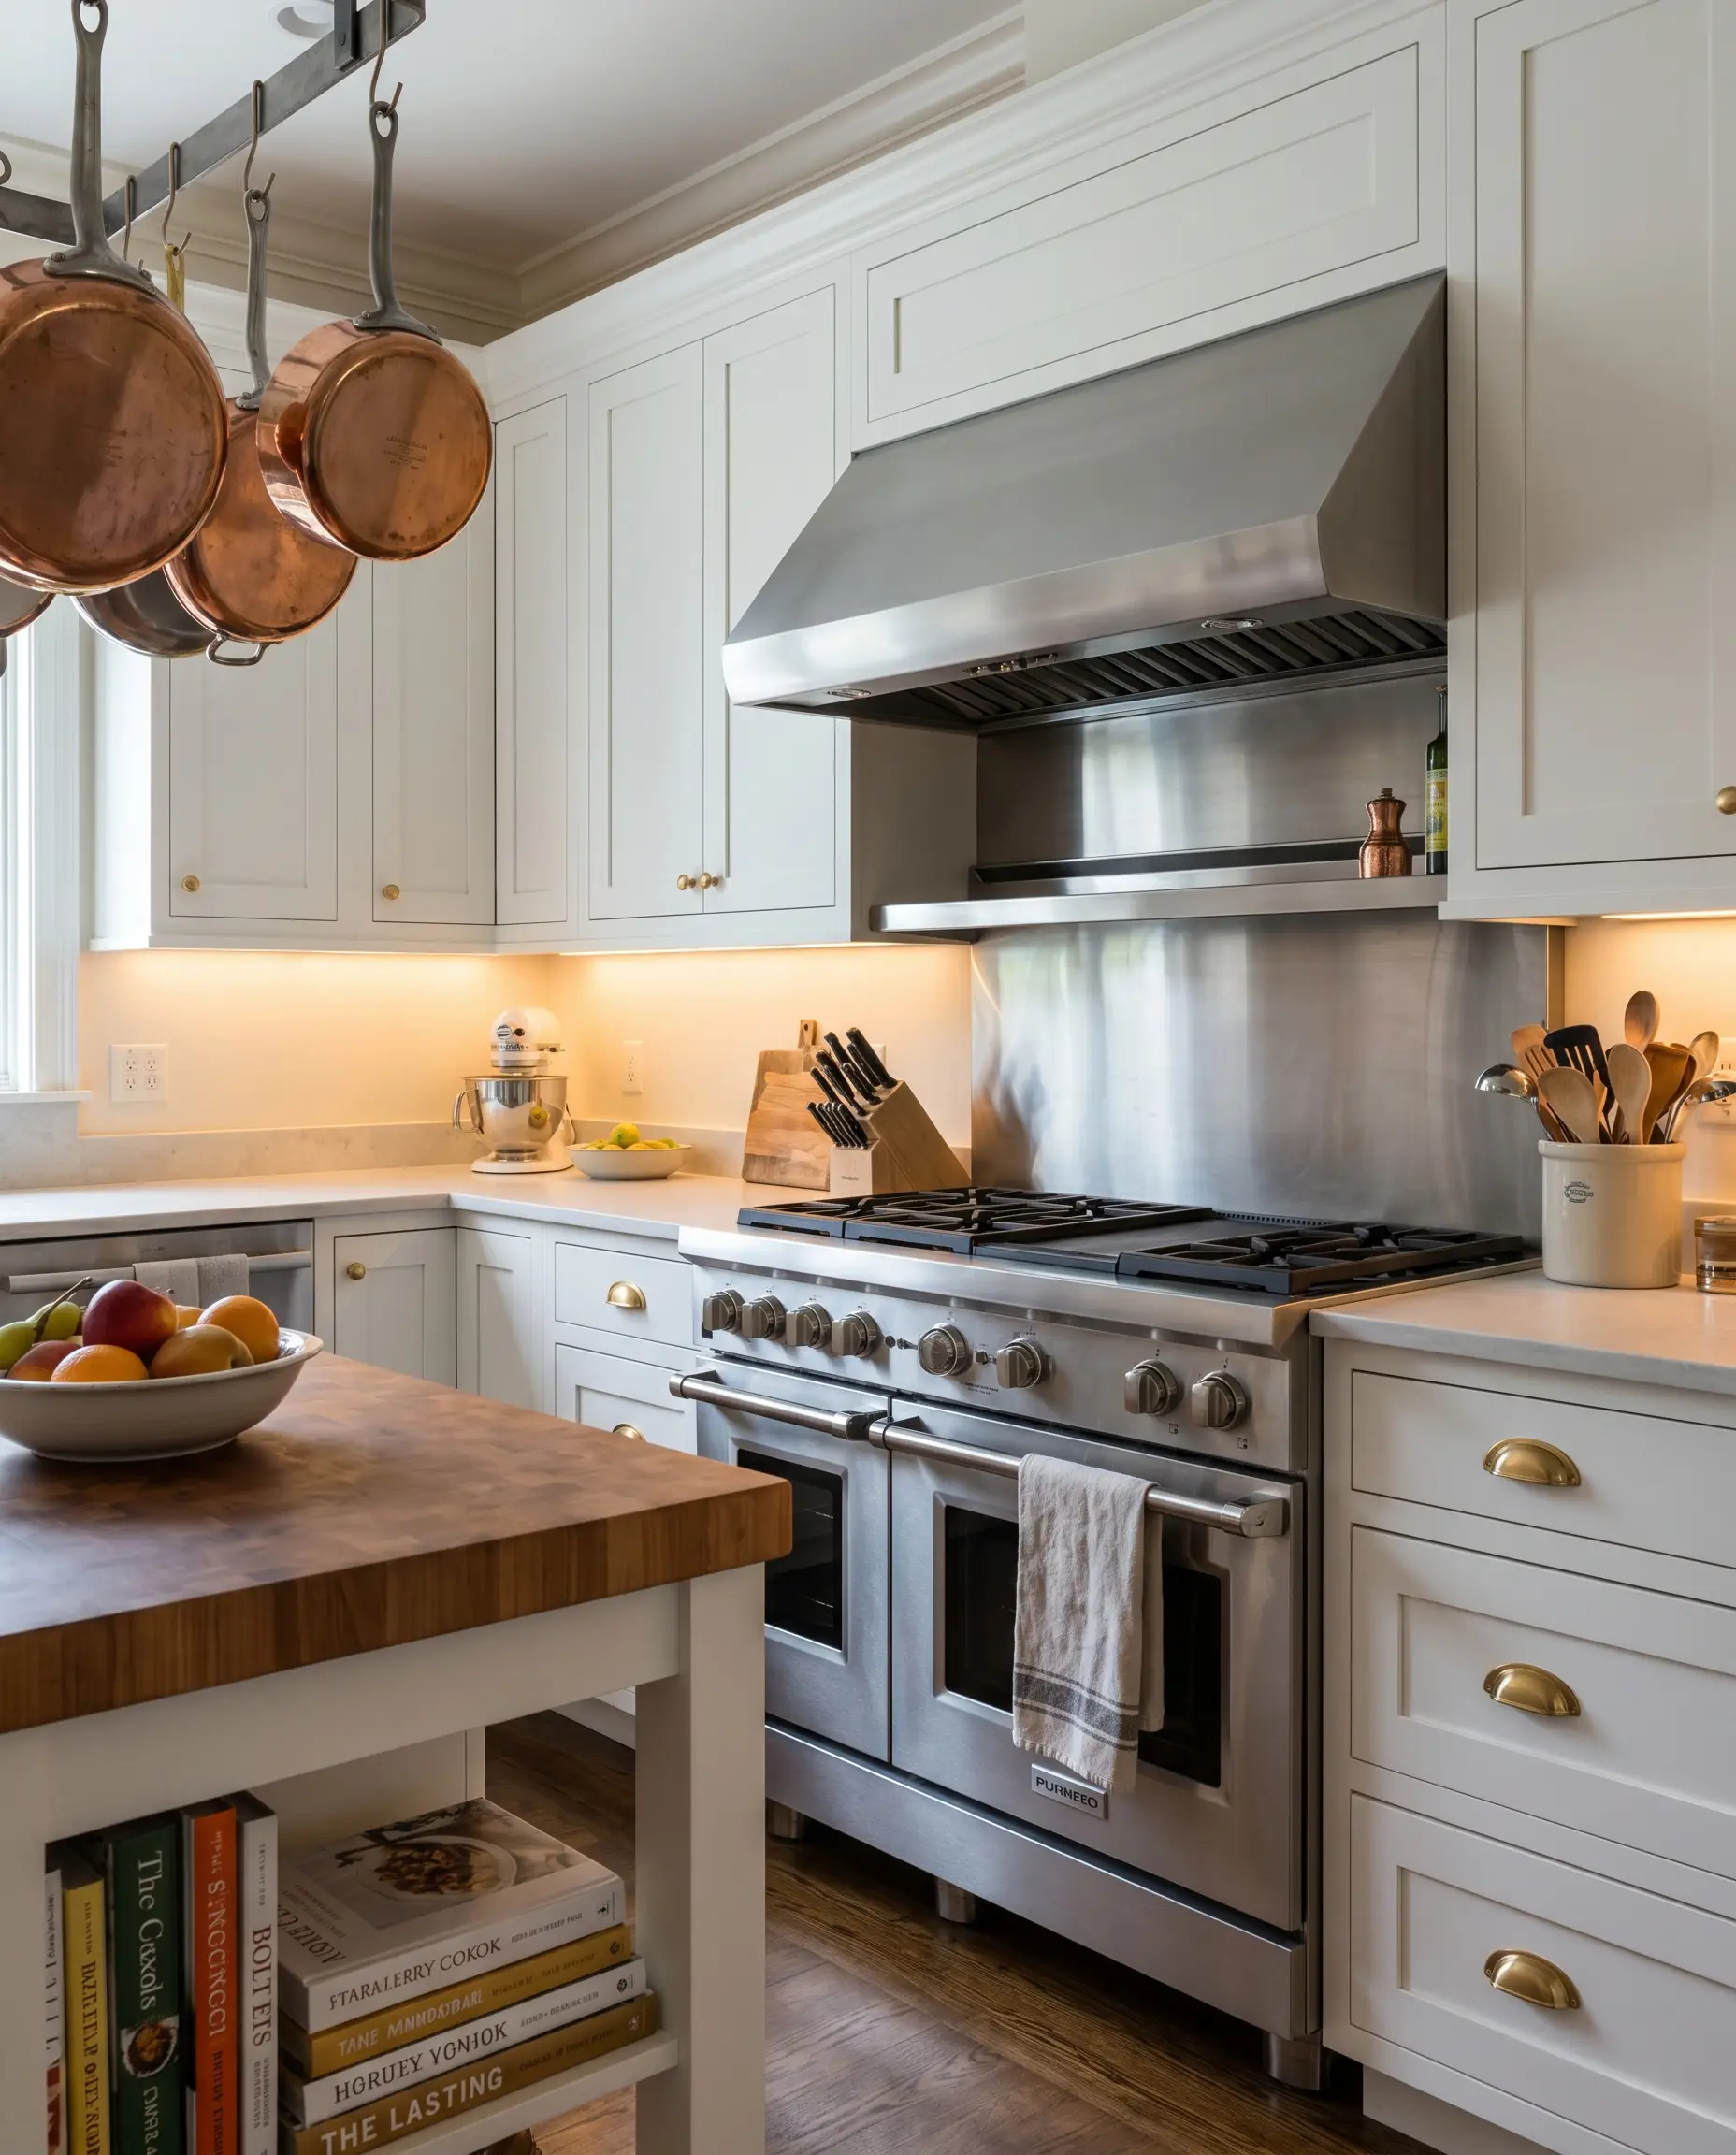
You do not need to invest in expensive custom panel-ready appliances to make gold hardware work beautifully in your kitchen. Brushed gold hardware actually serves to warm up the sterile, cool nature of standard stainless steel ovens and refrigerators, creating a balanced, lived-in aesthetic that feels accessible and high-end.
- Vibe: Accessible Luxury, Professional Kitchen
- Key Pairing: Satin brass pulls alongside stainless steel appliance fronts.
- Styling Pro-Tip: Choose a brushed or satin gold finish rather than polished gold to complement the brushed grain of the stainless steel.
Treat stainless steel as a neutral background element rather than a competing metal finish in your design scheme.
Design Rule
16. Coordinate with Statement Lighting Pendants
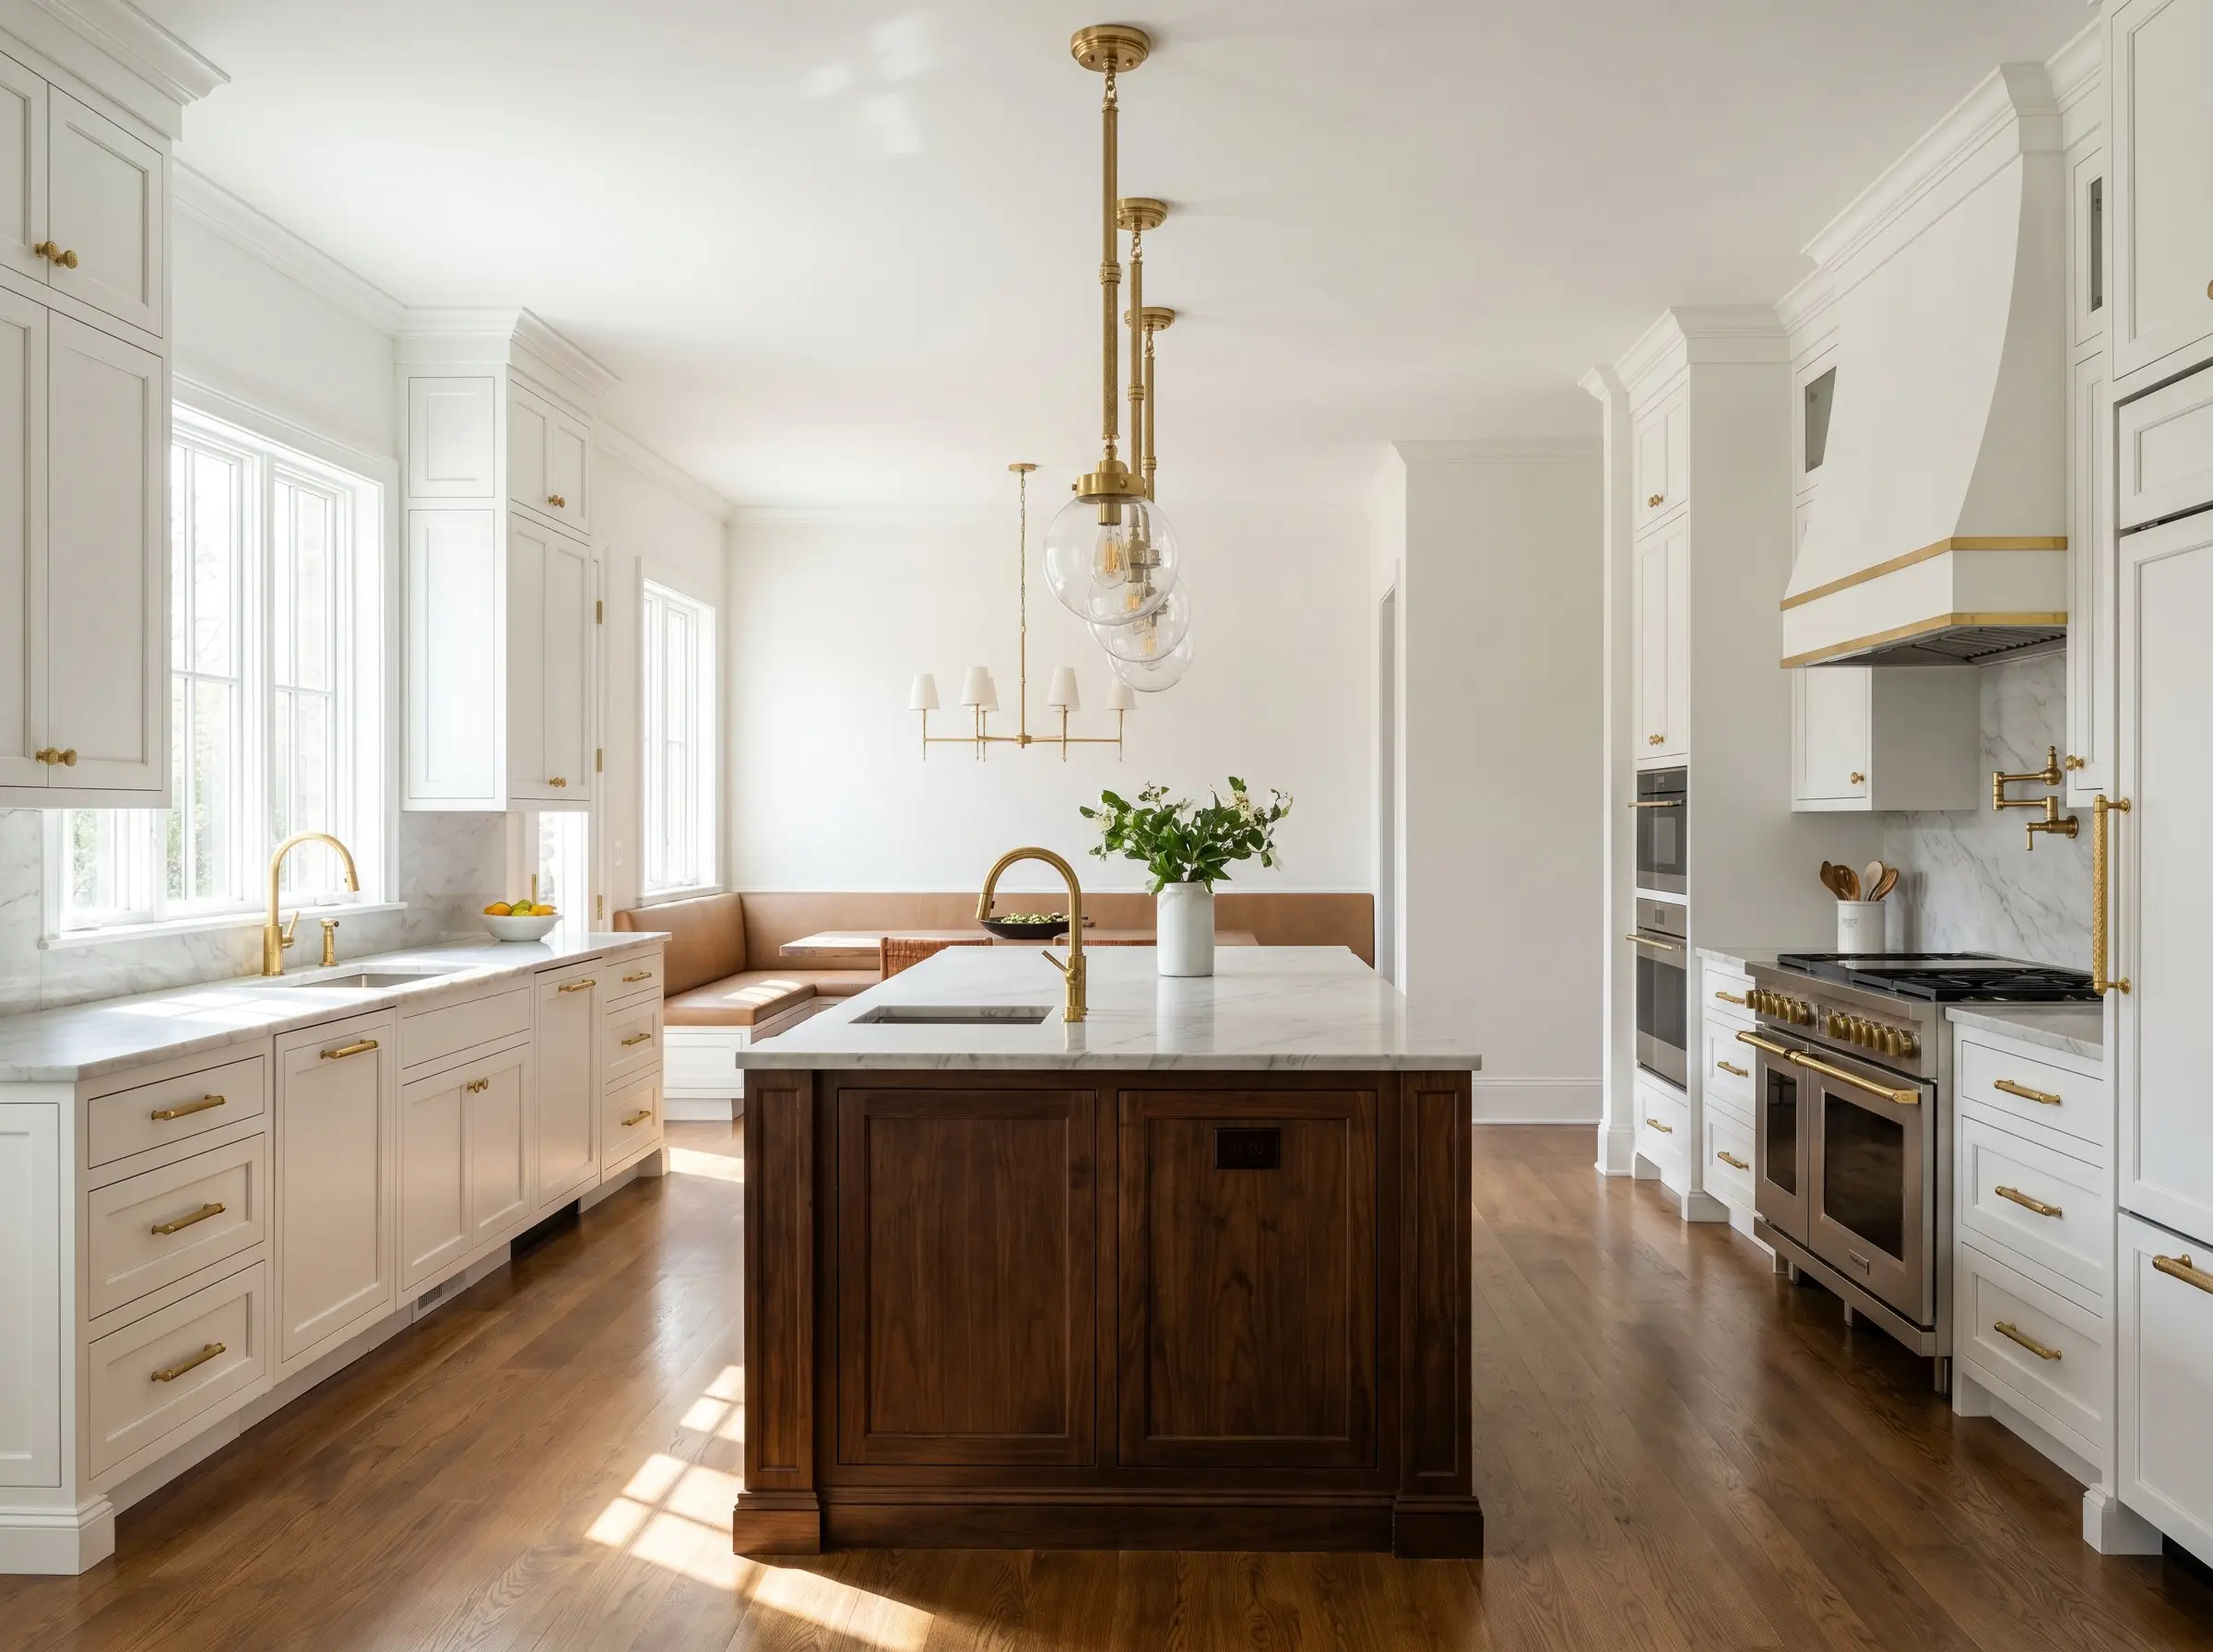
The final layer of a cohesive kitchen design is ensuring the finish of your kitchen island pendants shares a distinct visual language with your cabinet hardware. Matching a knurled brass rod on a pendant light to your knurled drawer pulls creates a subtle rhythm that guides the eye effortlessly through the space.
- Vibe: Cohesive, Designer-Curated
- Key Pairing: Gold hardware echoing the metal accents on Statement Pendant Lighting for Kitchen Islands.
- Styling Pro-Tip: The metals do not have to be from the same manufacturer, but they must share the same finish texture (e.g., matte with matte).
Hang your pendants so the lowest gold accent on the light fixture visually aligns with the highest gold hardware on your upper cabinets.
Design Rule
Executing Your Hardware Upgrade
Hardware is the defining architectural jewelry of your kitchen, and selecting the perfect pieces requires precision and physical testing. Before committing to a full kitchen order, always purchase a single sample of your top three finishes to test against your specific white cabinet paint under your home’s unique natural lighting. Once you are confident in the metal’s undertone, rigorously measure your current center-to-center hole spacing or map out your new drill points using the exact proportional scaling rules we discussed. Your white shaker cabinets are a blank canvas—now go install the bold, tactile hardware that proves your kitchen is anything but builder-grade.
The Hackrea Style Desk treats interior decoration as an exact visual science. Rather than focusing on demolition or floor plans, this desk masters the art of color theory, undertone matching, material pairings, and spatial proportion. From balancing the visual weight of mixed metals to finding the perfect bridging tone between disparate wood species, this desk provides the rigorous aesthetic rules needed to achieve high-end, editorial-quality harmony in any space.